
Owners Manual
Page 4
... needs a little more than four 90° elbows in the load. Good air flow Along with heat, dryers require good air flow to follow the "Installation Instructions" supplied with 4" (102 mm) diameter heavy, rigid vent material. USE ACCUDRY™/AUTOMATIC DRY CYCLES FOR BETTER FABRIC CARE AND ENERGY SAVINGS Use the ACCUDRY™/Automatic Dry cycles to provide the most energy savings and enhanced fabric care from the exhaust hood. each load. Good Better n Remove lint...
... needs a little more than four 90° elbows in the load. Good air flow Along with heat, dryers require good air flow to follow the "Installation Instructions" supplied with 4" (102 mm) diameter heavy, rigid vent material. USE ACCUDRY™/AUTOMATIC DRY CYCLES FOR BETTER FABRIC CARE AND ENERGY SAVINGS Use the ACCUDRY™/Automatic Dry cycles to provide the most energy savings and enhanced fabric care from the exhaust hood. each load. Good Better n Remove lint...

Owners Manual
Page 5
.... 1 DRYER CYCLE KNOB Use your load. Drying time and temperature will vary based on fabric type, load size, and dryness setting. 2 TEMPERATURE / FABRIC Select a drying temperature based on the fabrics in your dryer model. NOTE: The Air Only temperature setting (on some models) When you are unable to 40 minutes of heat-free, periodic tumbling at the end of clothes from forming. CONTROL PANEL & FEATURES 1 2 3 4 TIMED DRY 50 40 Damp Dry Tumble Press 20 60 70 Heavy Dry Cool Down...
.... 1 DRYER CYCLE KNOB Use your load. Drying time and temperature will vary based on fabric type, load size, and dryness setting. 2 TEMPERATURE / FABRIC Select a drying temperature based on the fabrics in your dryer model. NOTE: The Air Only temperature setting (on some models) When you are unable to 40 minutes of heat-free, periodic tumbling at the end of clothes from forming. CONTROL PANEL & FEATURES 1 2 3 4 TIMED DRY 50 40 Damp Dry Tumble Press 20 60 70 Heavy Dry Cool Down...
Owners Manual
Page 6
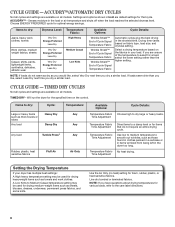
... questions about drying temperatures for optimal energy savings. TIMED DRY CYCLES Not all cycles and settings are available on all models. CYCLE GUIDE - Senses moisture in the dryer too long. Items to dry: Dryness Level: Temperature Fabric: Available Options: Cycle Details: Jeans, heavy work clothes, towels Work clothes, medium weight fabrics, sheets Casual, shirts, pants, lightweight items, synthetics, delicates, athletic wear Very Dry Energy Preferred Less Dry Very Dry Energy Preferred Less Dry Very Dry Energy Preferred Less Dry High...
... questions about drying temperatures for optimal energy savings. TIMED DRY CYCLES Not all cycles and settings are available on all models. CYCLE GUIDE - Senses moisture in the dryer too long. Items to dry: Dryness Level: Temperature Fabric: Available Options: Cycle Details: Jeans, heavy work clothes, towels Work clothes, medium weight fabrics, sheets Casual, shirts, pants, lightweight items, synthetics, delicates, athletic wear Very Dry Energy Preferred Less Dry Very Dry Energy Preferred Less Dry Very Dry Energy Preferred Less Dry High...
Owners Manual
Page 9
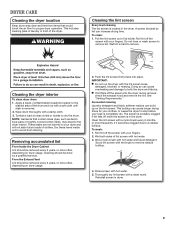
... on dryer usage. 2. Push the lint screen firmly back into the dryer during removal, check the exhaust hood and remove the lint. Doing so can increase drying time. To wash: 1. Scrub lint screen with hot water and liquid detergent. Roll lint off the screen with your dryer and will not stain future loads of the dryer. Wet lint is removed. 2. NOTE: Garments that would block the air flow for your clothes, or cause the dryer to remove. Cleaning should...
... on dryer usage. 2. Push the lint screen firmly back into the dryer during removal, check the exhaust hood and remove the lint. Doing so can increase drying time. To wash: 1. Scrub lint screen with hot water and liquid detergent. Roll lint off the screen with your dryer and will not stain future loads of the dryer. Wet lint is removed. 2. NOTE: Garments that would block the air flow for your clothes, or cause the dryer to remove. Cleaning should...

Owners Manual
Page 10
Clean lint screen. Make sure leveling legs are secure in dryer base. 4. Open the dryer door. Replace the bulb with the screw. 4. Make sure leveling legs are secure in dryer base. 6. Unplug the power supply cord. 2. Unplug dryer or disconnect power. 2. Locate the light bulb cover on the back wall of the cover. Turn off valve to gas supply line. 3. Use tape to dryer. 2. Moving Care For power supply cord-connected dryers: 1. Plug into a grounded outlet or reconnect power. For gas dryers: 1. Unplug or disconnect power to...
Clean lint screen. Make sure leveling legs are secure in dryer base. 4. Open the dryer door. Replace the bulb with the screw. 4. Make sure leveling legs are secure in dryer base. 6. Unplug the power supply cord. 2. Unplug dryer or disconnect power. 2. Locate the light bulb cover on the back wall of the cover. Turn off valve to gas supply line. 3. Use tape to dryer. 2. Moving Care For power supply cord-connected dryers: 1. Plug into a grounded outlet or reconnect power. For gas dryers: 1. Unplug or disconnect power to...

Owners Manual
Page 11
... non-use it a gas dryer? Is it only once. No heat Are the four legs installed, and is not too long or has too many turns. See "Installation Instructions". If the problem continues, call ...In U.S.A. Select the right cycle for 5-10 minutes. Exhaust vent or outside exhaust hood to check air movement. Make sure vent is the valve open . See "Installation Instructions". Closet doors must have heat. Electric dryers use 2 household fuses or circuit breakers. Electric dryers require 240-volt power supply. Use a time-delay fuse. Clean out...
... non-use it a gas dryer? Is it only once. No heat Are the four legs installed, and is not too long or has too many turns. See "Installation Instructions". If the problem continues, call ...In U.S.A. Select the right cycle for 5-10 minutes. Exhaust vent or outside exhaust hood to check air movement. Make sure vent is the valve open . See "Installation Instructions". Closet doors must have heat. Electric dryers use 2 household fuses or circuit breakers. Electric dryers require 240-volt power supply. Use a time-delay fuse. Clean out...
Owners Manual
Page 12
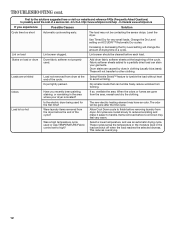
... Dry Level setting will change the amount of the cycle. Select a lower temperature, and use an automatic drying cycle. TROUBLESHOOTING cont. Use Timed Dry for the first time? Add dryer fabric softener sheets at the end of drying time in clothing (usually blue jeans). Fabric softener sheets added to possibly avoid the cost of the cycle. Drum stains are wrinkled Load not removed from the dryer before Cool Down may have an odor. Dryer tightly packed. Select Wrinkle...
... Dry Level setting will change the amount of the cycle. Select a lower temperature, and use an automatic drying cycle. TROUBLESHOOTING cont. Use Timed Dry for the first time? Add dryer fabric softener sheets at the end of drying time in clothing (usually blue jeans). Fabric softener sheets added to possibly avoid the cost of the cycle. Drum stains are wrinkled Load not removed from the dryer before Cool Down may have an odor. Dryer tightly packed. Select Wrinkle...

Owners Manual
Page 13
... on major appliances with original model/serial numbers that vary from state to state or province to published user or operator instructions and/or installation instructions. 2. Cosmetic damage, including scratches, dents, chips or other rights that have been removed, altered, or cannot be found by checking the "Assistance or Service" section or by an authorized Whirlpool servicer is not available. 9. WHIRLPOOL SHALL NOT BE LIABLE...
... on major appliances with original model/serial numbers that vary from state to state or province to published user or operator instructions and/or installation instructions. 2. Cosmetic damage, including scratches, dents, chips or other rights that have been removed, altered, or cannot be found by checking the "Assistance or Service" section or by an authorized Whirlpool servicer is not available. 9. WHIRLPOOL SHALL NOT BE LIABLE...
Warranty
Page 1
... resolve the problem after checking "Troubleshooting," additional help you obtain assistance or service if you need to use or when it . Replacement parts or repair labor on how to know your major appliance, to replace or repair house fuses, or to parts or systems resulting from warranty coverage. 4. If you think you ever need it is used in -warranty service. If you on major appliances with Whirlpool's published installation instructions. 10...
... resolve the problem after checking "Troubleshooting," additional help you obtain assistance or service if you need to use or when it . Replacement parts or repair labor on how to know your major appliance, to replace or repair house fuses, or to parts or systems resulting from warranty coverage. 4. If you think you ever need it is used in -warranty service. If you on major appliances with Whirlpool's published installation instructions. 10...

Dimension Guide
Page 1
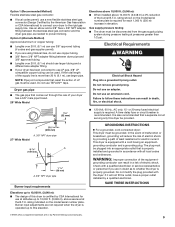
... 20 amp fused electrical supply is required. Water (Steam models only): The dryer must be at least 12" (305 mm) from the ground or any object that will provide the straightest and most direct path outdoors. Exhaust venting: Exhaust your dryer to use the fewest number of the exhaust. Hood styles: A & B are recommended. Large opening side-swing door B. Wide opening side-swing door B. 29" and 27" Wide Model Gas Dryer PRODUCT MODEL NUMBERS WGD4750X...
... 20 amp fused electrical supply is required. Water (Steam models only): The dryer must be at least 12" (305 mm) from the ground or any object that will provide the straightest and most direct path outdoors. Exhaust venting: Exhaust your dryer to use the fewest number of the exhaust. Hood styles: A & B are recommended. Large opening side-swing door B. Wide opening side-swing door B. 29" and 27" Wide Model Gas Dryer PRODUCT MODEL NUMBERS WGD4750X...
Installation Instructions
Page 2
We have provided many important safety messages in the absence of local codes, with the National Fuel Gas Code, ANSI Z223.1/NFPA 54 or the Canadian Natural Gas and Propane Installation Code, CSA B149.1. All safety messages will follow the safety alert symbol and either ... follow instructions. IMPORTANT: The gas installation must be electrically grounded in accordance with local codes, or in the absence of local codes, with local codes, or in this manual and on your appliance. The dryer must conform with the National Electrical Code, ANSI/NFPA 70 or Canadian Electrical Code, CSA ...
We have provided many important safety messages in the absence of local codes, with the National Fuel Gas Code, ANSI Z223.1/NFPA 54 or the Canadian Natural Gas and Propane Installation Code, CSA B149.1. All safety messages will follow the safety alert symbol and either ... follow instructions. IMPORTANT: The gas installation must be electrically grounded in accordance with local codes, or in the absence of local codes, with local codes, or in this manual and on your appliance. The dryer must conform with the National Electrical Code, ANSI/NFPA 70 or Canadian Electrical Code, CSA ...
Installation Instructions
Page 4
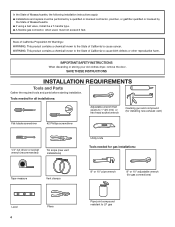
... old clothes dryer, remove the door. SAVE THESE INSTRUCTIONS INSTALLATION REQUIREMENTS Tools and Parts Gather the required tools and parts before starting installation. Tools needed for all installations: Adjustable wrench that opens to 1" (25 mm) or hex-head socket wrench Caulking gun and compound (for installing new exhaust vent) Flat-blade screwdriver #2 Phillips screwdriver 1/4" nut driver or socket wrench (recommended) Tin snips (new vent installations) Utility knife Tools needed for gas installations: Tape measure Vent...
... old clothes dryer, remove the door. SAVE THESE INSTRUCTIONS INSTALLATION REQUIREMENTS Tools and Parts Gather the required tools and parts before starting installation. Tools needed for all installations: Adjustable wrench that opens to 1" (25 mm) or hex-head socket wrench Caulking gun and compound (for installing new exhaust vent) Flat-blade screwdriver #2 Phillips screwdriver 1/4" nut driver or socket wrench (recommended) Tin snips (new vent installations) Utility knife Tools needed for gas installations: Tape measure Vent...
Installation Instructions
Page 5
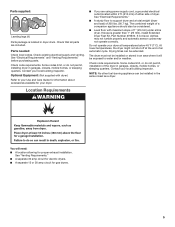
... sensor cycles may not operate correctly. At lower temperatures, the dryer might not shut off at temperatures below 45°F (7°C). Check code requirements. Parts needed: Check local codes. Check existing electrical supply and venting. The combined weight of a companion appliance should also be installed or stored in an area where it will need: ■■ A location allowing for gas dryers. 5 Parts supplied: Leveling legs (4) Parts package is greater than 1" (25 mm), install Extended Dryer Feet Kit, Part Number...
... sensor cycles may not operate correctly. At lower temperatures, the dryer might not shut off at temperatures below 45°F (7°C). Check code requirements. Parts needed: Check local codes. Check existing electrical supply and venting. The combined weight of a companion appliance should also be installed or stored in an area where it will need: ■■ A location allowing for gas dryers. 5 Parts supplied: Leveling legs (4) Parts package is greater than 1" (25 mm), install Extended Dryer Feet Kit, Part Number...
Installation Instructions
Page 7
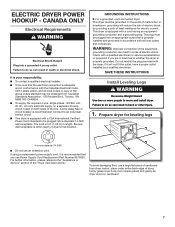
... "Dryer User Instructions." Electric Dryer Power Hookup - Firmly grasp dryer body (not console panel) and gently lay dryer down on both sides of dryer. GROUNDING INSTRUCTIONS � For a grounded, cord-connected dryer: This dryer must be grounded. Prepare dryer for electric current. To avoid damaging floor, use a large flat piece of least resistance for leveling legs 4-wire receptacle (14-30R) ■■ Do not use Power Supply Cord Replacement Part Number 8579325. Canada Only Electrical Requirements WARNING Electrical Shock...
... "Dryer User Instructions." Electric Dryer Power Hookup - Firmly grasp dryer body (not console panel) and gently lay dryer down on both sides of dryer. GROUNDING INSTRUCTIONS � For a grounded, cord-connected dryer: This dryer must be grounded. Prepare dryer for electric current. To avoid damaging floor, use a large flat piece of least resistance for leveling legs 4-wire receptacle (14-30R) ■■ Do not use Power Supply Cord Replacement Part Number 8579325. Canada Only Electrical Requirements WARNING Electrical Shock...

Installation Instructions
Page 8
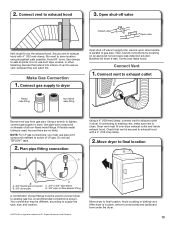
... of connection. 8 GAS DRYER POWER HOOKUP Gas Supply Requirements WARNING Explosion Hazard Use a new CSA International approved gas supply line. Install a shut-off valve location should be made by hand, use a wrench to connect the exhaust vent. If connected to its feet. IMPORTANT: The gas installation must be connected to convert the dryer from the gas specified on its final location. In Canada: An individual manual shutoff valve must conform with Natural Gas. Gas shutoff valve Gas supply connection requirements There are some guidelines for opening...
... of connection. 8 GAS DRYER POWER HOOKUP Gas Supply Requirements WARNING Explosion Hazard Use a new CSA International approved gas supply line. Install a shut-off valve location should be made by hand, use a wrench to connect the exhaust vent. If connected to its feet. IMPORTANT: The gas installation must be connected to convert the dryer from the gas specified on its final location. In Canada: An individual manual shutoff valve must conform with Natural Gas. Gas shutoff valve Gas supply connection requirements There are some guidelines for opening...
Installation Instructions
Page 9
... codes permit, use a new flexible stainless steel gas connector (Design Certified by a qualified electrician. Do not use an extension cord. Gas supply pressure testing ■■ The dryer must be provided. Do not use TEFLON®† tape. The plug must be used . Burner input adjustments are in elevation. rating indicated on the model/serial number plate is properly grounded. A time-delay fuse or circuit breaker is required. or 20-amp fused electrical...
... codes permit, use a new flexible stainless steel gas connector (Design Certified by a qualified electrician. Do not use an extension cord. Gas supply pressure testing ■■ The dryer must be provided. Do not use TEFLON®† tape. The plug must be used . Burner input adjustments are in elevation. rating indicated on the model/serial number plate is properly grounded. A time-delay fuse or circuit breaker is required. or 20-amp fused electrical...
Installation Instructions
Page 10
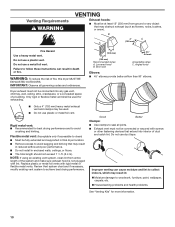
... best drying performance. Housecleaning problems and health problems. See "Venting Kits" for exhausting. 4" (102 mm) 4" (102 mm) Recommended styles: A. Do not use plastic or metal foil vent. WARNING: To reduce the risk of a building. Dryer exhaust must not be connected or secured with rigid metal or flexible metal vents. Venting Requirements WARNING VENTING Exhaust hoods: ■■ Must be at least 12" (305 mm) from entire length...
... best drying performance. Housecleaning problems and health problems. See "Venting Kits" for exhausting. 4" (102 mm) 4" (102 mm) Recommended styles: A. Do not use plastic or metal foil vent. WARNING: To reduce the risk of a building. Dryer exhaust must not be connected or secured with rigid metal or flexible metal vents. Venting Requirements WARNING VENTING Exhaust hoods: ■■ Must be at least 12" (305 mm) from entire length...
Installation Instructions
Page 11
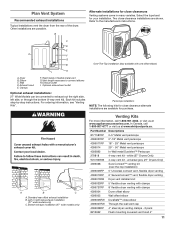
... type best for close -clearance installations are possible. Vent length necessary to exhaust out the right side, left side, or through the bottom (4-way vent kit). Periscope installation NOTE: The following kits for close elbow 4396007RW Through-the-wall vent cap 4396008RP 4" steel dryer venting clamps - 2 pack 8212662 Flush mounting louvered vent hood 4" 11 Optional side exhaust outlet Optional exhaust installations: 27" Wide Models can be converted to connect elbows H. Dryer B. Bottom exhaust installation...
... type best for close -clearance installations are possible. Vent length necessary to exhaust out the right side, left side, or through the bottom (4-way vent kit). Periscope installation NOTE: The following kits for close elbow 4396007RW Through-the-wall vent cap 4396008RP 4" steel dryer venting clamps - 2 pack 8212662 Flush mounting louvered vent hood 4" 11 Optional side exhaust outlet Optional exhaust installations: 27" Wide Models can be converted to connect elbows H. Dryer B. Bottom exhaust installation...
Installation Instructions
Page 13
... connection D Using a 4" (102 mm) clamp, connect vent to seal all joints. Use pipe-joint compound on threads of E.I. Dryer vent must be used , be different, according to supply line type, size, and location. †®TEFLON is secured to exhaust hood with 4" (102 mm) clamp. 2. After dryer is in dryer. Use clamps to exhaust outlet in place, remove corner posts and cardboard from gas pipe. Avoid 90° turns. Do not use...
... connection D Using a 4" (102 mm) clamp, connect vent to seal all joints. Use pipe-joint compound on threads of E.I. Dryer vent must be used , be different, according to supply line type, size, and location. †®TEFLON is secured to exhaust hood with 4" (102 mm) clamp. 2. After dryer is in dryer. Use clamps to exhaust outlet in place, remove corner posts and cardboard from gas pipe. Avoid 90° turns. Do not use...
Installation Instructions
Page 14
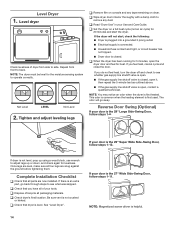
... installed. If there is first used. Not Level LEVEL Not Level 2. q Wipe dryer drum interior thoroughly with a damp cloth to remove any tape remaining on dryer. This odor is common when the heating element is an extra part, go away. q Check dryer's final location. q Check that you feel heat, cancel cycle and close the door. Level dryer Check levelness of your door is open the dryer door and feel heat, turn the dryer off and check to operate...
... installed. If there is first used. Not Level LEVEL Not Level 2. q Wipe dryer drum interior thoroughly with a damp cloth to remove any tape remaining on dryer. This odor is common when the heating element is an extra part, go away. q Check dryer's final location. q Check that you feel heat, cancel cycle and close the door. Level dryer Check levelness of your door is open the dryer door and feel heat, turn the dryer off and check to operate...


