
Installation Guide
Page 4
... snips (new vent installations) Pipe-joint compound resistant to your "Use and Care Guide" for information about accessories available for all parts are included. Check code requirements. Some codes limit, or do not permit, installing dryer in dryer drum. See "Venting Requirements."... supply and venting. Contact your dryer. Optional Equipment: (Not supplied with dryer) Refer to LP gas Parts supplied: Tape measure Vent clamps Level Pliers Leveling legs (4) Parts package is located in garages, closets, mobile homes, or sleeping quarters. INSTALLATION REQUIREMENTS Tools and...
... snips (new vent installations) Pipe-joint compound resistant to your "Use and Care Guide" for information about accessories available for all parts are included. Check code requirements. Some codes limit, or do not permit, installing dryer in dryer drum. See "Venting Requirements."... supply and venting. Contact your dryer. Optional Equipment: (Not supplied with dryer) Refer to LP gas Parts supplied: Tape measure Vent clamps Level Pliers Leveling legs (4) Parts package is located in garages, closets, mobile homes, or sleeping quarters. INSTALLATION REQUIREMENTS Tools and...

Installation Guide
Page 5
...) (25 mm) (25 mm) (705 mm) A B C A. Closet door with maximum slope of 3.6 cu. If slope is greater than 1" (25 mm), install Extended Dryer Feet Kit, Part Number 279810. Check code requirements. NOTE: No other fuel-burning appliance can be 1/2" (13 mm) (to support dryer and a total weight (dryer and load) of...
...) (25 mm) (25 mm) (705 mm) A B C A. Closet door with maximum slope of 3.6 cu. If slope is greater than 1" (25 mm), install Extended Dryer Feet Kit, Part Number 279810. Check code requirements. NOTE: No other fuel-burning appliance can be 1/2" (13 mm) (to support dryer and a total weight (dryer and load) of...

Installation Guide
Page 6
... can result in a risk of dryer's final location. 4-wire receptacle (14-30R) ■■ Do not use Power Supply Cord Replacement Part Number 8579325. Do not modify the plug provided with all local codes and ordinances. A time-delay fuse or circuit breaker is suitable for mobile...on all local codes. Connect to the Manufactured Home Construction and Safety Standard, Title 24 CFR, Part 3280 (formerly the Federal Standard for Mobile Home Construction and Safety, Title 24, HUD Part 280) or the Canadian Manufactured Home Standard CAN/CSA-Z240 MH. ■■ Metal exhaust system...
... can result in a risk of dryer's final location. 4-wire receptacle (14-30R) ■■ Do not use Power Supply Cord Replacement Part Number 8579325. Do not modify the plug provided with all local codes and ordinances. A time-delay fuse or circuit breaker is suitable for mobile...on all local codes. Connect to the Manufactured Home Construction and Safety Standard, Title 24 CFR, Part 3280 (formerly the Federal Standard for Mobile Home Construction and Safety, Title 24, HUD Part 280) or the Canadian Manufactured Home Standard CAN/CSA-Z240 MH. ■■ Metal exhaust system...

Installation Guide
Page 11
... as possible. ■■ Bend vent gradually to avoid kinking. ■■ Use as few 90° turns as possible. Terminate the exhaust vent outside. Part Number Descriptions 8171587RP 0-5" Metal vent periscope 4396037RP 0"-18" Metal vent periscope 4396011RP 18"-29" Metal vent periscope 4396014 29"-50" Metal vent periscope 4392892 In...
... as possible. ■■ Bend vent gradually to avoid kinking. ■■ Use as few 90° turns as possible. Terminate the exhaust vent outside. Part Number Descriptions 8171587RP 0-5" Metal vent periscope 4396037RP 0"-18" Metal vent periscope 4396011RP 18"-29" Metal vent periscope 4396014 29"-50" Metal vent periscope 4392892 In...

Installation Guide
Page 13
... LEVEL Not Level 13 Dryer vent must be level for heat. Move dryer to final location Move dryer to back. After dryer is an extra part, go away. Level Dryer 1. If there is in place, remove corner posts and cardboard from side to remove any tape remaining on a full heat cycle... above. ■■ If the gas supply line shut-off valve is secured to exhaust hood with a damp cloth to side. q Dispose of/recycle all parts are snug against the floor before tightening them. q Check that vent is open the dryer door and feel heat, cancel cycle and close the door...
... LEVEL Not Level 13 Dryer vent must be level for heat. Move dryer to final location Move dryer to back. After dryer is an extra part, go away. Level Dryer 1. If there is in place, remove corner posts and cardboard from side to remove any tape remaining on a full heat cycle... above. ■■ If the gas supply line shut-off valve is secured to exhaust hood with a damp cloth to side. q Dispose of/recycle all parts are snug against the floor before tightening them. q Check that vent is open the dryer door and feel heat, cancel cycle and close the door...

Installation Guide
Page 14
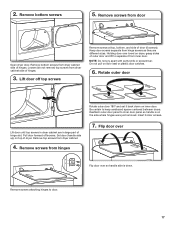
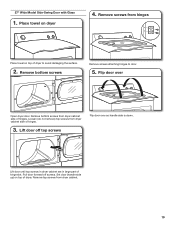
... hinge slot. Loosen (do not remove) top screws from hinges Place towel on dryer Lift door until top screws in dryer cabinet are in large part of hinges. 3. Place towel on top of dryer. Remove bottom screws from dryer cabinet. 4. Open dryer door. If your door is the 27" Wide Side...
... hinge slot. Loosen (do not remove) top screws from hinges Place towel on dryer Lift door until top screws in dryer cabinet are in large part of hinges. 3. Place towel on top of dryer. Remove bottom screws from dryer cabinet. 4. Open dryer door. If your door is the 27" Wide Side...
Installation Guide
Page 17
... hinges. Flip door over Flip door over towel on dryer, grasp sides of door (6 screws). Rotate outer door Lift door until top screws in large part of hinges. 3. Remove screws from hinges Rotate outer door 180º and set it from hinge screws as they are in dryer cabinet are different...
... hinges. Flip door over Flip door over towel on dryer, grasp sides of door (6 screws). Rotate outer door Lift door until top screws in large part of hinges. 3. Remove screws from hinges Rotate outer door 180º and set it from hinge screws as they are in dryer cabinet are different...
Installation Guide
Page 19
... over Open dryer door. Loosen (do not remove) top screws from dryer cabinet. 19 Lift door until top screws in dryer cabinet are in large part of dryer. Lift door off screws. Place towel on top of hinges. 3. Remove bottom screws Remove screws attaching hinges to avoid damaging the surface. 2. Set...
... over Open dryer door. Loosen (do not remove) top screws from dryer cabinet. 19 Lift door until top screws in dryer cabinet are in large part of dryer. Lift door off screws. Place towel on top of hinges. 3. Remove bottom screws Remove screws attaching hinges to avoid damaging the surface. 2. Set...

Use & Care Guide
Page 10
.... Plug into a grounded outlet or reconnect power. 10 Unplug dryer or disconnect power. 2. (For gas dryers only): Close shut off power at home. Replace all parts and panels before servicing. Disconnect wiring. 3. Locate the light bulb cover on some models) 1. Vacation, storage, and moving care Non-Use or Storage Care Operate...
.... Plug into a grounded outlet or reconnect power. 10 Unplug dryer or disconnect power. 2. (For gas dryers only): Close shut off power at home. Replace all parts and panels before servicing. Disconnect wiring. 3. Locate the light bulb cover on some models) 1. Vacation, storage, and moving care Non-Use or Storage Care Operate...

Use & Care Guide
Page 13
... legal rights, and you are excluded from unauthorized modifications made to parts or systems resulting from warranty coverage. 4. You must be provided by an authorized Whirlpool servicer is required to province. Service calls to be repaired in your.... 8. Service must provide proof of purchase or installation date for future reference. Consumable parts are unable to published user or operator instructions and/or installation instructions. 2. WHIRLPOOL CORPORATION LAUNDRY WARRANTY LIMITED WARRANTY For one year from accident, alteration, misuse, abuse,...
... legal rights, and you are excluded from unauthorized modifications made to parts or systems resulting from warranty coverage. 4. You must be provided by an authorized Whirlpool servicer is required to province. Service calls to be repaired in your.... 8. Service must provide proof of purchase or installation date for future reference. Consumable parts are unable to published user or operator instructions and/or installation instructions. 2. WHIRLPOOL CORPORATION LAUNDRY WARRANTY LIMITED WARRANTY For one year from accident, alteration, misuse, abuse,...

Warranty Information
Page 1
... these excluded circumstances shall be found by checking the "Assistance or Service" section or by an authorized Whirlpool servicer is not available. 9. You must be repaired in a remote area where service by calling Whirlpool. Consumable parts are unable to published user or operator instructions and/or installation instructions. 2. Cosmetic damage, including scratches, dents...
... these excluded circumstances shall be found by checking the "Assistance or Service" section or by an authorized Whirlpool servicer is not available. 9. You must be repaired in a remote area where service by calling Whirlpool. Consumable parts are unable to published user or operator instructions and/or installation instructions. 2. Cosmetic damage, including scratches, dents...


