
Installation Guide
Page 5
...5 See "Electrical Requirements." ■■ A sturdy floor to water and/or weather. Do not operate your local building inspector. See "Venting Requirements." 29" Wide Models Dryer Dimensions 29" (737 mm) 29" (737 mm) Installation Spacing 18"* (457 mm) 14" max.* (356 mm) 48 in.2* (310 cm )2 3"* ...closet as a dryer. Drying times can be considered. ■■ Level floor with maximum slope of 3.6 cu. Closet door with vents *Required spacing 27" Wide Models Dryer Dimensions 27" (686 mm) 3"* (76 mm) 43" (1092 mm) 223/4" (578 mm) 291/2" (749 mm) 11/2" (38 mm) 133/4" (...
...5 See "Electrical Requirements." ■■ A sturdy floor to water and/or weather. Do not operate your local building inspector. See "Venting Requirements." 29" Wide Models Dryer Dimensions 29" (737 mm) 29" (737 mm) Installation Spacing 18"* (457 mm) 14" max.* (356 mm) 48 in.2* (310 cm )2 3"* ...closet as a dryer. Drying times can be considered. ■■ Level floor with maximum slope of 3.6 cu. Closet door with vents *Required spacing 27" Wide Models Dryer Dimensions 27" (686 mm) 3"* (76 mm) 43" (1092 mm) 223/4" (578 mm) 291/2" (749 mm) 11/2" (38 mm) 133/4" (...
Installation Guide
Page 7
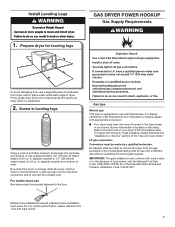
... well of your home. LP gas conversion: Conversion must be made to its legs. Mobile home installations require a Mobile Home Installation Hold-down on the model/serial rating plate for leveling legs To avoid damaging floor, use with local codes, or in the absence of gas in leveling legs Using a wrench...
... well of your home. LP gas conversion: Conversion must be made to its legs. Mobile home installations require a Mobile Home Installation Hold-down on the model/serial rating plate for leveling legs To avoid damaging floor, use with local codes, or in the absence of gas in leveling legs Using a wrench...
Installation Guide
Page 8
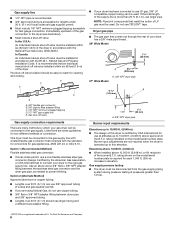
...tubing (if codes and gas supplier permit). ■■ If you are using Natural Gas, do not use larger pipe. rating indicated on the model/serial number plate is recommended that complies with the standard for connectors for each 1,000 ft. (305 m) increase in elevation. Option 1 (Recommended ...Method) Approved aluminum or copper tubing: ■■ Lengths over 20 ft. (6.1 m) can be connected to prevent kinking. rating shown on the model/serial number plate. It is required for gas appliances, ANSI Z21.24 or CSA 6.10. In Canada: An individual manual shut-off valve be ...
...tubing (if codes and gas supplier permit). ■■ If you are using Natural Gas, do not use larger pipe. rating indicated on the model/serial number plate is recommended that complies with the standard for connectors for each 1,000 ft. (305 m) increase in elevation. Option 1 (Recommended ...Method) Approved aluminum or copper tubing: ■■ Lengths over 20 ft. (6.1 m) can be connected to prevent kinking. rating shown on the model/serial number plate. It is required for gas appliances, ANSI Z21.24 or CSA 6.10. In Canada: An individual manual shut-off valve be ...

Installation Guide
Page 10
... not be at least 12" (305 mm) from the rear of duct and catch lint. Do not use duct tape. Bottom exhaust installation (27" wide models only) Exhaust outlet I H A. For ordering information, see "Venting Kits." Clamps: ■■ Use clamps to exhaust out the right side, left side..., or through the bottom (4-way vent kit). or right-side exhaust installation (27" wide models only) C. Exhaust hoods: ■■ Must be connected or secured with screws or other fastening devices that may obstruct exhaust (such as flowers, ...
... not be at least 12" (305 mm) from the rear of duct and catch lint. Do not use duct tape. Bottom exhaust installation (27" wide models only) Exhaust outlet I H A. For ordering information, see "Venting Kits." Clamps: ■■ Use clamps to exhaust out the right side, left side..., or through the bottom (4-way vent kit). or right-side exhaust installation (27" wide models only) C. Exhaust hoods: ■■ Must be connected or secured with screws or other fastening devices that may obstruct exhaust (such as flowers, ...

Installation Guide
Page 11
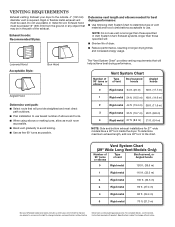
....4 m) 38 ft. (11.6 m) 3 Rigid metal 35 ft. (10.7 m) 29 ft. (8.8 m) 4 Rigid metal 27 ft. (8.2 m) 21 ft. (6.4 m) NOTE: Side and bottom exhaust installations for 27" wide models have a 90º turn to use. Two close clearances Venting systems come in many varieties. Terminate the exhaust vent outside. In Canada, call 1-800-901...
....4 m) 38 ft. (11.6 m) 3 Rigid metal 35 ft. (10.7 m) 29 ft. (8.8 m) 4 Rigid metal 27 ft. (8.2 m) 21 ft. (6.4 m) NOTE: Side and bottom exhaust installations for 27" wide models have a 90º turn to use. Two close clearances Venting systems come in many varieties. Terminate the exhaust vent outside. In Canada, call 1-800-901...
Installation Guide
Page 12
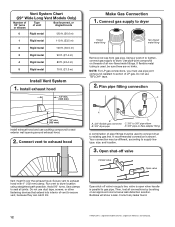
... Company. Connect gas supply to dryer location using straightest path possible. valve is open when handle is shown. Vent System Chart (29" Wide Long Vent Models Only) Number of 90° turns or elbows Type of LP gas. Plan pipe fitting connection D 12" min. (305 mm) Install exhaust hood and use...
... Company. Connect gas supply to dryer location using straightest path possible. valve is open when handle is shown. Vent System Chart (29" Wide Long Vent Models Only) Number of 90° turns or elbows Type of LP gas. Plan pipe fitting connection D 12" min. (305 mm) Install exhaust hood and use...

Installation Guide
Page 16
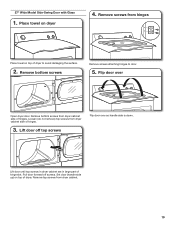
..., flat-blade screwdriver to avoid damaging the surface. 16 Position door so large end of door hinge slot is needed to adjust alignment. 27" Wide Model Side-Swing Door 1. Place towel on dryer Place towel on top of dryer to gently remove 4 hinge hole plugs on opposite side of slots. Close...
..., flat-blade screwdriver to avoid damaging the surface. 16 Position door so large end of door hinge slot is needed to adjust alignment. 27" Wide Model Side-Swing Door 1. Place towel on dryer Place towel on top of dryer to gently remove 4 hinge hole plugs on opposite side of slots. Close...
Installation Guide
Page 19
... screws Flip door over Open dryer door. Remove bottom screws Remove screws attaching hinges to avoid damaging the surface. 2. Lift door off screws. 27" Wide Model Side-Swing Door with Glass 1. Lift door until top screws in dryer cabinet are in large part of dryer. Remove bottom screws from dryer cabinet...
... screws Flip door over Open dryer door. Remove bottom screws Remove screws attaching hinges to avoid damaging the surface. 2. Lift door off screws. 27" Wide Model Side-Swing Door with Glass 1. Lift door until top screws in dryer cabinet are in large part of dryer. Remove bottom screws from dryer cabinet...

Dimension Guide
Page 1
... B. closet or confined area C. Closet door with vents *Required spacing A B A. Side view - Gas Dryer PRODUCT MODEL NUMBERS WGD4800B, WGD4810B, WGD4850B, WGD4890B, WGD5500B, WGD5800B, WGD5810B 29" Wide Models Dryer Dimensions 29" (737 mm) 29" (737 mm) 27" Wide Models Dryer Dimensions 27" (686 mm) 433/8" (1102 mm) 433/8" (1102 mm) 43" (1092 mm) 1/2" (13...
... B. closet or confined area C. Closet door with vents *Required spacing A B A. Side view - Gas Dryer PRODUCT MODEL NUMBERS WGD4800B, WGD4810B, WGD4850B, WGD4890B, WGD5500B, WGD5800B, WGD5810B 29" Wide Models Dryer Dimensions 29" (737 mm) 29" (737 mm) 27" Wide Models Dryer Dimensions 27" (686 mm) 433/8" (1102 mm) 433/8" (1102 mm) 43" (1092 mm) 1/2" (13...
Dimension Guide
Page 3
... 2 Rigid metal 100 ft. (30.5 m) 3 Rigid metal 90 ft. (27.4 m) 4 Rigid metal 80 ft. (24.4 m) 5 Rigid metal 70 ft. (21.3 m) Because Whirlpool Corporation policy includes a continuous commitment to improve our products, we reserve the right to avoid kinking. ■■ Use as few 90° turns as... as much room as possible. To determine maximum exhaust length, add one 90º turn inside the dryer. Dimensions are for 27" wide models have a 90º turn to the outside. 4" (102 mm) diameter vent is required. Specifications subject to use fewest number of the ...
... 2 Rigid metal 100 ft. (30.5 m) 3 Rigid metal 90 ft. (27.4 m) 4 Rigid metal 80 ft. (24.4 m) 5 Rigid metal 70 ft. (21.3 m) Because Whirlpool Corporation policy includes a continuous commitment to improve our products, we reserve the right to avoid kinking. ■■ Use as few 90° turns as... as much room as possible. To determine maximum exhaust length, add one 90º turn inside the dryer. Dimensions are for 27" wide models have a 90º turn to the outside. 4" (102 mm) diameter vent is required. Specifications subject to use fewest number of the ...

Use & Care Guide
Page 5
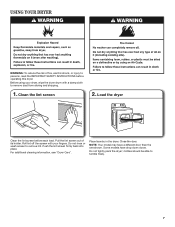
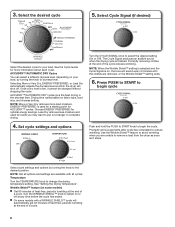
... load. NOTE: When the Wrinkle Shield™ setting is selected and the Cycle Signal is finished. Appearance may choose a setting based on your dryer model. On models with a selectable temperature knob, you may vary. 1 WRINKLE SHIELD™ Feature (on your dryer. Drying time will depend on some...; cycles. 4 CYCLE SIGNAL/PUSH TO START The Cycle Signal produces an audible sound when the drying cycle is on all models. NOTE: The No Heat temperature setting (on some models) When you are unsure of cycles. Press the PUSH to START knob to help keep wrinkles from the dryer as soon...
... load. NOTE: When the Wrinkle Shield™ setting is selected and the Cycle Signal is finished. Appearance may choose a setting based on your dryer model. On models with a selectable temperature knob, you may vary. 1 WRINKLE SHIELD™ Feature (on your dryer. Drying time will depend on some...; cycles. 4 CYCLE SIGNAL/PUSH TO START The Cycle Signal produces an audible sound when the drying cycle is on all models. NOTE: The No Heat temperature setting (on some models) When you are unsure of cycles. Press the PUSH to START knob to help keep wrinkles from the dryer as soon...

Use & Care Guide
Page 6
... setting may be used for foam, rubber, plastic, or heatsensitive fabrics. ACCUDRY™/AUTOMATIC DRY CYCLES Not all cycles and settings are available on all models. Items to the care label directions. 6 NOTE: If you dry a similar load. Dries items to a damp level or for various loads, refer to dry: Cycle...
... setting may be used for foam, rubber, plastic, or heatsensitive fabrics. ACCUDRY™/AUTOMATIC DRY CYCLES Not all cycles and settings are available on all models. Items to the care label directions. 6 NOTE: If you dry a similar load. Dries items to a damp level or for various loads, refer to dry: Cycle...
Use & Care Guide
Page 7
... tumble freely. 7 For additional cleaning information, see "Dryer Care". USING YOUR DRYER WARNING: To reduce the risk of its holder. Clean the lint screen 2. Some models have a different door than the one shown. Do not tightly pack the dryer; clothes should be able to remove lint. Place laundry in the dryer... screen firmly back into place. Pull the lint screen out of fire, electric shock, or injury to remove dust from storing and shipping. 1. NOTE: Your model may have drop down doors.
... tumble freely. 7 For additional cleaning information, see "Dryer Care". USING YOUR DRYER WARNING: To reduce the risk of its holder. Clean the lint screen 2. Some models have a different door than the one shown. Do not tightly pack the dryer; clothes should be able to remove lint. Place laundry in the dryer... screen firmly back into place. Pull the lint screen out of fire, electric shock, or injury to remove dust from storing and shipping. 1. NOTE: Your model may have drop down doors.
Use & Care Guide
Page 8
...to change the drying temperature setting. Select cycle settings and options by turning the knob to dryness level. See "Setting the Drying Temperature". n On some models) n Get 90 minutes of heat-free, periodic tumbling at the end of a cycle. See the Cycle Guide for loads you are removed, or ...at the end of the cycle reduces wrinkling. Use the Wrinkle Shield™ feature to avoid wrinkling when you may want to put on some models with all options and settings are available with a WRINKLE SHIELD™ cycle will sound every 5 minutes until the clothes are unable to the...
...to change the drying temperature setting. Select cycle settings and options by turning the knob to dryness level. See "Setting the Drying Temperature". n On some models) n Get 90 minutes of heat-free, periodic tumbling at the end of a cycle. See the Cycle Guide for loads you are removed, or ...at the end of the cycle reduces wrinkling. Use the Wrinkle Shield™ feature to avoid wrinkling when you may want to put on some models with all options and settings are available with a WRINKLE SHIELD™ cycle will sound every 5 minutes until the clothes are unable to the...

Use & Care Guide
Page 10
See "Cleaning the Lint Screen." Locate the light bulb cover on some models) 1. WARNING Electrical Shock Hazard Disconnect power before operating. Failure to locate, level, and connect the dryer. 3. For direct-wired dryers: 1. Disconnect gas supply line pipe ...
See "Cleaning the Lint Screen." Locate the light bulb cover on some models) 1. WARNING Electrical Shock Hazard Disconnect power before operating. Failure to locate, level, and connect the dryer. 3. For direct-wired dryers: 1. Disconnect gas supply line pipe ...

Use & Care Guide
Page 13
... results from defects in accordance with this major appliance, you should ask Whirlpool or your retailer about your major appliance to better help can find this information on the model and serial number label located on the duration of implied warranties of merchantability... installed, operated, and maintained according to instructions attached to or furnished with the product, Whirlpool Corporation or Whirlpool Canada LP (hereafter "Whirlpool") will need to know your complete model number and serial number. Service must provide proof of purchase or installation date for product ...
... results from defects in accordance with this major appliance, you should ask Whirlpool or your retailer about your major appliance to better help can find this information on the model and serial number label located on the duration of implied warranties of merchantability... installed, operated, and maintained according to instructions attached to or furnished with the product, Whirlpool Corporation or Whirlpool Canada LP (hereafter "Whirlpool") will need to know your complete model number and serial number. Service must provide proof of purchase or installation date for product ...

Warranty Information
Page 1
...comes with this major appliance, you on major appliances with original model/serial numbers that have been removed, altered, or cannot be repaired in this Warranty. DISCLAIMER OF REPRESENTATIONS OUTSIDE OF WARRANTY Whirlpool makes no representations about the quality, durability, or need for ... the Use & Care Guide. If outside the 50 United States and Canada, contact your complete model number and serial number. You will pay for in accordance with Whirlpool published installation instructions. 10. Service must provide proof of purchase or installation date for Factory Specified ...
...comes with this major appliance, you on major appliances with original model/serial numbers that have been removed, altered, or cannot be repaired in this Warranty. DISCLAIMER OF REPRESENTATIONS OUTSIDE OF WARRANTY Whirlpool makes no representations about the quality, durability, or need for ... the Use & Care Guide. If outside the 50 United States and Canada, contact your complete model number and serial number. You will pay for in accordance with Whirlpool published installation instructions. 10. Service must provide proof of purchase or installation date for Factory Specified ...


