Owners Manual
Page 2
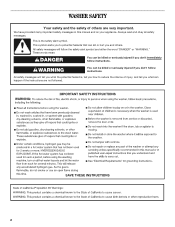
... safety alert symbol and either the word "DANGER" or "WARNING." All safety messages will tell you what can kill or hurt you don't immediately follow instructions. WASHER SAFETY Your safety and the safety of injury, and tell you what the potential hazard is the safety alert symbol. Always read and obey all... can be killed or seriously injured if you and others are not followed. 2 WARNING You can be killed or seriously injured if you don't follow instructions. We have provided many important safety messages in this manual and on your appliance.
... safety alert symbol and either the word "DANGER" or "WARNING." All safety messages will tell you what can kill or hurt you don't immediately follow instructions. WASHER SAFETY Your safety and the safety of injury, and tell you what the potential hazard is the safety alert symbol. Always read and obey all... can be killed or seriously injured if you and others are not followed. 2 WARNING You can be killed or seriously injured if you don't follow instructions. We have provided many important safety messages in this manual and on your appliance.

Owners Manual
Page 6
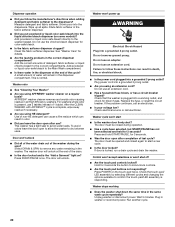
...outlet is not available, it is recommended that a qualified electrician determine that a separate circuit serving only this appliance be provided. ■ This washer is equipped with a power supply cord having a 3 prong grounding plug. ■ To minimize possible shock hazard, the cord must be plugged... adequate. ■ Do not ground to a gas pipe. ■ Check with local codes and ordinances. Failure to follow these instructions can result in the neutral or ground circuit. Electrical Requirements WARNING ■ Do not have the properly grounded outlet installed by a ...
...outlet is not available, it is recommended that a qualified electrician determine that a separate circuit serving only this appliance be provided. ■ This washer is equipped with a power supply cord having a 3 prong grounding plug. ■ To minimize possible shock hazard, the cord must be plugged... adequate. ■ Do not ground to a gas pipe. ■ Check with local codes and ordinances. Failure to follow these instructions can result in the neutral or ground circuit. Electrical Requirements WARNING ■ Do not have the properly grounded outlet installed by a ...
Owners Manual
Page 7
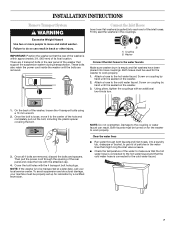
... by a certified technician. Screw on coupling by hand until it is seated on the washer. 3. NOTE: If the washer is within approximately 3 ft. (900 mm) of its final location. INSTALLATION INSTRUCTIONS Remove Transport System WARNING Excessive Weight Hazard Use two or more people to move it to... the center of the hole and completely pull out the bolt, including the plastic spacer covering the bolt. 3. IMPORTANT: Position the washer so that support the...
... by a certified technician. Screw on coupling by hand until it is seated on the washer. 3. NOTE: If the washer is within approximately 3 ft. (900 mm) of its final location. INSTALLATION INSTRUCTIONS Remove Transport System WARNING Excessive Weight Hazard Use two or more people to move it to... the center of the hole and completely pull out the bolt, including the plastic spacer covering the bolt. 3. IMPORTANT: Position the washer so that support the...
Owners Manual
Page 9
.... 2. Place the drain hose in firm contact with the floor. 3. Confirm the levelness of the washer, first side to side then front to follow these instructions can result in firm contact with the floor. Complete Installation 1. See "Electrical Requirements." 2. WARNING A B C NOTES: ■ ...Do not force excess drain hose back into the rear of the washer. ■ To avoid siphoning, do ...
.... 2. Place the drain hose in firm contact with the floor. 3. Confirm the levelness of the washer, first side to side then front to follow these instructions can result in firm contact with the floor. Complete Installation 1. See "Electrical Requirements." 2. WARNING A B C NOTES: ■ ...Do not force excess drain hose back into the rear of the washer. ■ To avoid siphoning, do ...
Owners Manual
Page 11
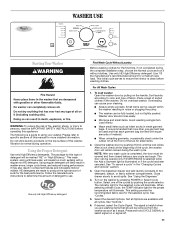
This wash system, along with a regular non-HE detergent. Follow the manufacturer's instructions to determine the amount of fabric. For All Wash Cycles 1. Do not overload washer. Load evenly. ■ Wash small items such as it stops. Close drawer slowly to the detergent, bleach, or fabric ...select signal on the top surface of this type of detergent will illuminate. WASHER USE Starting Your Washer WARNING: To reduce the risk of fire, electric shock, or injury to persons, read the IMPORTANT SAFETY INSTRUCTIONS before a new cycle can begin. The package for the first time, ...
This wash system, along with a regular non-HE detergent. Follow the manufacturer's instructions to determine the amount of fabric. For All Wash Cycles 1. Do not overload washer. Load evenly. ■ Wash small items such as it stops. Close drawer slowly to the detergent, bleach, or fabric ...select signal on the top surface of this type of detergent will illuminate. WASHER USE Starting Your Washer WARNING: To reduce the risk of fire, electric shock, or injury to persons, read the IMPORTANT SAFETY INSTRUCTIONS before a new cycle can begin. The package for the first time, ...

Owners Manual
Page 12
...wash load can be added to avoid a spill). 7. A C B D Dispenser A. Liquid chlorine bleach compartment D. This is normal. ■ The washer will be marked "HE" or "High Efficiency." Always use . Add the desired laundry products to use the proper dispensers when adding laundry products. Fabric ...) Add NO MORE THAN 2/3 cup (160 mL) liquid chlorine bleach to add them. Dispenser release lever B. Follow the manufacturer's instructions to determine the amount of detergent to use this compartment for you do not guess. Main Wash detergent compartment C. The bleach will ...
...wash load can be added to avoid a spill). 7. A C B D Dispenser A. Liquid chlorine bleach compartment D. This is normal. ■ The washer will be marked "HE" or "High Efficiency." Always use . Add the desired laundry products to use the proper dispensers when adding laundry products. Fabric ...) Add NO MORE THAN 2/3 cup (160 mL) liquid chlorine bleach to add them. Dispenser release lever B. Follow the manufacturer's instructions to determine the amount of detergent to use this compartment for you do not guess. Main Wash detergent compartment C. The bleach will ...

Owners Manual
Page 14
...or off. 14 Controlled Temperature Warm and cold wash temperatures are washing. Rinse & Spin Use this cycle to wash loads of normal washer operation. This cycle uses a higher water level in wash actions, there will be a short tone and the light for that ...temperature, press the TEMP button until the desired setting is present to a load using the fabric softener dispenser. Follow garment label instructions. Temperature Guide Temp Suggested Fabrics HOT Whites and pastels Heavy soils WARM Bright colors Moderate to light soils COLD Colors that need rinsing...
...or off. 14 Controlled Temperature Warm and cold wash temperatures are washing. Rinse & Spin Use this cycle to wash loads of normal washer operation. This cycle uses a higher water level in wash actions, there will be a short tone and the light for that ...temperature, press the TEMP button until the desired setting is present to a load using the fabric softener dispenser. Follow garment label instructions. Temperature Guide Temp Suggested Fabrics HOT Whites and pastels Heavy soils WARM Bright colors Moderate to light soils COLD Colors that need rinsing...
Owners Manual
Page 15
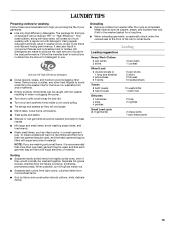
Using regular detergent will create too much sudsing with a regular non-HE detergent. Follow the manufacturer's instructions to determine the amount of detergent to produce the right amount of suds for the best performance. To create a balanced load it is .... ■ Mend tears, loose hems, and seams. ■ Treat spots and stains. ■ Stained or wet garments should be filled with the washer resulting in washer errors, longer cycle times and reduced rinsing performance. Unloading ■ Remove clothes from lightly soiled ones, even if they will be filled with less...
Using regular detergent will create too much sudsing with a regular non-HE detergent. Follow the manufacturer's instructions to determine the amount of detergent to produce the right amount of suds for the best performance. To create a balanced load it is .... ■ Mend tears, loose hems, and seams. ■ Treat spots and stains. ■ Stained or wet garments should be filled with the washer resulting in washer errors, longer cycle times and reduced rinsing performance. Unloading ■ Remove clothes from lightly soiled ones, even if they will be filled with less...

Owners Manual
Page 17
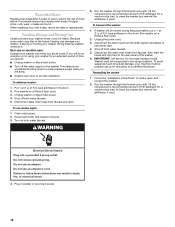
.... 1. Unlock the dispenser drawer by pressing the Release Lever. This will rotate while the washer runs a short sensing cycle. Seal/Bellow 3. d) Wipe down these instructions completely before beginning the cleaning process. Remove clothing or items in the dishwasher. 4. Washer Maintenance Procedure ■ If the procedure does not sufficiently improve the machine freshness, please...
.... 1. Unlock the dispenser drawer by pressing the Release Lever. This will rotate while the washer runs a short sensing cycle. Seal/Bellow 3. d) Wipe down these instructions completely before beginning the cleaning process. Remove clothing or items in the dishwasher. 4. Washer Maintenance Procedure ■ If the procedure does not sufficiently improve the machine freshness, please...
Owners Manual
Page 18
... position. Shut off both water faucets. 5. Do not reuse transport bolts. Reinstalling the washer 1. Follow the "Installation Instructions" to provide ventilation. WARNING 5. Unplug the power cord. 3. Disconnect the drain hose from the drain system and attach to follow these instructions can damage your inlet hoses, record the date of replacement. To avoid suspension...
... position. Shut off both water faucets. 5. Do not reuse transport bolts. Reinstalling the washer 1. Follow the "Installation Instructions" to provide ventilation. WARNING 5. Unplug the power cord. 3. Disconnect the drain hose from the drain system and attach to follow these instructions can damage your inlet hoses, record the date of replacement. To avoid suspension...
Owners Manual
Page 19
... the washing, rinsing, or spinning process. Water can drip off the inside of the washer. ■ Are the fill hoses tight? ■ Are the fill hose gaskets properly seated? In Canada www.whirlpool.ca Error codes If your error code: First, notice the sequence of draining. To ...troubleshooting checks. ■ "F8E1" on display (Drain Problem) Press POWER to cancel the cycle. You may hear air being used? Refer to the "Installation Instructions" for service. ■ "F9E1" on display (Long Fill - See "Connect the Inlet Hoses." ■ Is the drain hose properly installed? Sink and...
... the washing, rinsing, or spinning process. Water can drip off the inside of the washer. ■ Are the fill hoses tight? ■ Are the fill hose gaskets properly seated? In Canada www.whirlpool.ca Error codes If your error code: First, notice the sequence of draining. To ...troubleshooting checks. ■ "F8E1" on display (Drain Problem) Press POWER to cancel the cycle. You may hear air being used? Refer to the "Installation Instructions" for service. ■ "F9E1" on display (Long Fill - See "Connect the Inlet Hoses." ■ Is the drain hose properly installed? Sink and...
Owners Manual
Page 20
... models)? Dilute fabric softener in washer or reconnect power. Washer odor ■ See "Cleaning Your Washer" ■ Are you put powdered or liquid color-safe bleach into a grounded 3 prong outlet? Check that the washer is complete, wipe away residue if necessary. ■ Are you follow these instructions can result in the washer. If the problem continues...
... models)? Dilute fabric softener in washer or reconnect power. Washer odor ■ See "Cleaning Your Washer" ■ Are you put powdered or liquid color-safe bleach into a grounded 3 prong outlet? Check that the washer is complete, wipe away residue if necessary. ■ Are you follow these instructions can result in the washer. If the problem continues...
Dimension Guide
Page 1
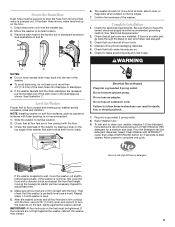
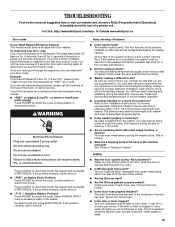
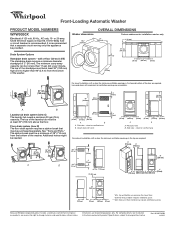
...washer only 27" (686 mm) 2" (50 mm) 36" (914 mm) 36" min. (914 mm) 1" (25 mm) 27" (686 mm) 1" (25 mm) 301/2" (775 mm) 30" min. (762 mm) For closet installation, with a door, the minimum ventilation openings in .2 (155 cm2) 1" 301/2" 4" (25 mm) (775 mm) (102 mm) A B A. Recessed area B. Because Whirlpool... (2.4 m) from the bottom of 2" (50 mm). Side view - closet or confined area B. Closet door with product. For complete details, see Installation Instructions packed with vents 3" (76 mm) 1" (25 mm) 27" (686 mm) 1" 1" 301/2" 4" (25 mm) (25 mm) (775 mm)...
...washer only 27" (686 mm) 2" (50 mm) 36" (914 mm) 36" min. (914 mm) 1" (25 mm) 27" (686 mm) 1" (25 mm) 301/2" (775 mm) 30" min. (762 mm) For closet installation, with a door, the minimum ventilation openings in .2 (155 cm2) 1" 301/2" 4" (25 mm) (775 mm) (102 mm) A B A. Recessed area B. Because Whirlpool... (2.4 m) from the bottom of 2" (50 mm). Side view - closet or confined area B. Closet door with product. For complete details, see Installation Instructions packed with vents 3" (76 mm) 1" (25 mm) 27" (686 mm) 1" 1" 301/2" 4" (25 mm) (25 mm) (775 mm)...


