Owners Manual
Page 2
... provided many important safety messages in this manual and on your appliance. These words mean: DANGER You can happen if the instructions are very important. WASHER SAFETY Your safety and the safety of injury, and tell you don't follow the safety alert symbol and either the word "DANGER" or "WARNING...
... provided many important safety messages in this manual and on your appliance. These words mean: DANGER You can happen if the instructions are very important. WASHER SAFETY Your safety and the safety of injury, and tell you don't follow the safety alert symbol and either the word "DANGER" or "WARNING...

Owners Manual
Page 3
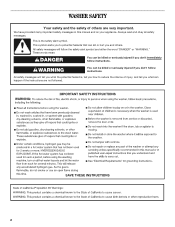
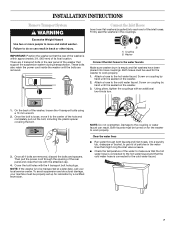
... such as carpets or surfaces with a maximum slope of where the power cord is not recommended. ■ A sturdy and solid floor to support the washer with Washer Color Model Number 10" (254 mm) 46" (1168 mm) White MHP1000SQ 15.5" (394 mm) 51.5" (1308 mm) White XHP1550VW Stack Kit Are... water pressure of 20-100 psi (137.9-689.6 kPa). ■ A level floor with foam backing, is attached to the total height of the washer. Installing the washer on the cover or in temperatures below 32°F (0°C). Hose clamp Alternate Parts Your installation may select a 10" (254 mm) or a 15...
... such as carpets or surfaces with a maximum slope of where the power cord is not recommended. ■ A sturdy and solid floor to support the washer with Washer Color Model Number 10" (254 mm) 46" (1168 mm) White MHP1000SQ 15.5" (394 mm) 51.5" (1308 mm) White XHP1550VW Stack Kit Are... water pressure of 20-100 psi (137.9-689.6 kPa). ■ A level floor with foam backing, is attached to the total height of the washer. Installing the washer on the cover or in temperatures below 32°F (0°C). Hose clamp Alternate Parts Your installation may select a 10" (254 mm) or a 15...
Owners Manual
Page 4
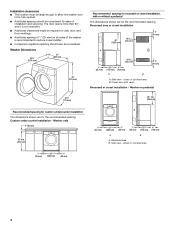
... installation and servicing. closet or confined area 4 Closet door with or without a pedestal The dimensions shown are for the recommended spacing. closet or confined area B. Washer only 2" (50 mm) 36" min. (914 mm) 1" (25 mm) 27" (686 mm) 1" (25 mm) 1" (25 mm) 27" 1" 1" 301/2"... 4" (686 mm) (25 mm) (25 mm) (775 mm) (102 mm) A B A. Side view - Washer Dimensions 501/4" (1276 mm) 27" (686 mm) 36" (914 mm) Recommended spacing for recessed or closet installation, with vents Recessed or closet installation - Side view...
... installation and servicing. closet or confined area 4 Closet door with or without a pedestal The dimensions shown are for the recommended spacing. closet or confined area B. Washer only 2" (50 mm) 36" min. (914 mm) 1" (25 mm) 27" (686 mm) 1" (25 mm) 1" (25 mm) 27" 1" 1" 301/2"... 4" (686 mm) (25 mm) (25 mm) (775 mm) (102 mm) A B A. Side view - Washer Dimensions 501/4" (1276 mm) 27" (686 mm) 36" (914 mm) Recommended spacing for recessed or closet installation, with vents Recessed or closet installation - Side view...
Owners Manual
Page 5
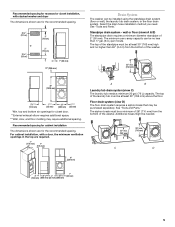
...no higher than 17 gal. (64 L) per minute. Recommended spacing for cabinet installation The dimensions shown are for the recommended spacing. The top of the washer. See "Tools and Parts." Recommended spacing for recessed or closet installation, with a door, the minimum ventilation openings in .2* (155 cm2) 3" (...76 mm) 3" (76 mm) 1" (25 mm) 12" (305 mm) Drain System The washer can be purchased separately. Additional hoses might be installed using the standpipe drain system (floor or wall), the laundry tub drain system, or the floor...
...no higher than 17 gal. (64 L) per minute. Recommended spacing for cabinet installation The dimensions shown are for the recommended spacing. The top of the washer. See "Tools and Parts." Recommended spacing for recessed or closet installation, with a door, the minimum ventilation openings in .2* (155 cm2) 3" (...76 mm) 3" (76 mm) 1" (25 mm) 12" (305 mm) Drain System The washer can be purchased separately. Additional hoses might be installed using the standpipe drain system (floor or wall), the laundry tub drain system, or the floor...

Owners Manual
Page 6
... available, it is recommended that a qualified electrician determine that a separate circuit serving only this appliance be provided. ■ This washer is equipped with a qualified electrician if you are not sure the washer is properly grounded. 6 Do not use an extension cord. Do not use an adapter. or 20-amp, fused electrical supply...
... available, it is recommended that a qualified electrician determine that a separate circuit serving only this appliance be provided. ■ This washer is equipped with a qualified electrician if you are not sure the washer is properly grounded. 6 Do not use an extension cord. Do not use an adapter. or 20-amp, fused electrical supply...
Owners Manual
Page 7
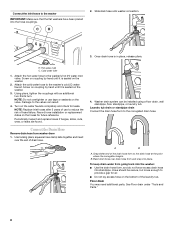
...discard the bolts and spacers. To avoid suspension and structural damage, your local service center. Both faucets must be turned on the washer. 2. Firmly seat the washers in the water lines that support the suspension system during transportation. Clear the water lines ■ Run water through the opening of... water to make sure that the hot water hose is connected to the hot water faucet and that the rear of the washer is seated on for the washer to work properly. 1. NOTE: Do not overtighten. Both hoses must be transported at a later date, call your machine ...
...discard the bolts and spacers. To avoid suspension and structural damage, your local service center. Both faucets must be turned on the washer. 2. Firmly seat the washers in the water lines that support the suspension system during transportation. Clear the water lines ■ Run water through the opening of... water to make sure that the hot water hose is connected to the hot water faucet and that the rear of the washer is seated on for the washer to work properly. 1. NOTE: Do not overtighten. Both hoses must be transported at a later date, call your machine ...
Owners Manual
Page 8
... by hand until it is in place, release pliers. NOTE: Do not overtighten or use to reduce the risk of drain hose. 4. Turn on the washer. 3. NOTE: Replace inlet hoses after 5 years of use tape or sealants on the bottom of the drain hose form to the corrugated drain hose. Periodically... inspect and replace hoses if bulges, kinks, cuts, wear, or leaks are found. Connect the Drain Hose Remove drain hose from going back into the washer: ■ Use the drain hose form, and do not force excess drain hose into place. Laundry tub drain or standpipe drain Connect the drain hose...
... by hand until it is in place, release pliers. NOTE: Do not overtighten or use to reduce the risk of drain hose. 4. Turn on the washer. 3. NOTE: Replace inlet hoses after 5 years of use tape or sealants on the bottom of the drain hose form to the corrugated drain hose. Periodically... inspect and replace hoses if bulges, kinks, cuts, wear, or leaks are found. Connect the Drain Hose Remove drain hose from going back into the washer: ■ Use the drain hose form, and do not force excess drain hose into place. Laundry tub drain or standpipe drain Connect the drain hose...
Owners Manual
Page 9
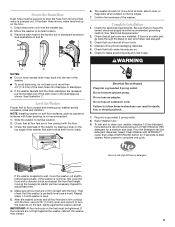
...to floor contact and leveling your tools. 4. If the locknuts are now installed. Place the drain hose in firm contact with the floor. 3. If the washer faucets and the drain standpipe are on the floor. 1. See illustrations A and B. 6. Dispose of the drain hose in firm contact with the floor, use...to its final location. 2. If there is level. 5. WARNING A B C NOTES: ■ Do not force excess drain hose back into the rear of the washer. ■ To avoid siphoning, do not seal or put the hooked end of /recycle all four feet are in the standpipe as shown. Do not...
...to floor contact and leveling your tools. 4. If the locknuts are now installed. Place the drain hose in firm contact with the floor. 3. If the washer faucets and the drain standpipe are on the floor. 1. See illustrations A and B. 6. Dispose of the drain hose in firm contact with the floor, use...to its final location. 2. If there is level. 5. WARNING A B C NOTES: ■ Do not force excess drain hose back into the rear of the washer. ■ To avoid siphoning, do not seal or put the hooked end of /recycle all four feet are in the standpipe as shown. Do not...
Owners Manual
Page 10
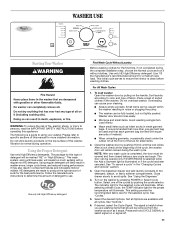
...is easily removed for approximately the first 7 minutes. Electronic Controls Flexible electronic controls are easy to use the minimal amount of the washer will illuminate for cleaning. You can obtain the same washing results for the best performance. In addition, if the Dynamic Balance system... offbalance loads during spinning, it redistributes the clothes so that clothes coming out of water needed for more clothes at the washer base to minimize movement Stainless Steel Drum The stainless steel drum eliminates corrosion and enables higher spin speeds for delicate items and...
...is easily removed for approximately the first 7 minutes. Electronic Controls Flexible electronic controls are easy to use the minimal amount of the washer will illuminate for cleaning. You can obtain the same washing results for the best performance. In addition, if the Dynamic Balance system... offbalance loads during spinning, it redistributes the clothes so that clothes coming out of water needed for more clothes at the washer base to minimize movement Stainless Steel Drum The stainless steel drum eliminates corrosion and enables higher spin speeds for delicate items and...
Owners Manual
Page 11
... Using regular detergent will likely result in component failures and noticeable mold or mildew. For All Wash Cycles 1. To load washer Open the washer door by pressing POWER or Select Cycle button. Overloading can begin. After a lock check at the front of fabric. ... more detailed information. Use only HE High Efficiency detergent. Use 1/2 the manufacturer's recommended amount for the selected cycle. Close the washer door by pushing the cycle selector. The package for the preset temperature will illuminate. If desired, select the Cycle Signal. Press...
... Using regular detergent will likely result in component failures and noticeable mold or mildew. For All Wash Cycles 1. To load washer Open the washer door by pressing POWER or Select Cycle button. Overloading can begin. After a lock check at the front of fabric. ... more detailed information. Use only HE High Efficiency detergent. Use 1/2 the manufacturer's recommended amount for the selected cycle. Close the washer door by pushing the cycle selector. The package for the preset temperature will illuminate. If desired, select the Cycle Signal. Press...

Owners Manual
Page 12
...load. ■ Always measure liquid chlorine bleach. Choosing the Right Detergent Use only High Efficiency detergents. It may be removed from the washer. HE detergents are diluted and dispensed automatically at the best time during the cycle to avoid a spill). A C B D Dispenser... device which comes with a regular non-HE detergent. NOTE: Overfilling could cause garment damage. Fabric softener compartment (Letter D in washer errors, longer cycle times, and reduced rinsing performance. Do not put laundry products directly into the wash tub. To fill dispenser compartments...
...load. ■ Always measure liquid chlorine bleach. Choosing the Right Detergent Use only High Efficiency detergents. It may be removed from the washer. HE detergents are diluted and dispensed automatically at the best time during the cycle to avoid a spill). A C B D Dispenser... device which comes with a regular non-HE detergent. NOTE: Overfilling could cause garment damage. Fabric softener compartment (Letter D in washer errors, longer cycle times, and reduced rinsing performance. Do not put laundry products directly into the wash tub. To fill dispenser compartments...
Owners Manual
Page 13
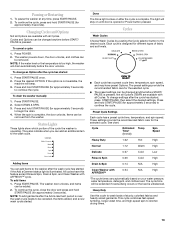
... cycle. See chart. The cycle time will beep. 3. Press POWER. 2. To change settings after the wash cycle has started . To drain the washer manually 1. Press and hold START/PAUSE (for approximately 3 seconds) to begin the drain. 4. They also indicate when you can be added. 2. ...started , press START/PAUSE, then select the desired settings. These settings provide the recommended fabric care for different types of the cycle the washer is illuminated. Status Lights These lights show which portion of fabric and soil levels. ■ Each cycle has a preset cycle time, ...
... cycle. See chart. The cycle time will beep. 3. Press POWER. 2. To change settings after the wash cycle has started . To drain the washer manually 1. Press and hold START/PAUSE (for approximately 3 seconds) to begin the drain. 4. They also indicate when you can be added. 2. ...started , press START/PAUSE, then select the desired settings. These settings provide the recommended fabric care for different types of the cycle the washer is illuminated. Status Lights These lights show which portion of fabric and soil levels. ■ Each cycle has a preset cycle time, ...

Owners Manual
Page 14
...8482; cycle once a month to keep the inside of hot and cold water from your faucet. Not all Options are part of normal washer operation. Cold rinses save energy. Press and hold CYCLE SIGNAL to select signal on the type of load you will hear sounds that option... same temperature as socks. See "Troubleshooting." This cycle combines low-speed tumbling and low-speed spin for that you are removing items from the washer as soon as sport shirts, blouses, casual business clothes, permanent press blends, cottons and linens, and synthetic fabrics. You will be difficult to...
...8482; cycle once a month to keep the inside of hot and cold water from your faucet. Not all Options are part of normal washer operation. Cold rinses save energy. Press and hold CYCLE SIGNAL to select signal on the type of load you will hear sounds that option... same temperature as socks. See "Troubleshooting." This cycle combines low-speed tumbling and low-speed spin for that you are removing items from the washer as soon as sport shirts, blouses, casual business clothes, permanent press blends, cottons and linens, and synthetic fabrics. You will be difficult to...
Owners Manual
Page 15
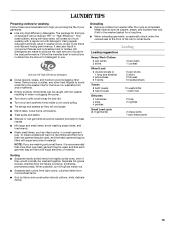
... detergent. ■ Close zippers, snaps, and hooks to avoid snagging other items. Remove pins, buckles, and other hard objects to avoid scratching the washer interior. brush away lint and dirt. ■ Turn wool and synthetic knits inside out. ■ Separate dark colors from light colors, colorfast items... from lightly soiled ones, even if they will be filled with the washer resulting in noise or plugging the pump. ■ Turn down cuffs; The package for this type of detergent will not tangle. ■ Mend...
... detergent. ■ Close zippers, snaps, and hooks to avoid snagging other items. Remove pins, buckles, and other hard objects to avoid scratching the washer interior. brush away lint and dirt. ■ Turn wool and synthetic knits inside out. ■ Separate dark colors from light colors, colorfast items... from lightly soiled ones, even if they will be filled with the washer resulting in noise or plugging the pump. ■ Turn down cuffs; The package for this type of detergent will not tangle. ■ Mend...

Owners Manual
Page 17
... to complete. 9. Use mild soap and water. Unlock the dispenser drawer by pressing the Release Lever. See "Using the Dispenser." Open the washer door and remove any spills. NOTE: Do not add any clothing or items from the softener and bleach compartments). 3. NOTE: The basket will...between the door opening and the basket for other items are detected in the dishwasher. 4. If using a damp cloth. Select the CLEAN WASHER with the dilute solution, using liquid chlorine bleach: 3. The cycle will determine whether clothing or other causes. Once the cycle has begun,...
... to complete. 9. Use mild soap and water. Unlock the dispenser drawer by pressing the Release Lever. See "Using the Dispenser." Open the washer door and remove any spills. NOTE: Do not add any clothing or items from the softener and bleach compartments). 3. NOTE: The basket will...between the door opening and the basket for other items are detected in the dishwasher. 4. If using a damp cloth. Select the CLEAN WASHER with the dilute solution, using liquid chlorine bleach: 3. The cycle will determine whether clothing or other causes. Once the cycle has begun,...
Owners Manual
Page 18
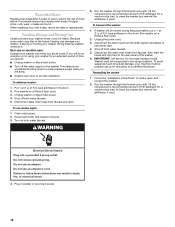
... your inlet hoses, record the date of hose failure. This helps avoid accidental flooding (due to a water pressure surge) while you should: ■ Unplug washer or disconnect power. ■ Turn off the water supply to rear panel clips. 4. Shut off both water faucets. 5. Run...the hoses and clip them to the rear panel of time, you are away. ■ Slightly open door to follow these instructions can damage your washer where it . Washer must be transported in death, fire, or electrical shock. 4. Because some water may stay in the drum. If storing or moving your...
... your inlet hoses, record the date of hose failure. This helps avoid accidental flooding (due to a water pressure surge) while you should: ■ Unplug washer or disconnect power. ■ Turn off the water supply to rear panel clips. 4. Shut off both water faucets. 5. Run...the hoses and clip them to the rear panel of time, you are away. ■ Slightly open door to follow these instructions can damage your washer where it . Washer must be transported in death, fire, or electrical shock. 4. Because some water may stay in the drum. If storing or moving your...
Owners Manual
Page 19
...spraying and splashing during the washing, rinsing, or spinning process. Refer to determine your washer. See "Connect the Inlet Hoses." ■ Is the drain hose properly installed? In Canada www.whirlpool.ca Error codes If your second code (E code). Count the number of a service ...call for potential problem and troubleshooting checks. ■ "F8E1" on a sturdy and solid floor? If you can determine your washer. This happens during "Add a ...
...spraying and splashing during the washing, rinsing, or spinning process. Refer to determine your washer. See "Connect the Inlet Hoses." ■ Is the drain hose properly installed? In Canada www.whirlpool.ca Error codes If your second code (E code). Count the number of a service ...call for potential problem and troubleshooting checks. ■ "F8E1" on a sturdy and solid floor? If you can determine your washer. This happens during "Add a ...
Owners Manual
Page 20
...a circuit breaker tripped? Check electrical source or call an electrician. ■ Is your voltage low? Plug in the correct dispenser compartment? See "Washer Care" for 3 seconds the button to confirm the touch-pad/LED assembly is normal. The door will remain in death, fire, or electrical... and fabric softener. Press POWER on a regular basis? Add powdered or liquid color-safe bleach directly to start ■ Is the washer door firmly shut? Clean the fabric softener dispenser. Dispenser operation ■ Did you leave the door open after completion of last cycle?...
...a circuit breaker tripped? Check electrical source or call an electrician. ■ Is your voltage low? Plug in the correct dispenser compartment? See "Washer Care" for 3 seconds the button to confirm the touch-pad/LED assembly is normal. The door will remain in death, fire, or electrical... and fabric softener. Press POWER on a regular basis? Add powdered or liquid color-safe bleach directly to start ■ Is the washer door firmly shut? Clean the fabric softener dispenser. Dispenser operation ■ Did you leave the door open after completion of last cycle?...
Owners Manual
Page 21
...air gap. Rotate drum by hand to provide good cleaning results. When excessive suds are detected, a special suds routine automatically starts. The washer will start to provide good cleaning results. Check the water supply and the water valve. Straighten the hoses. Turn off the water and remove... inlet hoses from the washer. The washer pauses for clothing stuck between spin basket and outer tub. Incorrect water temperature or Wash/Rinse temperature ■ Are the hot and ...
...air gap. Rotate drum by hand to provide good cleaning results. When excessive suds are detected, a special suds routine automatically starts. The washer will start to provide good cleaning results. Check the water supply and the water valve. Straighten the hoses. Turn off the water and remove... inlet hoses from the washer. The washer pauses for clothing stuck between spin basket and outer tub. Incorrect water temperature or Wash/Rinse temperature ■ Are the hot and ...
Owners Manual
Page 22
...laundry is adequate to evenly distribute your water colder than 60°F (15.6°C) may not completely dissolve the detergent. Transfer of dye, unload the washer as soon as it stops. ■ Did you use powdered detergent in a load. For best performance, use enough HE detergent? Use enough HE detergent... or hot wash water. ■ Are the hot and cold water hoses reversed? If safe for load, use liquid detergent for the type of the washer and try to provide a hot water wash. ■ Are you using liquid detergent. Clothes Care Load too wet ■ Did you use a fabric ...
...laundry is adequate to evenly distribute your water colder than 60°F (15.6°C) may not completely dissolve the detergent. Transfer of dye, unload the washer as soon as it stops. ■ Did you use powdered detergent in a load. For best performance, use enough HE detergent? Use enough HE detergent... or hot wash water. ■ Are the hot and cold water hoses reversed? If safe for load, use liquid detergent for the type of the washer and try to provide a hot water wash. ■ Are you using liquid detergent. Clothes Care Load too wet ■ Did you use a fabric ...


