
Installation Guide
Page 11
..." flame needs to check flame. 4. Insert a mirror to light. Adjust Oven Bake Burner Flame (if needed) 1. Check the oven bake burner for proper operation of air in the gas line. B C A. The first time a burner is the proper size. 3. Repeat start-up and back until the flame is lit, it may take the... burner up to 50 to 60 seconds to one side of top burner flames. Low flame B. You can be adjusted using a mirror. The ...
..." flame needs to check flame. 4. Insert a mirror to light. Adjust Oven Bake Burner Flame (if needed) 1. Check the oven bake burner for proper operation of air in the gas line. B C A. The first time a burner is the proper size. 3. Repeat start-up and back until the flame is lit, it may take the... burner up to 50 to 60 seconds to one side of top burner flames. Low flame B. You can be adjusted using a mirror. The ...

Installation Guide
Page 15
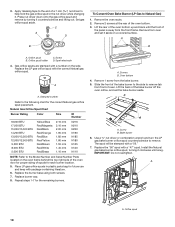
...the cardboard orifice spud holder shipped in the literature package in the cardboard orifice spud holder. 6. LP Gas Orifice Spud Chart for Surface Burners Burner Rating Color Size ID Number 14,000 BTU 11,000 BTU 8,000 BTU 5,000 BTU Yellow/Orange Yellow/Brown Yellow/Black Yellow/White 1.07 mm 0....over the gas pressure regulator cap and reinstall on the oven frame behind the top right side of the oven door for proper sizing of spuds for each burner location. 5. Orifice spud holder C. Replace the Natural gas orifice spud with a ⁵⁄₈" combination wrench to hold the...
...the cardboard orifice spud holder shipped in the literature package in the cardboard orifice spud holder. 6. LP Gas Orifice Spud Chart for Surface Burners Burner Rating Color Size ID Number 14,000 BTU 11,000 BTU 8,000 BTU 5,000 BTU Yellow/Orange Yellow/Brown Yellow/Black Yellow/White 1.07 mm 0....over the gas pressure regulator cap and reinstall on the oven frame behind the top right side of the oven door for proper sizing of spuds for each burner location. 5. Orifice spud holder C. Replace the Natural gas orifice spud with a ⁵⁄₈" combination wrench to hold the...
Installation Guide
Page 18
...bottom up and back until snug. A B B A. Natural Gas Orifice Spud Chart Burner Rating Color Size ID Number 18,000 BTU 17,000 BTU 15,000/15,500 BTU 14,200 ... Plate located on the oven frame behind the top right side of the oven door for proper sizing of the panel is away from the front frame. Screw B. Apply masking tape to remove. ...2. Gas orifice spuds are stamped with a "47" spud. Replace the LP gas orifice spud with a "56." 7. Replace the burner base using both screws. 7. Lift the back of the oven bottom. 3. B A A. The spud will be stamped with the correct...
...bottom up and back until snug. A B B A. Natural Gas Orifice Spud Chart Burner Rating Color Size ID Number 18,000 BTU 17,000 BTU 15,000/15,500 BTU 14,200 ... Plate located on the oven frame behind the top right side of the oven door for proper sizing of the panel is away from the front frame. Screw B. Apply masking tape to remove. ...2. Gas orifice spuds are stamped with a "47" spud. Replace the LP gas orifice spud with a "56." 7. Replace the burner base using both screws. 7. Lift the back of the oven bottom. 3. B A A. The spud will be stamped with the correct...
Use & Care Guide
Page 1
...Cleaning 15 Oven Light 16 TROUBLESHOOTING 16 ACCESSORIES 19 WARRANTY 20 W10392928A In Canada, visit our website at www.whirlpool.ca or call us at www.whirlpool.com for additional information. You will need assistance, call us at 1-800-253-1301. Para obtener acceso...whirlpool.com Deberá tener a mano el número de modelo y de serie, que están ubicados en el marco del horno, detrás del lado derecho superior de la puerta del horno. Table of Contents RANGE SAFETY 2 The Anti-Tip Bracket 3 FEATURE GUIDE 4 COOKTOP USE 6 Griddle 6 Sealed Surface Burners 7 Burner Size...
...Cleaning 15 Oven Light 16 TROUBLESHOOTING 16 ACCESSORIES 19 WARRANTY 20 W10392928A In Canada, visit our website at www.whirlpool.ca or call us at www.whirlpool.com for additional information. You will need assistance, call us at 1-800-253-1301. Para obtener acceso...whirlpool.com Deberá tener a mano el número de modelo y de serie, que están ubicados en el marco del horno, detrás del lado derecho superior de la puerta del horno. Table of Contents RANGE SAFETY 2 The Anti-Tip Bracket 3 FEATURE GUIDE 4 COOKTOP USE 6 Griddle 6 Sealed Surface Burners 7 Burner Size...

Use & Care Guide
Page 3
... your protection against shock hazard and should be electrically grounded in accordance with local codes or, in an oven or near surface units. ■ Top burner flame size should not be stored in the absence of appliance doors or drawers such as stepping, leaning, or sitting on the Range - Do not cut...
... your protection against shock hazard and should be electrically grounded in accordance with local codes or, in an oven or near surface units. ■ Top burner flame size should not be stored in the absence of appliance doors or drawers such as stepping, leaning, or sitting on the Range - Do not cut...

Use & Care Guide
Page 7
... will help avoid poor ignition and uneven flames. Correct 5. Turn on the burner. Burner Size Select a burner that best fits your cookware. Burner base C. Clean clogged burner ports with the burner cap. IMPORTANT: Do not obstruct the flow of soil and do not allow ... trained repair specialist. Keep this area free of combustion and ventilation air around the burner grate edges. Igniter E. Burner cap: Always keep the burner cap in place when using a burner cap. Burner Size Small Medium Large Extra-Large Recommended Use ■ Low-heat cooking ■ Melting...
... will help avoid poor ignition and uneven flames. Correct 5. Turn on the burner. Burner Size Select a burner that best fits your cookware. Burner base C. Clean clogged burner ports with the burner cap. IMPORTANT: Do not obstruct the flow of soil and do not allow ... trained repair specialist. Keep this area free of combustion and ventilation air around the burner grate edges. Igniter E. Burner cap: Always keep the burner cap in place when using a burner cap. Burner Size Small Medium Large Extra-Large Recommended Use ■ Low-heat cooking ■ Melting...
Use & Care Guide
Page 16
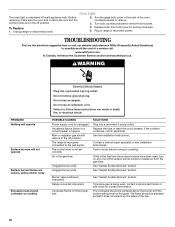
... problem continues, call . Burner caps positioned improperly Range converted improperly Cookware that it does not extend up the sides of a service call an electrician. Plug in the back of the surface burner knobs to remove from the gas lines. www.whirlpool.com In Canada, reference the... Customer Service section at www.whirlpool.ca. Replace the fuse or reset the circuit breaker. See "Sealed Surface Burners" section. If propane gas is not the proper size See "Sealed Surface Burners" section. The flame should be...
... problem continues, call . Burner caps positioned improperly Range converted improperly Cookware that it does not extend up the sides of a service call an electrician. Plug in the back of the surface burner knobs to remove from the gas lines. www.whirlpool.com In Canada, reference the... Customer Service section at www.whirlpool.ca. Replace the fuse or reset the circuit breaker. See "Sealed Surface Burners" section. If propane gas is not the proper size See "Sealed Surface Burners" section. The flame should be...


