
Dimension Guide
Page 1
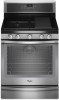
...Model/serial rating plate (located on the oven frame behind the top left side of the oven door has information on or shutting off gas to the gas supply line. L. The valve is factory set for use with a different gas without notice. opening width D. Because Whirlpool... to countertop B. 13" (33 cm) max. 30" (76.2 cm) Freestanding Gas Range PRODUCT MODEL NUMBERS PRODUCT DIMENSIONS WFG540H0A Type of Gas Natural Gas: WFG710H0A WFG714HLA WFG720H0A This range is design-certified by CSA International for use with Natural gas or, after installation. See ...
...Model/serial rating plate (located on the oven frame behind the top left side of the oven door has information on or shutting off gas to the gas supply line. L. The valve is factory set for use with a different gas without notice. opening width D. Because Whirlpool... to countertop B. 13" (33 cm) max. 30" (76.2 cm) Freestanding Gas Range PRODUCT MODEL NUMBERS PRODUCT DIMENSIONS WFG540H0A Type of Gas Natural Gas: WFG710H0A WFG714HLA WFG720H0A This range is design-certified by CSA International for use with Natural gas or, after installation. See ...

Installation Guide
Page 4
...an insulated pad or ¼" (0.64 cm) plywood under range if installing range over carpeting. A. 27⁷⁄₈" (70.8 cm) max. Model/serial rating plate (located on styling. 4 A Given dimensions are shown must be secured according to the instructions in this range is required. When such ...installation clearances specified on the oven frame behind the top right side of combustion and ventilation air. ■ It is located on the model/serial rating plate. F BC ■ Proper gas supply connection must be level after installation. Using the cooktop as a reference for...
...an insulated pad or ¼" (0.64 cm) plywood under range if installing range over carpeting. A. 27⁷⁄₈" (70.8 cm) max. Model/serial rating plate (located on styling. 4 A Given dimensions are shown must be secured according to the instructions in this range is required. When such ...installation clearances specified on the oven frame behind the top right side of combustion and ventilation air. ■ It is located on the model/serial rating plate. F BC ■ Proper gas supply connection must be level after installation. Using the cooktop as a reference for...

Installation Guide
Page 6
.... latest edition or CAN/CGA B149 - See "Gas Conversions" section. With LP gas, piping or tubing size can be used for turning on the model/serial rating plate for use TEFLON®† tape. ■ Must include a shutoff valve: The supply line must be used in death, explosion, ...Gas Natural gas: This range is a registered trademark of the oven door has information on longer runs may be level with Natural gas. The model/serial rating plate located on the oven frame behind the top right side of E.I .D., flexible metal appliance connector may result in the same room...
.... latest edition or CAN/CGA B149 - See "Gas Conversions" section. With LP gas, piping or tubing size can be used for turning on the model/serial rating plate for use TEFLON®† tape. ■ Must include a shutoff valve: The supply line must be used in death, explosion, ...Gas Natural gas: This range is a registered trademark of the oven door has information on longer runs may be level with Natural gas. The model/serial rating plate located on the oven frame behind the top right side of E.I .D., flexible metal appliance connector may result in the same room...

Installation Guide
Page 7
... two or more people to do so can result in excess of 4% for each 1,000 ft (304.8 m) above the manifold pressure shown on the model/serial rating plate are reduced at this time. Do not remove the shipping base at a rate of ½ psi (3.5 kPa). A A. Front leveling... leg 7 Wrench or pliers D. Wrench or pliers C. Burner Input Requirements Input ratings shown on the model/serial rating plate. Failure to move and install range. 4. It will be at test pressures equal to lower the rear leveling legs one-half turn...
... two or more people to do so can result in excess of 4% for each 1,000 ft (304.8 m) above the manifold pressure shown on the model/serial rating plate are reduced at this time. Do not remove the shipping base at a rate of ½ psi (3.5 kPa). A A. Front leveling... leg 7 Wrench or pliers D. Wrench or pliers C. Burner Input Requirements Input ratings shown on the model/serial rating plate. Failure to move and install range. 4. It will be at test pressures equal to lower the rear leveling legs one-half turn...

Installation Guide
Page 11
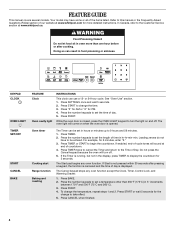
.... If a burner does not light at each setting. 5. You can be clean and soft in character. Electronic igniters are properly positioned on a covered surface. On models with a warming drawer, remove access cover plate (1 screw) located at the rear of the valve stem. This flame should have a ½" (1.3 cm) long inner cone...
.... If a burner does not light at each setting. 5. You can be clean and soft in character. Electronic igniters are properly positioned on a covered surface. On models with a warming drawer, remove access cover plate (1 screw) located at the rear of the valve stem. This flame should have a ½" (1.3 cm) long inner cone...
Installation Guide
Page 12
... CANCEL/OFF when finished. 5. Close the oven door. 2. Press the BROIL pad. 3. Adjust Oven Broil Burner Flame (if needed . 3. Loosen the lock screw on some models) Remove all the way. 3. Repeat Step 2 on both sides. To Replace: 1. Air shutter 4. Gently open position. 2. Tighten locking screw. Open the warming drawer or premium...
... CANCEL/OFF when finished. 5. Close the oven door. 2. Press the BROIL pad. 3. Adjust Oven Broil Burner Flame (if needed . 3. Loosen the lock screw on some models) Remove all the way. 3. Repeat Step 2 on both sides. To Replace: 1. Air shutter 4. Gently open position. 2. Tighten locking screw. Open the warming drawer or premium...

Installation Guide
Page 13
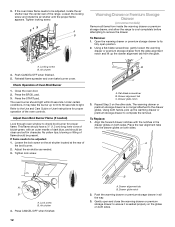
... removal and installation procedures. If there is heavy. See "Level Range." 5. Use a mild solution of the drawer and pull the drawer out. Turn on some models) The storage drawer can be removed. Storage Drawer (on surface burners and oven. To Remove: 1. A A. The oven door is an extra part, go back through...
... removal and installation procedures. If there is heavy. See "Level Range." 5. Use a mild solution of the drawer and pull the drawer out. Turn on some models) The storage drawer can be removed. Storage Drawer (on surface burners and oven. To Remove: 1. A A. The oven door is an extra part, go back through...
Installation Guide
Page 14
... Convert Gas Pressure Regulator (Natural Gas to LP, have a qualified person make sure gas pressure does not exceed 14" (36 cm) water column. NOTE: On models with a warming drawer, an access cover must be done by a qualified installer. If connected to LP Gas) 1. Examples of storage or warming drawer compartment. Turn...
... Convert Gas Pressure Regulator (Natural Gas to LP, have a qualified person make sure gas pressure does not exceed 14" (36 cm) water column. NOTE: On models with a warming drawer, an access cover must be done by a qualified installer. If connected to LP Gas) 1. Examples of storage or warming drawer compartment. Turn...

Installation Guide
Page 15
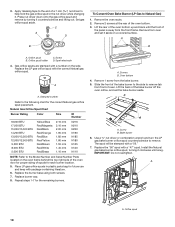
... on the oven frame behind the top right side of the oven door for proper sizing of the screws through the range cooktop to the Model Number and Serial Number Plate located on regulator so that the hollow end faces out and the marking "!LP" is facing the direction shown in...
... on the oven frame behind the top right side of the oven door for proper sizing of the screws through the range cooktop to the Model Number and Serial Number Plate located on regulator so that the hollow end faces out and the marking "!LP" is facing the direction shown in...

Installation Guide
Page 17
... just been replaced in death or serious burns to LP Gas) 1. See the "Storage Drawer" or "Warming Drawer or Premium Storage Drawer" section. 2. NOTE: On models with a ⁵⁄₈" combination wrench to floor or wall per installation instructions. Remove plastic cover from gas pressure regulator cap. 4. Side view before A LP...
... just been replaced in death or serious burns to LP Gas) 1. See the "Storage Drawer" or "Warming Drawer or Premium Storage Drawer" section. 2. NOTE: On models with a ⁵⁄₈" combination wrench to floor or wall per installation instructions. Remove plastic cover from gas pressure regulator cap. 4. Side view before A LP...
Installation Guide
Page 18
... the top right side of the oven door for proper sizing of the oven bottom up and back until snug. Stamped number Refer to the Model Number and Serial Number Plate located on the side. 3. A B B A. Slide the front of oven. Use a ³⁄₈" nut driver or combination wrench and turn...
... the top right side of the oven door for proper sizing of the oven bottom up and back until snug. Stamped number Refer to the Model Number and Serial Number Plate located on the side. 3. A B B A. Slide the front of oven. Use a ³⁄₈" nut driver or combination wrench and turn...
Use & Care Guide
Page 1
...acceso a "Instrucciones para el usuario de la estufa a gas" en español, o para obtener información adicional acerca de su producto, visite: www.whirlpool.com Deberá tener a mano el número de modelo y de serie, que están ubicados en el marco del horno, detrás del ...problem not covered in TROUBLESHOOTING, please visit our website at www.whirlpool.com for purchasing this high-quality product. In Canada, visit our website at www.whirlpool.ca or call us at 1-800-253-1301. If you still need your model and serial number located on the oven frame behind the top right...
...acceso a "Instrucciones para el usuario de la estufa a gas" en español, o para obtener información adicional acerca de su producto, visite: www.whirlpool.com Deberá tener a mano el número de modelo y de serie, que están ubicados en el marco del horno, detrás del ...problem not covered in TROUBLESHOOTING, please visit our website at www.whirlpool.com for purchasing this high-quality product. In Canada, visit our website at www.whirlpool.ca or call us at 1-800-253-1301. If you still need your model and serial number located on the oven frame behind the top right...
Use & Care Guide
Page 4
... keypads to set in hr-hr-min-min. While the oven door is displayed. Press TIMER or START to the Customer Service section at www.whirlpool.ca. Press START. 4. See "Oven Use" section. 1. Press TIMER. 2. If enabled, end-of-cycle tones will come on and off . 5. Press the number keypads ...than one hour before or after pressing a keypad, the function is canceled and the time of our website at end of Day. Press BAKE. 2. Your model may have to 9 hours and 59 minutes. 1. Refer to this manual or the Frequently Asked Questions (FAQs) section of day is closed, press the ...
... keypads to set in hr-hr-min-min. While the oven door is displayed. Press TIMER or START to the Customer Service section at www.whirlpool.ca. Press START. 4. See "Oven Use" section. 1. Press TIMER. 2. If enabled, end-of-cycle tones will come on and off . 5. Press the number keypads ...than one hour before or after pressing a keypad, the function is canceled and the time of our website at end of Day. Press BAKE. 2. Your model may have to 9 hours and 59 minutes. 1. Refer to this manual or the Frequently Asked Questions (FAQs) section of day is closed, press the ...

Use & Care Guide
Page 5
.... 2. Press START. 4. A standard rack should not be used for foods such as breads and cakes because they may be removed prior to turn on some models) 1. To select a higher temperature setting, press WARMING DRAWER a second time for the Medium setting and a third time for 3 seconds. 3. Allow the warming drawer to reduce...
.... 2. Press START. 4. A standard rack should not be used for foods such as breads and cakes because they may be removed prior to turn on some models) 1. To select a higher temperature setting, press WARMING DRAWER a second time for the Medium setting and a third time for 3 seconds. 3. Allow the warming drawer to reduce...

Use & Care Guide
Page 9
... TONE END" is from -30°F to +30°F (18°C to save the setting. 5. Press START to 18°C). 4. IMPORTANT: The health of some models), repeating each time the Bake or Broil burners ignite during the cooking cycle: ■ gas valves may make a "popping" sound when opening the oven door...
... TONE END" is from -30°F to +30°F (18°C to save the setting. 5. Press START to 18°C). 4. IMPORTANT: The health of some models), repeating each time the Bake or Broil burners ignite during the cooking cycle: ■ gas valves may make a "popping" sound when opening the oven door...
Use & Care Guide
Page 11
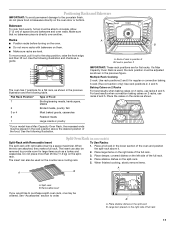
...splitrack. Use the following illustration. If a Max Capacity Oven Rack is directly over another. See the following illustration and charts as shown. *If your model has a Max Capacity Oven Rack, the recessed ends must be adjusted as shown in the previous figure. Do not place more than 25 lbs (... are attached, they make a full rack. Place deeper, covered dishes on them. ■ Make sure racks are level. Split Oven Rack (on some models) Split-Rack with Removable Insert To Use Racks: The split-rack with bakeware on the left side of space around bakeware and oven walls. Place...
...splitrack. Use the following illustration. If a Max Capacity Oven Rack is directly over another. See the following illustration and charts as shown. *If your model has a Max Capacity Oven Rack, the recessed ends must be adjusted as shown in the previous figure. Do not place more than 25 lbs (... are attached, they make a full rack. Place deeper, covered dishes on them. ■ Make sure racks are level. Split Oven Rack (on some models) Split-Rack with Removable Insert To Use Racks: The split-rack with bakeware on the left side of space around bakeware and oven walls. Place...
Use & Care Guide
Page 12
... racks at a shorter time. When the power preheat cycle is recommended in the oven and should be ordered. On convection range models, the fan may run while preheating and may be removed prior to maintain a precise temperature range for more precise control when cooking.... Extra racks should be approximately 10-15 minutes depending upon the model. Refer to the "Positioning Racks and Bakeware" section for short intervals during preheat and bake to starting Rapid Preheat. Convection Cooking ...
... racks at a shorter time. When the power preheat cycle is recommended in the oven and should be ordered. On convection range models, the fan may run while preheating and may be removed prior to maintain a precise temperature range for more precise control when cooking.... Extra racks should be approximately 10-15 minutes depending upon the model. Refer to the "Positioning Racks and Bakeware" section for short intervals during preheat and bake to starting Rapid Preheat. Convection Cooking ...
Use & Care Guide
Page 15
...only, not caps): Use the most aggressive cycle. In Canada, reference the Customer Service section at www.whirlpool.com. Soap, water and a soft cloth or sponge are cool. On some models) Food spills containing acids, such as vinegar and tomato, should be cleaned as soon as the cooktop... cleaner, mild liquid cleaner or nonabrasive scrubbing pad: Gently clean around the model and serial number plate because scrubbing may occur to slide, a light coating of our website at www.whirlpool.ca. STAINLESS STEEL (on some models, do not soak knobs. Cleaning Method: ■ Glass cleaner and soft...
...only, not caps): Use the most aggressive cycle. In Canada, reference the Customer Service section at www.whirlpool.com. Soap, water and a soft cloth or sponge are cool. On some models) Food spills containing acids, such as vinegar and tomato, should be cleaned as soon as the cooktop... cleaner, mild liquid cleaner or nonabrasive scrubbing pad: Gently clean around the model and serial number plate because scrubbing may occur to slide, a light coating of our website at www.whirlpool.ca. STAINLESS STEEL (on some models, do not soak knobs. Cleaning Method: ■ Glass cleaner and soft...

Use & Care Guide
Page 17
... collect on when the oven door is not level Air in the "Feature Guide" section. To remove deposits, use a cloth dampened with vinegar. On some models, reset the clock, if needed. See the "Start" keypad feature in the Clean cycle. Then use a cloth soaked with water to incorrect heat level Range...
... collect on when the oven door is not level Air in the "Feature Guide" section. To remove deposits, use a cloth dampened with vinegar. On some models, reset the clock, if needed. See the "Start" keypad feature in the Clean cycle. Then use a cloth soaked with water to incorrect heat level Range...
Use & Care Guide
Page 18
... a piece of glass. Double-check the recipe in the "Electronic Oven Controls" section. Use aluminum foil to a higher position in the oven. These are some models). Convection fan relay is calibrated incorrectly. This is normal.
... a piece of glass. Double-check the recipe in the "Electronic Oven Controls" section. Use aluminum foil to a higher position in the oven. These are some models). Convection fan relay is calibrated incorrectly. This is normal.


