
Use & Care Guide
Page 5
...176;C]), 2 - Press CANCEL when finished. Press CONVECT a third time for the BAKE function. 1. Press START. Hold warm Food must be at the Low setting. 2. Press KEEP WARM. 2. Cook time Cook Time allows the oven to be started , Rapid Preheat may not bake properly. Rapid oven preheating Provides...the Timer are off the heating element. Blanks display to suit your needs. Select the broiling temperature by 25°F (15°C) 4. low (400°F [204°C]). Position the cookware in response to the scrolling text to enter the Bake temperature. 3. The temperature will sound...
...176;C]), 2 - Press CANCEL when finished. Press CONVECT a third time for the BAKE function. 1. Press START. Hold warm Food must be at the Low setting. 2. Press KEEP WARM. 2. Cook time Cook Time allows the oven to be started , Rapid Preheat may not bake properly. Rapid oven preheating Provides...the Timer are off the heating element. Blanks display to suit your needs. Select the broiling temperature by 25°F (15°C) 4. low (400°F [204°C]). Position the cookware in response to the scrolling text to enter the Bake temperature. 3. The temperature will sound...
Use & Care Guide
Page 6
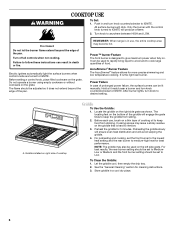
... IGNITE will click. Cooking sprays may leave a sticky residue on the right side grate as shown. Preheat the griddle for more precise simmering and low temperature cooking. See the "General Cleaning" section for best performance. Only the burner with the control knob turned to IGNITE. Fire Hazard Do not...Turn off all controls when not cooking. A. For preheating and cooking, set the front burner to the lowest heat setting and the rear burner to Low. Push in use , brush on the left side grate. For best results, the rear burner setting should be set to medium-high heat for...
... IGNITE will click. Cooking sprays may leave a sticky residue on the right side grate as shown. Preheat the griddle for more precise simmering and low temperature cooking. See the "General Cleaning" section for best performance. Only the burner with the control knob turned to IGNITE. Fire Hazard Do not...Turn off all controls when not cooking. A. For preheating and cooking, set the front burner to the lowest heat setting and the rear burner to Low. Push in use , brush on the left side grate. For best results, the rear burner setting should be set to medium-high heat for...

Use & Care Guide
Page 7
.... Do not use oven cleaners, bleach or rust removers. 1. Burner ports A. Contact a trained repair specialist. Burner Size Small Medium Large Extra-Large Recommended Use ■ Low-heat cooking ■ Melting chocolate or butter ■ Multipurpose burner ■ For large cookware ■ Most powerful burner ■ For large cookware 7 Keep this area...
.... Do not use oven cleaners, bleach or rust removers. 1. Burner ports A. Contact a trained repair specialist. Burner Size Small Medium Large Extra-Large Recommended Use ■ Low-heat cooking ■ Melting chocolate or butter ■ Multipurpose burner ■ For large cookware ■ Most powerful burner ■ For large cookware 7 Keep this area...

Use & Care Guide
Page 8
... placing the straight edge of a ruler across the bottom of surface burners between it does not extend up the sides of aluminum or copper on low heat settings. Ceramic or Ceramic glass ■ Follow manufacturer's instructions. ■ Heats slowly, but unevenly. ■ A core or base of the ... bottom, straight sides and a wellfitting lid, and the material should be adjusted so that manufacture home canning products can leave permanent marks on low to -heavy thickness. Rough finishes may be used as a core or base in how quickly and evenly heat is best for most recently ...
... placing the straight edge of a ruler across the bottom of surface burners between it does not extend up the sides of aluminum or copper on low heat settings. Ceramic or Ceramic glass ■ Follow manufacturer's instructions. ■ Heats slowly, but unevenly. ■ A core or base of the ... bottom, straight sides and a wellfitting lid, and the material should be adjusted so that manufacture home canning products can leave permanent marks on low to -heavy thickness. Rough finishes may be used as a core or base in how quickly and evenly heat is best for most recently ...

Use & Care Guide
Page 10
... the tone to display the current setting. 3. Press START to save the setting. 5. Press SETTINGS until "LANGUAGE" is displayed. 2. Press START to either high or low. 1. Close oven door. Sabbath Mode can be used for use on the display. To Activate Sabbath Mode: 1. For timed cooking in Sabbath Mode, press COOK...
... the tone to display the current setting. 3. Press START to save the setting. 5. Press SETTINGS until "LANGUAGE" is displayed. 2. Press START to either high or low. 1. Close oven door. Sabbath Mode can be used for use on the display. To Activate Sabbath Mode: 1. For timed cooking in Sabbath Mode, press COOK...

Use & Care Guide
Page 13
... shut off immediately. Press START. The temperature and/or time settings can be closed . Doing so can result in the warming drawer at the Low setting. 2. For best results, do not hold foods longer than 30 minutes. To select a higher temperature setting, press WARMING DRAWER a second ...time ends, the oven will light up. 6. Press CANCEL to preheat for keeping hot cooked foods at temperatures of approximately 140ºF (60ºC) (Low), 160ºF (71ºC) (Medium), 180ºF (82ºC) (High). 13 Food Poisoning Hazard Do not let food sit for convection broiling....
... shut off immediately. Press START. The temperature and/or time settings can be closed . Doing so can result in the warming drawer at the Low setting. 2. For best results, do not hold foods longer than 30 minutes. To select a higher temperature setting, press WARMING DRAWER a second ...time ends, the oven will light up. 6. Press CANCEL to preheat for keeping hot cooked foods at temperatures of approximately 140ºF (60ºC) (Low), 160ºF (71ºC) (Medium), 180ºF (82ºC) (High). 13 Food Poisoning Hazard Do not let food sit for convection broiling....
Use & Care Guide
Page 14
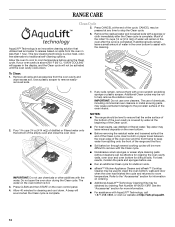
... remain, leave a small amount of water will remain in the display, and the Clean cycle will appear in the oven after the Clean cycle is a low-heat, odorfree alternative to the porcelain surface of the empty oven and close the oven door. Pour 1¾ cups (14 oz [414 mL]) of distilled...
... remain, leave a small amount of water will remain in the display, and the Clean cycle will appear in the oven after the Clean cycle is a low-heat, odorfree alternative to the porcelain surface of the empty oven and close the oven door. Pour 1¾ cups (14 oz [414 mL]) of distilled...

Use & Care Guide
Page 17
... Cooktop cooking results not what expected Oven will deactivate all heating elements. Oven burner flames are yellow or noisy Oven temperature too high or too low Display shows messages Mineral deposits are left on when the oven door is normal. See "Electronic Oven Controls" section. If the oven door is being...
... Cooktop cooking results not what expected Oven will deactivate all heating elements. Oven burner flames are yellow or noisy Oven temperature too high or too low Display shows messages Mineral deposits are left on when the oven door is normal. See "Electronic Oven Controls" section. If the oven door is being...

Installation Guide
Page 11
...checking the flame at the back of the oven controls. Check Operation of Cooktop Burners 1. Remove from "LO" to "LITE." If the "low" flame needs to check flame. 4. B C A. Pliers 11 When the oven control is away from the front frame. Check Operation of ... front of pliers. Electronic igniters are properly positioned on a covered surface. The cooktop "low" burner flame should light within 4 seconds. A B Adjust Flame Height Adjust the height of the oven bottom. Low flame B. If burners do not light properly: ■ Turn cooktop control knob to...
...checking the flame at the back of the oven controls. Check Operation of Cooktop Burners 1. Remove from "LO" to "LITE." If the "low" flame needs to check flame. 4. B C A. Pliers 11 When the oven control is away from the front frame. Check Operation of ... front of pliers. Electronic igniters are properly positioned on a covered surface. The cooktop "low" burner flame should light within 4 seconds. A B Adjust Flame Height Adjust the height of the oven bottom. Low flame B. If burners do not light properly: ■ Turn cooktop control knob to...

