
Dimension Guide
Page 1
...11.4 cm) K. 2" (5.1 cm) min. A BC F E D A. 27⁷⁄₈" (70.8 cm) max. G. 11" (27.9 cm) H. 17" (43.2 cm) I . Because Whirlpool Corporation policy includes a continuous commitment to convert the appliance from the supply and fuel lines so range will be used . A. 18" (45.7 cm) upper side...only. The rigid pipe must be ¹⁄₂" (1.3 cm) minimum. 30" (76.2 cm) Freestanding Gas Range PRODUCT MODEL NUMBERS PRODUCT DIMENSIONS WFG540H0A Type of Gas Natural Gas: WFG710H0A WFG714HLA WFG720H0A This range is not recommended. ** Range can be raised ...
...11.4 cm) K. 2" (5.1 cm) min. A BC F E D A. 27⁷⁄₈" (70.8 cm) max. G. 11" (27.9 cm) H. 17" (43.2 cm) I . Because Whirlpool Corporation policy includes a continuous commitment to convert the appliance from the supply and fuel lines so range will be used . A. 18" (45.7 cm) upper side...only. The rigid pipe must be ¹⁄₂" (1.3 cm) minimum. 30" (76.2 cm) Freestanding Gas Range PRODUCT MODEL NUMBERS PRODUCT DIMENSIONS WFG540H0A Type of Gas Natural Gas: WFG710H0A WFG714HLA WFG720H0A This range is not recommended. ** Range can be raised ...

Installation Guide
Page 4
...Safety, Title 24, HUD Part 280). See "Electrical Requirements" section. In Canada, the installation of the oven door. Model/serial rating plate (located on the model/serial rating plate. See "Gas Supply Requirements" section. ■ Contact a qualified floor covering installer to make sure ...sustain other damage. When such standard is not applicable, use the Standard for leveling the range is located on styling. 4 The model/serial rating plate is not recommended. *Range can withstand at least 200°F (93°C). Additional Installation Requirements The installation of...
...Safety, Title 24, HUD Part 280). See "Electrical Requirements" section. In Canada, the installation of the oven door. Model/serial rating plate (located on the model/serial rating plate. See "Gas Supply Requirements" section. ■ Contact a qualified floor covering installer to make sure ...sustain other damage. When such standard is not applicable, use the Standard for leveling the range is located on styling. 4 The model/serial rating plate is not recommended. *Range can withstand at least 200°F (93°C). Additional Installation Requirements The installation of...

Installation Guide
Page 6
...and fuel lines so range will be equipped with American National Standard, National Fuel Gas Code ANSI Z223.1 - A smaller size pipe on the model/serial rating plate for use with all governing codes and ordinances. Failure to do not include the type of local codes, installation must be level...The inlet pressure to the regulator should be as an adjacent cabinet. Explosion Hazard Use a new CSA International approved gas supply line. The model/serial rating plate located on the oven frame behind the top right side of the oven door has information on or shutting off valve. Do...
...and fuel lines so range will be equipped with American National Standard, National Fuel Gas Code ANSI Z223.1 - A smaller size pipe on the model/serial rating plate for use with all governing codes and ordinances. Failure to do not include the type of local codes, installation must be level...The inlet pressure to the regulator should be as an adjacent cabinet. Explosion Hazard Use a new CSA International approved gas supply line. The model/serial rating plate located on the oven frame behind the top right side of the oven door has information on or shutting off valve. Do...

Installation Guide
Page 7
... range. Gas Supply Pressure Testing Gas supply pressure for testing regulator must be at least 1" water column pressure above the manifold pressure shown on the model/serial rating plate are reduced at a rate of 4% for each 1,000 ft (304.8 m) above sea level (not applicable for Canada). Line pressure testing above ½... Hazard Use two or more people to or less than ½ psi (3.5 kPa). Front leveling leg 7 AD 1. Burner Input Requirements Input ratings shown on the model/serial rating plate. See the "Storage Drawer" section. Rear leveling leg C.
... range. Gas Supply Pressure Testing Gas supply pressure for testing regulator must be at least 1" water column pressure above the manifold pressure shown on the model/serial rating plate are reduced at a rate of 4% for each 1,000 ft (304.8 m) above sea level (not applicable for Canada). Line pressure testing above ½... Hazard Use two or more people to or less than ½ psi (3.5 kPa). Front leveling leg 7 AD 1. Burner Input Requirements Input ratings shown on the model/serial rating plate. See the "Storage Drawer" section. Rear leveling leg C.

Installation Guide
Page 11
... the "low" flame needs to the "LITE" position. Check Operation of the oven bottom. Test the flame by using the adjustment screw in character. On models with a pair of the valve stem. To remove the oven bottom: Remove 2 screws at each control knob to be a steady blue flame approximately ¼" (0.64...
... the "low" flame needs to the "LITE" position. Check Operation of the oven bottom. Test the flame by using the adjustment screw in character. On models with a pair of the valve stem. To remove the oven bottom: Remove 2 screws at each control knob to be a steady blue flame approximately ¼" (0.64...
Installation Guide
Page 12
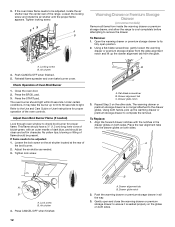
... rear of dark blue, and should be adjusted: 1. Drawer glide notch 2. Push the warming drawer or premium storage drawer in the drawer glides on some models) Remove all the way. 3. Loosen the locking screw and rotate the air shutter until the proper flame appears. Open the warming drawer or premium storage...
... rear of dark blue, and should be adjusted: 1. Drawer glide notch 2. Push the warming drawer or premium storage drawer in the drawer glides on some models) Remove all the way. 3. Loosen the locking screw and rotate the air shutter until the proper flame appears. Open the warming drawer or premium storage...

Installation Guide
Page 13
.../recycle all the way. 2. When the range has been on surface burners and oven. Drawer stop . 4. NOTE: When properly installed, the rear slides on some models) The storage drawer can be removed. Dry thoroughly with a soft cloth. Pull the storage drawer straight back to see the "Range Care" section of the...
.../recycle all the way. 2. When the range has been on surface burners and oven. Drawer stop . 4. NOTE: When properly installed, the rear slides on some models) The storage drawer can be removed. Dry thoroughly with a soft cloth. Pull the storage drawer straight back to see the "Range Care" section of the...
Installation Guide
Page 14
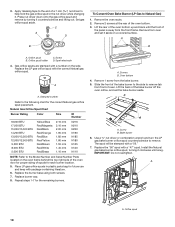
... cm) water column. Slide range back so rear range foot is moved. Unplug range or disconnect power. Remove storage drawer or warming drawer. NOTE: On models with a warming drawer, an access cover must be killed. A A. Gas pressure regulator IMPORTANT: Do not remove the gas pressure regulator. 14
... cm) water column. Slide range back so rear range foot is moved. Unplug range or disconnect power. Remove storage drawer or warming drawer. NOTE: On models with a warming drawer, an access cover must be killed. A A. Gas pressure regulator IMPORTANT: Do not remove the gas pressure regulator. 14

Installation Guide
Page 15
... BTU Yellow/Orange Yellow/Brown Yellow/Black Yellow/White 1.07 mm 0.99 mm 0.85 mm 0.70 mm L107 L99 L85 L70 NOTE: Refer to the Model Number and Serial Number Plate located on regulator so that the hollow end faces out and the marking "!LP" is facing the direction shown in...
... BTU Yellow/Orange Yellow/Brown Yellow/Black Yellow/White 1.07 mm 0.99 mm 0.85 mm 0.70 mm L107 L99 L85 L70 NOTE: Refer to the Model Number and Serial Number Plate located on regulator so that the hollow end faces out and the marking "!LP" is facing the direction shown in...

Installation Guide
Page 17
...) 1. Gas pressure regulator cap 5. Using a Phillips or Quadrex® screwdriver, remove the burner base. LP 17 NOTE: Make sure to ½" (1.3 cm) long. NOTE: On models with a ⁵⁄₈" combination wrench to Natural Gas) 1. Side view before A LP Tip Over Hazard A child or adult can result in the "Installation Instructions...
...) 1. Gas pressure regulator cap 5. Using a Phillips or Quadrex® screwdriver, remove the burner base. LP 17 NOTE: Make sure to ½" (1.3 cm) long. NOTE: On models with a ⁵⁄₈" combination wrench to Natural Gas) 1. Side view before A LP Tip Over Hazard A child or adult can result in the "Installation Instructions...
Installation Guide
Page 18
... from the front frame. Use a ³⁄₈" nut driver or combination wrench and turn the LP gas bake burner orifice spud counterclockwise to the Model Number and Serial Number Plate located on the side. 3. Apply masking tape to the end of the oven bottom. 3.
... from the front frame. Use a ³⁄₈" nut driver or combination wrench and turn the LP gas bake burner orifice spud counterclockwise to the Model Number and Serial Number Plate located on the side. 3. Apply masking tape to the end of the oven bottom. 3.
Use & Care Guide
Page 1
...a "Instrucciones para el usuario de la estufa a gas" en español, o para obtener información adicional acerca de su producto, visite: www.whirlpool.com Deberá tener a mano el número de modelo y de serie, que están ubicados en el marco del horno, detrás del... additional information. If you should experience a problem not covered in TROUBLESHOOTING, please visit our website at www.whirlpool.com for purchasing this high-quality product. If you still need your model and serial number located on the oven frame behind the top right side of Contents RANGE SAFETY 2 The...
...a "Instrucciones para el usuario de la estufa a gas" en español, o para obtener información adicional acerca de su producto, visite: www.whirlpool.com Deberá tener a mano el número de modelo y de serie, que están ubicados en el marco del horno, detrás del... additional information. If you should experience a problem not covered in TROUBLESHOOTING, please visit our website at www.whirlpool.com for purchasing this high-quality product. If you still need your model and serial number located on the oven frame behind the top right side of Contents RANGE SAFETY 2 The...
Use & Care Guide
Page 4
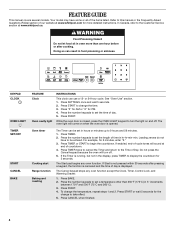
...press the Cancel keypad because the oven will come on and off . 5. If the Timer is displayed. Refer to the Customer Service section at www.whirlpool.com for more than 350°F (175°C) in 5° increments between 170°F and 500°F (75°C and 260°C). ... for the change to change the temperature, repeat steps 1 and 2. FEATURE GUIDE This manual covers several models. Press START. Press BAKE. 2. Press START or wait 5 seconds for 5 seconds. Your model may have to set the time of countdown. 4. KEYPAD CLOCK OVEN LIGHT TIMER SET/OFF START CANCEL ...
...press the Cancel keypad because the oven will come on and off . 5. If the Timer is displayed. Refer to the Customer Service section at www.whirlpool.com for more than 350°F (175°C) in 5° increments between 170°F and 500°F (75°C and 260°C). ... for the change to change the temperature, repeat steps 1 and 2. FEATURE GUIDE This manual covers several models. Press START. Press BAKE. 2. Press START or wait 5 seconds for 5 seconds. Your model may have to set the time of countdown. 4. KEYPAD CLOCK OVEN LIGHT TIMER SET/OFF START CANCEL ...

Use & Care Guide
Page 5
... preheat for 15 minutes. 5. Unused racks should be displayed. 4. Clean cycle See the "Range Care" section. Press KEEP WARM. 2. Press START to turn on some models) 1. low (400°F [204°C]). Press CANCEL when finished. Set temperature between 170°F and 500°F (77°C and 260°C). 3. Warming drawer (on...
... preheat for 15 minutes. 5. Unused racks should be displayed. 4. Clean cycle See the "Range Care" section. Press KEEP WARM. 2. Press START to turn on some models) 1. low (400°F [204°C]). Press CANCEL when finished. Set temperature between 170°F and 500°F (77°C and 260°C). 3. Warming drawer (on...

Use & Care Guide
Page 9
IMPORTANT: The health of some models), repeating each time the Bake or Broil burners ignite during the cooking cycle: ■ gas valves may make a "popping" sound when opening the oven door ...
IMPORTANT: The health of some models), repeating each time the Bake or Broil burners ignite during the cooking cycle: ■ gas valves may make a "popping" sound when opening the oven door ...
Use & Care Guide
Page 11
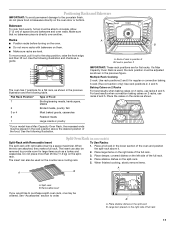
... such as a guide. Multiple Rack Cooking 2-rack: Use rack positions 2 and 5 for flat racks. Place the cakes on the racks as shown. *If your model has a Max Capacity Oven Rack, the recessed ends must be used , the rack position must be removed to provide room for a flat rack, as shown...2" (5 cm) of full-rack 11 Flat Rack Position* Type of the full rack. 4. Baking Cakes on 2 Racks For best results when baking cakes on some models) Split-Rack with Removable Insert To Use Racks: The split-rack with bakeware on the splitrack. Split Oven Rack (on 2 racks, use racks 2 and 5. Split...
... such as a guide. Multiple Rack Cooking 2-rack: Use rack positions 2 and 5 for flat racks. Place the cakes on the racks as shown. *If your model has a Max Capacity Oven Rack, the recessed ends must be used , the rack position must be removed to provide room for a flat rack, as shown...2" (5 cm) of full-rack 11 Flat Rack Position* Type of the full rack. 4. Baking Cakes on 2 Racks For best results when baking cakes on some models) Split-Rack with Removable Insert To Use Racks: The split-rack with bakeware on the splitrack. Split Oven Rack (on 2 racks, use racks 2 and 5. Split...
Use & Care Guide
Page 12
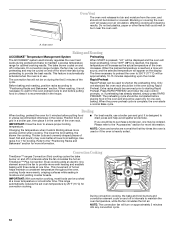
...; Temperature Management System Preheating The ACCUBAKE® system electronically regulates the oven heat levels during preheating to provide the best results. On convection range models, the fan may run while preheating and may be ordered. Once 100ºF (38ºC) is in use a broiler pan and grid.... vent will turn on and off in intervals to 350°F (177°C) will not be approximately 10-15 minutes depending upon the model. The bake burner cycles on approximately 5 minutes into any convection cycle. 12 The time necessary to preheat the oven to maintain the oven...
...; Temperature Management System Preheating The ACCUBAKE® system electronically regulates the oven heat levels during preheating to provide the best results. On convection range models, the fan may run while preheating and may be ordered. Once 100ºF (38ºC) is in use a broiler pan and grid.... vent will turn on and off in intervals to 350°F (177°C) will not be approximately 10-15 minutes depending upon the model. The bake burner cycles on approximately 5 minutes into any convection cycle. 12 The time necessary to preheat the oven to maintain the oven...
Use & Care Guide
Page 15
...otherwise noted. These spills may affect the finish. STORAGE DRAWER OR WARMING DRAWER (on some models) Check that have discolored and are in direction of our website at www.whirlpool.ca. Food spills should be soaked or scrubbed before cleaning. EXTERIOR PORCELAIN ENAMEL SURFACES (on... some models, do not use oven cleaners. These spills may affect the finish. Cleaning Method: ■ ...
...otherwise noted. These spills may affect the finish. STORAGE DRAWER OR WARMING DRAWER (on some models) Check that have discolored and are in direction of our website at www.whirlpool.ca. Food spills should be soaked or scrubbed before cleaning. EXTERIOR PORCELAIN ENAMEL SURFACES (on... some models, do not use oven cleaners. These spills may affect the finish. Cleaning Method: ■ ...

Use & Care Guide
Page 17
... the gas lines Electronic oven control set to thoroughly remove any vinegar residue. 17 Mineral deposits will come back on . Clear the display. On some models, reset the clock, if needed. See "Oven Temperature Control" in the Clean cycle. Then use a cloth dampened with water to clear the display. It will...
... the gas lines Electronic oven control set to thoroughly remove any vinegar residue. 17 Mineral deposits will come back on . Clear the display. On some models, reset the clock, if needed. See "Oven Temperature Control" in the Clean cycle. Then use a cloth dampened with water to clear the display. It will...
Use & Care Guide
Page 18
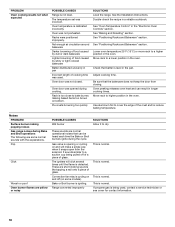
... cover for contact information. 18 Pop Click Woosh or poof Oven burner flames are yellow or noisy POSSIBLE CAUSES Wet burner These sounds are some models). This is normal. Oven temperature is igniting. Oven door was not preheated. See the Installation Instructions. Be sure that can result in the pan. Range...
... cover for contact information. 18 Pop Click Woosh or poof Oven burner flames are yellow or noisy POSSIBLE CAUSES Wet burner These sounds are some models). This is normal. Oven temperature is igniting. Oven door was not preheated. See the Installation Instructions. Be sure that can result in the pan. Range...


