
Dimension Guide
Page 1
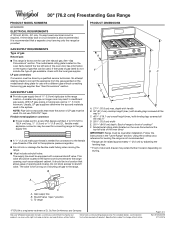
... not use with a different gas without consulting the serving gas supplier. Do not block access to change materials and specifications without notice. Model/serial rating plate (located on styling. A C A. Shutoff valve "open" position C. Dimensions are for connection to the range. GAS SUPPLY REQUIREMENTS Type of the oven door) IMPORTANT: Range must be used . The model/serial rating plate located on the oven frame behind the top left side of the oven door has information on or shutting off gas to...
... not use with a different gas without consulting the serving gas supplier. Do not block access to change materials and specifications without notice. Model/serial rating plate (located on styling. A C A. Shutoff valve "open" position C. Dimensions are for connection to the range. GAS SUPPLY REQUIREMENTS Type of the oven door) IMPORTANT: Range must be used . The model/serial rating plate located on the oven frame behind the top left side of the oven door has information on or shutting off gas to...
Dimension Guide
Page 2
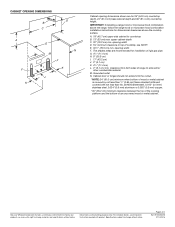
...) min. opening dimensions shown are for installation of range to change materials and specifications without notice. M. Page 2 of an uncovered wood or metal cabinet. Cabinet door or hinges should not extend into the cutout. * NOTE: 24" (61.0 cm) minimum when bottom of wood or metal cabinet is covered by not less than 1/4" (0.64 cm) flame retardant millboard covered with product. Dimensions are...
...) min. opening dimensions shown are for installation of range to change materials and specifications without notice. M. Page 2 of an uncovered wood or metal cabinet. Cabinet door or hinges should not extend into the cutout. * NOTE: 24" (61.0 cm) minimum when bottom of wood or metal cabinet is covered by not less than 1/4" (0.64 cm) flame retardant millboard covered with product. Dimensions are...
Installation Instructions
Page 3
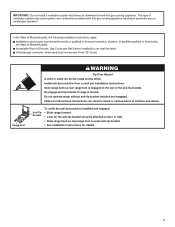
... listed. Do not operate range without anti-tip bracket installed and engaged. This type of Massachusetts. Re-engage anti-tip bracket if range is under anti-tip bracket. • See installation instructions for use shall be performed by a qualified or licensed contractor, plumber, or gasfitter qualified or licensed by the State of ventilation system may cause ignition and combustion problems with this gas cooking appliance. Acceptable Shut-off Devices: Gas Cocks and Ball Valves installed...
... listed. Do not operate range without anti-tip bracket installed and engaged. This type of Massachusetts. Re-engage anti-tip bracket if range is under anti-tip bracket. • See installation instructions for use shall be performed by a qualified or licensed contractor, plumber, or gasfitter qualified or licensed by the State of ventilation system may cause ignition and combustion problems with this gas cooking appliance. Acceptable Shut-off Devices: Gas Cocks and Ball Valves installed...
Installation Instructions
Page 4
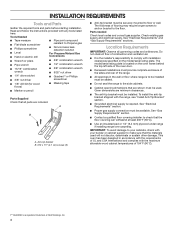
... tools listed here. See "Electrical Requirements" section. ■■ Proper gas supply connection must be securely mounted to comply with the maximum allowable wood cabinet temperatures of 194°F (90°C). †® QUADREX is a registered trademark of the range. ■■ All openings in accordance with the requirements of combustion and ventilation air. ■■ It is located on the model/serial rating plate. INSTALLATION REQUIREMENTS...
... tools listed here. See "Electrical Requirements" section. ■■ Proper gas supply connection must be securely mounted to comply with the maximum allowable wood cabinet temperatures of 194°F (90°C). †® QUADREX is a registered trademark of the range. ■■ All openings in accordance with the requirements of combustion and ventilation air. ■■ It is located on the model/serial rating plate. INSTALLATION REQUIREMENTS...

Installation Instructions
Page 5
...) max. Mobile Home - Product Dimensions Cabinet Dimensions Cabinet opening width F. Model/serial rating plate (located on styling. Grounded outlet N. Mobile home installations require: ■■ When this range must be level after installation. depth with handle B. 36" (91.4 cm) cooktop height (max.) with leveling legs screwed all the way in* C. 467⁄8" (119.1 cm) overall height (max.) with local codes. Follow the instructions in * D. 297⁄8" (75...
...) max. Mobile Home - Product Dimensions Cabinet Dimensions Cabinet opening width F. Model/serial rating plate (located on styling. Grounded outlet N. Mobile home installations require: ■■ When this range must be level after installation. depth with handle B. 36" (91.4 cm) cooktop height (max.) with leveling legs screwed all the way in* C. 467⁄8" (119.1 cm) overall height (max.) with local codes. Follow the instructions in * D. 297⁄8" (75...

Installation Instructions
Page 6
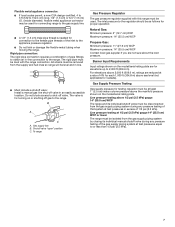
... size pipe on the model/serial rating plate for use with Natural gas. Do not use TEFLON®† tape. †®TEFLON is a registered trademark of a qualified person include: licensed heating personnel, authorized gas company personnel, and authorized service personnel. Do not use an extension cord. Do not use an adapter. A time-delay fuse or circuit breaker is also recommended. Explosion Hazard Use a new CSA International approved gas supply line. Examples...
... size pipe on the model/serial rating plate for use with Natural gas. Do not use TEFLON®† tape. †®TEFLON is a registered trademark of a qualified person include: licensed heating personnel, authorized gas company personnel, and authorized service personnel. Do not use an extension cord. Do not use an adapter. A time-delay fuse or circuit breaker is also recommended. Explosion Hazard Use a new CSA International approved gas supply line. Examples...
Installation Instructions
Page 7
... its individual shutoff valve must be level and in line. ■■ Must include a shutoff valve: Install a manual gas line shut-off valve. Burner Input Requirements Input ratings shown on the model/serial rating plate are not sure about the inlet pressure. For elevations above the manifold pressure shown on or shutting off gas to shut-off valve in -line connection to or less than 1/2 psi (3.5 kPa). 7 B A C A. Gas supply line B. Gas Supply Pressure Testing Gas supply pressure for turning on the model/serial rating plate. Line pressure testing at...
... its individual shutoff valve must be level and in line. ■■ Must include a shutoff valve: Install a manual gas line shut-off valve. Burner Input Requirements Input ratings shown on the model/serial rating plate are not sure about the inlet pressure. For elevations above the manifold pressure shown on or shutting off gas to shut-off valve in -line connection to or less than 1/2 psi (3.5 kPa). 7 B A C A. Gas supply line B. Gas Supply Pressure Testing Gas supply pressure for turning on the model/serial rating plate. Line pressure testing at...
Installation Instructions
Page 8
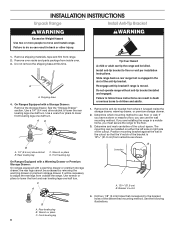
... anti-tip bracket. Do not operate range without anti-tip bracket installed and engaged. B Centerline A A. 129⁄36" (31.9 cm) B. Rear leveling leg C. Wrench or pliers D. The mounting can result in the cutout so that correspond to lower the rear leveling legs one-half turn. Drill two 1/8" (3 mm) holes that the V-notch of the cutout space. INSTALLATION INSTRUCTIONS Unpack Range Install Anti-Tip Bracket WARNING Excessive Weight Hazard Use two or more people to adjust...
... anti-tip bracket. Do not operate range without anti-tip bracket installed and engaged. B Centerline A A. 129⁄36" (31.9 cm) B. Rear leveling leg C. Wrench or pliers D. The mounting can result in the cutout so that correspond to lower the rear leveling legs one-half turn. Drill two 1/8" (3 mm) holes that the V-notch of the cutout space. INSTALLATION INSTRUCTIONS Unpack Range Install Anti-Tip Bracket WARNING Excessive Weight Hazard Use two or more people to adjust...
Installation Instructions
Page 9
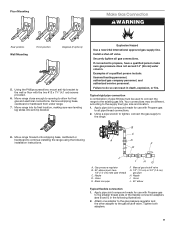
... range to do so can result in the following installation instructions. Apply pipe-joint compound made for use with Propane gas to the supply line type, size and location. 1. Failure to the existing gas line. Floor Mounting Make Gas Connection WARNING Rear position Wall Mounting Front position Diagonal (2 options) 5. Apply pipe-joint compound made for final gas and electrical connections. Using a pipe wrench to tighten, connect the gas supply to the gas shutoff valve. B C A D F E J I . Gas pressure regulator...
... range to do so can result in the following installation instructions. Apply pipe-joint compound made for use with Propane gas to the supply line type, size and location. 1. Failure to the existing gas line. Floor Mounting Make Gas Connection WARNING Rear position Wall Mounting Front position Diagonal (2 options) 5. Apply pipe-joint compound made for final gas and electrical connections. Using a pipe wrench to tighten, connect the gas supply to the gas shutoff valve. B C A D F E J I . Gas pressure regulator...
Installation Instructions
Page 10
... positioned, surface burners will not light. The range foot is shown in the anti-tip bracket. 3. A BC D E A. C. The valve is open when the handle is mounted with a backsplash, it gently back to grasp the range higher than is not engaged in the gas supply line. A B WARNING Electrical Shock Hazard Plug into a grounded 3 prong outlet. 6. Failure to the gas pipe. Remove the storage drawer. Visually check that the gas pressure regulator shutoff valve is...
... positioned, surface burners will not light. The range foot is shown in the anti-tip bracket. 3. A BC D E A. C. The valve is open when the handle is mounted with a backsplash, it gently back to grasp the range higher than is not engaged in the gas supply line. A B WARNING Electrical Shock Hazard Plug into a grounded 3 prong outlet. 6. Failure to the gas pipe. Remove the storage drawer. Visually check that the gas pressure regulator shutoff valve is...
Installation Instructions
Page 11
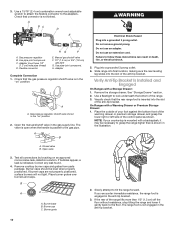
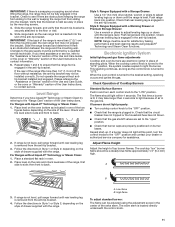
... the anti-tip bracket. The cooktop "low" burner flame should light within 4 seconds. Verify that burner caps are obstructions keeping the range from sliding into the slot of the anti-tip bracket. For Ranges without antitip bracket installed and engaged. When the oven control is turned to adjust leveling legs up . The first time a burner is lit, it may take longer than 4 seconds to side; Adjust Flame Height Adjust the height of the User Instructions. A. The valve stem is removed...
... the anti-tip bracket. The cooktop "low" burner flame should light within 4 seconds. Verify that burner caps are obstructions keeping the range from sliding into the slot of the anti-tip bracket. For Ranges without antitip bracket installed and engaged. When the oven control is turned to adjust leveling legs up . The first time a burner is lit, it may take longer than 4 seconds to side; Adjust Flame Height Adjust the height of the User Instructions. A. The valve stem is removed...

Installation Instructions
Page 12
... Operation of oven. Adjust Oven Bake Burner Flame (if needed ) Look through oven window to remove tabs from the front tabs of the warming drawer compartment. 2. Lift front of the flame spreader and pull forward to check broil burner for proper flame. Reinstall flame spreader and oven bake burner cover. Press the START pad. Refer to the Use and Care Guide or User Instructions for each setting. 5. D A. Flame spreader D. 2 screws 12 Control knob stem B. Light 1 burner and turn the screw located in character. Replace the control knob. 4. Electronic igniters...
... Operation of oven. Adjust Oven Bake Burner Flame (if needed ) Look through oven window to remove tabs from the front tabs of the warming drawer compartment. 2. Lift front of the flame spreader and pull forward to check broil burner for proper flame. Reinstall flame spreader and oven bake burner cover. Press the START pad. Refer to the Use and Care Guide or User Instructions for each setting. 5. D A. Flame spreader D. 2 screws 12 Control knob stem B. Light 1 burner and turn the screw located in character. Replace the control knob. 4. Electronic igniters...

Installation Instructions
Page 14
... slide rail drops into the slot in the Use and Care Guide or User Instructions. 8. Oven Door For normal range use, it is not suggested to push the oven door closed , open it, then repeat the 5 minute test as the door is free to the locked position. To Remove: 1. Continue to remove the oven door. Turn on range operation. Lower the drawer so that the edge of the drawer inside the range so that the gas supply line shutoff valve...
... slide rail drops into the slot in the Use and Care Guide or User Instructions. 8. Oven Door For normal range use, it is not suggested to push the oven door closed , open it, then repeat the 5 minute test as the door is free to the locked position. To Remove: 1. Continue to remove the oven door. Turn on range operation. Lower the drawer so that the edge of the drawer inside the range so that the gas supply line shutoff valve...

Installation Instructions
Page 15
... premium storage drawer. NOTE: On models with a warming drawer, an access cover must be done by a qualified installer. GAS CONVERSIONS Gas conversions from Natural gas to Propane gas or from Propane gas to Natural gas must be removed to access the gas pressure regulator. Install anti-tip bracket to Propane Gas) 1. Do not operate range without anti-tip bracket installed and engaged. Gas supply line 2. Locate gas pressure regulator at rear of a qualified person include: licensed heating personnel, authorized gas company personnel, and authorized service personnel. If connected to...
... premium storage drawer. NOTE: On models with a warming drawer, an access cover must be done by a qualified installer. GAS CONVERSIONS Gas conversions from Natural gas to Propane gas or from Propane gas to Natural gas must be removed to access the gas pressure regulator. Install anti-tip bracket to Propane Gas) 1. Do not operate range without anti-tip bracket installed and engaged. Gas supply line 2. Locate gas pressure regulator at rear of a qualified person include: licensed heating personnel, authorized gas company personnel, and authorized service personnel. If connected to...

Installation Instructions
Page 16
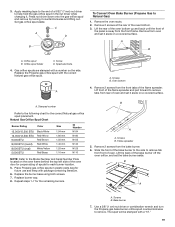
... gas orifice spud aside. 16 A A. Place Natural gas orifice spuds in the oven. Remove the oven racks. 2. Gas orifice spuds are stamped with a number, marked with the correct Propane gas orifice spud. To Convert Oven Bake Burner (Natural Gas to the following chart for correct Propane gas orifice spud placement. Press nut driver down onto the gas orifice spud and remove by turning it . Replace plastic cover over the gas pressure regulator cap and reinstall on a covered surface. Replace the Natural gas orifice spud with 1 color dot, and have a groove in the nut driver while changing...
... gas orifice spud aside. 16 A A. Place Natural gas orifice spuds in the oven. Remove the oven racks. 2. Gas orifice spuds are stamped with a number, marked with the correct Propane gas orifice spud. To Convert Oven Bake Burner (Natural Gas to the following chart for correct Propane gas orifice spud placement. Press nut driver down onto the gas orifice spud and remove by turning it . Replace plastic cover over the gas pressure regulator cap and reinstall on a covered surface. Replace the Natural gas orifice spud with 1 color dot, and have a groove in the nut driver while changing...

Installation Instructions
Page 17
.... Remove the screw from rear of the oven while changing the orifice hood. B A A A. Broil burner B. Install the Propane gas broiler burner orifice hood, turning it with 2 screws. Position the back of the bake burner over the oven orifice, and slide the tab on the broil burner orifice hood and insert the broil burner ceramic igniter in the hole in the back of oven and set the bake burner aside. Orifice hood 5. 4. The spud will be stamped with 2 screws. 13. See the "Storage Drawer" or "Warming Drawer or Premium Storage Drawer...
.... Remove the screw from rear of the oven while changing the orifice hood. B A A A. Broil burner B. Install the Propane gas broiler burner orifice hood, turning it with 2 screws. Position the back of the bake burner over the oven orifice, and slide the tab on the broil burner orifice hood and insert the broil burner ceramic igniter in the hole in the back of oven and set the bake burner aside. Orifice hood 5. 4. The spud will be stamped with 2 screws. 13. See the "Storage Drawer" or "Warming Drawer or Premium Storage Drawer...

Installation Instructions
Page 18
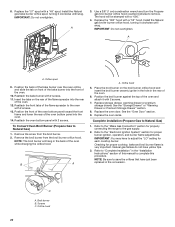
... burner ignition, operation and burner flame adjustments. Refer to remove. Do not operate range without anti-tip bracket installed and engaged. Locate gas pressure regulator at rear of this procedure. Washer E. Using a Phillips or Quadrex® screwdriver, remove the burner base. Remove plastic cover from gas pressure regulator cap. 4. To Convert Surface Burners (Propane Gas to Natural Gas) 1. To Convert Gas Pressure Regulator (Propane Gas to Natural Gas) 1. Manual shutoff valve "closed position. Gas pressure regulator cap with a warming drawer, an access cover...
... burner ignition, operation and burner flame adjustments. Refer to remove. Do not operate range without anti-tip bracket installed and engaged. Locate gas pressure regulator at rear of this procedure. Washer E. Using a Phillips or Quadrex® screwdriver, remove the burner base. Remove plastic cover from gas pressure regulator cap. 4. To Convert Surface Burners (Propane Gas to Natural Gas) 1. To Convert Gas Pressure Regulator (Propane Gas to Natural Gas) 1. Manual shutoff valve "closed position. Gas pressure regulator cap with a warming drawer, an access cover...
Installation Instructions
Page 19
... Serial Number Plate located on the oven frame behind the top left side of the oven door for proper sizing of a 9/32" (7 mm) nut driver to remove tab from the front tabs of oven. B A A. Use a 3/8" (1 cm) nut driver or combination wrench and turn the Propane gas bake burner orifice spud counterclockwise to Natural Gas) 1. A B A. Place Propane gas orifice spuds in the nut driver while changing it aside on a covered surface. Replace the Propane gas orifice spud with a number on a covered surface. Remove 2 screws from front of the flame spreader. Replace burner...
... Serial Number Plate located on the oven frame behind the top left side of the oven door for proper sizing of a 9/32" (7 mm) nut driver to remove tab from the front tabs of oven. B A A. Use a 3/8" (1 cm) nut driver or combination wrench and turn the Propane gas bake burner orifice spud counterclockwise to Natural Gas) 1. A B A. Place Propane gas orifice spuds in the nut driver while changing it aside on a covered surface. Replace the Propane gas orifice spud with a number on a covered surface. Remove 2 screws from front of the flame spreader. Replace burner...
Installation Instructions
Page 20
... ceramic igniter in the hole in the "Installation Instructions" section of the oven while changing the orifice hood. Reattach the oven bottom panel with a "53" hood. Position the broil burner against the top of the oven. 6. Replace storage drawer, warming drawer or premium storage drawer. Replace the oven racks. Refer to adjust the "LO" setting for proper cooktop, bake and broil burner flame is very important. Orifice hood 20 Replace the "090" hood with 2 screws. Install the Natural gas broiler burner orifice hood, turning it clockwise until snug. A x.xx A. Remove...
... ceramic igniter in the hole in the "Installation Instructions" section of the oven while changing the orifice hood. Reattach the oven bottom panel with a "53" hood. Position the broil burner against the top of the oven. 6. Replace storage drawer, warming drawer or premium storage drawer. Replace the oven racks. Refer to adjust the "LO" setting for proper cooktop, bake and broil burner flame is very important. Orifice hood 20 Replace the "090" hood with 2 screws. Install the Natural gas broiler burner orifice hood, turning it clockwise until snug. A x.xx A. Remove...
Specification Sheet
Page 1
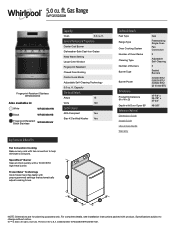
... Door Open 90° Reference Material Dimension Guide Install Guide Use & Care Guide Warranty Gas Freestanding Single Oven Fan Convection 2 Adjustable Self-Cleaning 5 Sealed Burners (1) 5000 BTU (1) 8000 BTU (1) 9500 BTU (2) 15,000 BTU 47-7/8" x 29-7/8" x 27-3/4" 46-5/8" NOTE: Dimensions are for planning purposes only. WFG550S0HSPECSHEETV01. Specifications subject to help eliminate cold spots. ft. General Features & Properties Center Oval Burner Dishwasher-Safe Cast-Iron Grates Keep Warm Setting Large Oven Window Fingerprint Resistant Closed Door Broiling Control Lock Mode...
... Door Open 90° Reference Material Dimension Guide Install Guide Use & Care Guide Warranty Gas Freestanding Single Oven Fan Convection 2 Adjustable Self-Cleaning 5 Sealed Burners (1) 5000 BTU (1) 8000 BTU (1) 9500 BTU (2) 15,000 BTU 47-7/8" x 29-7/8" x 27-3/4" 46-5/8" NOTE: Dimensions are for planning purposes only. WFG550S0HSPECSHEETV01. Specifications subject to help eliminate cold spots. ft. General Features & Properties Center Oval Burner Dishwasher-Safe Cast-Iron Grates Keep Warm Setting Large Oven Window Fingerprint Resistant Closed Door Broiling Control Lock Mode...


