Use & Care Guide
Page 5
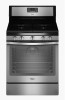
... sound, and "Loc" will automatically turn knob counterclockwise to lock) Clean cycle Oven control lockout INSTRUCTIONS Food must be used to anywhere between HIGH and LOW. Temperature is in the warmed oven. 1. Press and hold the START (hold 3 sec to IGNITE. WARNING COOKTOP USE To Set: 1. Electric igniters automatically light the...
... sound, and "Loc" will automatically turn knob counterclockwise to lock) Clean cycle Oven control lockout INSTRUCTIONS Food must be used to anywhere between HIGH and LOW. Temperature is in the warmed oven. 1. Press and hold the START (hold 3 sec to IGNITE. WARNING COOKTOP USE To Set: 1. Electric igniters automatically light the...
Use & Care Guide
Page 6
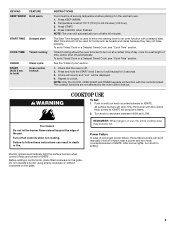
... burner ports with a straight pin as shown in the previous illustration. Correct 5. Incorrect B. Alignment pins D. Burner Size Small Medium Large Extra-Large Recommended Use ■ Low-heat cooking ■ Melting chocolate or butter ■ Multipurpose burner ■ For large cookware ■ Most powerful burner ■ For large cookware 6 Always clean the...
... burner ports with a straight pin as shown in the previous illustration. Correct 5. Incorrect B. Alignment pins D. Burner Size Small Medium Large Extra-Large Recommended Use ■ Low-heat cooking ■ Melting chocolate or butter ■ Multipurpose burner ■ For large cookware ■ Most powerful burner ■ For large cookware 6 Always clean the...
Use & Care Guide
Page 7
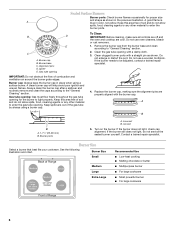
... steel ■ Heats quickly, but unevenly. 1 2 3 1 4 5 6 2 7 8 3 9 1 0 1 1 4 1 2 1 3 5 1 4 1 5 1 6 6 1 7 1 8 7 1 9 2 0 Copper Earthenware ■ Ideal results on low heat settings. Cast iron ■ Heats slowly and evenly. ■ Good for browning and frying. ■ Maintains heat for flatness by placing the straight edge...-to medium heat settings. ■ Heats very quickly and evenly. ■ Follow manufacturer's instructions. ■ Use on low to -heavy thickness. While you rotate the ruler, no space or light should be used as a core or base in...
... steel ■ Heats quickly, but unevenly. 1 2 3 1 4 5 6 2 7 8 3 9 1 0 1 1 4 1 2 1 3 5 1 4 1 5 1 6 6 1 7 1 8 7 1 9 2 0 Copper Earthenware ■ Ideal results on low heat settings. Cast iron ■ Heats slowly and evenly. ■ Good for browning and frying. ■ Maintains heat for flatness by placing the straight edge...-to medium heat settings. ■ Heats very quickly and evenly. ■ Follow manufacturer's instructions. ■ Use on low to -heavy thickness. While you rotate the ruler, no space or light should be used as a core or base in...

Use & Care Guide
Page 12
... remain in the oven bottom to assist with the water. Allow the oven to cool to room temperature before use of the oven cavity is a low-heat, odorfree alternative to keep water from the oven cavity and wipe excess soil. Much of the initial 1¾ cups (14 oz [414 mL]) of...
... remain in the oven bottom to assist with the water. Allow the oven to cool to room temperature before use of the oven cavity is a low-heat, odorfree alternative to keep water from the oven cavity and wipe excess soil. Much of the initial 1¾ cups (14 oz [414 mL]) of...
Use & Care Guide
Page 15
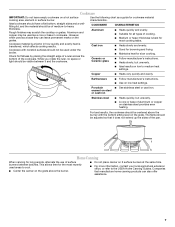
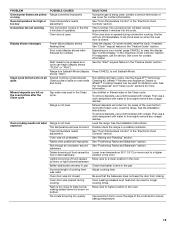
PROBLEM Oven burner flames are yellow or noisy Oven temperature too high or too low Convection fan not working Display shows messages Clean cycle did not work on all spills Mineral deposits are left on your model, press CANCEL to ...
PROBLEM Oven burner flames are yellow or noisy Oven temperature too high or too low Convection fan not working Display shows messages Clean cycle did not work on all spills Mineral deposits are left on your model, press CANCEL to ...

Installation Guide
Page 11
... above steps for proper operation of the oven bottom. Standard Surface Burners Push in and turn the screw located in character. If the "low" flame needs to light because of air in . Press the START pad. The oven bake burner should light within 8 seconds. Refer to... Operation of the burner. Replace the control knob. 4. Test the flame by using the adjustment screw in place of standing pilots. The cooktop "low" burner flame should be adjusted: A A. Look into the mirror to one side of Cooktop Burners 1. Pliers 11 Electronic Ignition System Initial lighting and...
... above steps for proper operation of the oven bottom. Standard Surface Burners Push in and turn the screw located in character. If the "low" flame needs to light because of air in . Press the START pad. The oven bake burner should light within 8 seconds. Refer to... Operation of the burner. Replace the control knob. 4. Test the flame by using the adjustment screw in place of standing pilots. The cooktop "low" burner flame should be adjusted: A A. Look into the mirror to one side of Cooktop Burners 1. Pliers 11 Electronic Ignition System Initial lighting and...

