Use & Care Guide
Page 5
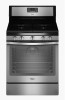
... OVEN LIGHT and TIMER keypads will function with a delayed start COOK TIME Timed cooking CLEAN START (hold 3 sec to IGNITE. Before setting a control knob, place filled cookware on the grate. 5 The cooktop functions are turned to lock) keypad for 3 seconds. 3. Do not operate a burner using empty...cookware or without cookware on the grate. A tone will sound, and "Loc" will produce a flame. 2. Only the burner with the control knob turned to IGNITE will be used to IGNITE. To set length of prolonged power failure, the surface burners can result in use, the entire ...
... OVEN LIGHT and TIMER keypads will function with a delayed start COOK TIME Timed cooking CLEAN START (hold 3 sec to IGNITE. Before setting a control knob, place filled cookware on the grate. 5 The cooktop functions are turned to lock) keypad for 3 seconds. 3. Do not operate a burner using empty...cookware or without cookware on the grate. A tone will sound, and "Loc" will produce a flame. 2. Only the burner with the control knob turned to IGNITE will be used to IGNITE. To set length of prolonged power failure, the surface burners can result in use, the entire ...
Use & Care Guide
Page 13
...vinegar and tomato, should be cleaned as soon as cast iron cookware. To Replace: 1. In Canada, reference the Customer Service section at www.whirlpool.com. SURFACE BURNERS EXTERIOR PORCELAIN ENAMEL SURFACES (on burners while wet. Cleaning Method: ■ Glass cleaner and soft cloth or sponge: Apply ... and caps against each other or hard surfaces such as the entire range is cool. To avoid damage, do not remove seals under knobs. To avoid chipping, do not use soap-filled scouring pads, abrasive cleaners, Cooktop Cleaner, steel-wool pads, gritty washcloths or abrasive paper...
...vinegar and tomato, should be cleaned as soon as cast iron cookware. To Replace: 1. In Canada, reference the Customer Service section at www.whirlpool.com. SURFACE BURNERS EXTERIOR PORCELAIN ENAMEL SURFACES (on burners while wet. Cleaning Method: ■ Glass cleaner and soft cloth or sponge: Apply ... and caps against each other or hard surfaces such as the entire range is cool. To avoid damage, do not remove seals under knobs. To avoid chipping, do not use soap-filled scouring pads, abrasive cleaners, Cooktop Cleaner, steel-wool pads, gritty washcloths or abrasive paper...
Use & Care Guide
Page 14
..."Sealed Surface Burners" section. Demo Mode is not set incorrectly SOLUTIONS Plug into a grounded 3 prong outlet. www.whirlpool.com In Canada, reference the Customer Service section at www.whirlpool.ca WARNING Electrical Shock Hazard Plug into a grounded 3 prong outlet. See the "Electronic Oven Controls" section for ...Nothing will operate Surface burners will not operate Surface burner flames are not matched. The range is blank. If propane gas is in knob before turning to a setting. Do not use an extension cord. Control is being used , turn on any key on the grate...
..."Sealed Surface Burners" section. Demo Mode is not set incorrectly SOLUTIONS Plug into a grounded 3 prong outlet. www.whirlpool.com In Canada, reference the Customer Service section at www.whirlpool.ca WARNING Electrical Shock Hazard Plug into a grounded 3 prong outlet. See the "Electronic Oven Controls" section for ...Nothing will operate Surface burners will not operate Surface burner flames are not matched. The range is blank. If propane gas is in knob before turning to a setting. Do not use an extension cord. Control is being used , turn on any key on the grate...

Installation Guide
Page 11
... bluish-green, with a pair of dark blue, and should light within 8 seconds. Check Operation of Oven Bake Burner 1. Replace the control knob. 4. The flame should be adjusted using a mirror. The cooktop "low" burner flame should light within 4 seconds. Oven bottom 3. The oven... a steady blue flame approximately ¼" (0.64 cm) high. Repeat start-up and back until the flame is located directly underneath the control knob. Remove from the front frame. A B A. Pliers 11 Check the oven bake burner for proper operation of the warming drawer compartment. 2....
... bluish-green, with a pair of dark blue, and should light within 8 seconds. Check Operation of Oven Bake Burner 1. Replace the control knob. 4. The flame should be adjusted using a mirror. The cooktop "low" burner flame should light within 4 seconds. Oven bottom 3. The oven... a steady blue flame approximately ¼" (0.64 cm) high. Repeat start-up and back until the flame is located directly underneath the control knob. Remove from the front frame. A B A. Pliers 11 Check the oven bake burner for proper operation of the warming drawer compartment. 2....


