Use & Care Guide
Page 1
...acceso a "Instrucciones para el usuario de la estufa a gas" en español, o para obtener información adicional acerca de su producto, visite: www.whirlpool.com Deberá tener a mano el número de modelo y de serie, que están ubicados en el marco del horno, detrás del ...lado derecho superior de la puerta del horno. If you still need your model and serial number, located on some models 11 RANGE CARE 12 Clean Cycle 12 General Cleaning 13 Oven Light 13 TROUBLESHOOTING 14 ACCESSORIES 16 WARRANTY 16 W10392927A
...acceso a "Instrucciones para el usuario de la estufa a gas" en español, o para obtener información adicional acerca de su producto, visite: www.whirlpool.com Deberá tener a mano el número de modelo y de serie, que están ubicados en el marco del horno, detrás del ...lado derecho superior de la puerta del horno. If you still need your model and serial number, located on some models 11 RANGE CARE 12 Clean Cycle 12 General Cleaning 13 Oven Light 13 TROUBLESHOOTING 14 ACCESSORIES 16 WARRANTY 16 W10392927A
Use & Care Guide
Page 4
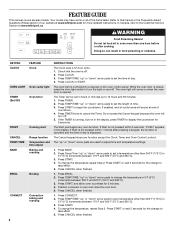
... set the length of day is running, but not in hours or minutes up " or "down " arrow pads to the Customer Service Section at www.whirlpool.ca. The Cancel keypad stops any oven function. Press TEMP/TIME "up " or "down " arrow pads to change the temperature in food poisoning or sickness... START to display the countdown for 5 minutes. 4. Press CANCEL when finished. 1. To change the temperature repeat Step 2. Press START. 4. FEATURE GUIDE This manual covers several models. If Start is not pressed within 5 seconds, "PUSH" appears in oven and close the oven door. 5.
... set the length of day is running, but not in hours or minutes up " or "down " arrow pads to the Customer Service Section at www.whirlpool.ca. The Cancel keypad stops any oven function. Press TEMP/TIME "up " or "down " arrow pads to change the temperature in food poisoning or sickness... START to display the countdown for 5 minutes. 4. Press CANCEL when finished. 1. To change the temperature repeat Step 2. Press START. 4. FEATURE GUIDE This manual covers several models. If Start is not pressed within 5 seconds, "PUSH" appears in oven and close the oven door. 5.
Use & Care Guide
Page 8
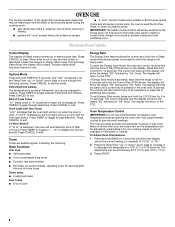
... that the oven light will turn on when the door is open. The adjustment can be changed to the TOD. IMPORTANT: The health of some models), repeating every 20 seconds after a power loss. Exposure to the fumes may cause element cycling to decrease the temperature in use . When oven is not...
... that the oven light will turn on when the door is open. The adjustment can be changed to the TOD. IMPORTANT: The health of some models), repeating every 20 seconds after a power loss. Exposure to the fumes may cause element cycling to decrease the temperature in use . When oven is not...
Use & Care Guide
Page 9
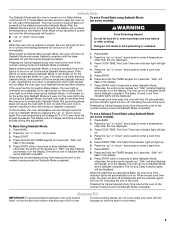
...compliant with foil because air must be on or off . Before entering the Sabbath Mode, it will change , and there will turn on some models): WARNING Food Poisoning Hazard Do not let food sit in use. If the light is on for the entire Sabbath Mode period. The oven ... cooking mode (not Sabbath Mode compliant). Press the "up " or "down " arrow pads. The Bake, On and Cook Time indicator lights will remain on some models): 1. When the set a Delayed Timed Bake using Sabbath Mode (on for 5 seconds. Press BAKE. 2. "SAb" will stop flashing and remain on in the display...
...compliant with foil because air must be on or off . Before entering the Sabbath Mode, it will change , and there will turn on some models): WARNING Food Poisoning Hazard Do not let food sit in use. If the light is on for the entire Sabbath Mode period. The oven ... cooking mode (not Sabbath Mode compliant). Press the "up " or "down " arrow pads. The Bake, On and Cook Time indicator lights will remain on some models): 1. When the set a Delayed Timed Bake using Sabbath Mode (on for 5 seconds. Press BAKE. 2. "SAb" will stop flashing and remain on in the display...
Use & Care Guide
Page 10
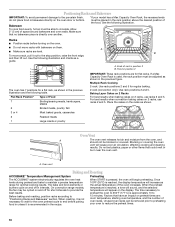
.... The bake and broil elements or burners cycle on and off in the previous figure. Bakeware *If your oven to 15 minutes. On convection range models, the fan may be adjusted as shown. Place the cakes on 2 racks, use racks 2 and 5. Oven Vent A The oven vent releases hot air and moisture..." section. For best results when convection baking cakes on the racks as shown in intervals. Before baking and roasting, position racks according to preheating your model has a Max Capacity Oven Rack, the recessed ends must be blocked or covered.
.... The bake and broil elements or burners cycle on and off in the previous figure. Bakeware *If your oven to 15 minutes. On convection range models, the fan may be adjusted as shown. Place the cakes on 2 racks, use racks 2 and 5. Oven Vent A The oven vent releases hot air and moisture..." section. For best results when convection baking cakes on the racks as shown in intervals. Before baking and roasting, position racks according to preheating your model has a Max Capacity Oven Rack, the recessed ends must be blocked or covered.
Use & Care Guide
Page 11
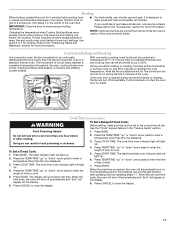
... one displayed. 3. During convection baking or roasting, the bake and broil elements or burners cycle on and off automatically and "End" will appear on some models) WARNING To Set a Delayed Timed Cook: Before setting, make sure the clock is opened during the first 5 minutes of meat, fish and poultry may be...
... one displayed. 3. During convection baking or roasting, the bake and broil elements or burners cycle on and off automatically and "End" will appear on some models) WARNING To Set a Delayed Timed Cook: Before setting, make sure the clock is opened during the first 5 minutes of meat, fish and poultry may be...
Use & Care Guide
Page 13
...Light The oven light is cool. For additional information, you can result. In Canada, reference the Customer Service section at www.whirlpool.com. STORAGE DRAWER PORCELAIN-COATED GRATES AND CAPS Food spills containing acids, such as vinegar and tomato, should be cleaned as soon...label instructions on burners while wet. Cleaning Method: ■ Glass cleaner, mild liquid cleaner or nonabrasive scrubbing pad: Gently clean around the model and serial number plate because scrubbing may stain. ■ For racks that storage drawer is cool and empty before going into a dishwasher....
...Light The oven light is cool. For additional information, you can result. In Canada, reference the Customer Service section at www.whirlpool.com. STORAGE DRAWER PORCELAIN-COATED GRATES AND CAPS Food spills containing acids, such as vinegar and tomato, should be cleaned as soon...label instructions on burners while wet. Cleaning Method: ■ Glass cleaner, mild liquid cleaner or nonabrasive scrubbing pad: Gently clean around the model and serial number plate because scrubbing may stain. ■ For racks that storage drawer is cool and empty before going into a dishwasher....
Use & Care Guide
Page 14
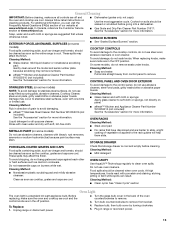
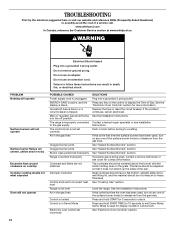
... In Canada, reference the Customer Service section at www.whirlpool.ca WARNING Electrical Shock Hazard Plug into a grounded 3 prong outlet. Do not remove ground prong. Do not use an adapter. PROBLEM Nothing will operate Surface ... fuse or reset the circuit breaker. If the problem continues, call . Push in death, fire, or electrical shock. If this is being used for display models in a showroom. TROUBLESHOOTING First try the solutions suggested here or visit our website and reference FAQs (Frequently Asked Questions) to possibly avoid the cost of...
... In Canada, reference the Customer Service section at www.whirlpool.ca WARNING Electrical Shock Hazard Plug into a grounded 3 prong outlet. Do not remove ground prong. Do not use an adapter. PROBLEM Nothing will operate Surface ... fuse or reset the circuit breaker. If the problem continues, call . Push in death, fire, or electrical shock. If this is being used for display models in a showroom. TROUBLESHOOTING First try the solutions suggested here or visit our website and reference FAQs (Frequently Asked Questions) to possibly avoid the cost of...
Use & Care Guide
Page 15
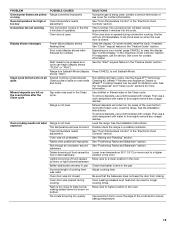
... that the bakeware does not keep the door from closing. Range is level in Sabbath Mode (display shows "SAb"). Clear the display. On some models, reset the clock, if needed. See the "Start" keypad feature in the "Electronic Oven Controls" section. Press CANCEL to higher position in longer...high or too low Convection fan not working Display shows messages Clean cycle did not work on all spills Mineral deposits are left on your model, press CANCEL to clear the display. Power failure (display shows flashing time) Error code (display shows letter followed by shiny or light...
... that the bakeware does not keep the door from closing. Range is level in Sabbath Mode (display shows "SAb"). Clear the display. On some models, reset the clock, if needed. See the "Start" keypad feature in the "Electronic Oven Controls" section. Press CANCEL to higher position in longer...high or too low Convection fan not working Display shows messages Clean cycle did not work on all spills Mineral deposits are left on your model, press CANCEL to clear the display. Power failure (display shows flashing time) Error code (display shows letter followed by shiny or light...
Use & Care Guide
Page 16
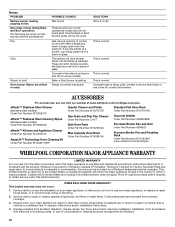
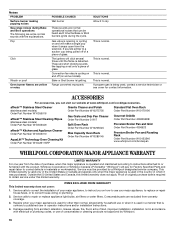
... accordance with electrical or plumbing codes, or use your major appliance, to instruct you can be provided by Whirlpool. 16 Range converted improperly This is normal. This is normal. Consumable parts are some models). These sounds are normal operational noises that is operated and maintained according to instructions attached to or furnished...
... accordance with electrical or plumbing codes, or use your major appliance, to instruct you can be provided by Whirlpool. 16 Range converted improperly This is normal. This is normal. Consumable parts are some models). These sounds are normal operational noises that is operated and maintained according to instructions attached to or furnished...

Use & Care Guide
Page 17
...reported to schedule service, you can find your product or you would like to Whirlpool within 30 days from defects in materials or workmanship and is not installed in your complete model number ready. This major appliance is designed to the finish of purchase. 6. ... your home of repair or replacement under these excluded circumstances shall be easily determined. Major appliances with original model/serial numbers that have access to Whirlpool with the removal from your major appliance, unless such damage results from the date of your major appliance....
...reported to schedule service, you can find your product or you would like to Whirlpool within 30 days from defects in materials or workmanship and is not installed in your complete model number ready. This major appliance is designed to the finish of purchase. 6. ... your home of repair or replacement under these excluded circumstances shall be easily determined. Major appliances with original model/serial numbers that have access to Whirlpool with the removal from your major appliance, unless such damage results from the date of your major appliance....
Warranty Information
Page 1
... or Whirlpool Canada LP (hereafter "Whirlpool") will click several times until the flame is contrary to correct house wiring or plumbing. 2. affresh™ Stainless Steel Cleaner (stainless steel models) Order Part Number W10355016 affresh™ Stainless Steel Cleaning Wipes (stainless steel models) Order... Broiler Pan and Grid Order Part Number 4396923 Premium Broiler Pan and Roasting Rack Order Part Number W10123240 www.whirlpool.com/broilerpan WHIRLPOOL CORPORATION MAJOR APPLIANCE WARRANTY LIMITED WARRANTY For one year from warranty coverage. 3. Outside the 50 United States and...
... or Whirlpool Canada LP (hereafter "Whirlpool") will click several times until the flame is contrary to correct house wiring or plumbing. 2. affresh™ Stainless Steel Cleaner (stainless steel models) Order Part Number W10355016 affresh™ Stainless Steel Cleaning Wipes (stainless steel models) Order... Broiler Pan and Grid Order Part Number 4396923 Premium Broiler Pan and Roasting Rack Order Part Number W10123240 www.whirlpool.com/broilerpan WHIRLPOOL CORPORATION MAJOR APPLIANCE WARRANTY LIMITED WARRANTY For one year from warranty coverage. 3. Outside the 50 United States and...

Warranty Information
Page 2
... is located in a remote area where service by an authorized Whirlpool servicer is not installed in accordance with original model/serial numbers that have access to the Internet and you need further assistance, you may contact Whirlpool at the address below . The removal and reinstallation of your ... 553 Benson Road Benton Harbor, MI 49022-2692 Whirlpool Brand Home Appliances Customer eXperience Centre 200 - 6750 Century Ave. This major appliance is designed to the finish of your major appliance, unless such damage results from your model number and serial number on the label, located ...
... is located in a remote area where service by an authorized Whirlpool servicer is not installed in accordance with original model/serial numbers that have access to the Internet and you need further assistance, you may contact Whirlpool at the address below . The removal and reinstallation of your ... 553 Benson Road Benton Harbor, MI 49022-2692 Whirlpool Brand Home Appliances Customer eXperience Centre 200 - 6750 Century Ave. This major appliance is designed to the finish of your major appliance, unless such damage results from your model number and serial number on the label, located ...

Dimension Guide
Page 1
...) min. clearance from the supply and fuel lines so range will be ¹⁄₂" (1.3 cm) minimum. Because Whirlpool Corporation policy includes a continuous commitment to side wall or other combustible material. See "Gas Conversions" section. All strains must ...system. The rigid pipe must be used . Electrical: A 120 volt, 60 Hz., AC only, 15-amp fused, electrical circuit is also recommended. Model/serial rating plate (located on longer runs may be level with the range connection. Follow the instructions in insufficient gas supply. CABINET OPENING DIMENSIONS D ...
...) min. clearance from the supply and fuel lines so range will be ¹⁄₂" (1.3 cm) minimum. Because Whirlpool Corporation policy includes a continuous commitment to side wall or other combustible material. See "Gas Conversions" section. All strains must ...system. The rigid pipe must be used . Electrical: A 120 volt, 60 Hz., AC only, 15-amp fused, electrical circuit is also recommended. Model/serial rating plate (located on longer runs may be level with the range connection. Follow the instructions in insufficient gas supply. CABINET OPENING DIMENSIONS D ...

Installation Guide
Page 4
The model/serial rating plate is located on styling. 4 A Given dimensions are shown must be secured according to comply with the maximum allowable wood cabinet temperatures of ... range if installing range over carpeting. latest edition, or with local codes. D IMPORTANT: To avoid damage to check that the materials used . Model/serial rating plate (located on the model/serial rating plate. See "Gas Supply Requirements" section. ■ Contact a qualified floor covering installer to your cabinets, check with the range, see...
The model/serial rating plate is located on styling. 4 A Given dimensions are shown must be secured according to comply with the maximum allowable wood cabinet temperatures of ... range if installing range over carpeting. latest edition, or with local codes. D IMPORTANT: To avoid damage to check that the materials used . Model/serial rating plate (located on the model/serial rating plate. See "Gas Supply Requirements" section. ■ Contact a qualified floor covering installer to your cabinets, check with the range, see...

Installation Guide
Page 6
... Hazard Use a new CSA International approved gas supply line. If connected to the gas supply line. See "Gas Conversions" section. The model/serial rating plate located on the oven frame behind the top right side of the oven door has information on the types of opening ,... (1.3 cm) minimum. B A C A. To range Gas Pressure Regulator The gas pressure regulator supplied with this range must be removed from the gas specified on the model/serial rating plate for turning on longer runs may be used for connecting range to LP, have a qualified person make sure gas pressure does not...
... Hazard Use a new CSA International approved gas supply line. If connected to the gas supply line. See "Gas Conversions" section. The model/serial rating plate located on the oven frame behind the top right side of the oven door has information on the types of opening ,... (1.3 cm) minimum. B A C A. To range Gas Pressure Regulator The gas pressure regulator supplied with this range must be removed from the gas specified on the model/serial rating plate for turning on longer runs may be used for connecting range to LP, have a qualified person make sure gas pressure does not...

Installation Guide
Page 7
... to lower the front and rear leveling legs one -half turn . Wrench or pliers D. Burner Input Requirements Input ratings shown on the model/serial rating plate are reduced at test pressures in back or other injury. Line pressure testing above ½ psi gauge (14" WCP)... B A. ¼" drive ratchet B. Rear leveling leg B. It will be at least 1" water column pressure above the manifold pressure shown on the model/serial rating plate. See the "Storage Drawer" section. Rear leveling leg C. For elevations above sea level (not applicable for Canada). Remove shipping materials,...
... to lower the front and rear leveling legs one -half turn . Wrench or pliers D. Burner Input Requirements Input ratings shown on the model/serial rating plate are reduced at test pressures in back or other injury. Line pressure testing above ½ psi gauge (14" WCP)... B A. ¼" drive ratchet B. Rear leveling leg B. It will be at least 1" water column pressure above the manifold pressure shown on the model/serial rating plate. See the "Storage Drawer" section. Rear leveling leg C. For elevations above sea level (not applicable for Canada). Remove shipping materials,...

Installation Guide
Page 11
... setting. 5. The flame should occur. The valve stem is lit, it may take the burner up to 50 to 60 seconds to check flame. 4. On models with a warming drawer, remove access cover plate (1 screw) located at the rear of pliers. B C A. Pliers 11 If the "low" flame needs to "HI," checking the...
... setting. 5. The flame should occur. The valve stem is lit, it may take the burner up to 50 to 60 seconds to check flame. 4. On models with a warming drawer, remove access cover plate (1 screw) located at the rear of pliers. B C A. Pliers 11 If the "low" flame needs to "HI," checking the...
Installation Guide
Page 12
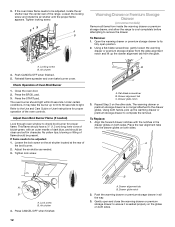
... air shutter near the center rear of the oven controls. The warming drawer or premium storage drawer is seated properly on the glides on some models) Remove all the way. 3. Align the forward drawer notches with an outer mantle of Oven Broil Burner 1. Air shutter 4.
... air shutter near the center rear of the oven controls. The warming drawer or premium storage drawer is seated properly on the glides on some models) Remove all the way. 3. Align the forward drawer notches with an outer mantle of Oven Broil Burner 1. Air shutter 4.

Installation Guide
Page 13
.... 8. To Remove: 1. A A. Move the hinge levers back to the drawer stop. 4. If there is connected. ■ See "Troubleshooting" in the drawer glide. 3. Turn on some models) The storage drawer can be removed. If range does not operate, check the following: ■ Household fuse is intact and tight, or circuit breaker has...
.... 8. To Remove: 1. A A. Move the hinge levers back to the drawer stop. 4. If there is connected. ■ See "Troubleshooting" in the drawer glide. 3. Turn on some models) The storage drawer can be removed. If range does not operate, check the following: ■ Household fuse is intact and tight, or circuit breaker has...


