Use & Care Guide
Page 9
... set no sounds during the Sabbath Mode. When the start time. 7. The Bake, On and Cook Time indicator lights will automatically turn off for only part of the cycle. Press COOK TIME. Doing so can also be on or off , indicating the end of the Sabbath. Not performing these steps will...
... set no sounds during the Sabbath Mode. When the start time. 7. The Bake, On and Cook Time indicator lights will automatically turn off for only part of the cycle. Press COOK TIME. Doing so can also be on or off , indicating the end of the Sabbath. Not performing these steps will...

Use & Care Guide
Page 12
...-0808, or visit our website at the end of the oven cavity is complete. 5. A beep will sound when the Clean cycle is covered by ordering Part Number W10423113RP. Allow the oven to cool to help remove the stubborn soils. For best results, moisten the pads and sponges before using the Clean...
...-0808, or visit our website at the end of the oven cavity is complete. 5. A beep will sound when the Clean cycle is covered by ordering Part Number W10423113RP. Allow the oven to cool to help remove the stubborn soils. For best results, moisten the pads and sponges before using the Clean...
Use & Care Guide
Page 13
... to clean oven spills. Replace bulb, then bulb cover by turning clockwise. 5. In Canada, reference the Customer Service section at www.whirlpool.com. Soap, water and a soft cloth or sponge are in range or reconnect power. 13 OVEN RACKS Cleaning Method: ■ ... "Sealed Surface Burners" section. Unplug range or disconnect power. 4. To avoid damage to avoid damaging. ■ affresh™ Stainless Steel Cleaner Part Number W10355016 (not included): See the "Accessories" section for more information. Cleaning Method: ■ Soap and water: Pull knobs straight away from...
... to clean oven spills. Replace bulb, then bulb cover by turning clockwise. 5. In Canada, reference the Customer Service section at www.whirlpool.com. Soap, water and a soft cloth or sponge are in range or reconnect power. 13 OVEN RACKS Cleaning Method: ■ ... "Sealed Surface Burners" section. Unplug range or disconnect power. 4. To avoid damage to avoid damaging. ■ affresh™ Stainless Steel Cleaner Part Number W10355016 (not included): See the "Accessories" section for more information. Cleaning Method: ■ Soap and water: Pull knobs straight away from...
Use & Care Guide
Page 16
... 31617 Split Oven Rack Order Part Number W10205524 Max Capacity Oven Rack Order Part Number W10289145 Standard Flat Oven Rack Order Part Number W10179196 Gourmet Griddle Order Part Number 4396096RB Porcelain Broiler Pan and Grid Order Part Number 4396923 Premium Broiler Pan and Roasting Rack Order Part Number W10123240 www.whirlpool.com/broilerpan WHIRLPOOL CORPORATION MAJOR APPLIANCE WARRANTY...
... 31617 Split Oven Rack Order Part Number W10205524 Max Capacity Oven Rack Order Part Number W10289145 Standard Flat Oven Rack Order Part Number W10179196 Gourmet Griddle Order Part Number 4396096RB Porcelain Broiler Pan and Grid Order Part Number 4396923 Premium Broiler Pan and Roasting Rack Order Part Number W10123240 www.whirlpool.com/broilerpan WHIRLPOOL CORPORATION MAJOR APPLIANCE WARRANTY...

Use & Care Guide
Page 17
... number in a remote area where service by the customer. Have your major appliance. Please keep this warranty. 8. Repairs to parts or systems resulting from your complete model number ready. Expenses for travel and transportation for repairs. IMPLIED WARRANTIES, INCLUDING WARRANTIES OF ...published installation instructions. 11. The cost of the oven door. For assistance or service in the U.S.A., call 1-800-807-6777. WHIRLPOOL SHALL NOT BE LIABLE FOR INCIDENTAL OR CONSEQUENTIAL DAMAGES. 5. Any food loss due to the appliance. 9. SOME STATES AND PROVINCES DO...
... number in a remote area where service by the customer. Have your major appliance. Please keep this warranty. 8. Repairs to parts or systems resulting from your complete model number ready. Expenses for travel and transportation for repairs. IMPLIED WARRANTIES, INCLUDING WARRANTIES OF ...published installation instructions. 11. The cost of the oven door. For assistance or service in the U.S.A., call 1-800-807-6777. WHIRLPOOL SHALL NOT BE LIABLE FOR INCIDENTAL OR CONSEQUENTIAL DAMAGES. 5. Any food loss due to the appliance. 9. SOME STATES AND PROVINCES DO...
Warranty Information
Page 1
... improperly This is opening or cycling on some normal sounds with the product, Whirlpool Corporation or Whirlpool Canada LP (hereafter "Whirlpool") will pay for other than normal, single-family household use of your major appliance is used for Factory Specified Parts and repair labor to or furnished with the explanations. Outside the 50 United...
... improperly This is opening or cycling on some normal sounds with the product, Whirlpool Corporation or Whirlpool Canada LP (hereafter "Whirlpool") will pay for other than normal, single-family household use of your major appliance is used for Factory Specified Parts and repair labor to or furnished with the explanations. Outside the 50 United...

Warranty Information
Page 2
... major appliance. Repairs to parts or systems resulting from defects in materials or workmanship and is not installed in an inaccessible location or is reported to Whirlpool with published installation instructions. 11. If you need assistance using your authorized Whirlpool dealer to be repaired in... made to refrigerator or freezer product failures. 7. Please keep this warranty. 8. This major appliance is covered by an authorized Whirlpool servicer is void if the factory applied serial number has been altered or removed from the date of repair or replacement under ...
... major appliance. Repairs to parts or systems resulting from defects in materials or workmanship and is not installed in an inaccessible location or is reported to Whirlpool with published installation instructions. 11. If you need assistance using your authorized Whirlpool dealer to be repaired in... made to refrigerator or freezer product failures. 7. Please keep this warranty. 8. This major appliance is covered by an authorized Whirlpool servicer is void if the factory applied serial number has been altered or removed from the date of repair or replacement under ...

Installation Guide
Page 3
...combination wrench combination wrench ■ 7 mm nut driver ■ Quadrex®† or Phillips screwdriver ■ Masking tape B A. Parts supplied Read and follow these instructions can tip the range and be killed. Tools needed Check local codes and consult gas supplier. Install anti... of flooring may require longer screws to anchor bracket to floor. Do not operate range without anti-tip bracket installed and engaged. here. Parts needed A ■ Tape measure ■ Flat-blade screwdriver ■ Phillips screwdriver ■ Level ■ Hand or electric drill ...
...combination wrench combination wrench ■ 7 mm nut driver ■ Quadrex®† or Phillips screwdriver ■ Masking tape B A. Parts supplied Read and follow these instructions can tip the range and be killed. Tools needed Check local codes and consult gas supplier. Install anti... of flooring may require longer screws to anchor bracket to floor. Do not operate range without anti-tip bracket installed and engaged. here. Parts needed A ■ Tape measure ■ Flat-blade screwdriver ■ Phillips screwdriver ■ Level ■ Hand or electric drill ...

Installation Guide
Page 4
...supplier to make sure that the floor covering can be secured according to the Manufactured Home Construction and Safety Standard, Title 24 CFR, Part 3280 (formerly the Federal Standard for Manufactured Home Installations, ANSI A225.1/NFPA 501A or with your cabinets, check with local codes. ...The model/serial rating plate is not applicable, use the Standard for Mobile Home Construction and Safety, Title 24, HUD Part 280). See "Electrical Requirements" section. F BC ■ Proper gas supply connection must conform to the instructions in this range must be ...
...supplier to make sure that the floor covering can be secured according to the Manufactured Home Construction and Safety Standard, Title 24 CFR, Part 3280 (formerly the Federal Standard for Manufactured Home Installations, ANSI A225.1/NFPA 501A or with your cabinets, check with local codes. ...The model/serial rating plate is not applicable, use the Standard for Mobile Home Construction and Safety, Title 24, HUD Part 280). See "Electrical Requirements" section. F BC ■ Proper gas supply connection must conform to the instructions in this range must be ...

Installation Guide
Page 7
... the front and rear leveling legs one -half turn . Use a wrench or pliers to adjust the rear legs from inside oven. 3. Remove oven racks and parts package from outside the range. Rear leveling leg C. Rear leveling leg B. Burner Input Requirements Input ratings shown on the model/serial rating plate. For elevations...
... the front and rear leveling legs one -half turn . Use a wrench or pliers to adjust the rear legs from inside oven. 3. Remove oven racks and parts package from outside the range. Rear leveling leg C. Rear leveling leg B. Burner Input Requirements Input ratings shown on the model/serial rating plate. For elevations...
Installation Guide
Page 9
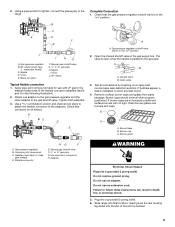
...-detection solution. Using a pipe wrench to tighten, connect the gas supply to the gas pipe. Tighten both adapters. 3. Remove cooktop burner caps and grates from parts package. Burner base B. Plug into a grounded 3 prong outlet. 6. Complete Connection 1. 2.
...-detection solution. Using a pipe wrench to tighten, connect the gas supply to the gas pipe. Tighten both adapters. 3. Remove cooktop burner caps and grates from parts package. Burner base B. Plug into a grounded 3 prong outlet. 6. Complete Connection 1. 2.

Installation Guide
Page 13
... into place. 3. The oven door is not, repeat the removal and installation procedures. Check that the door is open and close. Dispose of/recycle all parts are placed in the drawer. Check that the gas supply line shutoff valve is open. ■ If the gas supply line shutoff valve is closed... Door For normal range use, it away from whom you purchased your tools. 3. Close the oven door as far as the door is an extra part, go back through the steps to remove waxy residue caused by shipping material. Check that all packaging materials. 4. If you have all the way. 2. ...
... into place. 3. The oven door is not, repeat the removal and installation procedures. Check that the door is open and close. Dispose of/recycle all parts are placed in the drawer. Check that the gas supply line shutoff valve is open. ■ If the gas supply line shutoff valve is closed... Door For normal range use, it away from whom you purchased your tools. 3. Close the oven door as far as the door is an extra part, go back through the steps to remove waxy residue caused by shipping material. Check that all packaging materials. 4. If you have all the way. 2. ...
Installation Guide
Page 18
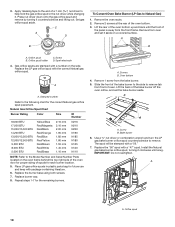
... behind the top right side of the oven door for proper sizing of a 7 mm nut driver to help hold the gas orifice spud in plastic parts bag for the remaining burners. C A D To Convert Oven Bake Burner (LP Gas to remove. Remove from front of the oven bottom. 3. Screw D. Remove 1 screw from...
... behind the top right side of the oven door for proper sizing of a 7 mm nut driver to help hold the gas orifice spud in plastic parts bag for the remaining burners. C A D To Convert Oven Bake Burner (LP Gas to remove. Remove from front of the oven bottom. 3. Screw D. Remove 1 screw from...


