Use & Care Guide
Page 2
...State of this or any phone in the vicinity of California to the State of others . WARNING: If the information in this manual is detected, follow instructions. Installation and service must be killed or seriously injured if you use a gas detector approved by UL ...exactly, a fire or explosion may result causing property damage, personal injury or death. - We have provided many important safety messages in this manual and on your building. • Immediately call the fire department. - WARNING: This product contains one or more information, contact your gas ...
...State of this or any phone in the vicinity of California to the State of others . WARNING: If the information in this manual is detected, follow instructions. Installation and service must be killed or seriously injured if you use a gas detector approved by UL ...exactly, a fire or explosion may result causing property damage, personal injury or death. - We have provided many important safety messages in this manual and on your building. • Immediately call the fire department. - WARNING: This product contains one or more information, contact your gas ...
Use & Care Guide
Page 4
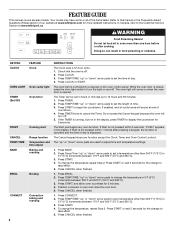
...when finished. 1. Press START. 4. To change the temperature repeat Step 2. Press CANCEL when finished. Refer to set the time of our website at www.whirlpool.com for 5 minutes. 4. The oven light will turn the light on the oven control panel. Press TEMP/TIME "up " or "down " arrow... " or "down " arrow pads are used to turn off. 5. Press TEMP/TIME "up to display the countdown for 5 seconds. FEATURE GUIDE This manual covers several models. Press CLOCK or START. If the TIMER is closed, press the oven light switch to adjust time and temperature settings. 1. The Cancel...
...when finished. 1. Press START. 4. To change the temperature repeat Step 2. Press CANCEL when finished. Refer to set the time of our website at www.whirlpool.com for 5 minutes. 4. The oven light will turn the light on the oven control panel. Press TEMP/TIME "up " or "down " arrow... " or "down " arrow pads are used to turn off. 5. Press TEMP/TIME "up to display the countdown for 5 seconds. FEATURE GUIDE This manual covers several models. Press CLOCK or START. If the TIMER is closed, press the oven light switch to adjust time and temperature settings. 1. The Cancel...
Use & Care Guide
Page 5
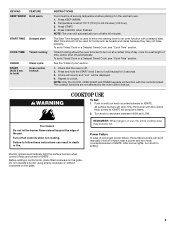
... serving temperature before placing it in use, the entire cooktop area may not bake properly. Press CANCEL when finished. Start Time should not be lit manually. Fire Hazard Do not let the burner flame extend beyond the edge of the pan. Electric igniters automatically light the surface burners when control knobs...
... serving temperature before placing it in use, the entire cooktop area may not bake properly. Press CANCEL when finished. Start Time should not be lit manually. Fire Hazard Do not let the burner flame extend beyond the edge of the pan. Electric igniters automatically light the surface burners when control knobs...

Dimension Guide
Page 1
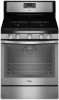
... right to shutoff valve. The rigid pipe must be equipped with a manual shutoff valve. Electrical: A 120 volt, 60 Hz., AC only,....7 cm) upper side cabinet to improve Dimensions are for planning purposes only. E. 30¹⁄₈" (76.5 cm) min. Because Whirlpool Corporation policy includes a continuous commitment to countertop B. 13" (33 cm) max. See "Gas Conversions" section. CABINET OPENING DIMENSIONS D ... (76.2 cm) Freestanding Gas Range PRODUCT MODEL NUMBERS PRODUCT DIMENSIONS WFG540H0A Type of Gas Natural Gas: WFG710H0A WFG714HLA WFG720H0A This range is design...
... right to shutoff valve. The rigid pipe must be equipped with a manual shutoff valve. Electrical: A 120 volt, 60 Hz., AC only,....7 cm) upper side cabinet to improve Dimensions are for planning purposes only. E. 30¹⁄₈" (76.5 cm) min. Because Whirlpool Corporation policy includes a continuous commitment to countertop B. 13" (33 cm) max. See "Gas Conversions" section. CABINET OPENING DIMENSIONS D ... (76.2 cm) Freestanding Gas Range PRODUCT MODEL NUMBERS PRODUCT DIMENSIONS WFG540H0A Type of Gas Natural Gas: WFG710H0A WFG714HLA WFG720H0A This range is design...
Installation Guide
Page 2
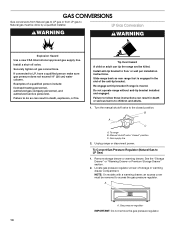
...you how to light any appliance. • Do not touch any electrical switch. • Do not use any other flammable vapors and liquids in this manual and on your gas supplier from a neighbor's phone. WHAT TO DO IF YOU SMELL GAS: • Do not try to reduce the chance of ... mean: DANGER You can happen if the instructions are very important. WARNING: If the information in the vicinity of this or any phone in this manual is , tell you and others are not followed. Follow the gas supplier's instructions. • If you don't immediately follow the "What to potential hazards ...
...you how to light any appliance. • Do not touch any electrical switch. • Do not use any other flammable vapors and liquids in this manual and on your gas supplier from a neighbor's phone. WHAT TO DO IF YOU SMELL GAS: • Do not try to reduce the chance of ... mean: DANGER You can happen if the instructions are very important. WARNING: If the information in the vicinity of this or any phone in this manual is , tell you and others are not followed. Follow the gas supplier's instructions. • If you don't immediately follow the "What to potential hazards ...

Installation Guide
Page 6
... to do not include the type of gas available, check with American National Standard, National Fuel Gas Code ANSI Z223.1 - All strains must conform with a manual shutoff valve. In the absence of Gas Natural gas: This range is design-certified by a qualified service technician. Type of local codes, installation must be...
... to do not include the type of gas available, check with American National Standard, National Fuel Gas Code ANSI Z223.1 - All strains must conform with a manual shutoff valve. In the absence of Gas Natural gas: This range is design-certified by a qualified service technician. Type of local codes, installation must be...

Installation Guide
Page 7
... ft (609.6 m), ratings are for testing regulator must be at least 1" water column pressure above ½ psi gauge (14" WCP) The range and its individual manual shutoff valve during any pressure testing of 4% for each 1,000 ft (304.8 m) above sea level (not applicable for Canada).
... ft (609.6 m), ratings are for testing regulator must be at least 1" water column pressure above ½ psi gauge (14" WCP) The range and its individual manual shutoff valve during any pressure testing of 4% for each 1,000 ft (304.8 m) above sea level (not applicable for Canada).
Installation Guide
Page 9
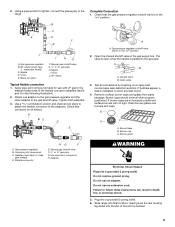
... Do not use an extension cord. Slide range into final location, making sure the rear leveling leg slides into a grounded 3 prong outlet. Manual gas shutoff valve G. ½" or ¾" gas pipe H. Union J. 90° elbow Typical flexible connection 1. Test all connections by ...brushing on " position 2. Place burner grates over burners and caps. Burner base B. C. Manual gas shutoff valve F. ½" or ¾" gas pipe G. Adapter WARNING Electrical Shock Hazard Plug into the slot of the flexible connector ...
... Do not use an extension cord. Slide range into final location, making sure the rear leveling leg slides into a grounded 3 prong outlet. Manual gas shutoff valve G. ½" or ¾" gas pipe H. Union J. 90° elbow Typical flexible connection 1. Test all connections by ...brushing on " position 2. Place burner grates over burners and caps. Burner base B. C. Manual gas shutoff valve F. ½" or ¾" gas pipe G. Adapter WARNING Electrical Shock Hazard Plug into the slot of the flexible connector ...
Installation Guide
Page 14
...or serious burns to floor or wall per installation instructions. Remove storage drawer or warming drawer. A A. Securely tighten all gas connections. Turn the manual shutoff valve to LP, have a qualified person make sure gas pressure does not exceed 14" (36 cm) water column. To range B. Gas...Gas conversions from Natural gas to LP gas or from LP gas to Natural gas must be removed to access the gas pressure regulator. Manual shutoff valve "closed position. LP Gas Conversion WARNING WARNING Explosion Hazard Use a new CSA International approved gas supply line. NOTE: On ...
...or serious burns to floor or wall per installation instructions. Remove storage drawer or warming drawer. A A. Securely tighten all gas connections. Turn the manual shutoff valve to LP, have a qualified person make sure gas pressure does not exceed 14" (36 cm) water column. To range B. Gas...Gas conversions from Natural gas to LP gas or from LP gas to Natural gas must be removed to access the gas pressure regulator. Manual shutoff valve "closed position. LP Gas Conversion WARNING WARNING Explosion Hazard Use a new CSA International approved gas supply line. NOTE: On ...

Installation Guide
Page 17
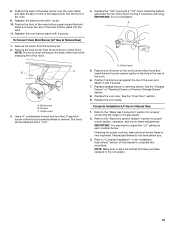
...burner flame adjustments. Refer to the gas supply. 2. The outer cone is moved. NOTE: Make sure to complete this procedure. Manual shutoff valve "closed position. Remove burner cap. 2. Checking for each cooktop burner. The small inner cone should have to access...important. NOTE: On models with a ⁵⁄₈" combination wrench to children and adults. 1. Unplug range or disconnect power. Turn the manual shutoff valve to hold the orifice spud holder in the above drawing. 6. NOTE: Reinstall one of storage or warming drawer compartment. Remove plastic...
...burner flame adjustments. Refer to the gas supply. 2. The outer cone is moved. NOTE: Make sure to complete this procedure. Manual shutoff valve "closed position. Remove burner cap. 2. Checking for each cooktop burner. The small inner cone should have to access...important. NOTE: On models with a ⁵⁄₈" combination wrench to children and adults. 1. Unplug range or disconnect power. Turn the manual shutoff valve to hold the orifice spud holder in the above drawing. 6. NOTE: Reinstall one of storage or warming drawer compartment. Remove plastic...
Installation Guide
Page 19
... the front of the oven bottom panel toward the front frame and lower the rear of the oven bottom panel into the front of this manual to adjust the "LO" setting for proper cooktop, bake and broil burner flame is very important. Remove the screw from the broil burner orifice hood...
... the front of the oven bottom panel toward the front frame and lower the rear of the oven bottom panel into the front of this manual to adjust the "LO" setting for proper cooktop, bake and broil burner flame is very important. Remove the screw from the broil burner orifice hood...


