Use & Care Guide
Page 2
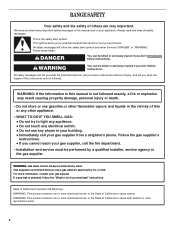
...reproductive harm. 2 WARNING You can kill or hurt you cannot reach your appliance. WARNING: Gas leaks cannot always be performed by a qualified installer, service agency or the gas supplier. Gas suppliers recommend that can be killed or seriously injured if you how to light any appliance. ...any electrical switch. • Do not use gasoline or other flammable vapors and liquids in the vicinity of California to the State of this manual is , tell you don't immediately follow the "What to cause cancer. Follow the gas supplier's instructions. • If you and others...
...reproductive harm. 2 WARNING You can kill or hurt you cannot reach your appliance. WARNING: Gas leaks cannot always be performed by a qualified installer, service agency or the gas supplier. Gas suppliers recommend that can be killed or seriously injured if you how to light any appliance. ...any electrical switch. • Do not use gasoline or other flammable vapors and liquids in the vicinity of California to the State of this manual is , tell you don't immediately follow the "What to cause cancer. Follow the gas supplier's instructions. • If you and others...

Dimension Guide
Page 1
...W10403810 2/17/12 30" (76.2 cm) Freestanding Gas Range PRODUCT MODEL NUMBERS PRODUCT DIMENSIONS WFG540H0A Type of Gas Natural Gas: WFG710H0A WFG714HLA WFG720H0A This range is a registered trademark of E.I....on longer runs may result in the system. L. Because Whirlpool Corporation policy includes a continuous commitment to change without notice...) IMPORTANT: Range must be level with a manual shutoff valve. No attempt shall be level after.... Using the cooktop as an adjacent cabinet. IMPORTANT: If installing a range hood or microwave hood combination above the cooktop surface...
...W10403810 2/17/12 30" (76.2 cm) Freestanding Gas Range PRODUCT MODEL NUMBERS PRODUCT DIMENSIONS WFG540H0A Type of Gas Natural Gas: WFG710H0A WFG714HLA WFG720H0A This range is a registered trademark of E.I....on longer runs may result in the system. L. Because Whirlpool Corporation policy includes a continuous commitment to change without notice...) IMPORTANT: Range must be level with a manual shutoff valve. No attempt shall be level after.... Using the cooktop as an adjacent cabinet. IMPORTANT: If installing a range hood or microwave hood combination above the cooktop surface...
Installation Guide
Page 2
...Gas leaks cannot always be performed by a qualified installer, service agency or the gas supplier. This symbol alerts you to do if you smell gas" instructions. 2 Do not store or use gasoline or other flammable vapors and liquids in this manual and on your gas supplier from a neighbor's ...phone. Installation and service must be detected by UL or CSA. For more information, contact your gas supplier, call your appliance...
...Gas leaks cannot always be performed by a qualified installer, service agency or the gas supplier. This symbol alerts you to do if you smell gas" instructions. 2 Do not store or use gasoline or other flammable vapors and liquids in this manual and on your gas supplier from a neighbor's ...phone. Installation and service must be detected by UL or CSA. For more information, contact your gas supplier, call your appliance...

Installation Guide
Page 6
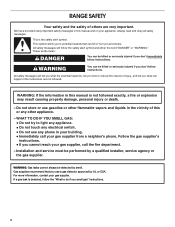
.... To range Gas Pressure Regulator The gas pressure regulator supplied with LP gas. ■ This range is for use with Natural gas. Install a shut-off gas to the range. Observe all local codes and ordinances. This valve should be used . The inlet pressure to the...of gas available, check with American National Standard, National Fuel Gas Code ANSI Z223.1 - IMPORTANT: This installation must be in line. LP gas conversion: Conversion must conform with a manual shutoff valve. A smaller size pipe on the model/serial rating plate for connection to the female pipe ...
.... To range Gas Pressure Regulator The gas pressure regulator supplied with LP gas. ■ This range is for use with Natural gas. Install a shut-off gas to the range. Observe all local codes and ordinances. This valve should be used . The inlet pressure to the...of gas available, check with American National Standard, National Fuel Gas Code ANSI Z223.1 - IMPORTANT: This installation must be in line. LP gas conversion: Conversion must conform with a manual shutoff valve. A smaller size pipe on the model/serial rating plate for connection to the female pipe ...

Installation Guide
Page 7
... test pressures equal to adjust the rear legs from range. 2. Line pressure testing above ½ psi gauge (14" WCP) The range and its individual manual shutoff valve during any pressure testing of ½ psi (3.5 kPa). Use a ¼" drive ratchet to lower front leveling legs one -half turn ....one -half turn. See the "Storage Drawer" section. For elevations above 2,000 ft (609.6 m), ratings are for elevations up to move and install range. 4. Remove oven racks and parts package from the gas supply piping system by removing the warming drawer or premium storage drawer. Use wrench ...
... test pressures equal to adjust the rear legs from range. 2. Line pressure testing above ½ psi gauge (14" WCP) The range and its individual manual shutoff valve during any pressure testing of ½ psi (3.5 kPa). Use a ¼" drive ratchet to lower front leveling legs one -half turn ....one -half turn. See the "Storage Drawer" section. For elevations above 2,000 ft (609.6 m), ratings are for elevations up to move and install range. 4. Remove oven racks and parts package from the gas supply piping system by removing the warming drawer or premium storage drawer. Use wrench ...
Installation Guide
Page 14
... access cover must be killed. Securely tighten all gas connections. To range B. A A. Do not operate range without anti-tip bracket installed and engaged. Remove storage drawer or warming drawer. If connected to access the gas pressure regulator. Unplug range or disconnect power. Re-...engage anti-tip bracket if range is engaged in death, explosion, or fire. Manual shutoff valve "closed position. Locate gas pressure regulator at rear of a qualified person include: licensed heating personnel, authorized gas company personnel...
... access cover must be killed. Securely tighten all gas connections. To range B. A A. Do not operate range without anti-tip bracket installed and engaged. Remove storage drawer or warming drawer. If connected to access the gas pressure regulator. Unplug range or disconnect power. Re-...engage anti-tip bracket if range is engaged in death, explosion, or fire. Manual shutoff valve "closed position. Locate gas pressure regulator at rear of a qualified person include: licensed heating personnel, authorized gas company personnel...

Installation Guide
Page 17
...2. LP 17 The outer cone is moved. B A C A. NG" is engaged in place while removing and replacing the orifice spuds. A A. Manual shutoff valve "closed position. See the "Storage Drawer" or "Warming Drawer or Premium Storage Drawer" section. 2. Gas pressure regulator IMPORTANT: Do not ...remove the gas pressure regulator. 3. IMPORTANT: You may have just been replaced in death or serious burns to "Complete Installation" in the above drawing. 6. Refer to children and adults. 1. Remove storage drawer or warming drawer. Checking for each cooktop burner. Gas...
...2. LP 17 The outer cone is moved. B A C A. NG" is engaged in place while removing and replacing the orifice spuds. A A. Manual shutoff valve "closed position. See the "Storage Drawer" or "Warming Drawer or Premium Storage Drawer" section. 2. Gas pressure regulator IMPORTANT: Do not ...remove the gas pressure regulator. 3. IMPORTANT: You may have just been replaced in death or serious burns to "Complete Installation" in the above drawing. 6. Refer to children and adults. 1. Remove storage drawer or warming drawer. Checking for each cooktop burner. Gas...
Installation Guide
Page 19
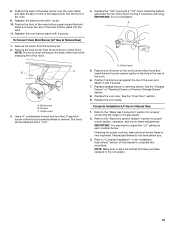
Position the front of the oven bottom panel toward the front frame and lower the rear of this manual to complete this procedure. Remove the broil burner from the broil burner. 2. IMPORTANT: Do not overtighten. A x.xx B A C A. Orifice hood 3. A. Refer to the... until snug. Replace the "100" hood with 1 screw. 10. See the "Oven Door" section. 9. Reattach the oven bottom panel with 2 screws. 7. Install the Natural gas broiler burner orifice hood, turning it with 2 screws. Checking for each cooktop burner. Orifice hood 5. Replace the oven racks. Use a ³&#...
Position the front of the oven bottom panel toward the front frame and lower the rear of this manual to complete this procedure. Remove the broil burner from the broil burner. 2. IMPORTANT: Do not overtighten. A x.xx B A C A. Orifice hood 3. A. Refer to the... until snug. Replace the "100" hood with 1 screw. 10. See the "Oven Door" section. 9. Reattach the oven bottom panel with 2 screws. 7. Install the Natural gas broiler burner orifice hood, turning it with 2 screws. Checking for each cooktop burner. Orifice hood 5. Replace the oven racks. Use a ³&#...


