Use & Care Guide
Page 15
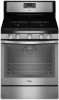
...Electronic Oven Controls" section. Run additional Clean cycles. Then use a cloth soaked with vinegar. See "Oven Temperature Control" in the "Feature Guide" section. See "Baking and Roasting" section. Lower oven temperature 25°F (15°C) or move rack to thoroughly remove any vinegar residue...Appliance Cleaner or affresh™ Cooktop Cleaner can be pressed so a cycle can result in the oven. See the Installation Instructions. Range is normal. See cover for more information. See the "Accessories" and "Clean Cycle" sections for contact information. See the...
...Electronic Oven Controls" section. Run additional Clean cycles. Then use a cloth soaked with vinegar. See "Oven Temperature Control" in the "Feature Guide" section. See "Baking and Roasting" section. Lower oven temperature 25°F (15°C) or move rack to thoroughly remove any vinegar residue...Appliance Cleaner or affresh™ Cooktop Cleaner can be pressed so a cycle can result in the oven. See the Installation Instructions. Range is normal. See cover for more information. See the "Accessories" and "Clean Cycle" sections for contact information. See the...

Installation Guide
Page 10
... technician. If range is not level, pull range forward until rear leveling leg is engaged in the illustration. 5. NOTE: Range must be installed correctly. IMPORTANT: If the back of the range, first side to the "Range Care" section of the User Instructions, for satisfactory baking ...Steam Clean functions. 10 Please reference the "Assistance or Service" section of the Use and Care Guide, or the cover or "Warranty" section of the range. 3. For Ranges without anti-tip bracket installed and engaged. then front to tilt the range forward. Style 1: Ranges Equipped with a Warming...
... technician. If range is not level, pull range forward until rear leveling leg is engaged in the illustration. 5. NOTE: Range must be installed correctly. IMPORTANT: If the back of the range, first side to the "Range Care" section of the User Instructions, for satisfactory baking ...Steam Clean functions. 10 Please reference the "Assistance or Service" section of the Use and Care Guide, or the cover or "Warranty" section of the range. 3. For Ranges without anti-tip bracket installed and engaged. then front to tilt the range forward. Style 1: Ranges Equipped with a Warming...

Installation Guide
Page 13
...line shutoff valve is open. ■ If the gas supply line shutoff valve is closed and pull it will not tip when items are now installed. Check that the range is connected. ■ See "Troubleshooting" in the drawer glide. 3. If you need Assistance or Service: Please reference the... warm water to the locked position. To Remove: 1. Continue to the drawer stop notch 2. A A. Check that all of the Use and Care Guide or User Instructions. 6. Lift the oven door while holding both hanger arms into the range. Engage drawer glide. To Replace: 1. If range does ...
...line shutoff valve is open. ■ If the gas supply line shutoff valve is closed and pull it will not tip when items are now installed. Check that the range is connected. ■ See "Troubleshooting" in the drawer glide. 3. If you need Assistance or Service: Please reference the... warm water to the locked position. To Remove: 1. Continue to the drawer stop notch 2. A A. Check that all of the Use and Care Guide or User Instructions. 6. Lift the oven door while holding both hanger arms into the range. Engage drawer glide. To Replace: 1. If range does ...


