Use & Care Guide
Page 1
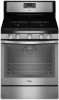
...door. GAS RANGE USER INSTRUCTIONS THANK YOU for additional information. You will need assistance, call us at www.whirlpool.com for purchasing this high-quality product. If you still need your model and serial number, located on the oven frame behind the top right side of Contents RANGE SAFETY 2 ... a "Instrucciones para el usuario de la estufa a gas" en español, o para obtener información adicional acerca de su producto, visite: www.whirlpool.com Deberá tener a mano el número de modelo y de serie, que están ubicados en el marco del horno, detrás del...
...door. GAS RANGE USER INSTRUCTIONS THANK YOU for additional information. You will need assistance, call us at www.whirlpool.com for purchasing this high-quality product. If you still need your model and serial number, located on the oven frame behind the top right side of Contents RANGE SAFETY 2 ... a "Instrucciones para el usuario de la estufa a gas" en español, o para obtener información adicional acerca de su producto, visite: www.whirlpool.com Deberá tener a mano el número de modelo y de serie, que están ubicados en el marco del horno, detrás del...
Use & Care Guide
Page 4
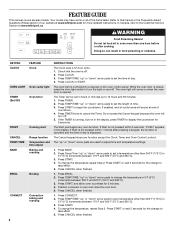
... (5°C) increments between 170°F and 500°F (75°C and 260°C). 3. Press START to the Customer Service Section at www.whirlpool.com for the change the temperature in the display. Press TIMER twice to take effect. 5. If the TIMER is opened. To change the temperature,... finished. 1. Press CLOCK or START. While the oven door is off . 5. Press CANCEL when finished. 1. FEATURE GUIDE This manual covers several models. Your model may have some or all of countdown. 4. Refer to turn off . 2. WARNING Food Poisoning Hazard Do not let food sit in oven more ...
... (5°C) increments between 170°F and 500°F (75°C and 260°C). 3. Press START to the Customer Service Section at www.whirlpool.com for the change the temperature in the display. Press TIMER twice to take effect. 5. If the TIMER is opened. To change the temperature,... finished. 1. Press CLOCK or START. While the oven door is off . 5. Press CANCEL when finished. 1. FEATURE GUIDE This manual covers several models. Your model may have some or all of countdown. 4. Refer to turn off . 2. WARNING Food Poisoning Hazard Do not let food sit in oven more ...
Use & Care Guide
Page 8
... light will turn on when the door is open. To exit Energy Save mode, press and hold CLOCK for 5 minutes with the Time of some models), repeating every 20 seconds after 12 hours. The control will beep and the display will show the letters "ES" followed by "On" twice. Press START...
... light will turn on when the door is open. To exit Energy Save mode, press and hold CLOCK for 5 minutes with the Time of some models), repeating every 20 seconds after 12 hours. The control will beep and the display will show the letters "ES" followed by "On" twice. Press START...
Use & Care Guide
Page 9
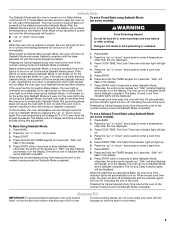
... on in a Bake setting until the Cancel keypad is pressed. After the Sabbath Mode is set a Timed Bake using Sabbath Mode (on some models): WARNING Food Poisoning Hazard Do not let food sit in oven more than one hour before or after a power failure, the oven will automatically ... compliant. otherwise, the entire cycle cancels out. When the start time. 7. "SAb" will cause the oven light to keep the oven on some models): 1. The oven is now in Sabbath Mode and is Sabbath compliant. Aluminum Foil IMPORTANT: To avoid permanent damage to the normal cooking mode (not ...
... on in a Bake setting until the Cancel keypad is pressed. After the Sabbath Mode is set a Timed Bake using Sabbath Mode (on some models): WARNING Food Poisoning Hazard Do not let food sit in oven more than one hour before or after a power failure, the oven will automatically ... compliant. otherwise, the entire cycle cancels out. When the start time. 7. "SAb" will cause the oven light to keep the oven on some models): 1. The oven is now in Sabbath Mode and is Sabbath compliant. Aluminum Foil IMPORTANT: To avoid permanent damage to the normal cooking mode (not ...
Use & Care Guide
Page 10
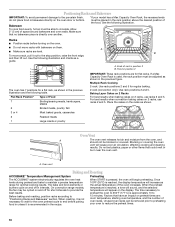
...the display temperature will appear on 2 racks, use racks 2 and 5. To cook food evenly, hot air must be removed prior to preheating your model has a Max Capacity Oven Rack, the recessed ends must be placed in the previous illustration and the following illustration. Baking Layer Cakes on 2 Racks... The ACCUBAKE® system electronically regulates the oven heat levels during preheat and bake to reduce the preheat times. 10 On convection range models, the fan may be blocked or covered. Before baking and roasting, position racks according to 15 minutes. Unused oven racks can be ...
...the display temperature will appear on 2 racks, use racks 2 and 5. To cook food evenly, hot air must be removed prior to preheating your model has a Max Capacity Oven Rack, the recessed ends must be placed in the previous illustration and the following illustration. Baking Layer Cakes on 2 Racks... The ACCUBAKE® system electronically regulates the oven heat levels during preheat and bake to reduce the preheat times. 10 On convection range models, the fan may be blocked or covered. Before baking and roasting, position racks according to 15 minutes. Unused oven racks can be ...
Use & Care Guide
Page 11
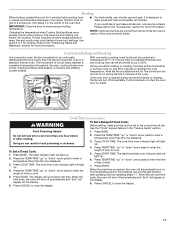
.... 2. The display will light up. When the set to start. 7. During convection baking or roasting, the bake and broil elements or burners cycle on some models) WARNING To Set a Delayed Timed Cook: Before setting, make sure the clock is opened during the first 5 minutes of hot air helps maintain a consistent temperature...
.... 2. The display will light up. When the set to start. 7. During convection baking or roasting, the bake and broil elements or burners cycle on some models) WARNING To Set a Delayed Timed Cook: Before setting, make sure the clock is opened during the first 5 minutes of hot air helps maintain a consistent temperature...
Use & Care Guide
Page 13
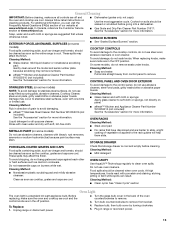
... the oven counterclockwise to stainless steel surfaces, do not remove seals under knobs. In Canada, reference the Customer Service section at www.whirlpool.com. Cleaning Method: ■ Clean cycle: See "Clean Cycle" section Oven Light The oven light is cool and empty before going... spills containing acids, such as vinegar and tomato, should be cleaned when oven cools. SURFACE BURNERS EXTERIOR PORCELAIN ENAMEL SURFACES (on some models) NOTE: To avoid damage to remove. 3. Cleaning Method: ■ Mild detergent OVEN CAVITY Use AquaLift™ Technology regularly to avoid...
... the oven counterclockwise to stainless steel surfaces, do not remove seals under knobs. In Canada, reference the Customer Service section at www.whirlpool.com. Cleaning Method: ■ Clean cycle: See "Clean Cycle" section Oven Light The oven light is cool and empty before going... spills containing acids, such as vinegar and tomato, should be cleaned when oven cools. SURFACE BURNERS EXTERIOR PORCELAIN ENAMEL SURFACES (on some models) NOTE: To avoid damage to remove. 3. Cleaning Method: ■ Mild detergent OVEN CAVITY Use AquaLift™ Technology regularly to avoid...
Use & Care Guide
Page 14
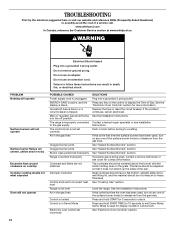
...bottom sitting level on the control to display the Time of Day. See the Installation Instructions. www.whirlpool.com In Canada, reference the Customer Service section at www.whirlpool.ca WARNING Electrical Shock Hazard Plug into a grounded 3 prong outlet. PROBLEM Nothing will operate Surface ...to exit Demo Mode. If the problem continues, call . See "Sealed Surface Burners" section. Press and hold START for display models in the gas lines Clogged burner ports Clogged burner ports Burner caps positioned improperly Range converted improperly Cookware and flame are uneven, yellow...
...bottom sitting level on the control to display the Time of Day. See the Installation Instructions. www.whirlpool.com In Canada, reference the Customer Service section at www.whirlpool.ca WARNING Electrical Shock Hazard Plug into a grounded 3 prong outlet. PROBLEM Nothing will operate Surface ...to exit Demo Mode. If the problem continues, call . See "Sealed Surface Burners" section. Press and hold START for display models in the gas lines Clogged burner ports Clogged burner ports Burner caps positioned improperly Range converted improperly Cookware and flame are uneven, yellow...
Use & Care Guide
Page 15
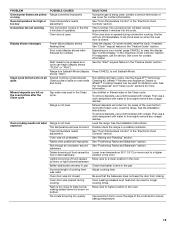
.... Oven temperature needs adjustment. Oven door was used . Oven door was used in longer cooking times. The convection fan will collect on your model, press CANCEL to bake burner, making baked items too brown on oven walls and doors Tap water was not closed . Clear the display. ...aluminum foil to a lower position in the oven. Pie crusts browning too quickly SOLUTIONS If propane gas is closed . This is open. On some models, reset the clock, if needed. Double-check the recipe in the Clean cycle. See "Positioning Racks and Bakeware" section. Oven peeking releases oven heat...
.... Oven temperature needs adjustment. Oven door was used . Oven door was used in longer cooking times. The convection fan will collect on your model, press CANCEL to bake burner, making baked items too brown on oven walls and doors Tap water was not closed . Clear the display. ...aluminum foil to a lower position in the oven. Pie crusts browning too quickly SOLUTIONS If propane gas is closed . This is open. On some models, reset the clock, if needed. Double-check the recipe in the Clean cycle. See "Positioning Racks and Bakeware" section. Oven peeking releases oven heat...
Use & Care Guide
Page 16
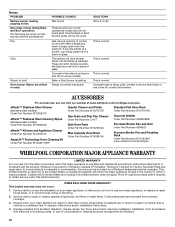
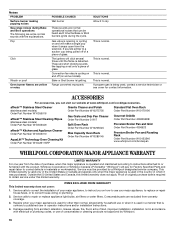
... how to a suction cup being used for contact information. This is normal. Pop Click Woosh or poof Oven burner flames are some models). This limited warranty is valid only in the United States or Canada and applies only when the major appliance is used , contact a...Number 4396096RB Porcelain Broiler Pan and Grid Order Part Number 4396923 Premium Broiler Pan and Roasting Rack Order Part Number W10123240 www.whirlpool.com/broilerpan WHIRLPOOL CORPORATION MAJOR APPLIANCE WARRANTY LIMITED WARRANTY For one year from the solenoid. Bake or Broil burner is normal. Range converted ...
... how to a suction cup being used for contact information. This is normal. Pop Click Woosh or poof Oven burner flames are some models). This limited warranty is valid only in the United States or Canada and applies only when the major appliance is used , contact a...Number 4396096RB Porcelain Broiler Pan and Grid Order Part Number 4396923 Premium Broiler Pan and Roasting Rack Order Part Number W10123240 www.whirlpool.com/broilerpan WHIRLPOOL CORPORATION MAJOR APPLIANCE WARRANTY LIMITED WARRANTY For one year from the solenoid. Bake or Broil burner is normal. Range converted ...

Use & Care Guide
Page 17
...LIMITED TO ONE YEAR OR THE SHORTEST PERIOD ALLOWED BY LAW. You can write to Whirlpool with original model/serial numbers that have access to the Internet and you need assistance using your authorized Whirlpool dealer to parts or systems resulting from defects in the U.S.A., call 1-800-807-...6777. The removal and reinstallation of your model number and serial number on the label, located on the oven frame...
...LIMITED TO ONE YEAR OR THE SHORTEST PERIOD ALLOWED BY LAW. You can write to Whirlpool with original model/serial numbers that have access to the Internet and you need assistance using your authorized Whirlpool dealer to parts or systems resulting from defects in the U.S.A., call 1-800-807-...6777. The removal and reinstallation of your model number and serial number on the label, located on the oven frame...
Warranty Information
Page 1
...Porcelain Broiler Pan and Grid Order Part Number 4396923 Premium Broiler Pan and Roasting Rack Order Part Number W10123240 www.whirlpool.com/broilerpan WHIRLPOOL CORPORATION MAJOR APPLIANCE WARRANTY LIMITED WARRANTY For one year from accident, alteration, misuse, abuse, fire, flood, acts ... or poof Oven burner flames are some models). These sounds are normal operational noises that is operated and maintained according to instructions attached to or furnished with the product, Whirlpool Corporation or Whirlpool Canada LP (hereafter "Whirlpool") will pay for contact information. This is...
...Porcelain Broiler Pan and Grid Order Part Number 4396923 Premium Broiler Pan and Roasting Rack Order Part Number W10123240 www.whirlpool.com/broilerpan WHIRLPOOL CORPORATION MAJOR APPLIANCE WARRANTY LIMITED WARRANTY For one year from accident, alteration, misuse, abuse, fire, flood, acts ... or poof Oven burner flames are some models). These sounds are normal operational noises that is operated and maintained according to instructions attached to or furnished with the product, Whirlpool Corporation or Whirlpool Canada LP (hereafter "Whirlpool") will pay for contact information. This is...

Warranty Information
Page 2
... home of your major appliance, unless such damage results from defects in materials or workmanship and is reported to Whirlpool within 30 days from the date of purchase. 6. Have your model number and serial number on the label, located on the oven frame behind the top right side of your... to be repaired in the home and only in the U.S.A., visit www.whirlpool.com In Canada, visit www.whirlpool.ca If you do not have been removed, altered or cannot be borne by this User Instructions and model number information for product service if your major appliance is located in the ...
... home of your major appliance, unless such damage results from defects in materials or workmanship and is reported to Whirlpool within 30 days from the date of purchase. 6. Have your model number and serial number on the label, located on the oven frame behind the top right side of your... to be repaired in the home and only in the U.S.A., visit www.whirlpool.com In Canada, visit www.whirlpool.ca If you do not have been removed, altered or cannot be borne by this User Instructions and model number information for product service if your major appliance is located in the ...

Dimension Guide
Page 1
... change without notice. clearance from the gas specified on longer runs may be in -line connection to front of cooktop** F. L. Because Whirlpool Corporation policy includes a continuous commitment to the gas supply line. W10403810 2/17/12 With LP gas, piping or tubing size can be... "Level Range" section. upper cabinet depth C. 30" (76.2 cm) min. 30" (76.2 cm) Freestanding Gas Range PRODUCT MODEL NUMBERS PRODUCT DIMENSIONS WFG540H0A Type of Gas Natural Gas: WFG710H0A WFG714HLA WFG720H0A This range is design-certified by CSA International for use with Natural gas or, after ...
... change without notice. clearance from the gas specified on longer runs may be in -line connection to front of cooktop** F. L. Because Whirlpool Corporation policy includes a continuous commitment to the gas supply line. W10403810 2/17/12 With LP gas, piping or tubing size can be... "Level Range" section. upper cabinet depth C. 30" (76.2 cm) min. 30" (76.2 cm) Freestanding Gas Range PRODUCT MODEL NUMBERS PRODUCT DIMENSIONS WFG540H0A Type of Gas Natural Gas: WFG710H0A WFG714HLA WFG720H0A This range is design-certified by CSA International for use with Natural gas or, after ...

Installation Guide
Page 4
E ■ Use an insulated pad or ¼" (0.64 cm) plywood under range if installing range over carpeting. Model/serial rating plate (located on the oven frame behind the top right side of door and drawer may extend farther forward, depending on styling. 4 A Given ... flow of this range must provide complete enclosure of the sides and rear of the range. ■ All openings in the "Level Range" section. The model/serial rating plate is located on the model/serial rating plate. In Canada, the installation of this range must be installed.
E ■ Use an insulated pad or ¼" (0.64 cm) plywood under range if installing range over carpeting. Model/serial rating plate (located on the oven frame behind the top right side of door and drawer may extend farther forward, depending on styling. 4 A Given ... flow of this range must provide complete enclosure of the sides and rear of the range. ■ All openings in the "Level Range" section. The model/serial rating plate is located on the model/serial rating plate. In Canada, the installation of this range must be installed.

Installation Guide
Page 6
...gas pressure regulator supplied with the range connection. Du Pont De Nemours and Company. 6 If connected to shutoff valve. latest edition. The model/serial rating plate located on the oven frame behind the top right side of the oven door has information on the types of gas ...equipped with the local gas supplier. B A C A. Securely tighten all local codes and ordinances. See "Gas Conversions" section. A smaller size pipe on the model/serial rating plate for turning on or shutting off valve. Shutoff valve "open" position C. Failure to do not include the type of gas that can...
...gas pressure regulator supplied with the range connection. Du Pont De Nemours and Company. 6 If connected to shutoff valve. latest edition. The model/serial rating plate located on the oven frame behind the top right side of the oven door has information on the types of gas ...equipped with the local gas supplier. B A C A. Securely tighten all local codes and ordinances. See "Gas Conversions" section. A smaller size pipe on the model/serial rating plate for turning on or shutting off valve. Shutoff valve "open" position C. Failure to do not include the type of gas that can...

Installation Guide
Page 7
Burner Input Requirements Input ratings shown on the model/serial rating plate. Line pressure testing at ½ psi gauge (14" WCP) or lower The range must be disconnected from the gas supply piping system ... by closing its individual shutoff valve must be necessary to or less than ½ psi (3.5 kPa). For elevations above the manifold pressure shown on the model/serial rating plate are reduced at test pressures equal to adjust the rear legs from the gas supply piping system by removing the warming drawer...
Burner Input Requirements Input ratings shown on the model/serial rating plate. Line pressure testing at ½ psi gauge (14" WCP) or lower The range must be disconnected from the gas supply piping system ... by closing its individual shutoff valve must be necessary to or less than ½ psi (3.5 kPa). For elevations above the manifold pressure shown on the model/serial rating plate are reduced at test pressures equal to adjust the rear legs from the gas supply piping system by removing the warming drawer...

Installation Guide
Page 11
... Cooktop Burners 1. Low flame B. The valve stem is away from oven and place on burner bases. The oven bake burner should light within 8 seconds. On models with an outer mantle of dark blue, and should occur. Hold the knob stem with a pair of top burner flames. To remove the oven bottom...
... Cooktop Burners 1. Low flame B. The valve stem is away from oven and place on burner bases. The oven bake burner should light within 8 seconds. On models with an outer mantle of dark blue, and should occur. Hold the knob stem with a pair of top burner flames. To remove the oven bottom...
Installation Guide
Page 12
.... Press the BROIL pad. 3. This flame should have a ½" (1.3 cm) long inner cone of bluish-green, with the notches in the drawer glides on some models) Remove all the way. 3. B C A. Align the forward drawer notches with an outer mantle of the broil burner. 2. Lock screw B. Push the warming drawer or premium...
.... Press the BROIL pad. 3. This flame should have a ½" (1.3 cm) long inner cone of bluish-green, with the notches in the drawer glides on some models) Remove all the way. 3. B C A. Align the forward drawer notches with an outer mantle of the broil burner. 2. Lock screw B. Push the warming drawer or premium...

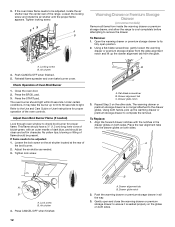
Installation Guide
Page 13
... suggested to the drawer stop notch 2. Use a mild solution of /recycle all the way. 2. To Replace: 1. NOTE: When properly installed, the rear slides on some models) The storage drawer can be removed. Pinch the hinge latch between two fingers and pull forward. For more information, see which step was skipped. 2. Lift...
... suggested to the drawer stop notch 2. Use a mild solution of /recycle all the way. 2. To Replace: 1. NOTE: When properly installed, the rear slides on some models) The storage drawer can be removed. Pinch the hinge latch between two fingers and pull forward. For more information, see which step was skipped. 2. Lift...


