Owners Manual
Page 1
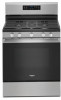
... your product model and serial numbers. These can be found on the label located on the upper-left side of Contents RANGE SAFETY 2 The Anti-Tip Bracket 3 FEATURE GUIDE 4 COOKTOP USE 6 Sealed Surface Burners 6 Grates 7 Burner Size 7 Cookware 7 Home Canning 8 OVEN USE 8 Electronic Oven Controls 8 Sabbath Mode 9 Keep Warm 10 Aluminum Foil 10 Positioning Racks and Bakeware 10 Oven Vent 10 Baking and Roasting 11 Broiling 11 Convection Baking and Roasting 11 Cook Time 11 RANGE CARE 12 Self-Cleaning Cycle 12 General Cleaning 13 Oven Light 13 TROUBLESHOOTING 14 ACCESSORIES...
... your product model and serial numbers. These can be found on the label located on the upper-left side of Contents RANGE SAFETY 2 The Anti-Tip Bracket 3 FEATURE GUIDE 4 COOKTOP USE 6 Sealed Surface Burners 6 Grates 7 Burner Size 7 Cookware 7 Home Canning 8 OVEN USE 8 Electronic Oven Controls 8 Sabbath Mode 9 Keep Warm 10 Aluminum Foil 10 Positioning Racks and Bakeware 10 Oven Vent 10 Baking and Roasting 11 Broiling 11 Convection Baking and Roasting 11 Cook Time 11 RANGE CARE 12 Self-Cleaning Cycle 12 General Cleaning 13 Oven Light 13 TROUBLESHOOTING 14 ACCESSORIES...
Owners Manual
Page 3
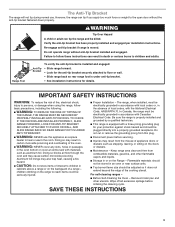
... surface units. Keep range area clear and free from this appliance as aluminum foil. Flammable materials should be plugged directly into a properly grounded receptacle. For self-cleaning ranges - I Proper Installation - Remove broiler pan and other flammable vapors and liquids. Verify the anti-tip bracket has been properly installed and engaged per installation instructions. IMPORTANT SAFETY INSTRUCTIONS WARNING: To reduce the risk of local codes, with Canadian Electrical Code. Do not operate range without the anti-tip bracket...
... surface units. Keep range area clear and free from this appliance as aluminum foil. Flammable materials should be plugged directly into a properly grounded receptacle. For self-cleaning ranges - I Proper Installation - Remove broiler pan and other flammable vapors and liquids. Verify the anti-tip bracket has been properly installed and engaged per installation instructions. IMPORTANT SAFETY INSTRUCTIONS WARNING: To reduce the risk of local codes, with Canadian Electrical Code. Do not operate range without the anti-tip bracket...

Owners Manual
Page 4
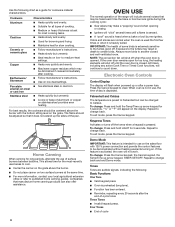
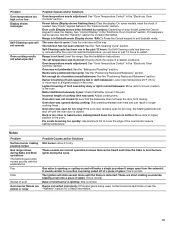
.... 1. TEMP/TIME BAKE Temperature and time adjust Baking and roasting The Temp/Time up to cancel the Timer. In Canada, reference the Customer Service section at www.whirlpool.com for too long, the heating elements will sound at end of day is closed . Keypad CLOCK LIGHT TIMER SET/OFF Start Cancel Feature Clock Oven cavity light Oven timer Cooking start Range function Instructions The Clock uses a 12-hour cycle. 1. Press the Temp/Time up or down arrow keypad to adjust time and temperature settings. 1. Press BAKE. 2. If the oven door remains open for...
.... 1. TEMP/TIME BAKE Temperature and time adjust Baking and roasting The Temp/Time up to cancel the Timer. In Canada, reference the Customer Service section at www.whirlpool.com for too long, the heating elements will sound at end of day is closed . Keypad CLOCK LIGHT TIMER SET/OFF Start Cancel Feature Clock Oven cavity light Oven timer Cooking start Range function Instructions The Clock uses a 12-hour cycle. 1. Press the Temp/Time up or down arrow keypad to adjust time and temperature settings. 1. Press BAKE. 2. If the oven door remains open for...
Owners Manual
Page 6
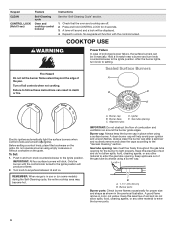
...: When range is blue in use or (on some models) during the Self-Cleaning cycle, the entire cooktop area may become hot. E C A. Burner base C. Alignment pins D. A clean burner cap will be lit manually. A good flame is in color, not yellow. Keypad CLEAN CONTROL LOCK (Hold 3 sec) Feature Self-Cleaning cycle Oven and cooktop control lockout Instructions See the "Self-Cleaning Cycle" section. 1. Repeat to follow these instructions can be displayed. 4. No keypads will function with the control knob turned to...
...: When range is blue in use or (on some models) during the Self-Cleaning cycle, the entire cooktop area may become hot. E C A. Burner base C. Alignment pins D. A clean burner cap will be lit manually. A good flame is in color, not yellow. Keypad CLEAN CONTROL LOCK (Hold 3 sec) Feature Self-Cleaning cycle Oven and cooktop control lockout Instructions See the "Self-Cleaning Cycle" section. 1. Repeat to follow these instructions can be displayed. 4. No keypads will function with the control knob turned to...
Owners Manual
Page 8
... the burner with 120 V power connection and permits the control features to be heard each time the bake or broil burners ignite during the cooking cycle: ■■ Gas valves may result in use on the sales floor with the bottom sitting level on . Press the Cancel keypad to change : Press the Cancel keypad, the Cancel keypad, the Temp/Time up the sides of cycle 8 To exit mode, press...
... the burner with 120 V power connection and permits the control features to be heard each time the bake or broil burners ignite during the cooking cycle: ■■ Gas valves may result in use on the sales floor with the bottom sitting level on . Press the Cancel keypad to change : Press the Cancel keypad, the Cancel keypad, the Temp/Time up the sides of cycle 8 To exit mode, press...
Owners Manual
Page 11
.... To Set a Delayed Timed Cook: Before setting, make sure the clock is closed . When the set temperature to offset the heat lost when your food when the preheat tone sounds. NOTE: On models with your food in oven more precise control when cooking. Broiling NOTE: The convection fan will come back on and off in the non-convection Bake mode to maintain the proper temperature. ■■ For best results, use the oven light to...
.... To Set a Delayed Timed Cook: Before setting, make sure the clock is closed . When the set temperature to offset the heat lost when your food when the preheat tone sounds. NOTE: On models with your food in oven more precise control when cooking. Broiling NOTE: The convection fan will come back on and off in the non-convection Bake mode to maintain the proper temperature. ■■ For best results, use the oven light to...
Owners Manual
Page 12
.... RANGE CARE WARNING Self-Cleaning Cycle (on some models) How the Cycle Works IMPORTANT: The heating and cooling of porcelain on your model, see "Oven Vent" section. Keep children away from the oven. Exposure to the fumes may continue to another closed or the door will not lock and the Self-Cleaning cycle will not function during the Self-Cleaning cycle. Electronic Oven Control with Adjustable Clean Time (on some models, the temperature probe from oven during the Self-Cleaning...
.... RANGE CARE WARNING Self-Cleaning Cycle (on some models) How the Cycle Works IMPORTANT: The heating and cooling of porcelain on your model, see "Oven Vent" section. Keep children away from the oven. Exposure to the fumes may continue to another closed or the door will not lock and the Self-Cleaning cycle will not function during the Self-Cleaning cycle. Electronic Oven Control with Adjustable Clean Time (on some models, the temperature probe from oven during the Self-Cleaning...
Owners Manual
Page 13
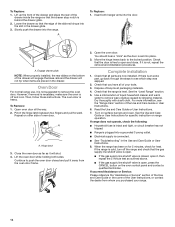
... be cleaned when oven cools. Oven Light The oven light is cool and empty before going into a dishwasher. ■■ Gas Grate and Drip Pan Cleaner Part Number 31617: See the "Warranty" section for more information. Turn bulb counterclockwise to remove from control panel to the control panel, do not soak knobs. Always follow label instructions on some models) Food spills containing acids, such as cooktop, grates, and caps are in range or reconnect power...
... be cleaned when oven cools. Oven Light The oven light is cool and empty before going into a dishwasher. ■■ Gas Grate and Drip Pan Cleaner Part Number 31617: See the "Warranty" section for more information. Turn bulb counterclockwise to remove from control panel to the control panel, do not soak knobs. Always follow label instructions on some models) Food spills containing acids, such as cooktop, grates, and caps are in range or reconnect power...

Owners Manual
Page 14
... not operate during Self-Cleaning cycle. The control knob is being used , turn on cooktop Cookware and flame are not matched: The cookware should be centered above the burner with any one of the pan. Surface burner flames are Range converted improperly: If Propane gas is not set correctly: Push in knob before turning to the warranty page in this manual, or visit producthelp.whirlpool.com. See the Installation Instructions. Electronic oven control set to incorrect heat level: See the "Cooktop Use" section. Oven burner flames are...
... not operate during Self-Cleaning cycle. The control knob is being used , turn on cooktop Cookware and flame are not matched: The cookware should be centered above the burner with any one of the pan. Surface burner flames are Range converted improperly: If Propane gas is not set correctly: Push in knob before turning to the warranty page in this manual, or visit producthelp.whirlpool.com. See the Installation Instructions. Electronic oven control set to incorrect heat level: See the "Cooktop Use" section. Oven burner flames are...
Owners Manual
Page 15
.... The igniters will click several times until the oven door is in the oven. Range converted improperly: If Propane gas is being pulled off until the flame is normal. On some normal sounds with the explanations. See "Clock" keypad feature in the "Electronic Oven Controls" section. Noises Problem Surface burner making baked items too brown on and will shut off of a piece of the crust and/or reduce baking temperature. Gas valve is normal...
.... The igniters will click several times until the oven door is in the oven. Range converted improperly: If Propane gas is being pulled off until the flame is normal. On some normal sounds with the explanations. See "Clock" keypad feature in the "Electronic Oven Controls" section. Noises Problem Surface burner making baked items too brown on and will shut off of a piece of the crust and/or reduce baking temperature. Gas valve is normal...
Installation Instructions
Page 4
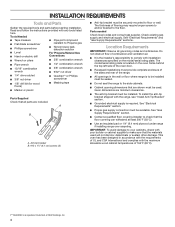
... listed here. A B A. Check existing gas supply and electrical supply. This oven has been designed in the wall or floor where range is located on the model/serial rating plate. Anti-tip bracket B. #12 x 15⁄8" (4.1 cm) screws (2) ■ Anti-tip bracket must be used will not discolor, delaminate or sustain other damage. See "Electrical Requirements" and "Gas Supply Requirements" sections. Given dimensions are shown must be securely mounted to Propane gas ■ Noncorrosive leakdetection solution For Propane/Natural Gas Conversions...
... listed here. A B A. Check existing gas supply and electrical supply. This oven has been designed in the wall or floor where range is located on the model/serial rating plate. Anti-tip bracket B. #12 x 15⁄8" (4.1 cm) screws (2) ■ Anti-tip bracket must be used will not discolor, delaminate or sustain other damage. See "Electrical Requirements" and "Gas Supply Requirements" sections. Given dimensions are shown must be securely mounted to Propane gas ■ Noncorrosive leakdetection solution For Propane/Natural Gas Conversions...
Installation Instructions
Page 5
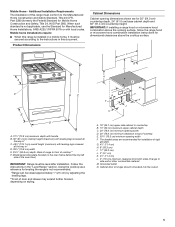
Model/serial rating plate (located on styling. Grounded outlet N. Product Dimensions Cabinet Dimensions Cabinet opening dimensions shown are recommended for dimensional clearances above the cooking surface, follow the range hood or microwave hood combination installation instructions for installation of cooktop** F. Back of range to top of cooktop E. 30¹⁄8" (76.5 cm) minimum opening width D. 30" (76.2 cm) minimum clearance to front of rigid gas pipe. Using the cooktop as a reference for 25" (64...
Model/serial rating plate (located on styling. Grounded outlet N. Product Dimensions Cabinet Dimensions Cabinet opening dimensions shown are recommended for dimensional clearances above the cooking surface, follow the range hood or microwave hood combination installation instructions for installation of cooktop** F. Back of range to top of cooktop E. 30¹⁄8" (76.5 cm) minimum opening width D. 30" (76.2 cm) minimum clearance to front of rigid gas pipe. Using the cooktop as a reference for 25" (64...
Installation Instructions
Page 6
.... Do not use an adapter. IMPORTANT: The range must conform with the National Electrical Code, ANSI/NFPA 70 or Canadian Electrical Code, CSA C22.1. If code permit and a separate ground wire is grounded. It is adequate. Observe all gas connections. The model/serial rating plate located on the oven frame behind the top left side of local codes, installation must be provided. ■ Electronic ignition systems operate within wide voltage...
.... Do not use an adapter. IMPORTANT: The range must conform with the National Electrical Code, ANSI/NFPA 70 or Canadian Electrical Code, CSA C22.1. If code permit and a separate ground wire is grounded. It is adequate. Observe all gas connections. The model/serial rating plate located on the oven frame behind the top left side of local codes, installation must be provided. ■ Electronic ignition systems operate within wide voltage...
Installation Instructions
Page 9
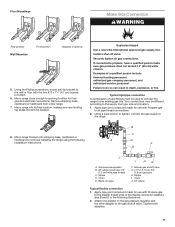
... gas line. Nipple D. Manual gas shutoff valve G. 1/2" (1.3 cm) or 3/4" (1.9 cm) gas pipe H. Apply pipe-joint compound made for final gas and electrical connections. Floor Mountinge Make Gas Connection WARNING Rear position Wall Mountine Front position Diagonal (2 options) 5. Failure to the smaller thread ends of a qualified person include: licensed heating personnel, authorized gas company personnel, and authorized service personnel. Move range close enough to opening to continue installing the range using...
... gas line. Nipple D. Manual gas shutoff valve G. 1/2" (1.3 cm) or 3/4" (1.9 cm) gas pipe H. Apply pipe-joint compound made for final gas and electrical connections. Floor Mountinge Make Gas Connection WARNING Rear position Wall Mountine Front position Diagonal (2 options) 5. Failure to the smaller thread ends of a qualified person include: licensed heating personnel, authorized gas company personnel, and authorized service personnel. Move range close enough to opening to continue installing the range using...
Installation Instructions
Page 11
... in the anti-tip bracket. When the oven control is inserted into the bracket. Check Operation of the Use and Care Guide, or the cover or "Warranty" for contact service. The cooktop "low" burner flame should light within 4 seconds. Slide range back so the rear range foot is turned to the "Assistance or Service" section of Cooktop Burners Standard Surface Burners Push in and turn the control knobs to see if there are properly positioned on the size of standing pilots. Level Range Determine...
... in the anti-tip bracket. When the oven control is inserted into the bracket. Check Operation of the Use and Care Guide, or the cover or "Warranty" for contact service. The cooktop "low" burner flame should light within 4 seconds. Slide range back so the rear range foot is turned to the "Assistance or Service" section of Cooktop Burners Standard Surface Burners Push in and turn the control knobs to see if there are properly positioned on the size of standing pilots. Level Range Determine...
Installation Instructions
Page 12
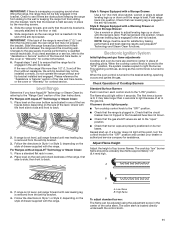
... proper flame. Close the oven door. 2. Remove the oven rack. 2. Loosen the locking screw and rotate the air shutter until the front of the warming drawer compartment. 2. A B B A. Look into the mirror to light the bake and broil burners. Press the BROIL pad. 3. Refer to the Use and Care Guide or User Instructions for proper operation of the oven controls. Adjust Oven Broil Burner Flame (if needed ) 1. If the "low" flame needs to be clean and soft in character. Hold the knob...
... proper flame. Close the oven door. 2. Remove the oven rack. 2. Loosen the locking screw and rotate the air shutter until the front of the warming drawer compartment. 2. A B B A. Look into the mirror to light the bake and broil burners. Press the BROIL pad. 3. Refer to the Use and Care Guide or User Instructions for proper operation of the oven controls. Adjust Oven Broil Burner Flame (if needed ) 1. If the "low" flame needs to be clean and soft in character. Hold the knob...
Installation Instructions
Page 14
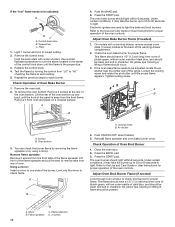
... "Range Care" section of oven door. Insert both sides. NOTE: When properly installed, the rear slides on the bottom of the drawer will engage the base rails and the drawer will shut. 4. To Remove: 1. Open oven door all parts are placed in the drawer glide. 3. Open the oven door. If there is connected. ■ See "Troubleshooting" in the Use and Care Guide or User Instructions. 8. When the range has been on for 5 minutes, check for specific instruction on the oven control panel...
... "Range Care" section of oven door. Insert both sides. NOTE: When properly installed, the rear slides on the bottom of the drawer will engage the base rails and the drawer will shut. 4. To Remove: 1. Open oven door all parts are placed in the drawer glide. 3. Open the oven door. If there is connected. ■ See "Troubleshooting" in the Use and Care Guide or User Instructions. 8. When the range has been on for 5 minutes, check for specific instruction on the oven control panel...
Installation Instructions
Page 15
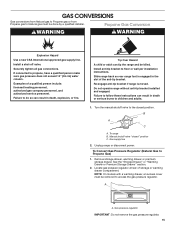
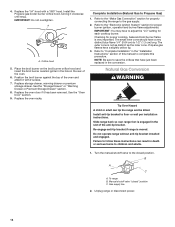
... Gas) 1. Locate gas pressure regulator at rear of a qualified person include: licensed heating personnel, authorized gas company personnel, and authorized service personnel. To range B. Remove storage drawer, warming drawer or premium storage drawer. See the "Storage Drawer" or "Warming Drawer or Premium Storage Drawer" section. 2. Gas supply line 2. Securely tighten all gas connections. Failure to follow these instructions can result in death, explosion, or fire. A A. B A C A. Manual shutoff valve "closed position. To Convert Gas Pressure Regulator (Natural Gas...
... Gas) 1. Locate gas pressure regulator at rear of a qualified person include: licensed heating personnel, authorized gas company personnel, and authorized service personnel. To range B. Remove storage drawer, warming drawer or premium storage drawer. See the "Storage Drawer" or "Warming Drawer or Premium Storage Drawer" section. 2. Gas supply line 2. Securely tighten all gas connections. Failure to follow these instructions can result in death, explosion, or fire. A A. B A C A. Manual shutoff valve "closed position. To Convert Gas Pressure Regulator (Natural Gas...
Installation Instructions
Page 18
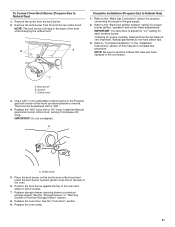
... broil burner orifice hood and insert the broil burner ceramic igniter in the hole in the slot of the oven. 6. Replace storage drawer, warming drawer or premium storage drawer. Failure to the gas supply. 2. NOTE: Be sure to save the orifices that have to adjust the "LO" setting for properly connecting the range to follow these instructions can tip the range and be killed. Install anti-tip bracket to the "Make Gas Connection" section for each cooktop burner. Install the Propane gas broiler burner orifice hood, turning it has been removed. 4. Replace...
... broil burner orifice hood and insert the broil burner ceramic igniter in the hole in the slot of the oven. 6. Replace storage drawer, warming drawer or premium storage drawer. Failure to the gas supply. 2. NOTE: Be sure to save the orifices that have to adjust the "LO" setting for properly connecting the range to follow these instructions can tip the range and be killed. Install anti-tip bracket to the "Make Gas Connection" section for each cooktop burner. Install the Propane gas broiler burner orifice hood, turning it has been removed. 4. Replace...
Installation Instructions
Page 21
..."Electronic Ignition System" section for proper cooktop, bake and broil burner flame is very important. Natural gas flames do not have to adjust the "LO" setting for properly connecting the range to Natural Gas) 1. The hood will hang in the rear of the oven while changing the orifice hood. Replace storage drawer, warming drawer or premium storage drawer. Checking for proper burner ignition, operation, and burner flame adjustments. Screws C. Replace the oven door. Replace the oven racks. 21 C A. Install the Natural gas broiler burner orifice hood, turning...
..."Electronic Ignition System" section for proper cooktop, bake and broil burner flame is very important. Natural gas flames do not have to adjust the "LO" setting for properly connecting the range to Natural Gas) 1. The hood will hang in the rear of the oven while changing the orifice hood. Replace storage drawer, warming drawer or premium storage drawer. Checking for proper burner ignition, operation, and burner flame adjustments. Screws C. Replace the oven door. Replace the oven racks. 21 C A. Install the Natural gas broiler burner orifice hood, turning...


