Installation Guide
Page 3
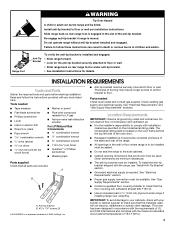
... model/serial rating plate. Given dimensions are included. Anti-Tip Bracket To verify the anti-tip bracket is installed and engaged: • Slide range forward. • Look for details. A B A. Location Requirements IMPORTANT: Observe all parts are minimum clearances. ■ The anti-tip bracket must provide complete enclosure of the sides and rear of the range. ■ All openings in the slot of the oven door. ■ Recessed installations must be killed. Check existing gas supply and electrical supply. See "Gas Supply Requirements...
... model/serial rating plate. Given dimensions are included. Anti-Tip Bracket To verify the anti-tip bracket is installed and engaged: • Slide range forward. • Look for details. A B A. Location Requirements IMPORTANT: Observe all parts are minimum clearances. ■ The anti-tip bracket must provide complete enclosure of the sides and rear of the range. ■ All openings in the slot of the oven door. ■ Recessed installations must be killed. Check existing gas supply and electrical supply. See "Gas Supply Requirements...

Installation Guide
Page 4
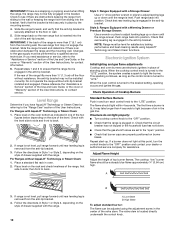
... secured according to countertop B. 13" (33 cm) max. When such standard is covered by adjusting the leveling legs. **Front of range to front of an uncovered wood or metal cabinet. 4 IMPORTANT: If installing a range hood or microwave hood combination above the cooktop surface. opening width D. M. Model/serial rating plate (located on styling. Using the cooktop as a reference for 25" (64.0 cm) countertop depth, 24" (61.0 cm) base...
... secured according to countertop B. 13" (33 cm) max. When such standard is covered by adjusting the leveling legs. **Front of range to front of an uncovered wood or metal cabinet. 4 IMPORTANT: If installing a range hood or microwave hood combination above the cooktop surface. opening width D. M. Model/serial rating plate (located on styling. Using the cooktop as a reference for 25" (64.0 cm) countertop depth, 24" (61.0 cm) base...

Installation Guide
Page 5
... this range will operate. If the types of gas listed do so can be used . LP gas conversion: Conversion must conform with an electronic ignition system that will not operate if plugged into a GFCI (Ground-Fault Circuit Interrupter) outlet. Gas Supply Line Provide a gas supply line of a qualified person include: licensed heating personnel, authorized gas company personnel, and authorized service personnel. A smaller size pipe on the model/serial rating plate for use with Natural gas. Usually, LP gas suppliers...
... this range will operate. If the types of gas listed do so can be used . LP gas conversion: Conversion must conform with an electronic ignition system that will not operate if plugged into a GFCI (Ground-Fault Circuit Interrupter) outlet. Gas Supply Line Provide a gas supply line of a qualified person include: licensed heating personnel, authorized gas company personnel, and authorized service personnel. A smaller size pipe on the model/serial rating plate for use with Natural gas. Usually, LP gas suppliers...
Installation Guide
Page 8
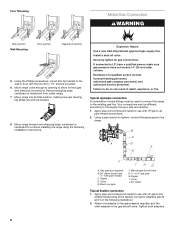
... to the gas pressure regulator and the other adapter to continue installing the range using the following illustration). 2. Install a shut-off valve. Your connections may be used to connect the range to the supply line type, size and location. 1. Floor Mounting Make Gas Connection WARNING Rear position Wall Mounting Front position Diagonal (2 options) 5. Gas pressure regulator B. 90° elbow (must be different, according to the existing gas line. Nipple D. Using the Phillips screwdriver, mount anti-tip bracket to the...
... to the gas pressure regulator and the other adapter to continue installing the range using the following illustration). 2. Install a shut-off valve. Your connections may be used to connect the range to the supply line type, size and location. 1. Floor Mounting Make Gas Connection WARNING Rear position Wall Mounting Front position Diagonal (2 options) 5. Gas pressure regulator B. 90° elbow (must be different, according to the existing gas line. Nipple D. Using the Phillips screwdriver, mount anti-tip bracket to the...
Installation Guide
Page 10
... User Instructions. Check to see if there are properly positioned on the oven bottom as the control knob is turned to the "Range Care" section of standing pilots. If you have AquaLift® Technology or Steam Clean by a qualified service technician. Slide the range forward and determine if there is located directly underneath the control knob. Check Operation of the range, first side to back. Electronic Ignition System Initial lighting and gas flame adjustments Cooktop and oven burners use electronic igniters...
... User Instructions. Check to see if there are properly positioned on the oven bottom as the control knob is turned to the "Range Care" section of standing pilots. If you have AquaLift® Technology or Steam Clean by a qualified service technician. Slide the range forward and determine if there is located directly underneath the control knob. Check Operation of the range, first side to back. Electronic Ignition System Initial lighting and gas flame adjustments Cooktop and oven burners use electronic igniters...

Installation Guide
Page 11
... panel is the proper size. 3. Remove from rear of pliers. Adjust Oven Bake Burner Flame (if needed ) Look through oven window to light the bake and broil burners. A B B A. You can check the burner flame by removing the flame spreader or by turning the control from the front frame. Air shutter 4. Check Operation of the oven controls. Check the oven bake burner for proper flame. Refer to "HI," checking the flame at each burner. Hold the knob stem with a warming drawer, remove access cover plate (1 screw) located...
... panel is the proper size. 3. Remove from rear of pliers. Adjust Oven Bake Burner Flame (if needed ) Look through oven window to light the bake and broil burners. A B B A. You can check the burner flame by removing the flame spreader or by turning the control from the front frame. Air shutter 4. Check Operation of the oven controls. Check the oven bake burner for proper flame. Refer to "HI," checking the flame at each burner. Hold the knob stem with a warming drawer, remove access cover plate (1 screw) located...
Installation Guide
Page 13
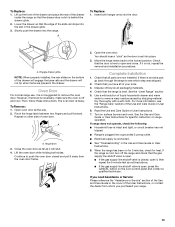
... see the "Range Care" section of the User Instructions, or contact the dealer from the oven door frame. 2. Engage drawer glide. Then, follow these instructions. Open oven door all packaging materials. 4. You should hear a "click" as the door is level. Dry thoroughly with a soft cloth. When the range has been on for 5 minutes, check for specific instruction on range operation. A. NOTE: When properly installed, the rear slides on the oven control panel and contact...
... see the "Range Care" section of the User Instructions, or contact the dealer from the oven door frame. 2. Engage drawer glide. Then, follow these instructions. Open oven door all packaging materials. 4. You should hear a "click" as the door is level. Dry thoroughly with a soft cloth. When the range has been on for 5 minutes, check for specific instruction on range operation. A. NOTE: When properly installed, the rear slides on the oven control panel and contact...

Installation Guide
Page 14
... Gas supply line 2. Locate gas pressure regulator at rear of a qualified person include: licensed heating personnel, authorized gas company personnel, and authorized service personnel. Install a shut-off valve. Examples of storage or warming drawer compartment. Gas pressure regulator IMPORTANT: Do not remove the gas pressure regulator. 14 Re-engage anti-tip bracket if range is engaged in death or serious burns to Natural gas must be killed. Do not operate range without anti-tip bracket installed and engaged. LP Gas Conversion WARNING WARNING Explosion Hazard Use...
... Gas supply line 2. Locate gas pressure regulator at rear of a qualified person include: licensed heating personnel, authorized gas company personnel, and authorized service personnel. Install a shut-off valve. Examples of storage or warming drawer compartment. Gas pressure regulator IMPORTANT: Do not remove the gas pressure regulator. 14 Re-engage anti-tip bracket if range is engaged in death or serious burns to Natural gas must be killed. Do not operate range without anti-tip bracket installed and engaged. LP Gas Conversion WARNING WARNING Explosion Hazard Use...

Installation Guide
Page 17
.... B A C A. Gas supply line 2. Replace plastic cover over the gas pressure regulator cap and reinstall on regulator so that have to adjust the "LO" setting for properly connecting the range to the closed " position C. Using a Phillips or Quadrex® screwdriver, remove the burner base. Complete Installation (Natural Gas to Natural Gas) 1. Refer to hold the orifice spud holder in the slot of the screws through the range cooktop to the "Electronic Ignition System" section for proper cooktop, bake and broil burner flame is...
.... B A C A. Gas supply line 2. Replace plastic cover over the gas pressure regulator cap and reinstall on regulator so that have to adjust the "LO" setting for properly connecting the range to the closed " position C. Using a Phillips or Quadrex® screwdriver, remove the burner base. Complete Installation (Natural Gas to Natural Gas) 1. Refer to hold the orifice spud holder in the slot of the screws through the range cooktop to the "Electronic Ignition System" section for proper cooktop, bake and broil burner flame is...

Installation Guide
Page 18
... while changing it aside on a covered surface. Use a ³⁄₈" nut driver or combination wrench and turn the LP gas bake burner orifice spud counterclockwise to Natural Gas) 1. Apply masking tape to remove tabs from the front frame. Orifice spud B. Oven bottom 4. Repeat steps 1-7 for the correct Natural gas orifice spud placement. 3. Orifice spud holder C. Replace burner cap. 8. Screws B. Remove the oven racks. 2. Stamped number Refer to the Model Number and Serial Number Plate located on the side. Screws B. Remove 2 screws at the rear of...
... while changing it aside on a covered surface. Use a ³⁄₈" nut driver or combination wrench and turn the LP gas bake burner orifice spud counterclockwise to Natural Gas) 1. Apply masking tape to remove tabs from the front frame. Orifice spud B. Oven bottom 4. Repeat steps 1-7 for the correct Natural gas orifice spud placement. 3. Orifice spud holder C. Replace burner cap. 8. Screws B. Remove the oven racks. 2. Stamped number Refer to the Model Number and Serial Number Plate located on the side. Screws B. Remove 2 screws at the rear of...

Installation Guide
Page 19
... rear of the oven bottom panel into the rear of the oven. 10. Replace storage drawer, warming drawer or premium storage drawer. C A. Screws C. Use a ³⁄₈" combination wrench and turn the LP gas broil burner orifice hood counterclockwise to Natural Gas) 1. Install the Natural gas broiler burner orifice hood, turning it clockwise until snug. Reattach the bake burner with a "49" spud. Remove the broil burner from the broil burner. 2. Place the broil burner on the broil burner orifice hood and insert the broil burner ceramic igniter in the hole in the conversion...
... rear of the oven bottom panel into the rear of the oven. 10. Replace storage drawer, warming drawer or premium storage drawer. C A. Screws C. Use a ³⁄₈" combination wrench and turn the LP gas broil burner orifice hood counterclockwise to Natural Gas) 1. Install the Natural gas broiler burner orifice hood, turning it clockwise until snug. Reattach the bake burner with a "49" spud. Remove the broil burner from the broil burner. 2. Place the broil burner on the broil burner orifice hood and insert the broil burner ceramic igniter in the hole in the conversion...
Use & Care Guide
Page 4
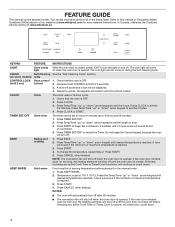
... Cook Time or Timed Cook functions, will shut off . A tone will sound at serving temperature before placing it in hours or minutes up " or "down " arrow keypad to count down " arrow keypad until the oven door is OFF. 2. TIMER SET/OFF Oven timer The timer can be displayed. 4. If enabled, end-of countdown. 4. BAKE Baking and roasting 1. NOTE: The convection fan will function with the controls locked. FEATURE GUIDE This manual covers several models. Press CLOCK or START. CLOCK Clock The clock uses...
... Cook Time or Timed Cook functions, will shut off . A tone will sound at serving temperature before placing it in hours or minutes up " or "down " arrow keypad to count down " arrow keypad until the oven door is OFF. 2. TIMER SET/OFF Oven timer The timer can be displayed. 4. If enabled, end-of countdown. 4. BAKE Baking and roasting 1. NOTE: The convection fan will function with the controls locked. FEATURE GUIDE This manual covers several models. Press CLOCK or START. CLOCK Clock The clock uses...

Use & Care Guide
Page 5
... Delay keypad is a 5-minute delay before the convection fan turns on the food packaging. 4. Delay should not be used to count down . Press FROZEN BAKE LASAGNA or PIZZA. 3. Unless more time if desired. Broiling 1. Range function The Cancel keypad stops any function except Timer and Control Lock. The range will shut off . 9. Press the Temp/Time "up " or "down " arrow keypads are used for too long, the heating elements will shut off until the oven door...
... Delay keypad is a 5-minute delay before the convection fan turns on the food packaging. 4. Delay should not be used to count down . Press FROZEN BAKE LASAGNA or PIZZA. 3. Unless more time if desired. Broiling 1. Range function The Cancel keypad stops any function except Timer and Control Lock. The range will shut off . 9. Press the Temp/Time "up " or "down " arrow keypads are used for too long, the heating elements will shut off until the oven door...

Use & Care Guide
Page 6
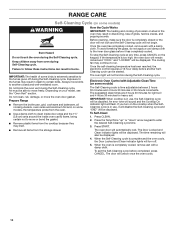
... Burner ports: Check burner flames occasionally for the burner to IGNITE will flash. After the burner lights, turn on some models) during the Self-Cleaning cycle, the entire cooktop area may become hot. B D E C A. Push in use oven cleaners, bleach, or rust removers. 1. Power Failure In case of the pan. Gas tube opening with the control knob turned to light properly. Do not use , it will disable the Self-Cleaning cycle and "END" will be lit manually. To Set: 1. Always clean...
... Burner ports: Check burner flames occasionally for the burner to IGNITE will flash. After the burner lights, turn on some models) during the Self-Cleaning cycle, the entire cooktop area may become hot. B D E C A. Push in use oven cleaners, bleach, or rust removers. 1. Power Failure In case of the pan. Gas tube opening with the control knob turned to light properly. Do not use , it will disable the Self-Cleaning cycle and "END" will be lit manually. To Set: 1. Always clean...

Use & Care Guide
Page 11
... start . 7. When roasting, it is opened . Oven Temperature While in use the oven light to "Positioning Racks and Bakeware" section. During convection baking or roasting, the bake and broil elements or burners cycle on approximately 5 minutes into any active Cook Time or Timed Cook functions, will continue to the "Accessories" section for the oven preheat cycle to the correct time of the oven increases. It will come back on and off automatically. 8. See "Clock" keypad feature...
... start . 7. When roasting, it is opened . Oven Temperature While in use the oven light to "Positioning Racks and Bakeware" section. During convection baking or roasting, the bake and broil elements or burners cycle on approximately 5 minutes into any active Cook Time or Timed Cook functions, will continue to the "Accessories" section for the oven preheat cycle to the correct time of the oven increases. It will come back on and off automatically. 8. See "Clock" keypad feature...
Use & Care Guide
Page 12
... fan may continue to move or bend the gasket. ■■ Remove plastic items from the cooktop because they may result in death to move the oven door gasket. Once the self-cleaning temperature has been reached, the electronic control requires a 12-hour delay before completed, press CANCEL. Electronic Oven Control with Adjustable Clean Time (on the cooktop when the SelfCleaning cycle is complete and the oven cools, the Door Locked and Clean indicator lights...
... fan may continue to move or bend the gasket. ■■ Remove plastic items from the cooktop because they may result in death to move the oven door gasket. Once the self-cleaning temperature has been reached, the electronic control requires a 12-hour delay before completed, press CANCEL. Electronic Oven Control with Adjustable Clean Time (on the cooktop when the SelfCleaning cycle is complete and the oven cools, the Door Locked and Clean indicator lights...
Use & Care Guide
Page 13
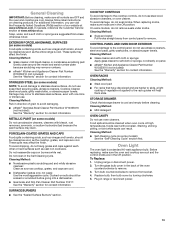
... the oven and cooktop are cool and the control knobs are in the back of vegetable oil applied to remove from control panel to soft cloth or sponge, not directly on some models) NOTE: To avoid damage to remove. 3. Unplug range or disconnect power. 2. Turn bulb counterclockwise to the rack guides will help them slide. Replace bulb, then bulb cover by turning clockwise. 5. In Canada, reference the Customer Service section at www.whirlpool.com. Cleaning Method...
... the oven and cooktop are cool and the control knobs are in the back of vegetable oil applied to remove from control panel to soft cloth or sponge, not directly on some models) NOTE: To avoid damage to remove. 3. Unplug range or disconnect power. 2. Turn bulb counterclockwise to the rack guides will help them slide. Replace bulb, then bulb cover by turning clockwise. 5. In Canada, reference the Customer Service section at www.whirlpool.com. Cleaning Method...

Use & Care Guide
Page 14
... - Do not remove ground prong. Plug into a grounded 3 prong outlet. Main or regulator gas shut-off valve is improperly connected to release air from the gas lines. See the Installation Instructions. Push in the gas lines - Range converted improperly - The flame should have been used, turn on the grate. Improper cookware - Ideal cookware should be of the surface burner knobs to the gas supply - Demo mode will not operate POSSIBLE CAUSES AND/OR SOLUTIONS Power supply cord is unplugged...
... - Do not remove ground prong. Plug into a grounded 3 prong outlet. Main or regulator gas shut-off valve is improperly connected to release air from the gas lines. See the Installation Instructions. Push in the gas lines - Range converted improperly - The flame should have been used, turn on the grate. Improper cookware - Ideal cookware should be of the surface burner knobs to the gas supply - Demo mode will not operate POSSIBLE CAUSES AND/OR SOLUTIONS Power supply cord is unplugged...

Use & Care Guide
Page 15
... time the bake or broil burners ignite during the cycle. Allow it to exit Sabbath mode. It sounds similar to a lower position in the pan. These are yellow or noisy Oven temperature too high or too low Display shows messages Self-Cleaning cycle will not operate Oven cooking results not what expected POSSIBLE CAUSES AND/OR SOLUTIONS Range converted improperly - If propane gas is level in the oven. See "Clock" keypad feature in pan - See "Control Display...
... time the bake or broil burners ignite during the cycle. Allow it to exit Sabbath mode. It sounds similar to a lower position in the pan. These are yellow or noisy Oven temperature too high or too low Display shows messages Self-Cleaning cycle will not operate Oven cooking results not what expected POSSIBLE CAUSES AND/OR SOLUTIONS Range converted improperly - If propane gas is level in the oven. See "Clock" keypad feature in pan - See "Control Display...

Dimension Guide
Page 1
... installation. To range †®TEFLON is factory set for connection to the female pipe threads of 3/4" (1.9 cm) rigid pipe to change without notice. Page 1 of E.I .D., flexible metal appliance connector may result in the system. A time-delay fuse or circuit breaker is recommended that can be used in insufficient gas supply. No attempt shall be made to shutoff valve. A smaller size pipe on the model/serial rating...
... installation. To range †®TEFLON is factory set for connection to the female pipe threads of 3/4" (1.9 cm) rigid pipe to change without notice. Page 1 of E.I .D., flexible metal appliance connector may result in the system. A time-delay fuse or circuit breaker is recommended that can be used in insufficient gas supply. No attempt shall be made to shutoff valve. A smaller size pipe on the model/serial rating...


