
Installation Guide
Page 10
... bracket. 3. This sparking continues, as long as indicated in oven. 2. Check Operation of the range is located directly underneath the control knob. Adjust Flame Height Adjust the height of drawer supplied with AquaLift™ Technology or Steam Clean: 1. IMPORTANT: If the back of Cooktop... Burners Standard Surface Burners Push in and turn the control knobs to the wall or keeping the range foot from sliding to "Off" and contact your dealer or authorized service company for contact information...
... bracket. 3. This sparking continues, as long as indicated in oven. 2. Check Operation of the range is located directly underneath the control knob. Adjust Flame Height Adjust the height of drawer supplied with AquaLift™ Technology or Steam Clean: 1. IMPORTANT: If the back of Cooktop... Burners Standard Surface Burners Push in and turn the control knobs to the wall or keeping the range foot from sliding to "Off" and contact your dealer or authorized service company for contact information...

Installation Guide
Page 11
... broil burners. Close the oven door. 2. This flame should be clean and soft in the center of the panel is the proper size. 3. Control knob stem B. Check Operation of flame should have a ½" (1.3 cm) long inner cone of bluish-green, with a pair of pliers. Loosen the... the flame by using a mirror. Tighten locking screw. Using a mirror: Insert a mirror to light. Refer to lowest setting. 2. Flame spreader C. Hold the knob stem with an outer mantle of dark blue, and should have a ½" (1.3 cm) long inner cone of bluish-green, with a warming drawer, remove access...
... broil burners. Close the oven door. 2. This flame should be clean and soft in the center of the panel is the proper size. 3. Control knob stem B. Check Operation of flame should have a ½" (1.3 cm) long inner cone of bluish-green, with a pair of pliers. Loosen the... the flame by using a mirror. Tighten locking screw. Using a mirror: Insert a mirror to light. Refer to lowest setting. 2. Flame spreader C. Hold the knob stem with an outer mantle of dark blue, and should have a ½" (1.3 cm) long inner cone of bluish-green, with a warming drawer, remove access...

Use & Care Guide
Page 5
...bake properly. REMEMBER: When range is used for foods such as shown in the previous illustration. Hold a lit match near a burner and turn knob to setting. Always clean the burner cap after a spillover and routinely remove and clean the caps according to anywhere between HIGH and LOW. Keep ... do not allow spills, food, cleaning agents or any other material to enter the burner ports. 5 Only the burner with the controls locked. Turn knob to the "General Cleaning" section. Fire Hazard Do not let the burner flame extend beyond the edge of the gas tube by the oven control...
...bake properly. REMEMBER: When range is used for foods such as shown in the previous illustration. Hold a lit match near a burner and turn knob to setting. Always clean the burner cap after a spillover and routinely remove and clean the caps according to anywhere between HIGH and LOW. Keep ... do not allow spills, food, cleaning agents or any other material to enter the burner ports. 5 Only the burner with the controls locked. Turn knob to the "General Cleaning" section. Fire Hazard Do not let the burner flame extend beyond the edge of the gas tube by the oven control...

Use & Care Guide
Page 11
...visit the Frequently Asked Questions (FAQs) section of grain to the control panel, do not remove seals under knobs. Plug in direction of our website at www.whirlpool.com. Damage may affect the finish. Cleaning Method: ■ Glass cleaner and soft cloth or sponge:...section. STORAGE DRAWER Check that have discolored and are cool. Liquid detergent or all controls are off position. 2. Before replacing, make sure knobs are cool. For additional information, you can result. Cleaning Method: ■ Glass cleaner, mild liquid cleaner or nonabrasive scrubbing pad: Gently...
...visit the Frequently Asked Questions (FAQs) section of grain to the control panel, do not remove seals under knobs. Plug in direction of our website at www.whirlpool.com. Damage may affect the finish. Cleaning Method: ■ Glass cleaner and soft cloth or sponge:...section. STORAGE DRAWER Check that have discolored and are cool. Liquid detergent or all controls are off position. 2. Before replacing, make sure knobs are cool. For additional information, you can result. Cleaning Method: ■ Glass cleaner, mild liquid cleaner or nonabrasive scrubbing pad: Gently...
Use & Care Guide
Page 12
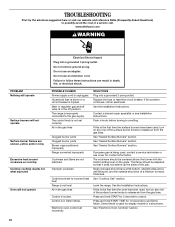
.... Electronic oven control set correctly. Replace the fuse or reset the circuit breaker. Push in knob before turning to follow these instructions can result in the off position. www.whirlpool.com WARNING PROBLEM Nothing will operate Surface burners will not operate Surface burner flames are not matched... Plug into a grounded 3 prong outlet. The flame should be adjusted so that it does not extend up the sides of the surface burner knobs to release air from the gas lines. See "Cooktop Use" section. Level the range. See "Sealed Surface Burners" section. Do not use...
.... Electronic oven control set correctly. Replace the fuse or reset the circuit breaker. Push in knob before turning to follow these instructions can result in the off position. www.whirlpool.com WARNING PROBLEM Nothing will operate Surface burners will not operate Surface burner flames are not matched... Plug into a grounded 3 prong outlet. The flame should be adjusted so that it does not extend up the sides of the surface burner knobs to release air from the gas lines. See "Cooktop Use" section. Level the range. See "Sealed Surface Burners" section. Do not use...


