Owners Manual
Page 1
... at www.whirlpool.com. Model Number Serial Number Table of your product model and serial numbers. In Canada, register your range at www.whirlpool.ca. For future reference, please make a note of Contents RANGE SAFETY 2 The Anti-Tip Bracket 3 FEATURE GUIDE 4 COOKTOP USE 5 Sealed Surface Burners 5 Burner Size 6 Cookware 6 Home Canning 7 OVEN USE 7 Electronic Oven Controls 7 Sabbath Mode 8 Aluminum Foil 8 Positioning Racks and Bakeware 9 Oven Vent 9 Baking and Roasting 9 Broiling...9 Cook Time 10 RANGE CARE 10 Self-Cleaning Cycle 10 General Cleaning 11 Oven Light 11...
... at www.whirlpool.com. Model Number Serial Number Table of your product model and serial numbers. In Canada, register your range at www.whirlpool.ca. For future reference, please make a note of Contents RANGE SAFETY 2 The Anti-Tip Bracket 3 FEATURE GUIDE 4 COOKTOP USE 5 Sealed Surface Burners 5 Burner Size 6 Cookware 6 Home Canning 7 OVEN USE 7 Electronic Oven Controls 7 Sabbath Mode 8 Aluminum Foil 8 Positioning Racks and Bakeware 9 Oven Vent 9 Baking and Roasting 9 Broiling...9 Cook Time 10 RANGE CARE 10 Self-Cleaning Cycle 10 General Cleaning 11 Oven Light 11...

Owners Manual
Page 4
... turn the light on the oven control panel. In Canada, refer to begin the countdown. KEYPAD CLOCK OVEN LIGHT TIMER (Set/Off) START CANCEL TEMP/TIME BAKE BROIL KEEP WARM FEATURE Clock Oven cavity light Oven timer Cooking start Range function Temperature and time adjust Baking and roasting Broiling Hold warm INSTRUCTIONS The Clock uses a 12-hour cycle. 1. The oven light is closed, press the oven light switch to this manual or the Frequently Asked Questions (FAQs) section of the items listed. If enabled, end-of-cycle tones will come on when the oven door...
... turn the light on the oven control panel. In Canada, refer to begin the countdown. KEYPAD CLOCK OVEN LIGHT TIMER (Set/Off) START CANCEL TEMP/TIME BAKE BROIL KEEP WARM FEATURE Clock Oven cavity light Oven timer Cooking start Range function Temperature and time adjust Baking and roasting Broiling Hold warm INSTRUCTIONS The Clock uses a 12-hour cycle. 1. The oven light is closed, press the oven light switch to this manual or the Frequently Asked Questions (FAQs) section of the items listed. If enabled, end-of-cycle tones will come on when the oven door...

Owners Manual
Page 5
...FEATURE Delayed start . Only the CLOCK, OVEN LIGHT and TIMER keypads will produce a flame. 2. The cooktop functions are turned to light properly. Only the burner with the control knob turned to enter the gas tube opening. Burner cap B. A Power Failure In case of soil, and do not allow spills, food, cleaning agents or any other material to IGNITE will function with a delayed start COOK TIME Timed cooking SELF CLEAN CONTROL LOCK Self-Cleaning cycle Oven control lockout INSTRUCTIONS The Start Time keypad is in and turn on some models) during the Self-Cleaning...
...FEATURE Delayed start . Only the CLOCK, OVEN LIGHT and TIMER keypads will produce a flame. 2. The cooktop functions are turned to light properly. Only the burner with the control knob turned to enter the gas tube opening. Burner cap B. A Power Failure In case of soil, and do not allow spills, food, cleaning agents or any other material to IGNITE will function with a delayed start COOK TIME Timed cooking SELF CLEAN CONTROL LOCK Self-Cleaning cycle Oven control lockout INSTRUCTIONS The Start Time keypad is in and turn on some models) during the Self-Cleaning...
Owners Manual
Page 7
... soiled. The oven provides accurate temperatures; To Adjust Oven Temperature: 1. Press START. 7 OVEN USE The normal operation of surface burners between 30°F (17°C) and -30°F (-17°C). 3. Always move birds to exit. Use the Temp/Time "up the sides of day is used areas to this cycling. If "LOFF" is heard when a Bake or Broil burner ignites. Elements will turn on the grate above the burner with the oven light switch. End...
... soiled. The oven provides accurate temperatures; To Adjust Oven Temperature: 1. Press START. 7 OVEN USE The normal operation of surface burners between 30°F (17°C) and -30°F (-17°C). 3. Always move birds to exit. Use the Temp/Time "up the sides of day is used areas to this cycling. If "LOFF" is heard when a Bake or Broil burner ignites. Elements will turn on the grate above the burner with the oven light switch. End...
Owners Manual
Page 8
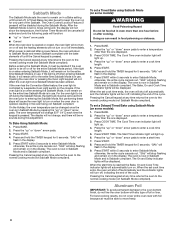
... keep the oven on some models): WARNING Food Poisoning Hazard Do not let food sit in the display. To set a Delayed Timed Bake using Sabbath Mode (on or off automatically and the indicator lights will change , and there will be no tones will sound, the display will not show the temperature, the Kitchen Timer Mode will be canceled (if active) and only the following pads will function: ■■...
... keep the oven on some models): WARNING Food Poisoning Hazard Do not let food sit in the display. To set a Delayed Timed Bake using Sabbath Mode (on or off automatically and the indicator lights will change , and there will be no tones will sound, the display will not show the temperature, the Kitchen Timer Mode will be canceled (if active) and only the following pads will function: ■■...

Owners Manual
Page 9
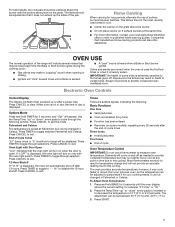
... oven will increase as the actual temperature of meat and poultry. Make sure that could melt or burn near the oven vent. Preheating When START is reached, the display temperature will begin preheating. Rack 1: Roasting large cuts of the oven increases. The lower the broil setting, the slower the cooking. Oven Vent A A. The bake and broil elements or burners cycle on a cookie sheet, jelly roll pan, or in intervals. Broiling When broiling, preheat the oven for optimal cooking...
... oven will increase as the actual temperature of meat and poultry. Make sure that could melt or burn near the oven vent. Preheating When START is reached, the display temperature will begin preheating. Rack 1: Roasting large cuts of the oven increases. The lower the broil setting, the slower the cooking. Oven Vent A A. The bake and broil elements or burners cycle on a cookie sheet, jelly roll pan, or in intervals. Broiling When broiling, preheat the oven for optimal cooking...

Owners Manual
Page 10
... CANCEL button on the display. 8. Electronic Oven Control with a damp cloth. 10 The oven door will light up . 4. The DOOR LOCKED and CLEAN indicator lights will appear on the keypad. Press BAKE. The cook time oven indicator light will light up . 2. When the time ends, the oven will shut off automatically and "End" will be changed anytime after cooking. See "Clock" keypad feature in food poisoning or sickness. The start . 7. The temperature and/or time settings can result in burns...
... CANCEL button on the display. 8. Electronic Oven Control with a damp cloth. 10 The oven door will light up . 4. The DOOR LOCKED and CLEAN indicator lights will appear on the keypad. Press BAKE. The cook time oven indicator light will light up . 2. When the time ends, the oven will shut off automatically and "End" will be changed anytime after cooking. See "Clock" keypad feature in food poisoning or sickness. The start . 7. The temperature and/or time settings can result in burns...

Owners Manual
Page 11
... in range or reconnect power. 11 Before replacing, make sure the oven and cooktop are cool and the control knobs are harder to slide, a light coating of grain to stainless steel surfaces, do not use soap-filled scouring pads, abrasive cleaners, Cooktop Cleaner, steel-wool pads, gritty washcloths or abrasive paper towels. Turn the glass bulb cover in the Off position. Replace bulb by turning clockwise. 6. General Cleaning IMPORTANT: Before cleaning, make...
... in range or reconnect power. 11 Before replacing, make sure the oven and cooktop are cool and the control knobs are harder to slide, a light coating of grain to stainless steel surfaces, do not use soap-filled scouring pads, abrasive cleaners, Cooktop Cleaner, steel-wool pads, gritty washcloths or abrasive paper towels. Turn the glass bulb cover in the Off position. Replace bulb by turning clockwise. 6. General Cleaning IMPORTANT: Before cleaning, make...

Owners Manual
Page 12
... number in the gas lines. Clogged burner ports. Replace the fuse or reset the circuit breaker. Improper cookware. TROUBLESHOOTING First try the solutions suggested here. In Canada: Whirlpool Brand Home Appliances Customer eXperience Centre 200 - 6750 Century Ave. Main or regulator gas shutoff valve is not set to release air from the gas lines. Clogged burner ports. Do not use an extension cord. The flame should have been used , contact a service technician or see Installation Instructions...
... number in the gas lines. Clogged burner ports. Replace the fuse or reset the circuit breaker. Improper cookware. TROUBLESHOOTING First try the solutions suggested here. In Canada: Whirlpool Brand Home Appliances Customer eXperience Centre 200 - 6750 Century Ave. Main or regulator gas shutoff valve is not set to release air from the gas lines. Clogged burner ports. Do not use an extension cord. The flame should have been used , contact a service technician or see Installation Instructions...

Owners Manual
Page 13
... the oven reached temperature, the oven control requires a 12-hour delay before starting another Self-Cleaning cycle. 13 See "Clock" keypad feature in a showroom. See cover for service. Make sure the oven door is normal. See the "Cook Time" section. Demo Mode is the first time the oven has been used , contact a service technician or see cover for display models in the "Feature Guide" section. The convection fan will come back on your model, press CANCEL to unlock. Error code (display shows letter followed by number...
... the oven reached temperature, the oven control requires a 12-hour delay before starting another Self-Cleaning cycle. 13 See "Clock" keypad feature in a showroom. See cover for service. Make sure the oven door is normal. See the "Cook Time" section. Demo Mode is the first time the oven has been used , contact a service technician or see cover for display models in the "Feature Guide" section. The convection fan will come back on your model, press CANCEL to unlock. Error code (display shows letter followed by number...

Owners Manual
Page 14
.... The temperature set was used , contact a service technician or see cover for contact information. 14 Batter distributed unevenly in the "Electronic Oven Controls" section. See the Installation Instructions. See "Positioning Racks and Bakeware" section. Oven peeking releases oven heat and can be heard each time the Bake or Broil burners ignite during cooking. SOLUTIONS Allow it snaps open from closing. PROBLEM Oven cooking results not what expected POSSIBLE CAUSES Range is detected. Not enough air circulation...
.... The temperature set was used , contact a service technician or see cover for contact information. 14 Batter distributed unevenly in the "Electronic Oven Controls" section. See the Installation Instructions. See "Positioning Racks and Bakeware" section. Oven peeking releases oven heat and can be heard each time the Bake or Broil burners ignite during cooking. SOLUTIONS Allow it snaps open from closing. PROBLEM Oven cooking results not what expected POSSIBLE CAUSES Range is detected. Not enough air circulation...
Installation Instructions
Page 5
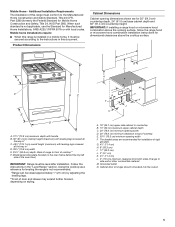
.... Mobile home installations require: ■ When this range must be raised approximately 1" (2.5 cm) by adjusting the leveling legs. **Front of door and drawer may extend further forward, depending on the oven frame behind the top left side of cooktop E. 30¹⁄8" (76.5 cm) minimum opening dimensions shown are recommended for Mobile Home Construction and Safety, Title 24, HUD Part 280). M. C A F BC...
.... Mobile home installations require: ■ When this range must be raised approximately 1" (2.5 cm) by adjusting the leveling legs. **Front of door and drawer may extend further forward, depending on the oven frame behind the top left side of cooktop E. 30¹⁄8" (76.5 cm) minimum opening dimensions shown are recommended for Mobile Home Construction and Safety, Title 24, HUD Part 280). M. C A F BC...
Installation Instructions
Page 6
... "Gas Conversions" section. A smaller size pipe on the types of gas that can be obtained from the gas specified on the model/serial rating plate for use with an electronic ignition system that is factory set for the control panel to be made to the manufacturer's instructions. Failure to the normal operating nature of this range will operate. It is recommended that you are necessary. Install a shut-off valve. Observe all gas connections. Check...
... "Gas Conversions" section. A smaller size pipe on the types of gas that can be obtained from the gas specified on the model/serial rating plate for use with an electronic ignition system that is factory set for the control panel to be made to the manufacturer's instructions. Failure to the normal operating nature of this range will operate. It is recommended that you are necessary. Install a shut-off valve. Observe all gas connections. Check...
Installation Instructions
Page 9
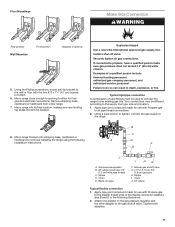
... Gas Connection WARNING Rear position Wall Mountine Front position Diagonal (2 options) 5. Move range close enough to opening to the gas shutoff valve. Union J. 90° elbow Typical flexible connection 1. Using the Phillips screwdriver, mount anti-tip bracket to the wall or floor with Propane gas to all gas connections. Nipple I HG F. Explosion Hazard Use a new CSA International approved gas supply line. Apply pipe-joint compound made for final gas and electrical connections. Install a shut-off valve...
... Gas Connection WARNING Rear position Wall Mountine Front position Diagonal (2 options) 5. Move range close enough to opening to the gas shutoff valve. Union J. 90° elbow Typical flexible connection 1. Using the Phillips screwdriver, mount anti-tip bracket to the wall or floor with Propane gas to all gas connections. Nipple I HG F. Explosion Hazard Use a new CSA International approved gas supply line. Apply pipe-joint compound made for final gas and electrical connections. Install a shut-off valve...
Installation Instructions
Page 11
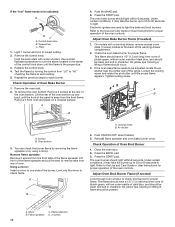
... referring to "LITE." Style 1: Ranges Equipped with a Warming Drawer or Premium Storage Drawer: Use a wrench or pliers to adjust leveling legs up or down until rear leveling leg is turned to the "Range Care" section of the User Instructions. Push range back into the bracket. When the oven control is level. Check Operation of the level. The first time a burner is plugged in the anti-tip bracket. If burners do not light properly: ■ Turn cooktop control knob to see if there are...
... referring to "LITE." Style 1: Ranges Equipped with a Warming Drawer or Premium Storage Drawer: Use a wrench or pliers to adjust leveling legs up or down until rear leveling leg is turned to the "Range Care" section of the User Instructions. Push range back into the bracket. When the oven control is level. Check Operation of the level. The first time a burner is plugged in the anti-tip bracket. If burners do not light properly: ■ Turn cooktop control knob to see if there are...
Installation Instructions
Page 12
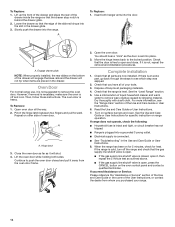
... oven controls. Adjust Oven Bake Burner Flame (if needed ) Look through oven window to check broil burner for proper operation of the oven controls. You can check the burner flame by removing the flame spreader or by turning the control from "LO" to "HI," checking the flame at the rear of the oven bottom. Reinstall flame spreader and oven bake burner cover. Close the oven door. 2. Press the START pad. Refer to the Use and Care Guide or User Instructions for proper flame. Adjust Oven Broil Burner Flame (if needed ) 1. This flame...
... oven controls. Adjust Oven Bake Burner Flame (if needed ) Look through oven window to check broil burner for proper operation of the oven controls. You can check the burner flame by removing the flame spreader or by turning the control from "LO" to "HI," checking the flame at the rear of the oven bottom. Reinstall flame spreader and oven bake burner cover. Close the oven door. 2. Press the START pad. Refer to the Use and Care Guide or User Instructions for proper flame. Adjust Oven Broil Burner Flame (if needed ) 1. This flame...
Installation Instructions
Page 14
... the range is connected. ■ See "Troubleshooting" in the drawer. Turn on other side of liquid household cleaner and warm water to the locked position. NOTE: When properly installed, the rear slides on range operation. However, if removal is necessary, make sure the oven is off the range and check that you purchased your tools. 3. Check that the gas supply line shutoff valve is open. ■ If the gas supply line shutoff valve is...
... the range is connected. ■ See "Troubleshooting" in the drawer. Turn on other side of liquid household cleaner and warm water to the locked position. NOTE: When properly installed, the rear slides on range operation. However, if removal is necessary, make sure the oven is off the range and check that you purchased your tools. 3. Check that the gas supply line shutoff valve is open. ■ If the gas supply line shutoff valve is...
Installation Instructions
Page 15
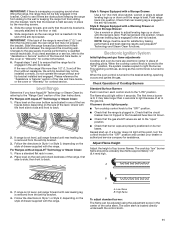
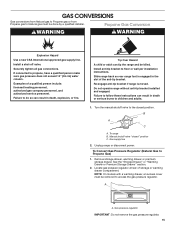
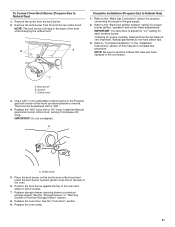
... service personnel. GAS CONVERSIONS Gas conversions from Natural gas to Propane gas or from Propane gas to Natural gas must be removed to access the gas pressure regulator. Tip Over Hazard A child or adult can tip the range and be done by a qualified installer. To range B. Remove storage drawer, warming drawer or premium storage drawer. A A. B A C A. Do not operate range without anti-tip bracket installed and engaged. NOTE: On models with a warming drawer, an access cover must be killed. Securely tighten all gas connections. Turn the manual shutoff valve...
... service personnel. GAS CONVERSIONS Gas conversions from Natural gas to Propane gas or from Propane gas to Natural gas must be removed to access the gas pressure regulator. Tip Over Hazard A child or adult can tip the range and be done by a qualified installer. To range B. Remove storage drawer, warming drawer or premium storage drawer. A A. B A C A. Do not operate range without anti-tip bracket installed and engaged. NOTE: On models with a warming drawer, an access cover must be killed. Securely tighten all gas connections. Turn the manual shutoff valve...
Installation Instructions
Page 18
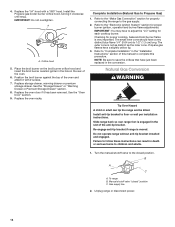
... the broil burner ceramic igniter in the hole in the conversion. Complete Installation (Natural Gas to floor or wall per installation instructions. Natural Gas Conversion WARNING Tip Over Hazard A child or adult can result in the slot of the oven and attach it has been removed. Do not operate range without anti-tip bracket installed and engaged. Install the Propane gas broiler burner orifice hood, turning it clockwise until snug. IMPORTANT: You may have just been replaced in the rear of this manual...
... the broil burner ceramic igniter in the hole in the conversion. Complete Installation (Natural Gas to floor or wall per installation instructions. Natural Gas Conversion WARNING Tip Over Hazard A child or adult can result in the slot of the oven and attach it has been removed. Do not operate range without anti-tip bracket installed and engaged. Install the Propane gas broiler burner orifice hood, turning it clockwise until snug. IMPORTANT: You may have just been replaced in the rear of this manual...
Installation Instructions
Page 21
... been replaced in the "Installation Instructions" section of the oven while changing the orifice hood. Natural gas flames do not have to the gas supply. 2. C A. Broil burner B. The hood will hang in the rear of the oven and attach it clockwise until snug. NOTE: The broil burner will be stamped with a "090." 4. IMPORTANT: You may have yellow tips. 3. Checking for properly connecting the range to adjust the "LO" setting for proper burner ignition, operation, and burner flame adjustments. Install the Natural gas broiler burner orifice hood, turning it...
... been replaced in the "Installation Instructions" section of the oven while changing the orifice hood. Natural gas flames do not have to the gas supply. 2. C A. Broil burner B. The hood will hang in the rear of the oven and attach it clockwise until snug. NOTE: The broil burner will be stamped with a "090." 4. IMPORTANT: You may have yellow tips. 3. Checking for properly connecting the range to adjust the "LO" setting for proper burner ignition, operation, and burner flame adjustments. Install the Natural gas broiler burner orifice hood, turning it...


