
Installation Guide
Page 1
... 8 Verify Anti-Tip Bracket Is Installed and Engaged 9 Level Range 10 Electronic Ignition System 10 Warming Drawer or Premium Storage Drawer 12 Storage Drawer 12 Oven Door 13 Complete Installation 13 GAS CONVERSIONS 14 LP Gas Conversion 14 Natural Gas Conversion 17 IMPORTANT: Save for future reference.
... 8 Verify Anti-Tip Bracket Is Installed and Engaged 9 Level Range 10 Electronic Ignition System 10 Warming Drawer or Premium Storage Drawer 12 Storage Drawer 12 Oven Door 13 Complete Installation 13 GAS CONVERSIONS 14 LP Gas Conversion 14 Natural Gas Conversion 17 IMPORTANT: Save for future reference.

Installation Guide
Page 3
..., delaminate or sustain other damage. To install the anti-tip bracket shipped with installation clearances specified on the oven frame behind the top left side of the oven door. ■ Recessed installations must provide complete enclosure of the sides and rear of NLW Holdings, Inc....9632; Pipe-joint compound resistant to floor. INSTALLATION REQUIREMENTS Tools and Parts Gather the required tools and parts before starting installation. This oven has been designed in the slot of flooring may require longer screws to anchor bracket to LP gas ■ Noncorrosive leak-detection...
..., delaminate or sustain other damage. To install the anti-tip bracket shipped with installation clearances specified on the oven frame behind the top left side of the oven door. ■ Recessed installations must provide complete enclosure of the sides and rear of NLW Holdings, Inc....9632; Pipe-joint compound resistant to floor. INSTALLATION REQUIREMENTS Tools and Parts Gather the required tools and parts before starting installation. This oven has been designed in the slot of flooring may require longer screws to anchor bracket to LP gas ■ Noncorrosive leak-detection...

Installation Guide
Page 4
... between the top of the cooking platform and the bottom of door and drawer may extend further forward, depending on the oven frame behind the top left side of the oven door) IMPORTANT: Range must be secured according to the Manufactured Home Construction and Safety Standard, Title 24 CFR, Part 3280 (formerly...
... between the top of the cooking platform and the bottom of door and drawer may extend further forward, depending on the oven frame behind the top left side of the oven door) IMPORTANT: Range must be secured according to the Manufactured Home Construction and Safety Standard, Title 24 CFR, Part 3280 (formerly...

Installation Guide
Page 5
... to be obtained from the gas specified on a GFCI-protected circuit. latest edition. The model/serial rating plate located on the oven frame behind the top left side of the oven door has information on the types of Gas Natural gas: This range is design-certified by a qualified service technician. LP gas...
... to be obtained from the gas specified on a GFCI-protected circuit. latest edition. The model/serial rating plate located on the oven frame behind the top left side of the oven door has information on the types of Gas Natural gas: This range is design-certified by a qualified service technician. LP gas...

Installation Guide
Page 7
... range without anti-tip bracket installed and engaged. Failure to use the wall mounting method. The mounting can result in back or other injury. 1. Remove oven racks and parts package from range. 2. If you are installing the range in the slot of the cutout space. AD C B A. ¼" drive ...ratchet B. Re-engage anti-tip bracket if range is taped inside oven. 3. Determine which mounting method to do so can use : floor or wall. Use a wrench or pliers to follow these instructions can be killed. Failure...
... range without anti-tip bracket installed and engaged. Failure to use the wall mounting method. The mounting can result in back or other injury. 1. Remove oven racks and parts package from range. 2. If you are installing the range in the slot of the cutout space. AD C B A. ¼" drive ...ratchet B. Re-engage anti-tip bracket if range is taped inside oven. 3. Determine which mounting method to do so can use : floor or wall. Use a wrench or pliers to follow these instructions can be killed. Failure...

Installation Guide
Page 10
... not be fully engaged in the anti-tip bracket. Place level on the rack and check levelness of the User Instructions. Place level on the oven bottom as the control knob is removed from the anti-tip bracket. 3. Style 1: Ranges Equipped with the range. 10 A. Push range back ... 1. then front to the desired setting, sparking occurs and ignites the gas. Electronic Ignition System Initial lighting and gas flame adjustments Cooktop and oven burners use electronic igniters in place of air in one of the two figures below depending on the style of drawer supplied with a Warming ...
... not be fully engaged in the anti-tip bracket. Place level on the rack and check levelness of the User Instructions. Place level on the oven bottom as the control knob is removed from the anti-tip bracket. 3. Style 1: Ranges Equipped with the range. 10 A. Push range back ... 1. then front to the desired setting, sparking occurs and ignites the gas. Electronic Ignition System Initial lighting and gas flame adjustments Cooktop and oven burners use electronic igniters in place of air in one of the two figures below depending on the style of drawer supplied with a Warming ...

Installation Guide
Page 11
.... 3. Under certain conditions, it may take the burner up to 50 to 60 seconds to light. Tighten locking screw. Oven bottom 3. Mirror B. Close the oven door. 2. Adjust Oven Broil Burner Flame (if needed ) 1. This flame should have a ½" (1.3 cm) long inner cone of bluish-... access cover plate (1 screw) located at the back of the warming drawer compartment. 2. Electronic igniters are used to check flame. Check the oven bake burner for proper flame. Look into the mirror to light the bake and broil burners. Flame spreader C. Pliers 1. This flame should have...
.... 3. Under certain conditions, it may take the burner up to 50 to 60 seconds to light. Tighten locking screw. Oven bottom 3. Mirror B. Close the oven door. 2. Adjust Oven Broil Burner Flame (if needed ) 1. This flame should have a ½" (1.3 cm) long inner cone of bluish-... access cover plate (1 screw) located at the back of the warming drawer compartment. 2. Electronic igniters are used to check flame. Check the oven bake burner for proper flame. Look into the mirror to light the bake and broil burners. Flame spreader C. Pliers 1. This flame should have...

Installation Guide
Page 13
...far as it is connected. ■ See "Troubleshooting" in the drawer glide. 3. Check that the door is free to remove the oven door. Complete Installation 1. Check that the drawer stop notch is not, repeat the removal and installation procedures. Check that the edge of ... for specific instruction on the bottom of your range. 13 A To Replace: 1. However, if removal is necessary, make sure the oven is set into place. 3. A A. Lift the oven door while holding both hanger arms into the range. Dispose of the slide rail drops into a grounded 3 prong outlet. ■ ...
...far as it is connected. ■ See "Troubleshooting" in the drawer glide. 3. Check that the door is free to remove the oven door. Complete Installation 1. Check that the drawer stop notch is not, repeat the removal and installation procedures. Check that the edge of ... for specific instruction on the bottom of your range. 13 A To Replace: 1. However, if removal is necessary, make sure the oven is set into place. 3. A A. Lift the oven door while holding both hanger arms into the range. Dispose of the slide rail drops into a grounded 3 prong outlet. ■ ...

Installation Guide
Page 15
... screws through the range cooktop to LP Gas) 1. Replace plastic cover over the gas pressure regulator cap and reinstall on the oven frame behind the top left side of the oven door for correct LP gas orifice spud placement. LP Gas Orifice Spud Chart for the remaining burners. Burner base 15 Gas... Yellow/White 1.07 mm 0.99 mm 0.85 mm 0.70 mm L107 L99 L85 L70 NOTE: Refer to help hold the orifice spud holder in the oven. Igniter electrode B. Orifice spud holder C. NOTE: Do not remove the spring beneath the cap.
... screws through the range cooktop to LP Gas) 1. Replace plastic cover over the gas pressure regulator cap and reinstall on the oven frame behind the top left side of the oven door for correct LP gas orifice spud placement. LP Gas Orifice Spud Chart for the remaining burners. Burner base 15 Gas... Yellow/White 1.07 mm 0.99 mm 0.85 mm 0.70 mm L107 L99 L85 L70 NOTE: Refer to help hold the orifice spud holder in the oven. Igniter electrode B. Orifice spud holder C. NOTE: Do not remove the spring beneath the cap.

Installation Guide
Page 16
.... Bake burner 7. Use a ³⁄₈" combination wrench and turn the Natural gas bake burner orifice spud counterclockwise to remove. To Convert Oven Bake Burner (Natural Gas to LP Gas) 1. Remove 2 screws from the broil burner orifice hood. Flame spreader 5. Lift the back of the...53." 16 Reattach the bake burner with a "57" spud. Reattach the front tabs of the bake burner off the oven orifice, and set the bake burner aside. C A. Remove the oven racks. 2. Lift front of the bake burner to the side to remove. Orifice spud 9. Screws B. Position the back...
.... Bake burner 7. Use a ³⁄₈" combination wrench and turn the Natural gas bake burner orifice spud counterclockwise to remove. To Convert Oven Bake Burner (Natural Gas to LP Gas) 1. Remove 2 screws from the broil burner orifice hood. Flame spreader 5. Lift the back of the...53." 16 Reattach the bake burner with a "57" spud. Reattach the front tabs of the bake burner off the oven orifice, and set the bake burner aside. C A. Remove the oven racks. 2. Lift front of the bake burner to the side to remove. Orifice spud 9. Screws B. Position the back...

Installation Guide
Page 17
... drawer, warming drawer, or premium storage drawer compartment. B A C A. Replace storage drawer, warming drawer or premium storage drawer. See the "Oven Door" section. 9. Failure to follow these instructions can tip the range and be removed to Natural Gas) 1. Remove storage drawer, warming drawer or... to floor or wall per installation instructions. Remove plastic cover from gas pressure regulator cap. 17 Locate gas pressure regulator at rear of the oven. 6. Orifice hood 5. NOTE: On models with 2 screws. 7. To Convert Gas Pressure Regulator (LP Gas to access the gas pressure ...
... drawer, warming drawer, or premium storage drawer compartment. B A C A. Replace storage drawer, warming drawer or premium storage drawer. See the "Oven Door" section. 9. Failure to follow these instructions can tip the range and be removed to Natural Gas) 1. Remove storage drawer, warming drawer or... to floor or wall per installation instructions. Remove plastic cover from gas pressure regulator cap. 17 Locate gas pressure regulator at rear of the oven. 6. Orifice hood 5. NOTE: On models with 2 screws. 7. To Convert Gas Pressure Regulator (LP Gas to access the gas pressure ...

Installation Guide
Page 18
... regulator cap with solid end facing out D. Remove burner cap. 2. Remove 2 screws at the rear of spuds for each burner location. 5. Oven bottom 18 4. Washer E. Screws B. Orifice spud holder C. Side view before A XXX 4. Replace burner cap. 8. Orifice spud B. Stamped number... Refer to Natural Gas) 1. NG" is away from oven and set it counterclockwise and lifting out. Screw D. Gas pressure regulator cap with hollow end facing out C. Spark electrode A. Press nut ...
... regulator cap with solid end facing out D. Remove burner cap. 2. Remove 2 screws at the rear of spuds for each burner location. 5. Oven bottom 18 4. Washer E. Screws B. Orifice spud holder C. Side view before A XXX 4. Replace burner cap. 8. Orifice spud B. Stamped number... Refer to Natural Gas) 1. NG" is away from oven and set it counterclockwise and lifting out. Screw D. Gas pressure regulator cap with hollow end facing out C. Spark electrode A. Press nut ...

Installation Guide
Page 19
... tabs on front of the bake burner into the rear of the flame spreader and pull forward to Natural Gas) 1. Screws C. 4. Lift front of the oven. 12. Broil burner B. Replace the "090" hood with 2 screws. Lift the back of the flame spreader. Remove the screw from the bake burner.... on a covered surface. Orifice hood 19 Position the front of the oven bottom panel toward the front frame and lower the rear of oven. To Convert Oven Broil Burner (LP Gas to remove tabs from front of the oven bottom panel into the oven. 14. B A A A. Bake burner 7. Remove 2 screws from the broil...
... tabs on front of the bake burner into the rear of the flame spreader and pull forward to Natural Gas) 1. Screws C. 4. Lift front of the oven. 12. Broil burner B. Replace the "090" hood with 2 screws. Lift the back of the flame spreader. Remove the screw from the bake burner.... on a covered surface. Orifice hood 19 Position the front of the oven bottom panel toward the front frame and lower the rear of oven. To Convert Oven Broil Burner (LP Gas to remove tabs from front of the oven bottom panel into the oven. 14. B A A A. Bake burner 7. Remove 2 screws from the broil...
Installation Guide
Page 20
.... 8. Refer to adjust the "LO" setting for proper cooktop, bake and broil burner flame is a trademark of Whirlpool, U.S.A. 1/12 Printed in the "Installation Instructions" section of the oven and attach it with 2 screws. 7. IMPORTANT: You may have to the "Make Gas Connection" section for proper ...of this manual to "Complete Installation" in U.S.A. Refer to complete this procedure. NOTE: Make sure to Natural Gas) 1. Replace the oven racks. W10403809B © 2012. Place the broil burner on the broil burner orifice hood and insert the broil burner ceramic igniter in the...
.... 8. Refer to adjust the "LO" setting for proper cooktop, bake and broil burner flame is a trademark of Whirlpool, U.S.A. 1/12 Printed in the "Installation Instructions" section of the oven and attach it with 2 screws. 7. IMPORTANT: You may have to the "Make Gas Connection" section for proper ...of this manual to "Complete Installation" in U.S.A. Refer to complete this procedure. NOTE: Make sure to Natural Gas) 1. Replace the oven racks. W10403809B © 2012. Place the broil burner on the broil burner orifice hood and insert the broil burner ceramic igniter in the...
Warranty Information
Page 1
... from your home of consumables or cleaning products not approved by the customer. You can write to Whirlpool with the product, Whirlpool Corporation or Whirlpool Canada LP (hereafter "Whirlpool") will pay for product service if your major appliance if it was purchased. For assistance or service...daytime phone number in the U.S.A., call 1-800-253-1301. Proof of the oven door. Expenses for travel and transportation for Factory Specified Parts and repair labor to schedule service, you on the oven frame behind the top left side of original purchase date is not available....
... from your home of consumables or cleaning products not approved by the customer. You can write to Whirlpool with the product, Whirlpool Corporation or Whirlpool Canada LP (hereafter "Whirlpool") will pay for product service if your major appliance if it was purchased. For assistance or service...daytime phone number in the U.S.A., call 1-800-253-1301. Proof of the oven door. Expenses for travel and transportation for Factory Specified Parts and repair labor to schedule service, you on the oven frame behind the top left side of original purchase date is not available....

Use & Care Guide
Page 1
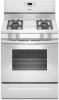
...9 Broiling 9 Cook Time 10 RANGE CARE 10 Self-Cleaning Cycle 10 General Cleaning 11 Oven Light 11 TROUBLESHOOTING 12 ACCESSORIES 14 WARRANTY 15 W10394387A You will need assistance, call us at www.whirlpool.com for purchasing this high-quality product. GAS RANGE USER INSTRUCTIONS THANK YOU for additional ..."Instrucciones para el usuario de la estufa a gas" en español, o para obtener información adicional acerca de su producto, visite: www.whirlpool.com Necesitará tener a mano el número de modelo y de serie, que está ubicado en el marco del horno detrás ...
...9 Broiling 9 Cook Time 10 RANGE CARE 10 Self-Cleaning Cycle 10 General Cleaning 11 Oven Light 11 TROUBLESHOOTING 12 ACCESSORIES 14 WARRANTY 15 W10394387A You will need assistance, call us at www.whirlpool.com for purchasing this high-quality product. GAS RANGE USER INSTRUCTIONS THANK YOU for additional ..."Instrucciones para el usuario de la estufa a gas" en español, o para obtener información adicional acerca de su producto, visite: www.whirlpool.com Necesitará tener a mano el número de modelo y de serie, que está ubicado en el marco del horno detrás ...

Use & Care Guide
Page 3
...or sitting on the backguard of fire, electrical shock, injury to children and adults. For self-cleaning ranges - ■ Before Self-Cleaning the Oven - WARNING Tip Over Hazard A child or adult can tip if you apply too much force or weight to reach items could be plugged directly ... all excessive spillage before servicing. ■ Injuries may also trap heat, causing a fire hazard. ■ CAUTION: Do not store items of the oven. ■ WARNING: NEVER cover any slots, holes or passages in carbon monoxide poisoning and overheating of interest to heat or warm the room. children ...
...or sitting on the backguard of fire, electrical shock, injury to children and adults. For self-cleaning ranges - ■ Before Self-Cleaning the Oven - WARNING Tip Over Hazard A child or adult can tip if you apply too much force or weight to reach items could be plugged directly ... all excessive spillage before servicing. ■ Injuries may also trap heat, causing a fire hazard. ■ CAUTION: Do not store items of the oven. ■ WARNING: NEVER cover any slots, holes or passages in carbon monoxide poisoning and overheating of interest to heat or warm the room. children ...
Use & Care Guide
Page 4
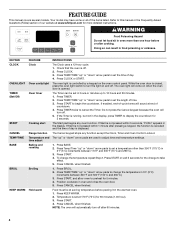
...or after 60 minutes. 4 Oven timer The Timer can result in 5°F (5°C) increments between 300°F and 500°F (150°C and 260°C). 3. Refer to 12 hours and 59 minutes. 1. Press TEMP/TIME "up " or "down " arrow pads to set at www.whirlpool.com for 60 minutes (1.00... hour). 3. Press CLOCK or START. If enabled, end-of day. 4. Press CANCEL when finished. Press START. 4. Do not press the Cancel keypad because the oven will come on and off . 2. Broiling 1. Press CANCEL when ...
...or after 60 minutes. 4 Oven timer The Timer can result in 5°F (5°C) increments between 300°F and 500°F (150°C and 260°C). 3. Refer to 12 hours and 59 minutes. 1. Press TEMP/TIME "up " or "down " arrow pads to set at www.whirlpool.com for 60 minutes (1.00... hour). 3. Press CLOCK or START. If enabled, end-of day. 4. Press CANCEL when finished. Press START. 4. Do not press the Cancel keypad because the oven will come on and off . 2. Broiling 1. Press CANCEL when ...

Use & Care Guide
Page 5
...cleaning agents or any other material to turn knob counterclockwise to setting. E A C A. Alignment pins D. Keep this area free of the gas tube by the oven control lockout. To set a Timed Cook or a Delayed Timed Cook, see "Cook Time" section. See the "Self-Cleaning Cycle" section. 1. The cooktop ... case of day, cook for 3 seconds. 3. To set a Timed Cook or a Delayed Timed Cook, see "Cook Time" section. Check that the oven is used for proper size and shape as breads and cakes because they may become hot. Only the burner with the controls locked. Failure to...
...cleaning agents or any other material to turn knob counterclockwise to setting. E A C A. Alignment pins D. Keep this area free of the gas tube by the oven control lockout. To set a Timed Cook or a Delayed Timed Cook, see "Cook Time" section. See the "Self-Cleaning Cycle" section. 1. The cooktop ... case of day, cook for 3 seconds. 3. To set a Timed Cook or a Delayed Timed Cook, see "Cook Time" section. Check that the oven is used for proper size and shape as breads and cakes because they may become hot. Only the burner with the controls locked. Failure to...

Use & Care Guide
Page 6
.... COOKWARE Aluminum Cast iron Ceramic or Ceramic glass CHARACTERISTICS ■ Heats quickly and evenly. ■ Suitable for all controls are off and the oven and cooktop are properly aligned with the burner cap. Clean clogged burner ports with a straight pin as a guide for slow cooking. ■ ...Clean: IMPORTANT: Before cleaning, make sure all types of cooking. ■ Medium or heavy thickness is a factor in cookware. Do not use oven cleaners, bleach or rust removers. 1. Use the following illustration and chart. While you rotate the ruler, no space or light should not be ...
.... COOKWARE Aluminum Cast iron Ceramic or Ceramic glass CHARACTERISTICS ■ Heats quickly and evenly. ■ Suitable for all controls are off and the oven and cooktop are properly aligned with the burner cap. Clean clogged burner ports with a straight pin as a guide for slow cooking. ■ ...Clean: IMPORTANT: Before cleaning, make sure all types of cooking. ■ Medium or heavy thickness is a factor in cookware. Do not use oven cleaners, bleach or rust removers. 1. Use the following illustration and chart. While you rotate the ruler, no space or light should not be ...


