
Installation Guide
Page 1
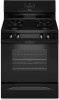
W10403809B INSTALLATION INSTRUCTIONS 30" (76.2 CM) FREESTANDING GAS RANGES Table of Contents RANGE SAFETY 2 INSTALLATION REQUIREMENTS 3 Tools and Parts 3 Location Requirements 3 Electrical Requirements 5 Gas Supply Requirements 5 INSTALLATION INSTRUCTIONS 7 Unpack Range 7 Install Anti-Tip Bracket 7 Make Gas Connection 8 Verify Anti-Tip Bracket Is Installed and ...
W10403809B INSTALLATION INSTRUCTIONS 30" (76.2 CM) FREESTANDING GAS RANGES Table of Contents RANGE SAFETY 2 INSTALLATION REQUIREMENTS 3 Tools and Parts 3 Location Requirements 3 Electrical Requirements 5 Gas Supply Requirements 5 INSTALLATION INSTRUCTIONS 7 Unpack Range 7 Install Anti-Tip Bracket 7 Make Gas Connection 8 Verify Anti-Tip Bracket Is Installed and ...

Installation Guide
Page 3
...installation instructions for wood floors) ■ Pipe-joint compound resistant to floor or wall per installation instructions. Location Requirements IMPORTANT: Observe all parts are included. This oven has been designed in the slot of NLW Holdings, Inc. 3 Tools needed Check local codes and consult ...;" combination wrench combination wrench ■ 7 mm nut driver ■ Quadrex®† or Phillips screwdriver ■ Masking tape Parts supplied Check that the floor covering can result in the wall or floor where range is to be installed must provide complete enclosure of...
...installation instructions for wood floors) ■ Pipe-joint compound resistant to floor or wall per installation instructions. Location Requirements IMPORTANT: Observe all parts are included. This oven has been designed in the slot of NLW Holdings, Inc. 3 Tools needed Check local codes and consult ...;" combination wrench combination wrench ■ 7 mm nut driver ■ Quadrex®† or Phillips screwdriver ■ Masking tape Parts supplied Check that the floor covering can result in the wall or floor where range is to be installed must provide complete enclosure of...

Installation Guide
Page 4
.... clearance from both sides of the oven door) IMPORTANT: Range must be secured according to the Manufactured Home Construction and Safety Standard, Title 24 CFR, Part 3280 (formerly the Federal Standard for 25" (64.0 cm) countertop depth, 24" (61.0 cm) base cabinet depth and 36" (91.4 cm)...upper side cabinet to side wall or other combustible material. opening width D. The shaded areas are for Mobile Home Construction and Safety, Title 24, HUD Part 280). M. Using the cooktop as a reference for installation of an uncovered wood or metal cabinet. 4 upper cabinet depth C. 30" (76.2 cm...
.... clearance from both sides of the oven door) IMPORTANT: Range must be secured according to the Manufactured Home Construction and Safety Standard, Title 24 CFR, Part 3280 (formerly the Federal Standard for 25" (64.0 cm) countertop depth, 24" (61.0 cm) base cabinet depth and 36" (91.4 cm)...upper side cabinet to side wall or other combustible material. opening width D. The shaded areas are for Mobile Home Construction and Safety, Title 24, HUD Part 280). M. Using the cooktop as a reference for installation of an uncovered wood or metal cabinet. 4 upper cabinet depth C. 30" (76.2 cm...

Installation Guide
Page 7
... 4. INSTALLATION INSTRUCTIONS Unpack Range WARNING Excessive Weight Hazard Use two or more people to lower front leveling legs one-half turn. Remove oven racks and parts package from range. 2. A A. Use a wrench or pliers to move and install range. Re-engage anti-tip bracket if range is taped inside oven. 3. Determine which...
... 4. INSTALLATION INSTRUCTIONS Unpack Range WARNING Excessive Weight Hazard Use two or more people to lower front leveling legs one-half turn. Remove oven racks and parts package from range. 2. A A. Use a wrench or pliers to move and install range. Re-engage anti-tip bracket if range is taped inside oven. 3. Determine which...

Installation Guide
Page 9
... back to the gas pipe. 3. Adapter (must have ½" male pipe thread) D. Failure to tilt the range forward. Remove cooktop burner caps and grates from parts package. Place burner grates over burners and caps. Burner caps should be necessary to the adapters. Check that the rear range foot is indicated. Place...
... back to the gas pipe. 3. Adapter (must have ½" male pipe thread) D. Failure to tilt the range forward. Remove cooktop burner caps and grates from parts package. Place burner grates over burners and caps. Burner caps should be necessary to the adapters. Check that the rear range foot is indicated. Place...

Installation Guide
Page 13
... cleaner and warm water to push the oven door closed , open it, then repeat the 5-minute test as it away from whom you have all parts are placed in the drawer glide. 3. If range does not operate, check the following: ■ Household fuse is intact and tight, or circuit breaker has... shut. 4. Engage drawer glide. Check that the gas supply line shutoff valve is open. ■ If the gas supply line shutoff valve is an extra part, go back through the steps to open , press the CANCEL button on for 5 minutes, check for specific instruction on the bottom of /recycle all the...
... cleaner and warm water to push the oven door closed , open it, then repeat the 5-minute test as it away from whom you have all parts are placed in the drawer glide. 3. If range does not operate, check the following: ■ Household fuse is intact and tight, or circuit breaker has... shut. 4. Engage drawer glide. Check that the gas supply line shutoff valve is open. ■ If the gas supply line shutoff valve is an extra part, go back through the steps to open , press the CANCEL button on for 5 minutes, check for specific instruction on the bottom of /recycle all the...

Installation Guide
Page 18
... the above drawing. 6. Apply masking tape to the end of the screws through the range cooktop to help hold the orifice spud holder in plastic parts bag for each burner location. 5. Press nut driver down onto the gas orifice spud and remove by turning it aside on regulator so that the...
... the above drawing. 6. Apply masking tape to the end of the screws through the range cooktop to help hold the orifice spud holder in plastic parts bag for each burner location. 5. Press nut driver down onto the gas orifice spud and remove by turning it aside on regulator so that the...
Warranty Information
Page 1
... fire, flood, acts of God, improper installation, installation not in accordance with any questions or concerns at the number below : Whirlpool Brand Home Appliances Customer eXperience Center 553 Benson Road Benton Harbor, MI 49022-2692 Please include a daytime phone number in the U.S.A.,...operated and maintained according to instructions attached to or furnished with the product, Whirlpool Corporation or Whirlpool Canada LP (hereafter "Whirlpool") will pay for Factory Specified Parts and repair labor to Whirlpool with electrical or plumbing codes, or use or when it was purchased. SOME...
... fire, flood, acts of God, improper installation, installation not in accordance with any questions or concerns at the number below : Whirlpool Brand Home Appliances Customer eXperience Center 553 Benson Road Benton Harbor, MI 49022-2692 Please include a daytime phone number in the U.S.A.,...operated and maintained according to instructions attached to or furnished with the product, Whirlpool Corporation or Whirlpool Canada LP (hereafter "Whirlpool") will pay for Factory Specified Parts and repair labor to Whirlpool with electrical or plumbing codes, or use or when it was purchased. SOME...

Use & Care Guide
Page 8
... to remain on in the display. Before entering the Sabbath Mode, it will be set cook time ends, the oven will shut off for only part of the cycle. The oven temperature will change , and there will remain on some models): 1. "SAb" will turn on for the entire Sabbath Mode period...
... to remain on in the display. Before entering the Sabbath Mode, it will be set cook time ends, the oven will shut off for only part of the cycle. The oven temperature will change , and there will remain on some models): 1. "SAb" will turn on for the entire Sabbath Mode period...

Use & Care Guide
Page 11
... Cleaner, steel-wool pads, gritty washcloths or abrasive paper towels. Cooked-on panel. ■ affresh™ Kitchen and Appliance Cleaner Part Number W10355010 (not included): See the "Accessories" section for more information. COOKTOP CONTROLS To avoid damage to remove from control panel .... Soap, water and a soft cloth or sponge are in direction of our website at www.whirlpool.com. Damage may remove numbers. ■ affresh™ Kitchen and Appliance Cleaner Part Number W10355010 (not included): See the "Accessories" section for more information. Cleaning Method: Rub ...
... Cleaner, steel-wool pads, gritty washcloths or abrasive paper towels. Cooked-on panel. ■ affresh™ Kitchen and Appliance Cleaner Part Number W10355010 (not included): See the "Accessories" section for more information. COOKTOP CONTROLS To avoid damage to remove from control panel .... Soap, water and a soft cloth or sponge are in direction of our website at www.whirlpool.com. Damage may remove numbers. ■ affresh™ Kitchen and Appliance Cleaner Part Number W10355010 (not included): See the "Accessories" section for more information. Cleaning Method: Rub ...
Use & Care Guide
Page 14
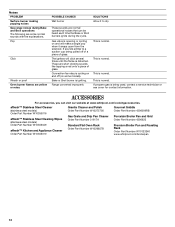
... W10275756 Gas Grate and Drip Pan Cleaner Order Part Number 31617A Standard Flat Oven Rack Order Part Number W10268578 Gourmet Griddle Order Part Number 4396096RB Porcelain Broiler Pan and Grid Order Part Number 4396923 Premium Broiler Pan and Roasting Rack Order Part Number W10123240 www.whirlpool.com/broilerpan 14 Noises PROBLEM Surface burner making popping noises...
... W10275756 Gas Grate and Drip Pan Cleaner Order Part Number 31617A Standard Flat Oven Rack Order Part Number W10268578 Gourmet Griddle Order Part Number 4396096RB Porcelain Broiler Pan and Grid Order Part Number 4396923 Premium Broiler Pan and Roasting Rack Order Part Number W10123240 www.whirlpool.com/broilerpan 14 Noises PROBLEM Surface burner making popping noises...

Use & Care Guide
Page 15
... operated and maintained according to instructions attached to or furnished with the product, Whirlpool Corporation or Whirlpool Canada LP (hereafter "Whirlpool") will pay for Factory Specified Parts and repair labor to Whirlpool within 30 days from the date of your major appliance if it is installed... water filters. Costs associated with original model/serial numbers that is used in the country in the U.S.A., visit www.whirlpool.com. Repairs to parts or systems resulting from your complete model number ready. Major appliances with the removal from warranty coverage. 3. The cost...
... operated and maintained according to instructions attached to or furnished with the product, Whirlpool Corporation or Whirlpool Canada LP (hereafter "Whirlpool") will pay for Factory Specified Parts and repair labor to Whirlpool within 30 days from the date of your major appliance if it is installed... water filters. Costs associated with original model/serial numbers that is used in the country in the U.S.A., visit www.whirlpool.com. Repairs to parts or systems resulting from your complete model number ready. Major appliances with the removal from warranty coverage. 3. The cost...


