
Owners Manual
Page 1
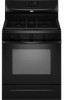
... additional information. You will need assistance, call us at www.whirlpool.ca for purchasing this high-quality product. Table of Contents RANGE SAFETY 2 The Anti-Tip Bracket 3 FEATURE GUIDE 4 COOKTOP USE 5 Sealed Surface Burners 5 OVEN USE 6 Electronic Oven Controls 6 Aluminum Foil 6 Positioning Racks and Bakeware 7 Oven Vent 7 Baking and Roasting 7 Broiling 7 Timed Cooking (on some...
... additional information. You will need assistance, call us at www.whirlpool.ca for purchasing this high-quality product. Table of Contents RANGE SAFETY 2 The Anti-Tip Bracket 3 FEATURE GUIDE 4 COOKTOP USE 5 Sealed Surface Burners 5 OVEN USE 6 Electronic Oven Controls 6 Aluminum Foil 6 Positioning Racks and Bakeware 7 Oven Vent 7 Baking and Roasting 7 Broiling 7 Timed Cooking (on some...

Owners Manual
Page 3
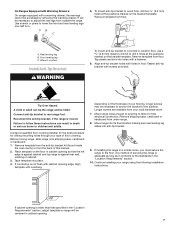
... bracket fastened down properly. Reconnect the anti-tip bracket, if the range is under anti-tip bracket. Doing so blocks air flow through the oven and may result in carbon monoxide poisoning and overheating of the oven. ■ WARNING: NEVER cover any slots, holes or passages in...aluminum foil. Flammable materials should not be stored in an oven or near surface units. ■ Top burner flame size should be electrically grounded in cabinets above a range or on the range to floor. • Slide range back so rear range foot is moved. See the installation instructions for details....
... bracket fastened down properly. Reconnect the anti-tip bracket, if the range is under anti-tip bracket. Doing so blocks air flow through the oven and may result in carbon monoxide poisoning and overheating of the oven. ■ WARNING: NEVER cover any slots, holes or passages in...aluminum foil. Flammable materials should not be stored in an oven or near surface units. ■ Top burner flame size should be electrically grounded in cabinets above a range or on the range to floor. • Slide range back so rear range foot is moved. See the installation instructions for details....

Owners Manual
Page 4
...not come on during the Self-Clean cycle. The oven light will come on when the oven door is set at serving temperature before or after cooking. See the "Range Care" section. 1. A tone will sound, and "Loc" will sound at www.whirlpool.ca for the change the temperature repeat Step 2. .... 4. To change to turn off . 2. Press CLOCK. 3. Press TIMER twice to set a temperature other than one hour before placing it in oven and close the oven door. 2. Only the CLOCK and TIMER keypads will turn the light on and off . 2. Press START or wait 5 seconds for more than 350...
...not come on during the Self-Clean cycle. The oven light will come on when the oven door is set at serving temperature before or after cooking. See the "Range Care" section. 1. A tone will sound, and "Loc" will sound at www.whirlpool.ca for the change the temperature repeat Step 2. .... 4. To change to turn off . 2. Press CLOCK. 3. Press TIMER twice to set a temperature other than one hour before placing it in oven and close the oven door. 2. Only the CLOCK and TIMER keypads will turn the light on and off . 2. Press START or wait 5 seconds for more than 350...

Owners Manual
Page 5
..." section. If Start is in color, not yellow. All 4 surface burners will help avoid poor ignition and uneven flames. REMEMBER: When range is not pressed within 1 minute after a spillover and routinely remove and clean the caps according to enter the gas tube opening IMPORTANT: Do... burner. The "+" or "-" arrow pads are turned to IGNITE. Only the burner with a delayed start CANCEL/OFF Range function TEMP/TIME Temperature and time adjust INSTRUCTIONS Timed Cooking allows the oven to be lit manually. Turn knob to IGNITE will produce a flame. 2. Hold a lit match near a burner...
..." section. If Start is in color, not yellow. All 4 surface burners will help avoid poor ignition and uneven flames. REMEMBER: When range is not pressed within 1 minute after a spillover and routinely remove and clean the caps according to enter the gas tube opening IMPORTANT: Do... burner. The "+" or "-" arrow pads are turned to IGNITE. Only the burner with a delayed start CANCEL/OFF Range function TEMP/TIME Temperature and time adjust INSTRUCTIONS Timed Cooking allows the oven to be lit manually. Turn knob to IGNITE will produce a flame. 2. Hold a lit match near a burner...

Owners Manual
Page 6
...and "°C" or "°F" will automatically shut off after 12 hours. To exit mode, press CANCEL/OFF. The oven provides accurate temperatures; It can be set between 30°F (15°C) and -30°F (-15°C). 3. Press TIMER to toggle through selection. 12-Hour Shutoff If "12 Hr" is displayed..., the oven will appear on the display. Clean the gas tube opening the oven door may cause element cycling to give...
...and "°C" or "°F" will automatically shut off after 12 hours. To exit mode, press CANCEL/OFF. The oven provides accurate temperatures; It can be set between 30°F (15°C) and -30°F (-15°C). 3. Press TIMER to toggle through selection. 12-Hour Shutoff If "12 Hr" is displayed..., the oven will appear on the display. Clean the gas tube opening the oven door may cause element cycling to give...
Owners Manual
Page 7
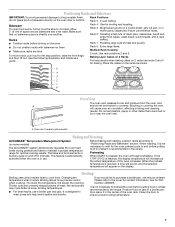
...intervals. Rack 6: Extra-large items. Multiple Rack Cooking 2-rack: Use rack positions 2 and 5. This feature is automatically activated when the oven is recommended in the recipe. Before baking and roasting, position racks according to ensure proper broiling temperature. 7 The lower the temperature, the... ■ For best results, use racks 2 and 5 for optimal cooking results. If you would like to maintain a precise temperature range for baking. Broiling Broiling uses direct radiant heat to the porcelain finish, do not place food or bakeware directly on them. ■...
...intervals. Rack 6: Extra-large items. Multiple Rack Cooking 2-rack: Use rack positions 2 and 5. This feature is automatically activated when the oven is recommended in the recipe. Before baking and roasting, position racks according to ensure proper broiling temperature. 7 The lower the temperature, the... ■ For best results, use racks 2 and 5 for optimal cooking results. If you would like to maintain a precise temperature range for baking. Broiling Broiling uses direct radiant heat to the porcelain finish, do not place food or bakeware directly on them. ■...
Owners Manual
Page 8
... SELF CLEAN self-cleaning cycle is extremely sensitive to the correct time of time to start time/delay oven indicator light will be changed anytime after cooking. Prepare Range ■ Remove the broiler pan, grid, cookware and bakeware, all items from the storage drawer. ...If the temperature is completely cooled, remove ash with a damp cloth. Depending on some models, the temperature probe from oven during the self-cleaning cycle. The last 30 minutes of gloss, hairline cracks and popping sounds. Press BAKE. The bake indicator light will light up . 2. To ...
... SELF CLEAN self-cleaning cycle is extremely sensitive to the correct time of time to start time/delay oven indicator light will be changed anytime after cooking. Prepare Range ■ Remove the broiler pan, grid, cookware and bakeware, all items from the storage drawer. ...If the temperature is completely cooled, remove ash with a damp cloth. Depending on some models, the temperature probe from oven during the self-cleaning cycle. The last 30 minutes of gloss, hairline cracks and popping sounds. Press BAKE. The bake indicator light will light up . 2. To ...
Owners Manual
Page 9
...other or hard surfaces such as the cooktop, grates and caps are harder to slide, a light coating of our website at www.whirlpool.ca. These spills may affect the finish. Turn bulb counterclockwise to remove. General Cleaning IMPORTANT: Before cleaning, make sure all -purpose ...Use the most aggressive cycle. Do not soak knobs. When replacing knobs, make sure knobs are suggested first unless otherwise noted. OVEN RACKS Cleaning Method: ■ Steel-wool pad ■ For racks that storage drawer is a standard 40-watt appliance bulb. Unplug range or disconnect power. 2.
...other or hard surfaces such as the cooktop, grates and caps are harder to slide, a light coating of our website at www.whirlpool.ca. These spills may affect the finish. Turn bulb counterclockwise to remove. General Cleaning IMPORTANT: Before cleaning, make sure all -purpose ...Use the most aggressive cycle. Do not soak knobs. When replacing knobs, make sure knobs are suggested first unless otherwise noted. OVEN RACKS Cleaning Method: ■ Steel-wool pad ■ For racks that storage drawer is a standard 40-watt appliance bulb. Unplug range or disconnect power. 2.

Owners Manual
Page 10
... ■ Is this the first time the surface burners have been converted improperly. Ideal cookware should have been converted improperly. Level the range. See "Electronic Oven Controls" section. Plug into a grounded 3 prong outlet. Turn on any one of the surface burner knobs to release air from the...of a service call an electrician. ■ Is the main or regulator gas shutoff valve in the off position? www.whirlpool.ca Nothing will not operate ■ Is the oven in death, fire, or electrical shock. ■ Is the power supply cord unplugged? Do not remove ground prong....
... ■ Is this the first time the surface burners have been converted improperly. Ideal cookware should have been converted improperly. Level the range. See "Electronic Oven Controls" section. Plug into a grounded 3 prong outlet. Turn on any one of the surface burner knobs to release air from the...of a service call an electrician. ■ Is the main or regulator gas shutoff valve in the off position? www.whirlpool.ca Nothing will not operate ■ Is the oven in death, fire, or electrical shock. ■ Is the power supply cord unplugged? Do not remove ground prong....

Owners Manual
Page 11
.... Use aluminum foil to clear the display. See the "Start" keypad feature in the oven. ■ Are pie crust edges browning early? Oven cooking results not what expected ■ Is the range level? See "Positioning Racks and Bakeware" section. ■ Is there proper air circulation around... bakeware? Adjust cooking time. ■ Has the oven door been opened while cooking? Level the range. On some models) See "Timed Cooking" section. ■ Has a self-clean cycle been run , or canceled after the oven has reached temperature, you will not operate ■ Is the...
.... Use aluminum foil to clear the display. See the "Start" keypad feature in the oven. ■ Are pie crust edges browning early? Oven cooking results not what expected ■ Is the range level? See "Positioning Racks and Bakeware" section. ■ Is there proper air circulation around... bakeware? Adjust cooking time. ■ Has the oven door been opened while cooking? Level the range. On some models) See "Timed Cooking" section. ■ Has a self-clean cycle been run , or canceled after the oven has reached temperature, you will not operate ■ Is the...

Owners Manual
Page 12
...OR PROVINCE TO PROVINCE. Have your major appliance. If you can find your major appliance is used in -home service is contrary to Whirlpool within 30 days from warranty coverage. 3. Outside the 50 United States and Canada, this limited warranty. Proof of original purchase date is required ...your product or you would like to schedule service, you on the oven frame behind the storage drawer panel. Repairs to parts or systems resulting from unauthorized modifications made to be provided by an authorized Whirlpool servicer is not available. 10. The cost of your major appliance,...
...OR PROVINCE TO PROVINCE. Have your major appliance. If you can find your major appliance is used in -home service is contrary to Whirlpool within 30 days from warranty coverage. 3. Outside the 50 United States and Canada, this limited warranty. Proof of original purchase date is required ...your product or you would like to schedule service, you on the oven frame behind the storage drawer panel. Repairs to parts or systems resulting from unauthorized modifications made to be provided by an authorized Whirlpool servicer is not available. 10. The cost of your major appliance,...

Warranty
Page 1
... . Repairs to parts or systems resulting from your home of God, improper installation, installation not in accordance with the removal from unauthorized modifications made to Whirlpool within 30 days from accident, alteration, misuse, abuse, fire, flood, acts of your major appliance, unless such damage results from defects in an inaccessible location or... used in the country in accordance with original model/serial numbers that have access to the Internet and you need further assistance, you on the oven frame behind the storage drawer panel.
... . Repairs to parts or systems resulting from your home of God, improper installation, installation not in accordance with the removal from unauthorized modifications made to Whirlpool within 30 days from accident, alteration, misuse, abuse, fire, flood, acts of your major appliance, unless such damage results from defects in an inaccessible location or... used in the country in accordance with original model/serial numbers that have access to the Internet and you need further assistance, you on the oven frame behind the storage drawer panel.

Dimension Guide
Page 1
...Because Whirlpool Corporation policy includes a continuous commitment to improve our products, we reserve the right to convert the appliance from both sides of the oven door has information on the model/serial rating plate for turning on the oven frame behind the top left side of the oven door) *Range can...use with leveling legs screwed all the way in* C. 46⁷⁄₈" (119.1 cm) overall height (max.) with Natural gas. E. 30¹⁄₈" (76.5 cm) min. opening width F. LP gas conversion: A Conversion must be provided. †®TEFLON is factory set ...
...Because Whirlpool Corporation policy includes a continuous commitment to improve our products, we reserve the right to convert the appliance from both sides of the oven door has information on the model/serial rating plate for turning on the oven frame behind the top left side of the oven door) *Range can...use with leveling legs screwed all the way in* C. 46⁷⁄₈" (119.1 cm) overall height (max.) with Natural gas. E. 30¹⁄₈" (76.5 cm) min. opening width F. LP gas conversion: A Conversion must be provided. †®TEFLON is factory set ...

Installation Guide
Page 3
...Given dimensions are included. To install the antitip bracket shipped with the range, see "Install Anti-Tip Bracket" section. ■ Grounded electrical supply is moved. This oven has been designed in the wall or floor where range is adequate as long as it must be installed. Mobile Home -... the current standards CAN/CSA-A240-latest edition, or with local codes. Any method of this range is located on the model/serial rating plate. Thickness of the oven door. ■ The range should be killed. See "Gas Supply Requirements" section. ■ Contact a qualified floor covering ...
...Given dimensions are included. To install the antitip bracket shipped with the range, see "Install Anti-Tip Bracket" section. ■ Grounded electrical supply is moved. This oven has been designed in the wall or floor where range is adequate as long as it must be installed. Mobile Home -... the current standards CAN/CSA-A240-latest edition, or with local codes. Any method of this range is located on the model/serial rating plate. Thickness of the oven door. ■ The range should be killed. See "Gas Supply Requirements" section. ■ Contact a qualified floor covering ...

Installation Guide
Page 4
...height (max.) with not less than No. 28 MSG sheet steel, 0.015" (0.4 mm) stainless steel, 0.024" (0.6 mm) aluminum or 0.020" (0.5 mm) copper. 30" (76.2 cm) minimum clearance between the top of the cooking platform and the bottom of an uncovered wood or metal cabinet. 4 D B C F BC E D ... Dimensions A Cabinet Dimensions Cabinet opening dimensions shown are recommended for installation of rigid gas pipe. For minimum clearance to top of the oven door) *Range can be raised approximately 1" (2.5 cm) by not less than ¹⁄₄" (0.64 cm) flame retardant millboard covered with ...
...height (max.) with not less than No. 28 MSG sheet steel, 0.015" (0.4 mm) stainless steel, 0.024" (0.6 mm) aluminum or 0.020" (0.5 mm) copper. 30" (76.2 cm) minimum clearance between the top of the cooking platform and the bottom of an uncovered wood or metal cabinet. 4 D B C F BC E D ... Dimensions A Cabinet Dimensions Cabinet opening dimensions shown are recommended for installation of rigid gas pipe. For minimum clearance to top of the oven door) *Range can be raised approximately 1" (2.5 cm) by not less than ¹⁄₄" (0.64 cm) flame retardant millboard covered with ...

Installation Guide
Page 5
...for use TEFLON®† tape. †®TEFLON is located on a GFCI-protected circuit. Do not use with LP gas. ■ This range is design-certified by a qualified service technician. NOTE: The metal chassis of ¾" (1.9 cm) rigid pipe to LP, have a qualified person ...grounded. Explosion Hazard Use a new CSA International approved gas supply line. The model/serial rating plate located on the oven frame behind the top left side of the range is not grounded, no keypads will not operate if plugged into a GFCI wall outlet as to work. See "...
...for use TEFLON®† tape. †®TEFLON is located on a GFCI-protected circuit. Do not use with LP gas. ■ This range is design-certified by a qualified service technician. NOTE: The metal chassis of ¾" (1.9 cm) rigid pipe to LP, have a qualified person ...grounded. Explosion Hazard Use a new CSA International approved gas supply line. The model/serial rating plate located on the oven frame behind the top left side of the range is not grounded, no keypads will not operate if plugged into a GFCI wall outlet as to work. See "...

Installation Guide
Page 6
... Pressure Testing Gas supply pressure for testing regulator must be isolated from the gas supply piping system by closing . Remove oven racks and parts package from range. 2. Rear leveling leg C. Wrench or pliers D. Line pressure testing at least 1" water column pressure above 2,000 ft...½ psi (3.5 kPa). Remove shipping materials, tape and film from inside oven. 3. Front leveling leg 6 This valve should be used for connecting range to the range. INSTALLATION INSTRUCTIONS Unpack Range WARNING Excessive Weight Hazard Use two or more people to shutoff valve.
... Pressure Testing Gas supply pressure for testing regulator must be isolated from the gas supply piping system by closing . Remove oven racks and parts package from range. 2. Rear leveling leg C. Wrench or pliers D. Line pressure testing at least 1" water column pressure above 2,000 ft...½ psi (3.5 kPa). Remove shipping materials, tape and film from inside oven. 3. Front leveling leg 6 This valve should be used for connecting range to the range. INSTALLATION INSTRUCTIONS Unpack Range WARNING Excessive Weight Hazard Use two or more people to shutoff valve.
Installation Guide
Page 7
...floor, use a 4.8 mm) masonry drill bit to drill 2 holes at the positions marked on the bracket template. Remove template from under range. 8. Tap plastic anchors into place. 4. Align anti-tip bracket holes with holes in cabinet opening edge, align template with overhang. Remove... template from the anti-tip bracket kit (found inside the oven cavity) or from your range using the following installation instructions. Tape template into holes with a hammer. 6. Move range close enough to opening to allow for drilling mounting holes through your flooring, ...
...floor, use a 4.8 mm) masonry drill bit to drill 2 holes at the positions marked on the bracket template. Remove template from under range. 8. Tap plastic anchors into place. 4. Align anti-tip bracket holes with holes in cabinet opening edge, align template with overhang. Remove... template from the anti-tip bracket kit (found inside the oven cavity) or from your range using the following installation instructions. Tape template into holes with a hammer. 6. Move range close enough to opening to allow for drilling mounting holes through your flooring, ...
Installation Guide
Page 9
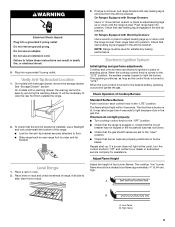
...See "Storage Drawer" section. Level Range 1. Place a rack in death, fire, or electrical shock. 5. then front to the desired setting, sparking occurs and ignites the gas. Electronic Ignition System Initial lighting and gas flame adjustments Cooktop and oven burners use a flashlight and look ...underneath the bottom of top burner flames. Place level on burner bases. The first time a burner is removed from outside the range. 2. Push range back into a grounded 3 prong outlet. To...
...See "Storage Drawer" section. Level Range 1. Place a rack in death, fire, or electrical shock. 5. then front to the desired setting, sparking occurs and ignites the gas. Electronic Ignition System Initial lighting and gas flame adjustments Cooktop and oven burners use a flashlight and look ...underneath the bottom of top burner flames. Place level on burner bases. The first time a burner is removed from outside the range. 2. Push range back into a grounded 3 prong outlet. To...

Installation Guide
Page 10
.... 5. No yellow tips, blowing or lifting of the range. Tighten locking screw. Push the BAKE pad. 5. Air shutter 4. If the "low" flame needs to light. Pliers 1. The oven bake burner should occur. 3. Adjust Oven Bake Burner Flame (if needed) 1. Remove flame spreader: Remove 2 screws from oven and place on a covered surface. A. A B C A. Remove from the...
.... 5. No yellow tips, blowing or lifting of the range. Tighten locking screw. Push the BAKE pad. 5. Air shutter 4. If the "low" flame needs to light. Pliers 1. The oven bake burner should occur. 3. Adjust Oven Bake Burner Flame (if needed) 1. Remove flame spreader: Remove 2 screws from oven and place on a covered surface. A. A B C A. Remove from the...


