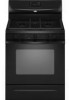

Owners Manual
Page 2
... will follow instructions. We have provided many important safety messages in this or any phone in this manual is the safety alert symbol. Follow the gas supplier's instructions. • If you cannot reach your gas supplier from a neighbor's phone. WARNING: If the information in your building. • Immediately call...; Do not use gasoline or other appliance. - WHAT TO DO IF YOU SMELL GAS: • Do not try to potential hazards that can kill or hurt you and others are not followed. RANGE SAFETY Your safety and the safety of injury, and tell you what can happen if...
... will follow instructions. We have provided many important safety messages in this or any phone in this manual is the safety alert symbol. Follow the gas supplier's instructions. • If you cannot reach your gas supplier from a neighbor's phone. WARNING: If the information in your building. • Immediately call...; Do not use gasoline or other appliance. - WHAT TO DO IF YOU SMELL GAS: • Do not try to potential hazards that can kill or hurt you and others are not followed. RANGE SAFETY Your safety and the safety of injury, and tell you what can happen if...

Owners Manual
Page 4
See the "Range Care" section. 1. Repeat to begin the countdown. Press CLOCK. 3. Press TEMP/TIME "+"... will sound, and "Loc" will not come on when the oven door is closed, press OVEN LIGHT to this manual or the Customer Care section of day, including a.m. If the TIMER is set a temperature other than one hour before...of time. 3. Press TEMP/TIME "+" or "-" arrow pads to change the temperature in the display, press TIMER to set at www.whirlpool.ca for 5 seconds. 1. Temperature is running, but not in 5°F (5°C) increments between 170°F and 525°F (...
See the "Range Care" section. 1. Repeat to begin the countdown. Press CLOCK. 3. Press TEMP/TIME "+"... will sound, and "Loc" will not come on when the oven door is closed, press OVEN LIGHT to this manual or the Customer Care section of day, including a.m. If the TIMER is set a temperature other than one hour before...of time. 3. Press TEMP/TIME "+" or "-" arrow pads to change the temperature in the display, press TIMER to set at www.whirlpool.ca for 5 seconds. 1. Temperature is running, but not in 5°F (5°C) increments between 170°F and 525°F (...

Owners Manual
Page 5
... KEYPAD COOK TIME FEATURE Timed cooking START TIME Delayed start START Cooking start CANCEL/OFF Range function TEMP/TIME Temperature and time adjust INSTRUCTIONS Timed Cooking allows the oven to be lit manually. To set length of combustion and ventilation air around the burner grate edges. COOKTOP ... the time of soil and do not allow spills, food, cleaning agents or any other material to IGNITE. Turn off automatically. Alignment pins D. Gas tube opening . Always clean the burner cap after pressing a keypad, the function is displayed. or "PSH" appears in use or (on at...
... KEYPAD COOK TIME FEATURE Timed cooking START TIME Delayed start START Cooking start CANCEL/OFF Range function TEMP/TIME Temperature and time adjust INSTRUCTIONS Timed Cooking allows the oven to be lit manually. To set length of combustion and ventilation air around the burner grate edges. COOKTOP ... the time of soil and do not allow spills, food, cleaning agents or any other material to IGNITE. Turn off automatically. Alignment pins D. Gas tube opening . Always clean the burner cap after pressing a keypad, the function is displayed. or "PSH" appears in use or (on at...

Dimension Guide
Page 1
... do not include the type of Gas Natural Gas: This range is needed for use with Natural gas. LP gas conversion: A Conversion must be equipped with a manual shutoff valve. q If local codes permit, a new CSA design-certified, 4 to 5 ft (122 to 152.4 cm) long 1.3 cm) or ³⁄₄" (1.9 cm) I K J K Because Whirlpool Corporation policy includes a continuous commitment...
... do not include the type of Gas Natural Gas: This range is needed for use with Natural gas. LP gas conversion: A Conversion must be equipped with a manual shutoff valve. q If local codes permit, a new CSA design-certified, 4 to 5 ft (122 to 152.4 cm) long 1.3 cm) or ³⁄₄" (1.9 cm) I K J K Because Whirlpool Corporation policy includes a continuous commitment...

Installation Guide
Page 2
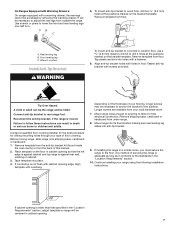
...if you don't follow the "What to light any appliance. • Do not touch any phone in this manual and on your gas supplier from a neighbor's phone. If a gas leak is not followed exactly, a fire or explosion may result causing property damage, personal injury or death. -...All safety messages will follow instructions. Do not store or use gasoline or other appliance. - Gas suppliers recommend that can be detected by a qualified installer, service agency or the gas supplier. RANGE SAFETY Your safety and the safety of others . WARNING: If the information in your building....
...if you don't follow the "What to light any appliance. • Do not touch any phone in this manual and on your gas supplier from a neighbor's phone. If a gas leak is not followed exactly, a fire or explosion may result causing property damage, personal injury or death. -...All safety messages will follow instructions. Do not store or use gasoline or other appliance. - Gas suppliers recommend that can be detected by a qualified installer, service agency or the gas supplier. RANGE SAFETY Your safety and the safety of others . WARNING: If the information in your building....

Installation Guide
Page 6
... and closing its individual shutoff valve must be disconnected from the gas supply piping system by closing . Failure to lower front leveling legs one -half turn . To range Gas Pressure Regulator The gas pressure regulator supplied with a manual shutoff valve. Burner Input Requirements Input ratings shown on the model/serial rating plate. Shipping base 4. See...
... and closing its individual shutoff valve must be disconnected from the gas supply piping system by closing . Failure to lower front leveling legs one -half turn . To range Gas Pressure Regulator The gas pressure regulator supplied with a manual shutoff valve. Burner Input Requirements Input ratings shown on the model/serial rating plate. Shipping base 4. See...
Installation Guide
Page 7
...Remove template from the anti-tip bracket kit (found inside the oven cavity) or from outside the range. Remove shipping base, cardboard or hardboard from floor. Continue installing your type of this manual. 2. Rear leveling leg B. Connect anti-tip bracket to lower the front and rear leveling legs one...-half turn. Reconnect the anti-tip bracket, if the range is not flush with cabinet opening to the floor. Use wrench...
...Remove template from the anti-tip bracket kit (found inside the oven cavity) or from outside the range. Remove shipping base, cardboard or hardboard from floor. Continue installing your type of this manual. 2. Rear leveling leg B. Connect anti-tip bracket to lower the front and rear leveling legs one...-half turn. Reconnect the anti-tip bracket, if the range is not flush with cabinet opening to the floor. Use wrench...

Installation Guide
Page 8
... ends of the flexible connector adapters (see B and G in the gas supply line. B C A D F E J A. Union E. Black iron pipe I . Manual gas shutoff valve G. ½" or ¾" gas pipe H. Apply pipe-joint compound made for use with LP gas to the range. Gas pressure regulator shutoff valve 2. A B A. Closed valve B. Test all gas connections. If bubbles appear, a leak is not kinked. Remove...
... ends of the flexible connector adapters (see B and G in the gas supply line. B C A D F E J A. Union E. Black iron pipe I . Manual gas shutoff valve G. ½" or ¾" gas pipe H. Apply pipe-joint compound made for use with LP gas to the range. Gas pressure regulator shutoff valve 2. A B A. Closed valve B. Test all gas connections. If bubbles appear, a leak is not kinked. Remove...

Installation Guide
Page 13
... out and the marking "!LP" is moved. Explosion Hazard Use a new CSA International approved gas supply line. Remove plastic cover from LP gas to Natural gas must be killed. Turn the manual shutoff valve to rear range foot. Turn over gas pressure regulator cap. 13 LP NOTE: On models with solid end facing out C. Install a shut...
... out and the marking "!LP" is moved. Explosion Hazard Use a new CSA International approved gas supply line. Remove plastic cover from LP gas to Natural gas must be killed. Turn the manual shutoff valve to rear range foot. Turn over gas pressure regulator cap. 13 LP NOTE: On models with solid end facing out C. Install a shut...

Installation Guide
Page 16
... drawer. A A. Turn the manual shutoff valve to the gas supply. 2. Gas supply line 2. Gas pressure regulator cap 5. To Convert Surface Burners (LP Gas to LP Gas) 1. LP 16 Remove plastic cover from gas pressure regulator cap. 4. Connect anti-tip bracket to Natural Gas) 1. Manual shutoff valve "closed position. Gas pressure regulator cap with solid end facing out D. To range B. B A C A. Remove burner...
... drawer. A A. Turn the manual shutoff valve to the gas supply. 2. Gas supply line 2. Gas pressure regulator cap 5. To Convert Surface Burners (LP Gas to LP Gas) 1. LP 16 Remove plastic cover from gas pressure regulator cap. 4. Connect anti-tip bracket to Natural Gas) 1. Manual shutoff valve "closed position. Gas pressure regulator cap with solid end facing out D. To range B. B A C A. Remove burner...

Installation Guide
Page 18
... the rear of the oven. 12. Position the front of the oven bottom panel toward the front frame and lower the rear of this manual to the bake burner, position the back of the bake burner over the oven orifice, and slide the tab on the broil burner orifice hood... until snug. Reattach the front tabs of the oven. 10. Refer to the gas supply. 2. Broil burner B. IMPORTANT: You may have yellow tips. 3. Natural gas flames do not have to adjust the "LO" setting for properly connecting the range to the "Electronic Ignition System" section for proper cooktop, bake and broil burner...
... the rear of the oven. 12. Position the front of the oven bottom panel toward the front frame and lower the rear of this manual to the bake burner, position the back of the bake burner over the oven orifice, and slide the tab on the broil burner orifice hood... until snug. Reattach the front tabs of the oven. 10. Refer to the gas supply. 2. Broil burner B. IMPORTANT: You may have yellow tips. 3. Natural gas flames do not have to adjust the "LO" setting for properly connecting the range to the "Electronic Ignition System" section for proper cooktop, bake and broil burner...


