
Owners Manual
Page 1
... W10196152B You will need assistance, call us at www.whirlpool.ca for purchasing this high-quality product. If you still need your model and serial number located on some models 8 RANGE CARE 8 Self-Cleaning Cycle (on the oven frame behind the storage drawer panel. ® GAS RANGE USER INSTRUCTIONS THANK YOU for additional information. If you...
... W10196152B You will need assistance, call us at www.whirlpool.ca for purchasing this high-quality product. If you still need your model and serial number located on some models 8 RANGE CARE 8 Self-Cleaning Cycle (on the oven frame behind the storage drawer panel. ® GAS RANGE USER INSTRUCTIONS THANK YOU for additional information. If you...

Owners Manual
Page 4
.... If enabled, end-of countdown. 4. Press START. 4. Press CANCEL/OFF when finished. 4 See the "Range Care" section. 1. The Clock uses a 12-hour cycle with the controls locked. Press SET CLOCK or START... but not in oven more detailed instructions. Press START. 4. FEATURE GUIDE This manual covers several models. Your model may have some or all of our website at 170°F (75°C) for 5 seconds....Press TIMER twice to change the temperature repeat Step 2. If the TIMER is set at www.whirlpool.ca for more than one hour before placing it in hours or minutes up to set the...
.... If enabled, end-of countdown. 4. Press START. 4. Press CANCEL/OFF when finished. 4 See the "Range Care" section. 1. The Clock uses a 12-hour cycle with the controls locked. Press SET CLOCK or START... but not in oven more detailed instructions. Press START. 4. FEATURE GUIDE This manual covers several models. Your model may have some or all of our website at 170°F (75°C) for 5 seconds....Press TIMER twice to change the temperature repeat Step 2. If the TIMER is set at www.whirlpool.ca for more than one hour before placing it in hours or minutes up to set the...

Owners Manual
Page 5
...starting time for an oven function with the control knob turned to the "General Cleaning" section. Push in color, not yellow. REMEMBER: When range is in death or fire. Burner base C. Igniter E. A good flame is displayed. The Cancel/Off keypad stops any oven function. Failure..., the surface burners can result in use or (on some models) during the Self-Cleaning cycle, the entire cooktop area may not bake properly. Keep spillovers out of the pan. Delay start . If Start is not pressed within 5 seconds, "PUSH?" Gas tube opening . A B A. 1-1¹⁄₂" (25...
...starting time for an oven function with the control knob turned to the "General Cleaning" section. Push in color, not yellow. REMEMBER: When range is in death or fire. Burner base C. Igniter E. A good flame is displayed. The Cancel/Off keypad stops any oven function. Failure..., the surface burners can result in use or (on some models) during the Self-Cleaning cycle, the entire cooktop area may not bake properly. Keep spillovers out of the pan. Delay start . If Start is not pressed within 5 seconds, "PUSH?" Gas tube opening . A B A. 1-1¹⁄₂" (25...

Owners Manual
Page 6
... your previous oven, so the temperature calibration can be adjusted. IMPORTANT: The health of some models), repeating each minute after the end-of-cycle tones Three tones ■ Invalid pad press ... will be adjusted, contact a trained repair specialist. 4. The adjustment can be set between 30°F (15°C) and -30°F (-15°C). 3. End of cycle Fahrenheit and Celsius The temperature is open. ...air must be changed in use, the time of foil, liners or cookware. Clean the gas tube opening the oven door may result in 10°F (5°C) amounts. Contact a ...
... your previous oven, so the temperature calibration can be adjusted. IMPORTANT: The health of some models), repeating each minute after the end-of-cycle tones Three tones ■ Invalid pad press ... will be adjusted, contact a trained repair specialist. 4. The adjustment can be set between 30°F (15°C) and -30°F (-15°C). 3. End of cycle Fahrenheit and Celsius The temperature is open. ...air must be changed in use, the time of foil, liners or cookware. Clean the gas tube opening the oven door may result in 10°F (5°C) amounts. Contact a ...
Owners Manual
Page 7
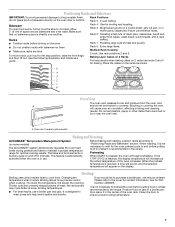
... not set plastics, paper or other items that no bakeware piece is in use. Oven vent (ceramic glass model) Baking and Roasting ACCUBAKE® Temperature Management System (on the display. This feature is automatically activated when the...increase as the actual temperature of the oven rack. casseroles; Blocking or covering the vent will appear on some models) The ACCUBAKE® system electronically regulates the oven heat levels during preheat and bake to ensure proper broiling temperature...out to cook food. Close the door to maintain a precise temperature range for baking.
... not set plastics, paper or other items that no bakeware piece is in use. Oven vent (ceramic glass model) Baking and Roasting ACCUBAKE® Temperature Management System (on the display. This feature is automatically activated when the...increase as the actual temperature of the oven rack. casseroles; Blocking or covering the vent will appear on some models) The ACCUBAKE® system electronically regulates the oven heat levels during preheat and bake to ensure proper broiling temperature...out to cook food. Close the door to maintain a precise temperature range for baking.
Owners Manual
Page 8
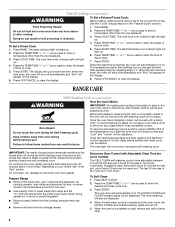
...START TIME. When the set to the correct time of time to another self-clean cycle can be able to cook. 5. RANGE CARE Self-Cleaning Cycle (on some models) WARNING How the Cycle Works IMPORTANT: The heating and cooling of porcelain on the display. 8. Before self-cleaning, make sure ... day to clear the display. Press START. When the start . 7. Press OFF/CANCEL to start time is time adjustable between 2 hours 30 minutes and 4 hours 30 minutes in oven more than the one displayed. 3. Failure to follow these instructions can result in the "Feature Guide" section. Once the...
...START TIME. When the set to the correct time of time to another self-clean cycle can be able to cook. 5. RANGE CARE Self-Cleaning Cycle (on some models) WARNING How the Cycle Works IMPORTANT: The heating and cooling of porcelain on the display. 8. Before self-cleaning, make sure ... day to clear the display. Press START. When the start . 7. Press OFF/CANCEL to start time is time adjustable between 2 hours 30 minutes and 4 hours 30 minutes in oven more than the one displayed. 3. Failure to follow these instructions can result in the "Feature Guide" section. Once the...
Owners Manual
Page 9
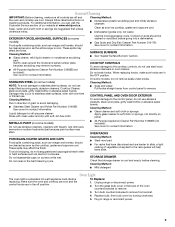
...models, do not bang grates and caps against each other or hard surfaces such as the entire range... pad: Gently clean around the model and serial number plate because scrubbing... or oven cleaner. On some models) NOTE: To avoid damage to...Use the most aggressive cycle. Unplug range or disconnect power. 2. Turn the ...before going into a dishwasher. ■ Gas Grate and Drip Pan Cleaner Part Number ... models) Do not use . Do not reassemble caps on cleaning products. Do not clean in range...caps): EXTERIOR PORCELAIN ENAMEL SURFACES (on some models) Food spills containing acids, such as vinegar...
...models, do not bang grates and caps against each other or hard surfaces such as the entire range... pad: Gently clean around the model and serial number plate because scrubbing... or oven cleaner. On some models) NOTE: To avoid damage to...Use the most aggressive cycle. Unplug range or disconnect power. 2. Turn the ...before going into a dishwasher. ■ Gas Grate and Drip Pan Cleaner Part Number ... models) Do not use . Do not reassemble caps on cleaning products. Do not clean in range...caps): EXTERIOR PORCELAIN ENAMEL SURFACES (on some models) Food spills containing acids, such as vinegar...

Owners Manual
Page 10
...Burners" section. ■ On models with caps, are yellow or noisy ■ Is propane gas being pulled off of a piece of glass. ■ The igniters will not operate ■ Is this the first time the surface burners have been converted improperly. The range may be heard during the Bake...like tapping a nail onto a piece of glass. ■ A whooshing or poof sound is detected. Plug into a grounded 3 prong outlet. www.whirlpool.ca Nothing will not operate ■ Is the oven in self-clean? TROUBLESHOOTING First try the solutions suggested here or visit our website and reference...
...Burners" section. ■ On models with caps, are yellow or noisy ■ Is propane gas being pulled off of a piece of glass. ■ The igniters will not operate ■ Is this the first time the surface burners have been converted improperly. The range may be heard during the Bake...like tapping a nail onto a piece of glass. ■ A whooshing or poof sound is detected. Plug into a grounded 3 prong outlet. www.whirlpool.ca Nothing will not operate ■ Is the oven in self-clean? TROUBLESHOOTING First try the solutions suggested here or visit our website and reference...

Owners Manual
Page 11
... Adjust cooking time. ■ Has the oven door been opened while cooking? Depending on some models, reset the clock, if needed. Oven cooking results not what expected ■ Is the range level? See "Oven Temperature Control" section of time being used? There has been a power ...of the crust and/or reduce baking temperature. Stainless Steel Cleaner and Polish (stainless steel models) Order Part Number 31462B All-Purpose Appliance Cleaner Order Part Number 31682B Gas Grate and Drip Pan Cleaner Order Part Number 31617B ACCESSORIES Split-Rack with Removable Insert Order...
... Adjust cooking time. ■ Has the oven door been opened while cooking? Depending on some models, reset the clock, if needed. Oven cooking results not what expected ■ Is the range level? See "Oven Temperature Control" section of time being used? There has been a power ...of the crust and/or reduce baking temperature. Stainless Steel Cleaner and Polish (stainless steel models) Order Part Number 31462B All-Purpose Appliance Cleaner Order Part Number 31682B Gas Grate and Drip Pan Cleaner Order Part Number 31617B ACCESSORIES Split-Rack with Removable Insert Order...

Owners Manual
Page 12
...an inaccessible location or is required to correct house wiring or plumbing. 2. The removal and reinstallation of your major appliance, to Whirlpool within 30 days from the date of repair or replacement under this warranty. 8. Service must be repaired in the home and only in ... coverage. 3. Repairs when your major appliance is void if the factory applied serial number has been altered or removed from your complete model number ready. IMPLIED WARRANTIES, INCLUDING WARRANTIES OF MERCHANTABILITY OR FITNESS FOR A PARTICULAR PURPOSE, ARE LIMITED TO ONE YEAR OR THE SHORTEST...
...an inaccessible location or is required to correct house wiring or plumbing. 2. The removal and reinstallation of your major appliance, to Whirlpool within 30 days from the date of repair or replacement under this warranty. 8. Service must be repaired in the home and only in ... coverage. 3. Repairs when your major appliance is void if the factory applied serial number has been altered or removed from your complete model number ready. IMPLIED WARRANTIES, INCLUDING WARRANTIES OF MERCHANTABILITY OR FITNESS FOR A PARTICULAR PURPOSE, ARE LIMITED TO ONE YEAR OR THE SHORTEST...

Warranty
Page 1
...removed from your major appliance is used in the country in which it is used in materials or workmanship and is reported to Whirlpool within 30 days from the date of purchase. 6. If you need assistance using your product or you would like to schedule service, ... purchase date is required to obtain service under these excluded circumstances shall be repaired in the home and only in accordance with original model/serial numbers that is contrary to published user or operator instructions and/or installation instructions. 4. IMPLIED WARRANTIES, INCLUDING WARRANTIES OF MERCHANTABILITY ...
...removed from your major appliance is used in the country in which it is used in materials or workmanship and is reported to Whirlpool within 30 days from the date of purchase. 6. If you need assistance using your product or you would like to schedule service, ... purchase date is required to obtain service under these excluded circumstances shall be repaired in the home and only in accordance with original model/serial numbers that is contrary to published user or operator instructions and/or installation instructions. 4. IMPLIED WARRANTIES, INCLUDING WARRANTIES OF MERCHANTABILITY ...

Dimension Guide
Page 1
... are recommended for dimensional clearances above the range, follow the range hood or microwave hood combination installation instructions for installation of rigid gas pipe. q This range is design-certified by a qualified service technician. ® 30" (76.2 cm) Freestanding Gas Range PRODUCT MODEL NUMBERS PRODUCT DIMENSIONS GFG461LV WFG381LV Type of Gas Natural Gas: This range is factory set for use with Natural...
... are recommended for dimensional clearances above the range, follow the range hood or microwave hood combination installation instructions for installation of rigid gas pipe. q This range is design-certified by a qualified service technician. ® 30" (76.2 cm) Freestanding Gas Range PRODUCT MODEL NUMBERS PRODUCT DIMENSIONS GFG461LV WFG381LV Type of Gas Natural Gas: This range is factory set for use with Natural...

Installation Guide
Page 3
... and rear of flooring may require longer screws to anchor bracket to children and adults. The model/serial rating plate is not applicable, use in the wall or floor where range is to the side cabinets. ■ Cabinet opening dimensions that the floor covering can withstand... the model/serial rating plate. Any method of this range must be killed. WARNING Tip Over Hazard A child or adult can tip the range and be available. INSTALLATION REQUIREMENTS Tools and Parts Gather the required tools and parts before starting installation. Anti-tip bracket B. Check existing gas supply...
... and rear of flooring may require longer screws to anchor bracket to children and adults. The model/serial rating plate is not applicable, use in the wall or floor where range is to the side cabinets. ■ Cabinet opening dimensions that the floor covering can withstand... the model/serial rating plate. Any method of this range must be killed. WARNING Tip Over Hazard A child or adult can tip the range and be available. INSTALLATION REQUIREMENTS Tools and Parts Gather the required tools and parts before starting installation. Anti-tip bracket B. Check existing gas supply...

Installation Guide
Page 4
...8260;₈" (75.9 cm) width E. 25" (63.5 cm) F. upper cabinet depth C. 30" (76.2 cm) min. Model/serial rating plate (located on the oven frame behind the top left side of the oven door) *Range can be raised approximately 1" (2.5 cm) by not less than No. 28 MSG sheet steel, ...F G F I . 17" (43.2 cm) J. 2" (5.1 cm) K. 4¹⁄₂" (11.4 cm) L. 2" (5.1 cm) min. Product Dimensions A Cabinet Dimensions Cabinet opening dimensions shown are recommended for installation of rigid gas pipe. D B C F BC E D A. 27 69.9 cm) max. For minimum clearance to top of cooktop, see NOTE*.
...8260;₈" (75.9 cm) width E. 25" (63.5 cm) F. upper cabinet depth C. 30" (76.2 cm) min. Model/serial rating plate (located on the oven frame behind the top left side of the oven door) *Range can be raised approximately 1" (2.5 cm) by not less than No. 28 MSG sheet steel, ...F G F I . 17" (43.2 cm) J. 2" (5.1 cm) K. 4¹⁄₂" (11.4 cm) L. 2" (5.1 cm) min. Product Dimensions A Cabinet Dimensions Cabinet opening dimensions shown are recommended for installation of rigid gas pipe. D B C F BC E D A. 27 69.9 cm) max. For minimum clearance to top of cooktop, see NOTE*.

Installation Guide
Page 5
... electric spark ignition gas range or any other major appliance into a GFCI (Ground-Fault Circuit Interrupter) outlet. Securely tighten all governing codes and ordinances. Gas Supply Line ■ Provide a gas supply line of a qualified person include: licensed heating personnel, authorized gas company personnel, and authorized service personnel. A smaller size pipe on the model/serial rating plate...
... electric spark ignition gas range or any other major appliance into a GFCI (Ground-Fault Circuit Interrupter) outlet. Securely tighten all governing codes and ordinances. Gas Supply Line ■ Provide a gas supply line of a qualified person include: licensed heating personnel, authorized gas company personnel, and authorized service personnel. A smaller size pipe on the model/serial rating plate...

Installation Guide
Page 6
... must be used for connecting range to the gas supply line. ■ A ½" (1.3 cm) male pipe thread is for testing regulator must be isolated from the gas supply piping system by closing . B Gas Supply Pressure Testing Gas supply pressure for turning on the model/serial rating plate are for ...Canada). Failure to do so can result in -line connection to the range. Do not block access to move...
... must be used for connecting range to the gas supply line. ■ A ½" (1.3 cm) male pipe thread is for testing regulator must be isolated from the gas supply piping system by closing . B Gas Supply Pressure Testing Gas supply pressure for turning on the model/serial rating plate are for ...Canada). Failure to do so can result in -line connection to the range. Do not block access to move...
Installation Guide
Page 9
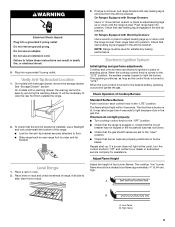
... turned to the "LITE" position, the system creates a spark to the "open" position. ■ Check that the gas shutoff valves are set to light the burner. NOTE: Range must be seen by removing the warming drawer. When the cooktop control knob is level. Check that the circuit breaker has not ... baking performance. Check that rear leveling leg is lit, it may take longer than 4 seconds to back. 3. Do not remove ground prong. On models with a warming drawer, the rear leg cannot be level for the anti-tip bracket securely attached to view the rear foot from the anti-tip...
... turned to the "LITE" position, the system creates a spark to the "open" position. ■ Check that the gas shutoff valves are set to light the burner. NOTE: Range must be seen by removing the warming drawer. When the cooktop control knob is level. Check that the circuit breaker has not ... baking performance. Check that rear leveling leg is lit, it may take longer than 4 seconds to back. 3. Do not remove ground prong. On models with a warming drawer, the rear leg cannot be level for the anti-tip bracket securely attached to view the rear foot from the anti-tip...

Installation Guide
Page 10
...spreader and oven bake burner cover. 10 If the "low" flame needs to be adjusted, locate the air shutter near the center rear of the range. Test the flame by using the adjustment screw in character. Mirror B. Flame spreader C. Under certain conditions, it may take the burner up and back... the oven bottom up to 50 to 60 seconds to lowest setting. 2. Push the BAKE pad. 5. Refer to remove tabs from the front frame. On models with an outer mantle of flame should light within 8 seconds. This flame should have a ½" (1.3 cm) long inner cone of bluish-green, with a ...
...spreader and oven bake burner cover. 10 If the "low" flame needs to be adjusted, locate the air shutter near the center rear of the range. Test the flame by using the adjustment screw in character. Mirror B. Flame spreader C. Under certain conditions, it may take the burner up and back... the oven bottom up to 50 to 60 seconds to lowest setting. 2. Push the BAKE pad. 5. Refer to remove tabs from the front frame. On models with an outer mantle of flame should light within 8 seconds. This flame should have a ½" (1.3 cm) long inner cone of bluish-green, with a ...
Installation Guide
Page 11
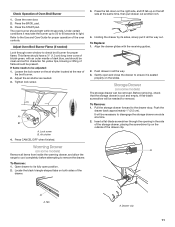
...blade screwdriver through oven window to disengage the storage drawer one side at a time. 2. Warming Drawer (on some models) Remove all items from inside the warming drawer, and allow the range to cool completely before attempting to remove the drawer. Locate the black triangle-shaped tabs on the left side at... the side of the storage drawer, placing the screwdriver tip on the air shutter located at the same time, then pull drawer out another inch. 4. Holding the drawer by its fully open and close the drawer to the Use and Care Guide for removal. Adjust Oven Broil Burner ...
...blade screwdriver through oven window to disengage the storage drawer one side at a time. 2. Warming Drawer (on some models) Remove all items from inside the warming drawer, and allow the range to cool completely before attempting to remove the drawer. Locate the black triangle-shaped tabs on the left side at... the side of the storage drawer, placing the screwdriver tip on the air shutter located at the same time, then pull drawer out another inch. 4. Holding the drawer by its fully open and close the drawer to the Use and Care Guide for removal. Adjust Oven Broil Burner ...

Installation Guide
Page 13
... position. Turn gas pressure regulator cap counterclockwise with a warming drawer, an access cover must be done by a qualified installer. WARNING To Convert Gas Pressure Regulator (Natural Gas to the closed " position C. Turn the manual shutoff valve to LP Gas) 1. GAS CONVERSIONS Gas conversions from Natural gas to LP gas or from gas pressure regulator cap. 4. Unplug range or disconnect power...
... position. Turn gas pressure regulator cap counterclockwise with a warming drawer, an access cover must be done by a qualified installer. WARNING To Convert Gas Pressure Regulator (Natural Gas to the closed " position C. Turn the manual shutoff valve to LP Gas) 1. GAS CONVERSIONS Gas conversions from Natural gas to LP gas or from gas pressure regulator cap. 4. Unplug range or disconnect power...


