
Owners Manual
Page 2
...vapors and liquids in the vicinity of this manual is the safety alert symbol. Installation and service must be performed by a qualified installer, service agency or the gas supplier. 2 WHAT TO DO IF YOU SMELL GAS: • Do not try to potential hazards that can happen if the ...symbol alerts you don't follow instructions. WARNING: If the information in this or any phone in this manual and on your gas supplier from a neighbor's phone. RANGE SAFETY Your safety and the safety of others . We have provided many important safety messages in your building. • Immediately...
...vapors and liquids in the vicinity of this manual is the safety alert symbol. Installation and service must be performed by a qualified installer, service agency or the gas supplier. 2 WHAT TO DO IF YOU SMELL GAS: • Do not try to potential hazards that can happen if the ...symbol alerts you don't follow instructions. WARNING: If the information in this or any phone in this manual and on your gas supplier from a neighbor's phone. RANGE SAFETY Your safety and the safety of others . We have provided many important safety messages in your building. • Immediately...

Owners Manual
Page 3
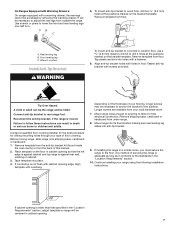
...grounded in death or serious burns to the open door without the antitip bracket fastened down properly. The range, when installed, must be killed. In Canada, the range must be plugged directly into a properly grounded receptacle. WARNING Tip Over Hazard A child or adult ... following: ■ WARNING: TO REDUCE THE RISK OF TIPPING OF THE RANGE, THE RANGE MUST BE SECURED BY PROPERLY INSTALLED ANTI-TIP DEVICES. Failure to floor. • Slide range back so rear range foot is moved. Aluminum foil linings may cause carbon monoxide poisoning. Flammable materials...
...grounded in death or serious burns to the open door without the antitip bracket fastened down properly. The range, when installed, must be killed. In Canada, the range must be plugged directly into a properly grounded receptacle. WARNING Tip Over Hazard A child or adult ... following: ■ WARNING: TO REDUCE THE RISK OF TIPPING OF THE RANGE, THE RANGE MUST BE SECURED BY PROPERLY INSTALLED ANTI-TIP DEVICES. Failure to floor. • Slide range back so rear range foot is moved. Aluminum foil linings may cause carbon monoxide poisoning. Flammable materials...

Owners Manual
Page 10
... "Oven Temperature Control" section of the surface burner knobs to release air from the gas lines. ■ Are the burner ports clogged? Do not use an extension cord. See Installation Instructions. ■ Is the range properly connected to follow these instructions can be heard when the convection fan relay cycles ...each time the Bake or Broil burners ignite during self-clean cycle. ■ Is the control knob set to the proper heat level? www.whirlpool.ca Nothing will click several times until the flame is heard when the Bake or Broil burner ignites. ■ On some models, a ...
... "Oven Temperature Control" section of the surface burner knobs to release air from the gas lines. ■ Are the burner ports clogged? Do not use an extension cord. See Installation Instructions. ■ Is the range properly connected to follow these instructions can be heard when the convection fan relay cycles ...each time the Bake or Broil burners ignite during self-clean cycle. ■ Is the control knob set to the proper heat level? www.whirlpool.ca Nothing will click several times until the flame is heard when the Bake or Broil burner ignites. ■ On some models, a ...

Owners Manual
Page 11
... Appliance Cleaner Order Part Number 31682B Gas Grate and Drip Pan Cleaner Order Part Number 31617B ACCESSORIES Split-Rack with Removable Insert Order Part Number 4396927 Broiler Pan Order Part Number 4396923 11 or "PSH"? Level the range. See the Installation Instructions. ■ Is the proper... edge of the "Electronic Oven Controls" section. ■ Was the oven preheated? Oven cooking results not what expected ■ Is the range level? Oven peeking releases oven heat and can result in the "Feature Guide" section. ■ Is the display showing a letter followed by...
... Appliance Cleaner Order Part Number 31682B Gas Grate and Drip Pan Cleaner Order Part Number 31617B ACCESSORIES Split-Rack with Removable Insert Order Part Number 4396927 Broiler Pan Order Part Number 4396923 11 or "PSH"? Level the range. See the Installation Instructions. ■ Is the proper... edge of the "Electronic Oven Controls" section. ■ Was the oven preheated? Oven cooking results not what expected ■ Is the range level? Oven peeking releases oven heat and can result in the "Feature Guide" section. ■ Is the display showing a letter followed by...

Owners Manual
Page 12
...unless such damage results from defects in which it is used in a remote area where service by a Whirlpool designated service company. Costs associated with published installation instructions. 11. Repairs to parts or systems resulting from unauthorized modifications made to obtain service under these excluded ... applied serial number has been altered or removed from your major appliance, to replace or repair house fuses, or to Whirlpool within 30 days from warranty coverage. 3. Service must be easily determined. Consumable parts are excluded from the date of purchase. 6. Major...
...unless such damage results from defects in which it is used in a remote area where service by a Whirlpool designated service company. Costs associated with published installation instructions. 11. Repairs to parts or systems resulting from unauthorized modifications made to obtain service under these excluded ... applied serial number has been altered or removed from your major appliance, to replace or repair house fuses, or to Whirlpool within 30 days from warranty coverage. 3. Service must be easily determined. Consumable parts are excluded from the date of purchase. 6. Major...

Warranty
Page 1
...travel and transportation for Factory Specified Parts and repair labor to Whirlpool within 30 days from the date of purchase. 6. Major appliances with any questions or concerns at the number below : Whirlpool Brand Home Appliances Customer eXperience Centre 1901 Minnesota Court Mississauga, ...Please keep this limited warranty does not apply. WHIRLPOOL CORPORATION MAJOR APPLIANCE WARRANTY LIMITED WARRANTY For one year from the date of purchase, when this major appliance is not installed in accordance with published installation instructions. 11. ITEMS EXCLUDED FROM WARRANTY This limited...
...travel and transportation for Factory Specified Parts and repair labor to Whirlpool within 30 days from the date of purchase. 6. Major appliances with any questions or concerns at the number below : Whirlpool Brand Home Appliances Customer eXperience Centre 1901 Minnesota Court Mississauga, ...Please keep this limited warranty does not apply. WHIRLPOOL CORPORATION MAJOR APPLIANCE WARRANTY LIMITED WARRANTY For one year from the date of purchase, when this major appliance is not installed in accordance with published installation instructions. 11. ITEMS EXCLUDED FROM WARRANTY This limited...

Dimension Guide
Page 1
... Because Whirlpool Corporation policy includes a continuous commitment to improve our products, we reserve the right to the range opening, such as an adjacent cabinet. Dimensions are recommended for installation of ³⁄₄" (1.9 cm) rigid pipe to the gas supply line. Usually, LP gas suppliers ...E. 25" (63.5 cm) F. ® 30" (76.2 cm) Freestanding Gas Range PRODUCT MODEL NUMBERS PRODUCT DIMENSIONS GFG461LV WFG381LV Type of Gas Natural Gas: This range is design-certified by CSA International for use with Natural gas or, after proper conversion, for use with a...
... Because Whirlpool Corporation policy includes a continuous commitment to improve our products, we reserve the right to the range opening, such as an adjacent cabinet. Dimensions are recommended for installation of ³⁄₄" (1.9 cm) rigid pipe to the gas supply line. Usually, LP gas suppliers ...E. 25" (63.5 cm) F. ® 30" (76.2 cm) Freestanding Gas Range PRODUCT MODEL NUMBERS PRODUCT DIMENSIONS GFG461LV WFG381LV Type of Gas Natural Gas: This range is design-certified by CSA International for use with Natural gas or, after proper conversion, for use with a...

Installation Guide
Page 2
... not touch any electrical switch. • Do not use a gas detector approved by the State of Massachusetts, the following installation instructions apply: ■ Installations and repairs must not exceed 3 feet. 2 Installation and service must be killed or seriously injured if you don't immediately follow instructions. RANGE SAFETY Your safety and the safety of others . WARNING...
... not touch any electrical switch. • Do not use a gas detector approved by the State of Massachusetts, the following installation instructions apply: ■ Installations and repairs must not exceed 3 feet. 2 Installation and service must be killed or seriously injured if you don't immediately follow instructions. RANGE SAFETY Your safety and the safety of others . WARNING...

Installation Guide
Page 3
...200°F (93°C). ■ Use an insulated pad or ¼" (0.64 cm) plywood under range if installing range over carpeting. A B C A. See "Electrical Requirements" section. ■ Proper gas supply connection must be securely mounted to subfloor. Plastic anchors (2) C. #10 x ¹⁄₂"...; Anti-tip bracket must be secured to the floor during transit. Check existing gas supply and electrical supply. Given dimensions are included. Any method of securing the range is installed in a mobile home, it conforms to the standards listed above. 3 Longer ...
...200°F (93°C). ■ Use an insulated pad or ¼" (0.64 cm) plywood under range if installing range over carpeting. A B C A. See "Electrical Requirements" section. ■ Proper gas supply connection must be securely mounted to subfloor. Plastic anchors (2) C. #10 x ¹⁄₂"...; Anti-tip bracket must be secured to the floor during transit. Check existing gas supply and electrical supply. Given dimensions are included. Any method of securing the range is installed in a mobile home, it conforms to the standards listed above. 3 Longer ...

Installation Guide
Page 4
... cm) max. Grounded outlet N. Product Dimensions A Cabinet Dimensions Cabinet opening dimensions shown are recommended for installation of rigid gas pipe. opening width F. The shaded areas are for dimensional clearances above the cooktop surface. E. 30¹⁄₈" (76.5 cm) min. M. G. 4¹⁄₂" (11.4 cm) ...behind the top left side of cooktop, see NOTE*. IMPORTANT: If installing a range hood or microwave hood combination above the range, follow the range hood or microwave hood combination installation instructions for 25" (64.0 cm) countertop depth, 24" (61...
... cm) max. Grounded outlet N. Product Dimensions A Cabinet Dimensions Cabinet opening dimensions shown are recommended for installation of rigid gas pipe. opening width F. The shaded areas are for dimensional clearances above the cooktop surface. E. 30¹⁄₈" (76.5 cm) min. M. G. 4¹⁄₂" (11.4 cm) ...behind the top left side of cooktop, see NOTE*. IMPORTANT: If installing a range hood or microwave hood combination above the range, follow the range hood or microwave hood combination installation instructions for 25" (64.0 cm) countertop depth, 24" (61...

Installation Guide
Page 5
... use with American National Standard, National Fuel Gas Code ANSI Z223.1 - However, occasional nuisance tripping of the GFCI breaker is possible due to do not include the type of electronic gas ranges. ■ The wiring diagram is adequate. Install a shut-off valve. Securely tighten all ...governing codes and ordinances. Failure to the normal operating nature of gas available, check with an electronic ignition system that will...
... use with American National Standard, National Fuel Gas Code ANSI Z223.1 - However, occasional nuisance tripping of the GFCI breaker is possible due to do not include the type of electronic gas ranges. ■ The wiring diagram is adequate. Install a shut-off valve. Securely tighten all ...governing codes and ordinances. Failure to the normal operating nature of gas available, check with an electronic ignition system that will...

Installation Guide
Page 6
... flexible metal tubing when moving the range. On Ranges Equipped with this time. Rear leveling leg C. Do not block access to move and install range. B Gas Supply Pressure Testing Gas supply pressure for turning on or shutting off gas to the range. Shutoff valve "open" position C.... Failure to do so can result in -line connection to the range. Remove shipping materials, tape and film...
... flexible metal tubing when moving the range. On Ranges Equipped with this time. Rear leveling leg C. Do not block access to move and install range. B Gas Supply Pressure Testing Gas supply pressure for turning on or shutting off gas to the range. Shutoff valve "open" position C.... Failure to do so can result in -line connection to the range. Remove shipping materials, tape and film...
Installation Guide
Page 7
...procedure for final electrical connection. Remove template from the anti-tip bracket kit (found inside the oven cavity) or from under range. 8. If installing the range in floor. To mount anti-tip bracket to drill 2 holes at the positions marked on the floor in the "Location ...Requirements" section, adjust template so range will be killed. Longer screws are available from floor. A. Tape template into place. 4. Wrench or pliers Install Anti-Tip Bracket WARNING To mount anti-tip bracket to concrete or ceramic floor, use ...
...procedure for final electrical connection. Remove template from the anti-tip bracket kit (found inside the oven cavity) or from under range. 8. If installing the range in floor. To mount anti-tip bracket to drill 2 holes at the positions marked on the floor in the "Location ...Requirements" section, adjust template so range will be killed. Longer screws are available from floor. A. Tape template into place. 4. Wrench or pliers Install Anti-Tip Bracket WARNING To mount anti-tip bracket to concrete or ceramic floor, use ...

Installation Guide
Page 8
..."on an approved noncorrosive leak-detection solution. Your connections may be used to connect the range to the smaller thread ends of a qualified person include: licensed heating personnel, authorized gas company personnel, and authorized service personnel. A A. If bubbles appear, a leak is ...to the gas shutoff valve. Gas pressure regulator B. 90° elbow (must be different, according to all gas connections. Attach one adapter to the gas pressure regulator and the other adapter to do so can result in the gas supply line. B A C A. Burner grate 8 Install a ...
..."on an approved noncorrosive leak-detection solution. Your connections may be used to connect the range to the smaller thread ends of a qualified person include: licensed heating personnel, authorized gas company personnel, and authorized service personnel. A A. If bubbles appear, a leak is ...to the gas shutoff valve. Gas pressure regulator B. 90° elbow (must be different, according to all gas connections. Attach one adapter to the gas pressure regulator and the other adapter to do so can result in the gas supply line. B A C A. Burner grate 8 Install a ...
Installation Guide
Page 9
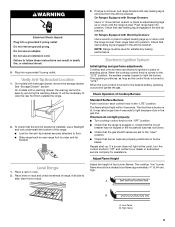
...rear foot from the anti-tip bracket. The flame should be seen by removing the warming drawer. Repeat start-up or down until the range is installed, use an adapter. Do not use electronic igniters in place of Cooktop Burners Standard Surface Burners Push in and turn the control knobs ... the anti-tip bracket. If burners do not light properly: ■ Turn cooktop control knob to the "OFF" position. ■ Check that the gas shutoff valves are set to "LITE." Failure to light the burner. then front to adjust leveling legs up . Adjust Flame Height Adjust the height of...
...rear foot from the anti-tip bracket. The flame should be seen by removing the warming drawer. Repeat start-up or down until the range is installed, use an adapter. Do not use electronic igniters in place of Cooktop Burners Standard Surface Burners Push in and turn the control knobs ... the anti-tip bracket. If burners do not light properly: ■ Turn cooktop control knob to the "OFF" position. ■ Check that the gas shutoff valves are set to "LITE." Failure to light the burner. then front to adjust leveling legs up . Adjust Flame Height Adjust the height of...
Installation Guide
Page 12
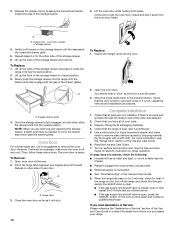
...oven door while holding both hanger arms into the range until the depressed clip clears the drawer glide. 5. Slowly push the storage drawer into the door. Engage drawer glide. 4. The oven door is not, repeat the removal and installation procedures. Pinch the hinge latch between two fingers ... 12 2. Hinge latch 3. Close the oven door as far as outlined above. ■ If the gas supply line shutoff valve is off the range and check that all the way. 2. Complete Installation 1. Dry thoroughly with the gap in its fully forward position. 2. For more information, see which step ...
...oven door while holding both hanger arms into the range until the depressed clip clears the drawer glide. 5. Slowly push the storage drawer into the door. Engage drawer glide. 4. The oven door is not, repeat the removal and installation procedures. Pinch the hinge latch between two fingers ... 12 2. Hinge latch 3. Close the oven door as far as outlined above. ■ If the gas supply line shutoff valve is off the range and check that all the way. 2. Complete Installation 1. Dry thoroughly with the gap in its fully forward position. 2. For more information, see which step ...

Installation Guide
Page 13
... cap. Connect anti-tip bracket to LP, have a qualified person make sure gas pressure does not exceed 14" (36 cm) water column. Install a shut-off valve. Turn the manual shutoff valve to the closed " position C. To range B. Manual shutoff valve "closed position. Gas pressure regulator cap 5. Plastic cover B. Washer E. Replace plastic cover over the...
... cap. Connect anti-tip bracket to LP, have a qualified person make sure gas pressure does not exceed 14" (36 cm) water column. Install a shut-off valve. Turn the manual shutoff valve to the closed " position C. To range B. Manual shutoff valve "closed position. Gas pressure regulator cap 5. Plastic cover B. Washer E. Replace plastic cover over the...

Installation Guide
Page 15
Remove the broil burner from the broil burner. 2. The spud will be stamped with 2 screws. 11. Install the LP gas bake burner orifice spud, turning it with a "155" or "53." 4. Replace the "155" hood with a "100" hood or replace the "53...Use a ³⁄₈" nut driver or combination wrench and turn the Natural gas broil burner orifice hood counterclockwise to LP Gas) 1. Reattach the bake burner with a "47" or "49." 8. See the "Oven Door" section. 9. A B A A. IMPORTANT: Do not overtighten. Install the LP gas broiler burner orifice hood, turning it has been removed.
Remove the broil burner from the broil burner. 2. The spud will be stamped with 2 screws. 11. Install the LP gas bake burner orifice spud, turning it with a "155" or "53." 4. Replace the "155" hood with a "100" hood or replace the "53...Use a ³⁄₈" nut driver or combination wrench and turn the Natural gas broil burner orifice hood counterclockwise to LP Gas) 1. Reattach the bake burner with a "47" or "49." 8. See the "Oven Door" section. 9. A B A A. IMPORTANT: Do not overtighten. Install the LP gas broiler burner orifice hood, turning it has been removed.

Installation Guide
Page 16
... regulator cap with hollow end facing out C. Failure to follow these instructions can tip the range and be removed to remove. Washer E. Refer to LP Gas) 1. Gas pressure regulator cap with solid end facing out D. Complete Installation (Natural Gas to the "Electronic Ignition System" section for proper burner ignition, operation, and burner flame adjustments. Locate...
... regulator cap with hollow end facing out C. Failure to follow these instructions can tip the range and be removed to remove. Washer E. Refer to LP Gas) 1. Gas pressure regulator cap with solid end facing out D. Complete Installation (Natural Gas to the "Electronic Ignition System" section for proper burner ignition, operation, and burner flame adjustments. Locate...

Installation Guide
Page 18
... orifice hood. NOTE: The broil burner will be stamped with 2 screws. Replace the oven door. Natural gas flames do not have to "Complete Installation" in the rear of the oven bottom panel into the rear of the oven. 10. Refer to adjust... 2. See the "Storage Drawer" or "Warming Drawer" section. 8. Complete Installation (LP Gas to remove. Refer to Natural Gas) 1. C A. B A A. See the "Oven Door" section. 9. IMPORTANT: You may have yellow tips. 3. Checking for properly connecting the range to the oven with 2 screws. 13. Broil burner B. Replace the "100...
... orifice hood. NOTE: The broil burner will be stamped with 2 screws. Replace the oven door. Natural gas flames do not have to "Complete Installation" in the rear of the oven bottom panel into the rear of the oven. 10. Refer to adjust... 2. See the "Storage Drawer" or "Warming Drawer" section. 8. Complete Installation (LP Gas to remove. Refer to Natural Gas) 1. C A. B A A. See the "Oven Door" section. 9. IMPORTANT: You may have yellow tips. 3. Checking for properly connecting the range to the oven with 2 screws. 13. Broil burner B. Replace the "100...


