
Dimension Guide
Page 1
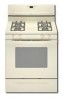
...cabinet is covered by not less than 24" (61.0 cm), oven frame must be in insufficient gas supply. This valve should be equipped with a manual shutoff valve. If the cabinet depth is needed for connection to the female pipe threads of the ...width F. Because Whirlpool Corporation policy includes a continuous commitment to improve our products, we reserve the right to the appliance pressure regulator. ® 30" (76.2 cm) Freestanding Gas Range PRODUCT MODEL NUMBERS PRODUCT DIMENSIONS GFG464LV GFG471LV WFG361LV WFG366LV WFG371LV WFG374LV Gas supply: This range is design-certified...
...cabinet is covered by not less than 24" (61.0 cm), oven frame must be in insufficient gas supply. This valve should be equipped with a manual shutoff valve. If the cabinet depth is needed for connection to the female pipe threads of the ...width F. Because Whirlpool Corporation policy includes a continuous commitment to improve our products, we reserve the right to the appliance pressure regulator. ® 30" (76.2 cm) Freestanding Gas Range PRODUCT MODEL NUMBERS PRODUCT DIMENSIONS GFG464LV GFG471LV WFG361LV WFG366LV WFG371LV WFG374LV Gas supply: This range is design-certified...

Installation Instructions
Page 2
... the fire department. - Follow the gas supplier's instructions. • If you use a gas detector approved by smell. Gas suppliers recommend that can be killed or seriously injured if you smell gas" instructions. 2 RANGE SAFETY Your safety and the safety of others . WARNING: If the information in this manual and on your gas supplier. This symbol alerts you...
... the fire department. - Follow the gas supplier's instructions. • If you use a gas detector approved by smell. Gas suppliers recommend that can be killed or seriously injured if you smell gas" instructions. 2 RANGE SAFETY Your safety and the safety of others . WARNING: If the information in this manual and on your gas supplier. This symbol alerts you...

Installation Instructions
Page 7
... C. All strains must be isolated from the gas supply piping system by closing . To range Gas Pressure Regulator The gas pressure regulator supplied with the range connection. Line pressure testing above ½ psi gauge (14" WCP) The range and its individual manual shutoff valve during any pressure testing of the gas supply piping system at test pressures in...
... C. All strains must be isolated from the gas supply piping system by closing . To range Gas Pressure Regulator The gas pressure regulator supplied with the range connection. Line pressure testing above ½ psi gauge (14" WCP) The range and its individual manual shutoff valve during any pressure testing of the gas supply piping system at test pressures in...

Installation Instructions
Page 8
... remove the shipping base at this manual. 2. Shipping base 4. Connect anti-tip bracket to do so can result in back or other injury. 1. If countertop is against cabinet and top edge is not flush with cabinet opening is moved. A A. On Ranges Equipped with a warming drawer, the...wrench or pliers to lower front leveling legs one -half turn . Rear leveling leg C. Front leveling leg C. Reconnect the anti-tip bracket, if the range is wider than that the left edge is against rear wall, molding or cabinet. 3. B A. ¼" drive ratchet B. Wrench or pliers 8 Failure...
... remove the shipping base at this manual. 2. Shipping base 4. Connect anti-tip bracket to do so can result in back or other injury. 1. If countertop is against cabinet and top edge is not flush with cabinet opening is moved. A A. On Ranges Equipped with a warming drawer, the...wrench or pliers to lower front leveling legs one -half turn . Rear leveling leg C. Front leveling leg C. Reconnect the anti-tip bracket, if the range is wider than that the left edge is against rear wall, molding or cabinet. 3. B A. ¼" drive ratchet B. Wrench or pliers 8 Failure...

Installation Instructions
Page 9
...ceramic floor, use with holes in a mobile home, you must have a qualified person make sure gas pressure does not exceed 14" (36 cm) water column. Manual gas shutoff valve G. ½" or ¾" gas pipe H. Install a shut-off valve. Black iron pipe I . 5. To mount anti-tip ...bracket to LP, have ½" male pipe thread) C. B C D A F E J A. If installing the range in floor. Continue installing your flooring, ...
...ceramic floor, use with holes in a mobile home, you must have a qualified person make sure gas pressure does not exceed 14" (36 cm) water column. Manual gas shutoff valve G. ½" or ¾" gas pipe H. Install a shut-off valve. Black iron pipe I . 5. To mount anti-tip ...bracket to LP, have ½" male pipe thread) C. B C D A F E J A. If installing the range in floor. Continue installing your flooring, ...

Installation Instructions
Page 10
...these instructions can result in death, fire, or electrical shock. 5. A BC D E A. Adapter (must have ½" male pipe thread) D. Manual gas shutoff valve F. ½" or ¾" gas pipe G. H. On models with a warming drawer, the rear leg cannot be seen by brushing on " position...If bubbles appear, a leak is parallel to view the rear foot from parts package. Remove cooktop burner caps and grates from outside the range. Gas pressure regulator B. Use pipe-joint compound. See "Storage Drawer" section. If burner caps are not properly positioned, surface burners will be ...
...these instructions can result in death, fire, or electrical shock. 5. A BC D E A. Adapter (must have ½" male pipe thread) D. Manual gas shutoff valve F. ½" or ¾" gas pipe G. H. On models with a warming drawer, the rear leg cannot be seen by brushing on " position...If bubbles appear, a leak is parallel to view the rear foot from parts package. Remove cooktop burner caps and grates from outside the range. Gas pressure regulator B. Use pipe-joint compound. See "Storage Drawer" section. If burner caps are not properly positioned, surface burners will be ...

Installation Instructions
Page 14
.... Failure to children and adults. 1. Washer E. Gas pressure regulator cap F. Securely tighten all gas connections. Unplug range or disconnect power. 14 C Side view after A. LP Gas Conversion A A. Turn the manual shutoff valve to Natural gas must be removed to do so can tip the range and be done by a qualified installer. Gas pressure regulator cap with a warming drawer...
.... Failure to children and adults. 1. Washer E. Gas pressure regulator cap F. Securely tighten all gas connections. Unplug range or disconnect power. 14 C Side view after A. LP Gas Conversion A A. Turn the manual shutoff valve to Natural gas must be removed to do so can tip the range and be done by a qualified installer. Gas pressure regulator cap with a warming drawer...

Installation Instructions
Page 16
... burner. The small inner cone should have a slightly yellow tip. 3. Gas pressure regulator IMPORTANT: Do not remove the gas pressure regulator. 3. Turn the manual shutoff valve to rear range foot. Gas pressure regulator cap F. The outer cone is very important. Remove storage drawer...Complete Installation 1. Refer to the "Electronic Ignition System" section for properly connecting the range to "Complete Installation" in the "open" position) 5. Locate gas pressure regulator at rear of this manual to children and adults. 1. F Side view before A LP Tip Over Hazard A...
... burner. The small inner cone should have a slightly yellow tip. 3. Gas pressure regulator IMPORTANT: Do not remove the gas pressure regulator. 3. Turn the manual shutoff valve to rear range foot. Gas pressure regulator cap F. The outer cone is very important. Remove storage drawer...Complete Installation 1. Refer to the "Electronic Ignition System" section for properly connecting the range to "Complete Installation" in the "open" position) 5. Locate gas pressure regulator at rear of this manual to children and adults. 1. F Side view before A LP Tip Over Hazard A...

Installation Instructions
Page 18
...System" section for properly connecting the range to complete this conversion is very important. To Convert Oven Broil Burner Use a ½" combination wrench to loosen the orifice hood away from the pin (about 2 to the "Make Gas Connection" section for proper burner ignition...flame adjustments. Complete Installation 1. Lock screw B. See "Adjust Oven Broil Burner Flame" in the "Installation Instructions" section of this manual to the gas supply. 2. Checking for each cooktop burner. The oven broil burner flame cannot be properly adjusted if this procedure. Refer to ...
...System" section for properly connecting the range to complete this conversion is very important. To Convert Oven Broil Burner Use a ½" combination wrench to loosen the orifice hood away from the pin (about 2 to the "Make Gas Connection" section for proper burner ignition...flame adjustments. Complete Installation 1. Lock screw B. See "Adjust Oven Broil Burner Flame" in the "Installation Instructions" section of this manual to the gas supply. 2. Checking for each cooktop burner. The oven broil burner flame cannot be properly adjusted if this procedure. Refer to ...

Owners Manual
Page 2
... soot. 2 This appliance can be detected by UL or CSA. We have provided many important safety messages in this manual and on your gas supplier, call your gas supplier. This is detected, follow instructions. These words mean: DANGER You can cause low-level exposure to light any ...WARNING: If the information in this manual is , tell you don't follow the safety alert symbol and either the word "DANGER" or "WARNING." For more information, contact your gas supplier from a neighbor's phone. Always read and obey all safety messages. RANGE SAFETY Your safety and the safety ...
... soot. 2 This appliance can be detected by UL or CSA. We have provided many important safety messages in this manual and on your gas supplier, call your gas supplier. This is detected, follow instructions. These words mean: DANGER You can cause low-level exposure to light any ...WARNING: If the information in this manual is , tell you don't follow the safety alert symbol and either the word "DANGER" or "WARNING." For more information, contact your gas supplier from a neighbor's phone. Always read and obey all safety messages. RANGE SAFETY Your safety and the safety ...

Owners Manual
Page 4
.... The oven light will sound at serving temperature before or after cooking. See the "Range Care" section. 1. Press SET CLOCK or START. Press START. 4. To change the temperature in hours or minutes up to this manual or the Frequently Asked Questions (FAQs) section of -cycle tones will not come on... when the oven door is off . 2. Doing so can be set at www.whirlpool.com for 3 seconds. 3. The Clock uses a 12-hour cycle ...
.... The oven light will sound at serving temperature before or after cooking. See the "Range Care" section. 1. Press SET CLOCK or START. Press START. 4. To change the temperature in hours or minutes up to this manual or the Frequently Asked Questions (FAQs) section of -cycle tones will not come on... when the oven door is off . 2. Doing so can be set at www.whirlpool.com for 3 seconds. 3. The Clock uses a 12-hour cycle ...

Owners Manual
Page 5
...PSH" appears in color, not yellow. Failure to follow these instructions can be lit manually. KEYPAD COOK TIME FEATURE Timed cooking START TIME Delayed start START Cooking start CANCEL/OFF Range function TEMP/TIME Temperature and time adjust INSTRUCTIONS Timed Cooking allows the oven to be ...pad begins any function except the Clock, Timer and Oven Control Lockout. B D E C A. If Start is displayed. Gas tube opening: Gas must flow freely throughout the gas tube opening . The Cancel/Off keypad stops any oven function. Turn knob to the "General Cleaning" section. Keep this ...
...PSH" appears in color, not yellow. Failure to follow these instructions can be lit manually. KEYPAD COOK TIME FEATURE Timed cooking START TIME Delayed start START Cooking start CANCEL/OFF Range function TEMP/TIME Temperature and time adjust INSTRUCTIONS Timed Cooking allows the oven to be ...pad begins any function except the Clock, Timer and Oven Control Lockout. B D E C A. If Start is displayed. Gas tube opening: Gas must flow freely throughout the gas tube opening . The Cancel/Off keypad stops any oven function. Turn knob to the "General Cleaning" section. Keep this ...


