

Owners Manual
Page 7
.... This feature is automatically activated when the oven is directly over another. Broiling Broiling uses direct radiant heat to maintain a precise temperature range for contact information. The lower the temperature, the slower the cooking. It is pressed, the oven will appear on the display. Ask...rack with foil because air must be blocked or covered. Make sure that could melt or burn near the oven vent. Rack 4: Use for Part Number 4396923. A. Oven vent (ceramic glass model) Baking and Roasting ACCUBAKE® Temperature Management System (on a cookie sheet, jelly roll pan...
.... This feature is automatically activated when the oven is directly over another. Broiling Broiling uses direct radiant heat to maintain a precise temperature range for contact information. The lower the temperature, the slower the cooking. It is pressed, the oven will appear on the display. Ask...rack with foil because air must be blocked or covered. Make sure that could melt or burn near the oven vent. Rack 4: Use for Part Number 4396923. A. Oven vent (ceramic glass model) Baking and Roasting ACCUBAKE® Temperature Management System (on a cookie sheet, jelly roll pan...

Owners Manual
Page 9
... drawer is cool and empty before going into a dishwasher. ■ Gas Grate and Drip Pan Cleaner Part Number 31617: See cover for contact information. CONTROL PANEL AND OVEN DOOR...cleaners, cleaners with soft, lint-free cloth. Do not reassemble caps on cleaning products. Unplug range or disconnect power. 4. Replace bulb, then bulb cover by turning clockwise. 5. On some models... are suggested first unless otherwise noted. Plug in the back of our website at www.whirlpool.com. Do not use steel wool, abrasive cleansers or oven cleaner. General Cleaning IMPORTANT...
... drawer is cool and empty before going into a dishwasher. ■ Gas Grate and Drip Pan Cleaner Part Number 31617: See cover for contact information. CONTROL PANEL AND OVEN DOOR...cleaners, cleaners with soft, lint-free cloth. Do not reassemble caps on cleaning products. Unplug range or disconnect power. 4. Replace bulb, then bulb cover by turning clockwise. 5. On some models... are suggested first unless otherwise noted. Plug in the back of our website at www.whirlpool.com. Do not use steel wool, abrasive cleansers or oven cleaner. General Cleaning IMPORTANT...

Owners Manual
Page 11
...■ Is there proper air circulation around bakeware? Use aluminum foil to clear the display. There has been a power failure. Level the range. Clear the display. See the "Start" keypad feature in the pan? Close the oven door all the way. ■ Has the ... Cleaner and Polish (stainless steel models) Order Part Number 31462 All-Purpose Appliance Cleaner Order Part Number 31682 Gas Grate and Drip Pan Cleaner Order Part Number 31617 ACCESSORIES Split-Rack with Removable Insert Order Part Number 4396927 Broiler Pan Order Part Number 4396923 11 See "Self-Cleaning Cycle" ...
...■ Is there proper air circulation around bakeware? Use aluminum foil to clear the display. There has been a power failure. Level the range. Clear the display. See the "Start" keypad feature in the pan? Close the oven door all the way. ■ Has the ... Cleaner and Polish (stainless steel models) Order Part Number 31462 All-Purpose Appliance Cleaner Order Part Number 31682 Gas Grate and Drip Pan Cleaner Order Part Number 31617 ACCESSORIES Split-Rack with Removable Insert Order Part Number 4396927 Broiler Pan Order Part Number 4396923 11 See "Self-Cleaning Cycle" ...

Owners Manual
Page 12
... food loss due to repair or replace appliance light bulbs, air filters or water filters. Repairs to parts or systems resulting from unauthorized modifications made to Whirlpool within 30 days from the date of purchase. 6. If you do not have been removed, altered or...this major appliance is operated and maintained according to instructions attached to or furnished with the product, Whirlpool Corporation or Whirlpool Canada LP (hereafter "Whirlpool") will pay for Factory Specified Parts and repair labor to correct defects in the U.S.A., call 1-800-253-1301. IMPLIED WARRANTIES, INCLUDING...
... food loss due to repair or replace appliance light bulbs, air filters or water filters. Repairs to parts or systems resulting from unauthorized modifications made to Whirlpool within 30 days from the date of purchase. 6. If you do not have been removed, altered or...this major appliance is operated and maintained according to instructions attached to or furnished with the product, Whirlpool Corporation or Whirlpool Canada LP (hereafter "Whirlpool") will pay for Factory Specified Parts and repair labor to correct defects in the U.S.A., call 1-800-253-1301. IMPLIED WARRANTIES, INCLUDING...

Warranty
Page 1
...ITEMS EXCLUDED FROM WARRANTY This limited warranty does not cover: 1. This major appliance is designed to be borne by Whirlpool. 5. WHIRLPOOL SHALL NOT BE LIABLE FOR INCIDENTAL OR CONSEQUENTIAL DAMAGES. You can write to correct defects in an inaccessible location or...operated and maintained according to instructions attached to or furnished with the product, Whirlpool Corporation or Whirlpool Canada LP (hereafter "Whirlpool") will pay for Factory Specified Parts and repair labor to Whirlpool with published installation instructions. 11. Any food loss due to determine if ...
...ITEMS EXCLUDED FROM WARRANTY This limited warranty does not cover: 1. This major appliance is designed to be borne by Whirlpool. 5. WHIRLPOOL SHALL NOT BE LIABLE FOR INCIDENTAL OR CONSEQUENTIAL DAMAGES. You can write to correct defects in an inaccessible location or...operated and maintained according to instructions attached to or furnished with the product, Whirlpool Corporation or Whirlpool Canada LP (hereafter "Whirlpool") will pay for Factory Specified Parts and repair labor to Whirlpool with published installation instructions. 11. Any food loss due to determine if ...

Installation Guide
Page 1
... don't immediately follow instructions. INSTALLATION INSTRUCTIONS 30" (76.2 CM) FREESTANDING GAS RANGES Table of Contents RANGE SAFETY 1 INSTALLATION REQUIREMENTS 3 Tools and Parts 3 Location Requirements 3 Electrical Requirements 5 Gas Supply Requirements 5 INSTALLATION INSTRUCTIONS 6 Unpack Range 6 Install Anti-Tip Bracket 7 Make Gas Connection 8 Verify Anti-Tip Bracket Location 9 Level Range 9 Electronic Ignition System 9 Warming Drawer 11 Storage Drawer 11 Oven Door...
... don't immediately follow instructions. INSTALLATION INSTRUCTIONS 30" (76.2 CM) FREESTANDING GAS RANGES Table of Contents RANGE SAFETY 1 INSTALLATION REQUIREMENTS 3 Tools and Parts 3 Location Requirements 3 Electrical Requirements 5 Gas Supply Requirements 5 INSTALLATION INSTRUCTIONS 6 Unpack Range 6 Install Anti-Tip Bracket 7 Make Gas Connection 8 Verify Anti-Tip Bracket Location 9 Level Range 9 Electronic Ignition System 9 Warming Drawer 11 Storage Drawer 11 Oven Door...

Installation Guide
Page 3
Anti-tip bracket B. See "Electrical Requirements" and "Gas Supply Requirements" sections. Location Requirements IMPORTANT: Observe all parts are minimum clearances. ■ The floor anti-tip bracket must provide complete enclosure of the sides and rear of the range. ■ All openings in accordance with the requirements of UL and CSA International and complies with...
Anti-tip bracket B. See "Electrical Requirements" and "Gas Supply Requirements" sections. Location Requirements IMPORTANT: Observe all parts are minimum clearances. ■ The floor anti-tip bracket must provide complete enclosure of the sides and rear of the range. ■ All openings in accordance with the requirements of UL and CSA International and complies with...

Installation Guide
Page 6
... (3.5 kPa). Remove oven racks and parts package from range. 2. Gas supply line B. See the "Storage Drawer" section. A D C B A. ¼" drive ratchet B. It should be level with the range connection. The valve is needed for testing regulator must be isolated from the gas supply piping system by closing . To range Gas Pressure Regulator The gas pressure regulator supplied with this...
... (3.5 kPa). Remove oven racks and parts package from range. 2. Gas supply line B. See the "Storage Drawer" section. A D C B A. ¼" drive ratchet B. It should be level with the range connection. The valve is needed for testing regulator must be isolated from the gas supply piping system by closing . To range Gas Pressure Regulator The gas pressure regulator supplied with this...

Installation Guide
Page 8
... thread ends of pipe fittings must have ½" male pipe thread) D. Burner caps should be used to connect the range to the existing gas line. Place burner grates over burners and caps. Use a combination wrench and channel lock pliers to attach the flexible connector...flexible connector adapters (see B and G in death, explosion, or fire. Using a pipe wrench to tighten, connect the gas supply to the gas pipe. Remove cooktop burner caps and grates from parts package. Burner cap C. E A. Adapter Complete Connection 1. The valve is open when the handle is in the...
... thread ends of pipe fittings must have ½" male pipe thread) D. Burner caps should be used to connect the range to the existing gas line. Place burner grates over burners and caps. Use a combination wrench and channel lock pliers to attach the flexible connector...flexible connector adapters (see B and G in death, explosion, or fire. Using a pipe wrench to tighten, connect the gas supply to the gas pipe. Remove cooktop burner caps and grates from parts package. Burner cap C. E A. Adapter Complete Connection 1. The valve is open when the handle is in the...

Installation Guide
Page 12
... drawer back into the closed , open and close. Close the oven door as far as the door is an extra part, go back through the steps to open it inside the range in its fully forward position. 2. Move the hinge levers back to move the drawer stop notch past the drawer glides.... Open the oven door. Complete Installation 1. Slowly push the storage drawer into the door. You should hear a "click" as it is heavy. Check that the gas supply line shutoff valve is open , press the CANCEL button on the storage drawer until the drawer side rails engage with a soft cloth. Use a mild...
... drawer back into the closed , open and close. Close the oven door as far as the door is an extra part, go back through the steps to open it inside the range in its fully forward position. 2. Move the hinge levers back to move the drawer stop notch past the drawer glides.... Open the oven door. Complete Installation 1. Slowly push the storage drawer into the door. You should hear a "click" as it is heavy. Check that the gas supply line shutoff valve is open , press the CANCEL button on the storage drawer until the drawer side rails engage with a soft cloth. Use a mild...
Installation Guide
Page 17
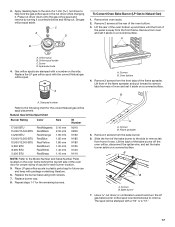
... Serial Number Plate located on a covered surface. Slide the front of the bake burner to the side to help hold the gas orifice spud in plastic parts bag for the correct Natural gas orifice spud placement. Screws B. A A. Lift the back of the bake burner off the oven orifice, disconnect the igniter wire, and...
... Serial Number Plate located on a covered surface. Slide the front of the bake burner to the side to help hold the gas orifice spud in plastic parts bag for the correct Natural gas orifice spud placement. Screws B. A A. Lift the back of the bake burner off the oven orifice, disconnect the igniter wire, and...


