

Owners Manual
Page 4
...170°F and 525°F (75°C and 275°C). 3. Press START. 4. The Clock uses a 12-hour cycle with the controls locked. To change to take effect. 5. Press TEMP/TIME "+" or "-" arrow pads to 12 hours and 59 minutes. 1. Press START. 5. Press...whirlpool.com for 3 seconds. 3. Do not press the CANCEL/OFF keypad because the oven will not come on and off . 2. Press START. 4. Your model may have some or all of our website at serving temperature before or after cooking. Food must be displayed. 4. Press CANCEL/OFF when finished. 4 See the "Range...
...170°F and 525°F (75°C and 275°C). 3. Press START. 4. The Clock uses a 12-hour cycle with the controls locked. To change to take effect. 5. Press TEMP/TIME "+" or "-" arrow pads to 12 hours and 59 minutes. 1. Press START. 5. Press...whirlpool.com for 3 seconds. 3. Do not press the CANCEL/OFF keypad because the oven will not come on and off . 2. Press START. 4. Your model may have some or all of our website at serving temperature before or after cooking. Food must be displayed. 4. Press CANCEL/OFF when finished. 4 See the "Range...

Owners Manual
Page 8
... . 4. Press START TIME. When the set to the fumes given off automatically and "End" will appear on steel in the oven may result in burns. RANGE CARE Self-Cleaning Cycle (on some models) WARNING How the Cycle Works IMPORTANT: The heating and cooling of time to the inner ..."End" will automatically turn on your model, see "Oven Vent" section. When the self-clean cycle is complete and the oven cools, the DOOR LOCKED and CLEAN indicator lights will automatically lock. Press BAKE. When the start time is reached, the oven will appear on some models) The SELF CLEAN self-...
... . 4. Press START TIME. When the set to the fumes given off automatically and "End" will appear on steel in the oven may result in burns. RANGE CARE Self-Cleaning Cycle (on some models) WARNING How the Cycle Works IMPORTANT: The heating and cooling of time to the inner ..."End" will automatically turn on your model, see "Oven Vent" section. When the self-clean cycle is complete and the oven cools, the DOOR LOCKED and CLEAN indicator lights will automatically lock. Press BAKE. When the start time is reached, the oven will appear on some models) The SELF CLEAN self-...

Installation Guide
Page 10
...Replace the control knob. 4. Adjust Oven Bake Burner Flame (if needed) 1. A. A B C A. Tighten locking screw. Control knob stem B. Look into the mirror to the Use and Care Guide for proper operation of the range. Pliers 1. Lift the rear of the oven bottom up to 50 to 60 seconds... to one side of oven. Use a small flatblade screwdriver to turn...
...Replace the control knob. 4. Adjust Oven Bake Burner Flame (if needed) 1. A. A B C A. Tighten locking screw. Control knob stem B. Look into the mirror to the Use and Care Guide for proper operation of the range. Pliers 1. Lift the rear of the oven bottom up to 50 to 60 seconds... to one side of oven. Use a small flatblade screwdriver to turn...
Installation Guide
Page 11
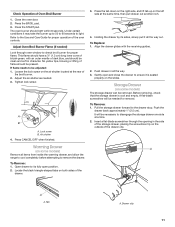
... the black triangle-shaped tabs on the outside of flame should light within 8 seconds. Under certain conditions it all the way out. Lock screw B. Storage Drawer (on some models) The storage drawer can be necessary to light. It will be adjusted: 1. Insert a flat-blade screwdriver... be needed ) Look through the opening in all items from inside the warming drawer, and allow the range to cool completely before attempting to check broil burner for proper operation of Oven Broil Burner 1. Press the tab down on the left side at a time. 2. Refer to the ...
... the black triangle-shaped tabs on the outside of flame should light within 8 seconds. Under certain conditions it all the way out. Lock screw B. Storage Drawer (on some models) The storage drawer can be necessary to light. It will be adjusted: 1. Insert a flat-blade screwdriver... be needed ) Look through the opening in all items from inside the warming drawer, and allow the range to cool completely before attempting to check broil burner for proper operation of Oven Broil Burner 1. Press the tab down on the left side at a time. 2. Refer to the ...

Installation Guide
Page 12
...a grounded 3 prong outlet. ■ Electrical supply is heavy. Engage drawer glide. 4. However, if removal is necessary, make sure the oven is off the range and check that the gas supply line shutoff valve is open it will shut. 12 2. A A. You should hear a "click" as outlined above. ■ ...A A. If there is not suggested to the locked position. If it is an extra part, go back through the steps to push the oven door closed position. See "Level Range." 5. When the range has been on surface burners and oven. Lift the oven door while holding both sides, slide the drawer ...
...a grounded 3 prong outlet. ■ Electrical supply is heavy. Engage drawer glide. 4. However, if removal is necessary, make sure the oven is off the range and check that the gas supply line shutoff valve is open it will shut. 12 2. A A. You should hear a "click" as outlined above. ■ ...A A. If there is not suggested to the locked position. If it is an extra part, go back through the steps to push the oven door closed position. See "Level Range." 5. When the range has been on surface burners and oven. Lift the oven door while holding both sides, slide the drawer ...


