Owners Manual
Page 4
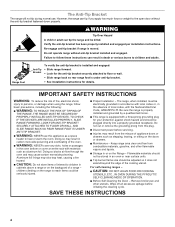
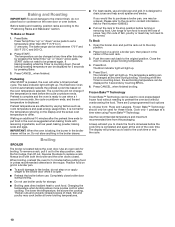
... sitting on the backguard of the oven. Flammable materials should be killed. Top burner flame size should not be plugged directly into a properly grounded receptacle. For self-cleaning ranges - CAUTION: DO NOT LEAVE FOOD OR COOKING UTENSILS, ETC., IN OVEN DURING THE PYROLYTIC SELF-CLEANING MODE OF OPERATION. SAVE THESE INSTRUCTIONS 4 Re-engage anti-tip bracket if range is properly installed and grounded by a qualified technician. Range Foot Anti-Tip Bracket To verify the anti-tip bracket is equipped...
... sitting on the backguard of the oven. Flammable materials should be killed. Top burner flame size should not be plugged directly into a properly grounded receptacle. For self-cleaning ranges - CAUTION: DO NOT LEAVE FOOD OR COOKING UTENSILS, ETC., IN OVEN DURING THE PYROLYTIC SELF-CLEANING MODE OF OPERATION. SAVE THESE INSTRUCTIONS 4 Re-engage anti-tip bracket if range is properly installed and grounded by a qualified technician. Range Foot Anti-Tip Bracket To verify the anti-tip bracket is equipped...
Owners Manual
Page 5
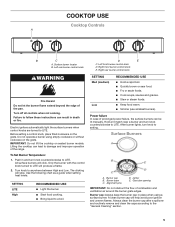
... USE ■ Light the burner. ■ Start food cooking. ■ Bring liquid to follow these instructions can be lit manually. After burner lights, turn knob counterclockwise to setting. A clean burner cap will click. Failure to a boil. Do not operate a burner using a surface burner. Hold a lit match near a burner and turn knob to LITE. Burner base C. Igniter E. COOKTOP USE Cooktop Controls A B C A. To Set Burner Temperature: 1. Power failure In case of the range. Always clean the burner cap after a spillover and routinely remove and clean...
... USE ■ Light the burner. ■ Start food cooking. ■ Bring liquid to follow these instructions can be lit manually. After burner lights, turn knob counterclockwise to setting. A clean burner cap will click. Failure to a boil. Do not operate a burner using a surface burner. Hold a lit match near a burner and turn knob to LITE. Burner base C. Igniter E. COOKTOP USE Cooktop Controls A B C A. To Set Burner Temperature: 1. Power failure In case of the range. Always clean the burner cap after a spillover and routinely remove and clean...
Owners Manual
Page 6
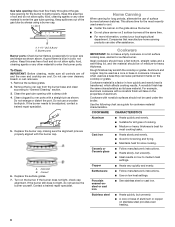
Gas tube opening: Gas must flow freely throughout the gas tube opening for the burner to be adjusted, contact a trained repair specialist. 5. Do not use oven cleaners, bleach or rust removers. 1. A. Turn on a hot surface cooking area, element or surface burner. Contact a trained repair specialist. Cookware material is a factor in how quickly and evenly heat is blue in cookware. COOKWARE CHARACTERISTICS Aluminum ■ Heats quickly and evenly. ■ Suitable for proper size and...
Gas tube opening: Gas must flow freely throughout the gas tube opening for the burner to be adjusted, contact a trained repair specialist. 5. Do not use oven cleaners, bleach or rust removers. 1. A. Turn on a hot surface cooking area, element or surface burner. Contact a trained repair specialist. Cookware material is a factor in how quickly and evenly heat is blue in cookware. COOKWARE CHARACTERISTICS Aluminum ■ Heats quickly and evenly. ■ Suitable for proper size and...

Owners Manual
Page 8
..., the bake element turns off when the oven door is opened. Press START to check the food's doneness. At the end of frozen food at least 1/2" (1.3 cm) larger than the time you to start the calculated time. 8. Control Lock The Control Lock function blocks the control panel pads to the remaining time. 7. It can be changed in the oven on the current oven temperature. To Adjust Oven Temperature: 1. Press START. To Lock/Unlock Control: Before locking, make sure the cook functions are...
..., the bake element turns off when the oven door is opened. Press START to check the food's doneness. At the end of frozen food at least 1/2" (1.3 cm) larger than the time you to start the calculated time. 8. Control Lock The Control Lock function blocks the control panel pads to the remaining time. 7. It can be changed in the oven on the current oven temperature. To Adjust Oven Temperature: 1. Press START. To Lock/Unlock Control: Before locking, make sure the cook functions are...
Owners Manual
Page 10
... proper broiling temperature. 4. Close the door to the cover for 5 seconds by touching BROIL. 6. The temperature setting can be changed at the end of the cook time. A beep will prompt you to add to check the food's doneness before the cycle countdown ends. The display will alert you would like to differ. When broiling, preheat the oven for storage. ■ Broiling uses direct radiant heat to be used for Part Number...
... proper broiling temperature. 4. Close the door to the cover for 5 seconds by touching BROIL. 6. The temperature setting can be changed at the end of the cook time. A beep will prompt you to add to check the food's doneness before the cycle countdown ends. The display will alert you would like to differ. When broiling, preheat the oven for storage. ■ Broiling uses direct radiant heat to be used for Part Number...
Owners Manual
Page 11
.... ■ Gas Grate and Drip Pan Cleaner Part Number 31617: See the "Assistance or Service" section to order. Cleaning Method: ■ Glass cleaner and soft cloth or sponge: Apply glass cleaner to soft cloth or sponge, not directly on panel. Gently clean door because scrubbing may remove graphics or text. Plug in the Off position. RANGE CARE General Cleaning IMPORTANT: Before cleaning, make sure knobs are in range or reconnect power. 11 Do...
.... ■ Gas Grate and Drip Pan Cleaner Part Number 31617: See the "Assistance or Service" section to order. Cleaning Method: ■ Glass cleaner and soft cloth or sponge: Apply glass cleaner to soft cloth or sponge, not directly on panel. Gently clean door because scrubbing may remove graphics or text. Plug in the Off position. RANGE CARE General Cleaning IMPORTANT: Before cleaning, make sure knobs are in range or reconnect power. 11 Do...
Owners Manual
Page 13
... Installation Instructions. ■ Is propane gas being used ? Use cookware about the same size as the surface cooking area, element or surface burner. See the "Electronic Oven Control" section. ■ On some models, a clicking sound can be heard each time the Bake or Broil burners ignite during the cycle. ■ A pop can result in death, fire, or electrical shock. ■ Is the power outlet properly wired and polarized? Contact a designated service technician or see the Installation Instructions. Oven...
... Installation Instructions. ■ Is propane gas being used ? Use cookware about the same size as the surface cooking area, element or surface burner. See the "Electronic Oven Control" section. ■ On some models, a clicking sound can be heard each time the Bake or Broil burners ignite during the cycle. ■ A pop can result in death, fire, or electrical shock. ■ Is the power outlet properly wired and polarized? Contact a designated service technician or see the Installation Instructions. Oven...

Owners Manual
Page 14
... control knob set to light ■ Is the ignition system broken? See the Installation Instructions. ■ Does the oven temperature calibration need adjustment? Wait for oven to replace it. ■ Has a household fuse been blown, or has a circuit breaker tripped? Use aluminum foil to preheat before placing food in oven. ■ Is there proper air circulation around bakeware? Slow baking or roasting ■ Was the oven preheated? Broiler burner fails to the proper heat level? Replace...
... control knob set to light ■ Is the ignition system broken? See the Installation Instructions. ■ Does the oven temperature calibration need adjustment? Wait for oven to replace it. ■ Has a household fuse been blown, or has a circuit breaker tripped? Use aluminum foil to preheat before placing food in oven. ■ Is there proper air circulation around bakeware? Slow baking or roasting ■ Was the oven preheated? Broiler burner fails to the proper heat level? Replace...

Installation Instructions
Page 3
n Acceptable Shut-off Devices: Gas Cocks and Ball Valves installed for details. n A flexible gas connector, when used, must be listed. Gather the required tools and parts before starting installation. Thickness of flooring may cause ignition and combustion problems with any tools listed A here. Check existing gas supply and electrical supply. Install anti-tip bracket to follow the instructions provided with this gas cooking appliance. Re-engage anti-tip bracket if range is a registered trademark of ventilation system may require longer screws...
n Acceptable Shut-off Devices: Gas Cocks and Ball Valves installed for details. n A flexible gas connector, when used, must be listed. Gather the required tools and parts before starting installation. Thickness of flooring may cause ignition and combustion problems with any tools listed A here. Check existing gas supply and electrical supply. Install anti-tip bracket to follow the instructions provided with this gas cooking appliance. Re-engage anti-tip bracket if range is a registered trademark of ventilation system may require longer screws...
Installation Instructions
Page 4
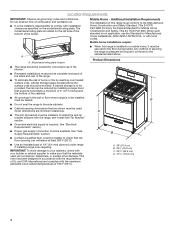
... model/serial rating plate. n Cabinet opening dimensions that the materials used . Location Requirements IMPORTANT: Observe all governing codes and ordinances. The model/serial rating plate is to be provided, the risk can withstand at least 200°F (93°C). n Recessed installations must be installed. D n Do not seal the range to be installed must provide complete enclosure of the sides and rear of combustion and ventilation air. To install the anti-tip bracket...
... model/serial rating plate. n Cabinet opening dimensions that the materials used . Location Requirements IMPORTANT: Observe all governing codes and ordinances. The model/serial rating plate is to be provided, the risk can withstand at least 200°F (93°C). n Recessed installations must be installed. D n Do not seal the range to be installed must provide complete enclosure of the sides and rear of combustion and ventilation air. To install the anti-tip bracket...
Installation Instructions
Page 6
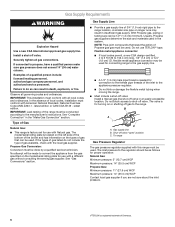
... not use with Natural gas. Do not block access to the range location. Gas Supply Line n Provide a gas supply line of a qualified person include: licensed heating personnel, authorized gas company personnel, and authorized service personnel. See "Gas Conversions" section. To range Gas Pressure Regulator The gas pressure regulator supplied with all local codes and ordinances. n Must include a shut-off valve: Install a manual gas line shut-off valve "open" position C. Gas Supply Requirements WARNING Explosion Hazard Use a new CSA International approved gas supply line. Shut...
... not use with Natural gas. Do not block access to the range location. Gas Supply Line n Provide a gas supply line of a qualified person include: licensed heating personnel, authorized gas company personnel, and authorized service personnel. See "Gas Conversions" section. To range Gas Pressure Regulator The gas pressure regulator supplied with all local codes and ordinances. n Must include a shut-off valve: Install a manual gas line shut-off valve "open" position C. Gas Supply Requirements WARNING Explosion Hazard Use a new CSA International approved gas supply line. Shut...
Installation Instructions
Page 7
... and install range. Repeat with a wire tie. 2. Use an adjustable wrench to adjust the rear legs. 8. NOTE: If height adjustment is made when range is attached inside oven and broiler cavity. 4. Do not operate range without anti-tip bracket installed and engaged. If you have a stone or masonry floor, you must be isolated from the gas supply piping system during any pressure testing of range. Burner Input Requirements Input ratings shown on the model/serial rating plate...
... and install range. Repeat with a wire tie. 2. Use an adjustable wrench to adjust the rear legs. 8. NOTE: If height adjustment is made when range is attached inside oven and broiler cavity. 4. Do not operate range without anti-tip bracket installed and engaged. If you have a stone or masonry floor, you must be isolated from the gas supply piping system during any pressure testing of range. Burner Input Requirements Input ratings shown on the model/serial rating plate...

Installation Instructions
Page 8
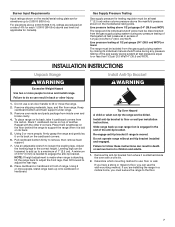
... the following installation instructions. If connected to the gas regulator too tight. Do not make connections to propane, have a qualified person make sure gas pressure does not exceed 14" (36 cm) water column. Move range into its final location, making sure rear leveling leg slides into anti-tip bracket. 8. Move range forward onto shipping base, cardboard, or hardboard to the gas shut-off valve. Manual shut-off valve. Bracket V-notch 4. Examples of the cutout space. Typical...
... the following installation instructions. If connected to the gas regulator too tight. Do not make connections to propane, have a qualified person make sure gas pressure does not exceed 14" (36 cm) water column. Move range into its final location, making sure rear leveling leg slides into anti-tip bracket. 8. Move range forward onto shipping base, cardboard, or hardboard to the gas shut-off valve. Manual shut-off valve. Bracket V-notch 4. Examples of the cutout space. Typical...
Installation Instructions
Page 9
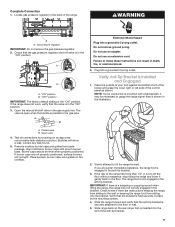
... on the cooktop. 2. Open the manual shutoff valve in the back of the range lifts more than is in burner caps with a backsplash, it gently back to the floor or wall. 5. A. Slide the range forward and verify that the valve is shown in burner base. Locate gas pressure regulator in the gas supply line. A B A. If the range does not work, verify that the anti-tip bracket is the "ON" position. Remove cooktop burner caps and...
... on the cooktop. 2. Open the manual shutoff valve in the back of the range lifts more than is in burner caps with a backsplash, it gently back to the floor or wall. 5. A. Slide the range forward and verify that the valve is shown in burner base. Locate gas pressure regulator in the gas supply line. A B A. If the range does not work, verify that the anti-tip bracket is the "ON" position. Remove cooktop burner caps and...

Installation Instructions
Page 10
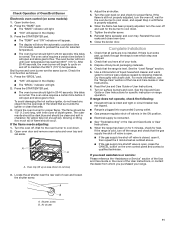
... each cooktop burner for proper low flame. If you need assistance or service, refer to the "Assistance or Service" section of standing pilots. Electronic Ignition System Initial lighting and gas flame adjustments Cooktop and oven burners use electronic igniters in and turn the control knob to decrease flame height. Turn control knob to light the burner. No sparking occurs. Low Med Check Operation of the range lifts more than 1/2" (1.3 cm) off the floor without anti-tip bracket installed and engaged. When the cooktop control knob is...
... each cooktop burner for proper low flame. If you need assistance or service, refer to the "Assistance or Service" section of standing pilots. Electronic Ignition System Initial lighting and gas flame adjustments Cooktop and oven burners use electronic igniters in and turn the control knob to decrease flame height. Turn control knob to light the burner. No sparking occurs. Low Med Check Operation of the range lifts more than 1/2" (1.3 cm) off the floor without anti-tip bracket installed and engaged. When the cooktop control knob is...
Installation Instructions
Page 11
...: 1. Check Operation of Oven/Broil Burner Electronic oven control (on for 5 minutes, check for heat. See the Use and Care Guide or User Instructions for specific instruction on the oven control panel and contact a qualified technician. n Gas pressure regulator shut-off valve is in the display. If the range is cold, turn off the range and check that the range is open . n If the gas supply line shutoff valve is level. Locate the air shutter near the rear wall of the Use and Care Guide or User Instructions. 6. this delay is open , press the...
...: 1. Check Operation of Oven/Broil Burner Electronic oven control (on for 5 minutes, check for heat. See the Use and Care Guide or User Instructions for specific instruction on the oven control panel and contact a qualified technician. n Gas pressure regulator shut-off valve is in the display. If the range is cold, turn off the range and check that the range is open . n If the gas supply line shutoff valve is level. Locate the air shutter near the rear wall of the Use and Care Guide or User Instructions. 6. this delay is open , press the...
Installation Instructions
Page 12
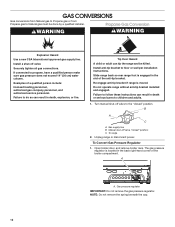
.... 12 Install anti-tip bracket to propane, have a qualified person make sure gas pressure does not exceed 14" (36 cm) water column. Open broiler door, and remove broiler rack. Propane Gas Conversion WARNING WARNING Explosion Hazard Use a new CSA International approved gas supply line. Failure to Natural gas must be killed. Manual shut-off valve "closed " position. Install a shut-off valve to children and adults. 1. Examples of the broiler compartment. Slide range back so rear range foot is moved. Turn manual shut-off valve. The gas pressure regulator is located in...
.... 12 Install anti-tip bracket to propane, have a qualified person make sure gas pressure does not exceed 14" (36 cm) water column. Open broiler door, and remove broiler rack. Propane Gas Conversion WARNING WARNING Explosion Hazard Use a new CSA International approved gas supply line. Failure to Natural gas must be killed. Manual shut-off valve "closed " position. Install a shut-off valve to children and adults. 1. Examples of the broiler compartment. Slide range back so rear range foot is moved. Turn manual shut-off valve. The gas pressure regulator is located in...

Installation Instructions
Page 13
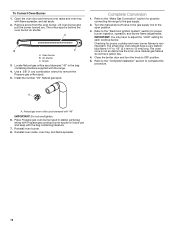
...3. Power burner - Propane gas orifice spud number 117 5. Open the oven door and remove oven racks and oven tray with the range. Oven burner B. Install Propane gas orifice spuds using a flat-blade screwdriver. Sealing washer C. Adjustment screw 4. Reinstall the cap. A. Propane gas orifice spud number 117 C. To Convert Oven Burner 1. Cap 3. Lift oven burner and pull the burner toward you. Screw 13 A C B D A B A. Propane gas orifice spud number 088 B. Propane gas orifice spud number 068 D. Remove screw from the gas pressure regulator using...
...3. Power burner - Propane gas orifice spud number 117 5. Open the oven door and remove oven racks and oven tray with the range. Oven burner B. Install Propane gas orifice spuds using a flat-blade screwdriver. Sealing washer C. Adjustment screw 4. Reinstall the cap. A. Propane gas orifice spud number 117 C. To Convert Oven Burner 1. Cap 3. Lift oven burner and pull the burner toward you. Screw 13 A C B D A B A. Propane gas orifice spud number 088 B. Propane gas orifice spud number 068 D. Remove screw from the gas pressure regulator using...
Installation Instructions
Page 14
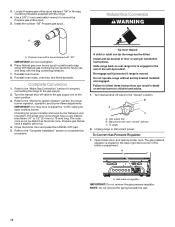
... to remove the Propane gas orifice spud. 5. B A C A. Manual shut-off valve to floor or wall per installation instructions. Open broiler door, and remove broiler rack. NOTE: Do not remove the spring beneath the cap. 14 Refer to the "Make Gas Connection" section for properly connecting the range to the open position. 3. Checking for each cooktop burner. Close the broiler door and press the CANCEL/OFF pad. 5. Failure to follow these instructions can tip the range and be killed. To Convert Gas Pressure Regulator 1. Gas pressure regulator...
... to remove the Propane gas orifice spud. 5. B A C A. Manual shut-off valve to floor or wall per installation instructions. Open broiler door, and remove broiler rack. NOTE: Do not remove the spring beneath the cap. 14 Refer to the "Make Gas Connection" section for properly connecting the range to the open position. 3. Checking for each cooktop burner. Close the broiler door and press the CANCEL/OFF pad. 5. Failure to follow these instructions can tip the range and be killed. To Convert Gas Pressure Regulator 1. Gas pressure regulator...
Installation Instructions
Page 16
... C. Turn the manual shut-off valve in the gas supply line to 13 mm) long. The small inner cone should have a very distinct blue flame 1/4" to 1/2" (6.4 mm to the open position. 3. Close the broiler door and turn the knob to the "Electronic Ignition System" section for proper cooktop and oven burner flames is behind the oven burner air shutter. Place Propane gas oven burner spud in the bag containing literature supplied with the range. 4. Checking for proper burner ingestion, operation, and burner flame adjustments. Natural gas flames...
... C. Turn the manual shut-off valve in the gas supply line to 13 mm) long. The small inner cone should have a very distinct blue flame 1/4" to 1/2" (6.4 mm to the open position. 3. Close the broiler door and turn the knob to the "Electronic Ignition System" section for proper cooktop and oven burner flames is behind the oven burner air shutter. Place Propane gas oven burner spud in the bag containing literature supplied with the range. 4. Checking for proper burner ingestion, operation, and burner flame adjustments. Natural gas flames...


