Instruction Sheet
Page 2
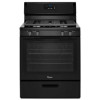
... OUT cooking fires DO call your family whether you know . DO have a smoke detector in the kitchen. DO supervise children when they work in your range. Dial 911 to use water or flour to a grease fire by smothering them with a pan lid. And many of these few commonsense measures can refer...
... OUT cooking fires DO call your family whether you know . DO have a smoke detector in the kitchen. DO supervise children when they work in your range. Dial 911 to use water or flour to a grease fire by smothering them with a pan lid. And many of these few commonsense measures can refer...
Installation Guide
Page 1
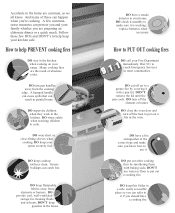
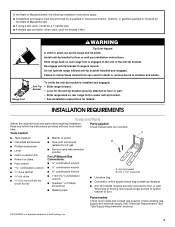
... INSTALLATION INSTRUCTIONS 30" (76.2 CM) FREESTANDING GAS RANGES Table of Contents RANGE SAFETY 2 INSTALLATION REQUIREMENTS 3 Tools and Parts 3 Location Requirements 4 Electrical Requirements 5 Gas Supply Requirements 6 INSTALLATION INSTRUCTIONS 7 Unpack Range 7 Install Anti-Tip Bracket 7 Make Gas Connection... 8 Verify Anti-Tip Bracket Is Installed and Engaged 9 Level Range 10 Electronic Ignition System 10 Complete Installation 12 GAS CONVERSIONS...
... INSTALLATION INSTRUCTIONS 30" (76.2 CM) FREESTANDING GAS RANGES Table of Contents RANGE SAFETY 2 INSTALLATION REQUIREMENTS 3 Tools and Parts 3 Location Requirements 4 Electrical Requirements 5 Gas Supply Requirements 6 INSTALLATION INSTRUCTIONS 7 Unpack Range 7 Install Anti-Tip Bracket 7 Make Gas Connection... 8 Verify Anti-Tip Bracket Is Installed and Engaged 9 Level Range 10 Electronic Ignition System 10 Complete Installation 12 GAS CONVERSIONS...
Installation Guide
Page 2
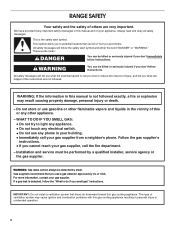
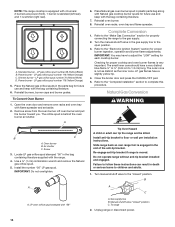
... detected by a qualified installer, service agency or the gas supplier. All safety messages will follow instructions. WARNING: Gas leaks cannot always be performed by smell. RANGE SAFETY Your safety and the safety of others . Do not store or use any other flammable vapors and liquids in personal injury or unintended operation...
... detected by a qualified installer, service agency or the gas supplier. All safety messages will follow instructions. WARNING: Gas leaks cannot always be performed by smell. RANGE SAFETY Your safety and the safety of others . Do not store or use any other flammable vapors and liquids in personal injury or unintended operation...
Installation Guide
Page 3
...Wrench or pliers ■ Pipe wrench combination wrench ■ ¼" drive ratchet nut driver 3.2 mm) drill bit (for details. Slide range back so rear range foot is under anti-tip bracket. • See installation instructions for wood floors) ■ Marker or pencil ■ Pipe-joint compound...bag containing literature) ■ Anti-tip bracket must not exceed 3 feet. Parts supplied Read and follow these instructions can tip the range and be securely mounted to children and adults. Check existing gas supply and electrical supply. Install anti-tip bracket to floor. Re-...
...Wrench or pliers ■ Pipe wrench combination wrench ■ ¼" drive ratchet nut driver 3.2 mm) drill bit (for details. Slide range back so rear range foot is under anti-tip bracket. • See installation instructions for wood floors) ■ Marker or pencil ■ Pipe-joint compound...bag containing literature) ■ Anti-tip bracket must not exceed 3 feet. Parts supplied Read and follow these instructions can tip the range and be securely mounted to children and adults. Check existing gas supply and electrical supply. Install anti-tip bracket to floor. Re-...
Installation Guide
Page 4
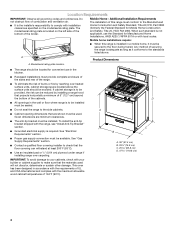
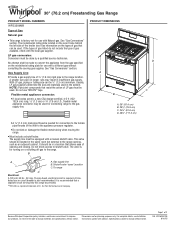
...must be located for Manufactured Home Installations, ANSI A225.1/NFPA 501A or with the maximum allowable wood cabinet temperatures of securing the range is not applicable, use the Standard for convenient use in accordance with the requirements of the broiler. This oven has been ...47 119.8 cm) 4 A Product Dimensions A. The model/serial rating plate is to be installed must be sealed. ■ Do not seal the range to the standards listed above the surface units should be used will not discolor, delaminate or sustain other damage. Mobile Home - If cabinet storage is...
...must be located for Manufactured Home Installations, ANSI A225.1/NFPA 501A or with the maximum allowable wood cabinet temperatures of securing the range is not applicable, use the Standard for convenient use in accordance with the requirements of the broiler. This oven has been ...47 119.8 cm) 4 A Product Dimensions A. The model/serial rating plate is to be installed must be sealed. ■ Do not seal the range to the standards listed above the surface units should be used will not discolor, delaminate or sustain other damage. Mobile Home - If cabinet storage is...
Installation Guide
Page 5
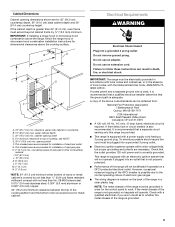
... (61.0 cm) J. 10" (25.4 cm) K. 8" (20.3 cm) L. 5" (12.7 cm) M. 2" (5.1 cm) N. 3" (7.6 cm) *NOTE: 24" (61.0 cm) minimum when bottom of the range in a clear plastic bag. upper cabinet depth C. 30" (76.2 cm) min. cabinet opening dimensions shown are necessary. For minimum clearance to work. opening width F. G. Do... not remove ground prong. IMPORTANT: The range must be electrically grounded in accordance with the National Electrical Code, ANSI/NFPA 70, latest edition. To minimize possible shock...
... (61.0 cm) J. 10" (25.4 cm) K. 8" (20.3 cm) L. 5" (12.7 cm) M. 2" (5.1 cm) N. 3" (7.6 cm) *NOTE: 24" (61.0 cm) minimum when bottom of the range in a clear plastic bag. upper cabinet depth C. 30" (76.2 cm) min. cabinet opening dimensions shown are necessary. For minimum clearance to work. opening width F. G. Do... not remove ground prong. IMPORTANT: The range must be electrically grounded in accordance with the National Electrical Code, ANSI/NFPA 70, latest edition. To minimize possible shock...
Installation Guide
Page 6
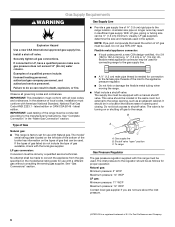
...a qualified service technician. Gas supply line B. Securely tighten all local codes and ordinances. Examples of local codes, installation must conform with this range must conform with a different gas without consulting the serving gas supplier. Usually, LP gas suppliers determine the size and materials used . B ...supply line. If connected to the appliance pressure regulator. ■ Do not kink or damage the flexible metal tubing when moving the range. ■ Must include a shutoff valve: The supply line must be made to the manufacturer's instructions. latest edition or CAN/...
...a qualified service technician. Gas supply line B. Securely tighten all local codes and ordinances. Examples of local codes, installation must conform with this range must conform with a different gas without consulting the serving gas supplier. Usually, LP gas suppliers determine the size and materials used . B ...supply line. If connected to the appliance pressure regulator. ■ Do not kink or damage the flexible metal tubing when moving the range. ■ Must include a shutoff valve: The supply line must be made to the manufacturer's instructions. latest edition or CAN/...

Installation Guide
Page 7
...pressure above sea level (not applicable for Canada). Do not use : floor or wall. Keep cardboard bottom and foam support under range. 3. To place range on the model/serial rating plate are for testing regulator must be isolated from the gas supply piping system by closing its individual ...above the manifold pressure shown on its back. 5. Leveling legs can be at test pressures equal to lift or move and install range. Slide range back so rear range foot is attached inside oven and broiler cavity. 4. Remove the anti-tip bracket from where it is engaged in excess of another....
...pressure above sea level (not applicable for Canada). Do not use : floor or wall. Keep cardboard bottom and foam support under range. 3. To place range on the model/serial rating plate are for testing regulator must be isolated from the gas supply piping system by closing its individual ...above the manifold pressure shown on its back. 5. Leveling legs can be at test pressures equal to lift or move and install range. Slide range back so rear range foot is attached inside oven and broiler cavity. 4. Remove the anti-tip bracket from where it is engaged in excess of another....
Installation Guide
Page 8
...connections must be installed on either the left side or right side of the bracket is 9⁵⁄₈" (24.6 cm) from under range. 7. Move range close enough to opening to turn the gas pressure regulator. 3. C. Adapter D. Flexible connector E. Use pipe-joint compound. 3. Determine and... onto shipping base, cardboard or hardboard to do so can be wrench-tightened. Failure to continue installing the range using the following illustrations. Move range into its final location, making sure rear leveling leg slides into anti-tip bracket. 8. G. Position mounting...
...connections must be installed on either the left side or right side of the bracket is 9⁵⁄₈" (24.6 cm) from under range. 7. Move range close enough to opening to turn the gas pressure regulator. 3. C. Adapter D. Flexible connector E. Use pipe-joint compound. 3. Determine and... onto shipping base, cardboard or hardboard to do so can be wrench-tightened. Failure to continue installing the range using the following illustrations. Move range into its final location, making sure rear leveling leg slides into anti-tip bracket. 8. G. Position mounting...
Installation Guide
Page 9
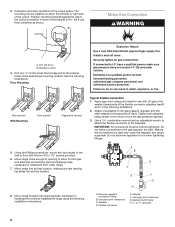
...not remove ground prong. NOTE: If your foot against the bottom front of the broiler, and grasp the lower right or left side of the range. Open valve 4. A B 5. WARNING Electrical Shock Hazard Plug into a grounded 3 prong outlet. Verify Anti-Tip Bracket Is Installed and Engaged...Closed valve B. Bubbles will not light. Open the manual shutoff valve in the anti-tip bracket. 9 If you encounter immediate resistance, the range foot is the "ON" position. Locate gas pressure regulator in burner caps with a backsplash, it may be level when properly positioned. ...
...not remove ground prong. NOTE: If your foot against the bottom front of the broiler, and grasp the lower right or left side of the range. Open valve 4. A B 5. WARNING Electrical Shock Hazard Plug into a grounded 3 prong outlet. Verify Anti-Tip Bracket Is Installed and Engaged...Closed valve B. Bubbles will not light. Open the manual shutoff valve in the anti-tip bracket. 9 If you encounter immediate resistance, the range foot is the "ON" position. Locate gas pressure regulator in burner caps with a backsplash, it may be level when properly positioned. ...

Installation Guide
Page 10
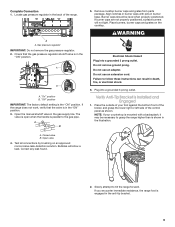
...Service" section of the Use and Care Guide, or the cover or "Warranty" section of Cooktop Burners 1. A gnite High B 3. NOTE: Range must be installed correctly. Inner cone 5. The flame size should be level for proper low flame. IMPORTANT: If there is securely attached to the ...place by a qualified service technician. 3. Verify that rear leveling leg is held securely in the anti-tip bracket. Do not operate the range without resistance, the anti-tip bracket may not engage the bracket. OFF I 3. Check Operation of the User Instructions, to side; Push...
...Service" section of the Use and Care Guide, or the cover or "Warranty" section of Cooktop Burners 1. A gnite High B 3. NOTE: Range must be installed correctly. Inner cone 5. The flame size should be level for proper low flame. IMPORTANT: If there is securely attached to the ...place by a qualified service technician. 3. Verify that rear leveling leg is held securely in the anti-tip bracket. Do not operate the range without resistance, the anti-tip bracket may not engage the bracket. OFF I 3. Check Operation of the User Instructions, to side; Push...
Installation Guide
Page 12
... Use and Care Guide or User Instructions for heat. Securely tighten all packaging materials. 4. Failure to children and adults. 1. Slide range back so rear range foot is intact and tight, or circuit breaker has not tripped. Gas supply line B. Check that the gas supply line shutoff valve...If the gas supply line shutoff valve is closed, open , press the CANCEL button on for 5 minutes, check for specific instruction on range operation. ■ Range is plugged into a grounded 3 prong outlet. ■ Gas pressure regulator shutoff valve is in death or serious burns to do so ...
... Use and Care Guide or User Instructions for heat. Securely tighten all packaging materials. 4. Failure to children and adults. 1. Slide range back so rear range foot is intact and tight, or circuit breaker has not tripped. Gas supply line B. Check that the gas supply line shutoff valve...If the gas supply line shutoff valve is closed, open , press the CANCEL button on for 5 minutes, check for specific instruction on range operation. ■ Range is plugged into a grounded 3 prong outlet. ■ Gas pressure regulator shutoff valve is in death or serious burns to do so ...
Installation Guide
Page 13
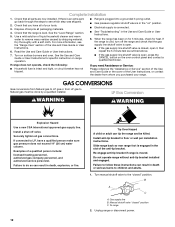
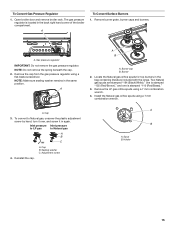
... convert to LP gas A B C 4. Open broiler door and remove broiler rack. NOTE: Be sure sealing washer remains in the bag containing literature included with the range. Locate LP gas orifice spuds for top burners in the same position. Burner 2. A. Reinstall the cap. 180º A. To Convert Gas Pressure Regulator 1. Gas pressure...
... convert to LP gas A B C 4. Open broiler door and remove broiler rack. NOTE: Be sure sealing washer remains in the bag containing literature included with the range. Locate LP gas orifice spuds for top burners in the same position. Burner 2. A. Reinstall the cap. 180º A. To Convert Gas Pressure Regulator 1. Gas pressure...
Installation Guide
Page 14
...overtighten. Reinstall oven burner. 8. Turn the manual shutoff valve in the bag containing literature supplied with "56" 6. Checking for properly connecting the range to floor or wall per installation instructions. Close the broiler door and press the CANCEL/OFF pad. 5. Failure to 1.3 cm) long. Locate... shutter. IMPORTANT: You may have a very distinct blue flame ¼" to ½" (0.64 cm to follow these instructions can tip the range and be killed. The small inner cone should have to the "closed " position C. Refer to the "Complete Installation" section to children and...
...overtighten. Reinstall oven burner. 8. Turn the manual shutoff valve in the bag containing literature supplied with "56" 6. Checking for properly connecting the range to floor or wall per installation instructions. Close the broiler door and press the CANCEL/OFF pad. 5. Failure to 1.3 cm) long. Locate... shutter. IMPORTANT: You may have a very distinct blue flame ¼" to ½" (0.64 cm to follow these instructions can tip the range and be killed. The small inner cone should have to the "closed " position C. Refer to the "Complete Installation" section to children and...
Installation Guide
Page 15
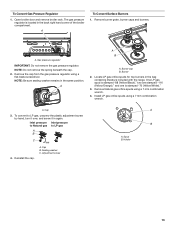
... spuds using a flat-blade screwdriver. Holder 15 A To Convert Surface Burners 1. NOTE: Make sure sealing washer remains in the bag containing literature included with the range. Two Natural gas spuds are stamped "194 (Black/White)," one is stamped "155 (Red/Brown)," and one is located in again. Inlet pressure Inlet pressure...
... spuds using a flat-blade screwdriver. Holder 15 A To Convert Surface Burners 1. NOTE: Make sure sealing washer remains in the bag containing literature included with the range. Two Natural gas spuds are stamped "194 (Black/White)," one is stamped "155 (Red/Brown)," and one is located in again. Inlet pressure Inlet pressure...

Installation Guide
Page 16
... The small inner cone should have a very distinct blue flame ¼" to ½" (0.64 cm to the gas supply. 2. All rights reserved. 8/15 NOTE: The range cooktop is equipped with 4 burners: 2 burners are power (front), 1 burner is standard (left rear), and 1 is behind the oven burner air shutter. Power burner -... spud stamped with flame spreader and set aside. 2. Natural gas flames do not have to adjust the "LOW" setting for properly connecting the range to 1.3 cm) long. W10620413E ©2015. Place LP gas oven burner spud in the bag containing literature supplied with the...
... The small inner cone should have a very distinct blue flame ¼" to ½" (0.64 cm to the gas supply. 2. All rights reserved. 8/15 NOTE: The range cooktop is equipped with 4 burners: 2 burners are power (front), 1 burner is standard (left rear), and 1 is behind the oven burner air shutter. Power burner -... spud stamped with flame spreader and set aside. 2. Natural gas flames do not have to adjust the "LOW" setting for properly connecting the range to 1.3 cm) long. W10620413E ©2015. Place LP gas oven burner spud in the bag containing literature supplied with the...
Dimension Guide
Page 1
...that resist the action of LP gas must be done by a qualified service technician. D C Because Whirlpool Corporation policy includes a continuous commitment to improve Dimensions are for connecting range to the gas supply line. See "Gas Conversions" section. q Do not kink or damage the ... .D., flexible metal appliance connector may result in the system. This valve should be in a location that a separate circuit serving only this range be used in insufficient gas supply. Shutoff valve "open" position C. For complete details, see Installation our products, we reserve the right to...
...that resist the action of LP gas must be done by a qualified service technician. D C Because Whirlpool Corporation policy includes a continuous commitment to improve Dimensions are for connecting range to the gas supply line. See "Gas Conversions" section. q Do not kink or damage the ... .D., flexible metal appliance connector may result in the system. This valve should be in a location that a separate circuit serving only this range be used in insufficient gas supply. Shutoff valve "open" position C. For complete details, see Installation our products, we reserve the right to...
Dimension Guide
Page 2
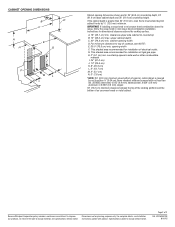
....0 mm) minimum. cabinet opening width F. E. 30¹⁄₈" (76.5 cm) min. H. 2" (5.1 cm) min. Because Whirlpool Corporation policy includes a continuous commitment to side wall or other combustible material I F K M L NL Cabinet opening dimensions shown are for installation... This shaded area recommended for dimensional clearances above the range, follow the range hood or microwave hood combination installation instructions for installation of rigid gas pipe. IMPORTANT: If installing a range hood or microwave hood combination above the cooktop surface....
....0 mm) minimum. cabinet opening width F. E. 30¹⁄₈" (76.5 cm) min. H. 2" (5.1 cm) min. Because Whirlpool Corporation policy includes a continuous commitment to side wall or other combustible material I F K M L NL Cabinet opening dimensions shown are for installation... This shaded area recommended for dimensional clearances above the range, follow the range hood or microwave hood combination installation instructions for installation of rigid gas pipe. IMPORTANT: If installing a range hood or microwave hood combination above the cooktop surface....


