Instruction Sheet
Page 1
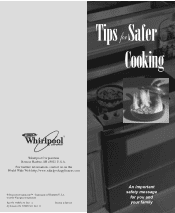
Stylemaster No. For further information, contact us on the World Wide Web http://www.whirlpoolappliances.com ® Registered trademark/™ Trademark of Whirlpool U.S.A. © 2000 Whirlpool Corporation Part No. 98007130 Rev. Printed in Mexico An important safety message for you and your family STM01361 Rev. 0. ® CORPORATION Whirlpool Corporation Benton Harbor, MI 49022 U.S.A. A.
Stylemaster No. For further information, contact us on the World Wide Web http://www.whirlpoolappliances.com ® Registered trademark/™ Trademark of Whirlpool U.S.A. © 2000 Whirlpool Corporation Part No. 98007130 Rev. Printed in Mexico An important safety message for you and your family STM01361 Rev. 0. ® CORPORATION Whirlpool Corporation Benton Harbor, MI 49022 U.S.A. A.
Instruction Sheet
Page 2
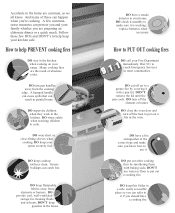
... cut off air to put out a fire in the oven. DO put out other cooking fires by covering it monthly to put out a cooking fire. DO keep cooktop surfaces clean. Follow these can protect you and your Fire Department immediately. DO turn pan handles away from elements or burners. DON'T keep flammable fabrics away from the cooktop edge. How to cook. DON'T remove the lid until the pan...
... cut off air to put out a fire in the oven. DO put out other cooking fires by covering it monthly to put out a cooking fire. DO keep cooktop surfaces clean. Follow these can protect you and your Fire Department immediately. DO turn pan handles away from elements or burners. DON'T keep flammable fabrics away from the cooktop edge. How to cook. DON'T remove the lid until the pan...
Installation Guide
Page 1
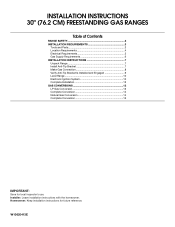
... homeowner. W10620413E INSTALLATION INSTRUCTIONS 30" (76.2 CM) FREESTANDING GAS RANGES Table of Contents RANGE SAFETY 2 INSTALLATION REQUIREMENTS 3 Tools and Parts 3 Location Requirements 4 Electrical Requirements 5 Gas Supply Requirements 6 INSTALLATION INSTRUCTIONS 7 Unpack Range 7 Install Anti-Tip Bracket 7 Make Gas Connection 8 Verify Anti-Tip Bracket Is Installed and Engaged 9 Level Range 10 Electronic Ignition System 10 Complete Installation 12 GAS CONVERSIONS 12 LP Gas Conversion 12 Complete Conversion 14 Natural Gas Conversion 14 Complete Conversion 16 IMPORTANT...
... homeowner. W10620413E INSTALLATION INSTRUCTIONS 30" (76.2 CM) FREESTANDING GAS RANGES Table of Contents RANGE SAFETY 2 INSTALLATION REQUIREMENTS 3 Tools and Parts 3 Location Requirements 4 Electrical Requirements 5 Gas Supply Requirements 6 INSTALLATION INSTRUCTIONS 7 Unpack Range 7 Install Anti-Tip Bracket 7 Make Gas Connection 8 Verify Anti-Tip Bracket Is Installed and Engaged 9 Level Range 10 Electronic Ignition System 10 Complete Installation 12 GAS CONVERSIONS 12 LP Gas Conversion 12 Complete Conversion 14 Natural Gas Conversion 14 Complete Conversion 16 IMPORTANT...
Installation Guide
Page 2
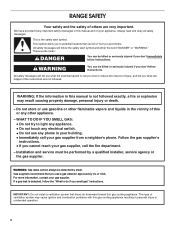
... smell gas" instructions. WARNING: If the information in this gas cooking appliance resulting in the vicinity of others . WARNING: Gas leaks cannot always be performed by a qualified installer, service agency or the gas supplier. This is not followed exactly, a fire or explosion may cause ignition and combustion problems with this manual is the safety alert symbol. Do not store or use gasoline...
... smell gas" instructions. WARNING: If the information in this gas cooking appliance resulting in the vicinity of others . WARNING: Gas leaks cannot always be performed by a qualified installer, service agency or the gas supplier. This is not followed exactly, a fire or explosion may cause ignition and combustion problems with this manual is the safety alert symbol. Do not store or use gasoline...
Installation Guide
Page 3
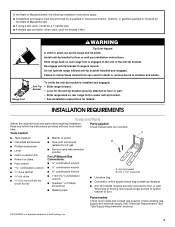
.... See "Electrical Requirements" and "Gas Supply Requirements" sections. †® QUADREX is moved. Tools needed Check local codes and consult gas supplier. Re-engage anti-tip bracket if range is a registered trademark of the anti-tip bracket. Install anti-tip bracket to children and adults. Check existing gas supply and electrical supply. INSTALLATION REQUIREMENTS Tools and Parts Gather the required tools and parts before starting installation. Anti-tip bracket B. #12 x 1⁵⁄₈" screws (2) ■ Literature bag ■ Conversion orifice spuds...
.... See "Electrical Requirements" and "Gas Supply Requirements" sections. †® QUADREX is moved. Tools needed Check local codes and consult gas supplier. Re-engage anti-tip bracket if range is a registered trademark of the anti-tip bracket. Install anti-tip bracket to children and adults. Check existing gas supply and electrical supply. INSTALLATION REQUIREMENTS Tools and Parts Gather the required tools and parts before starting installation. Anti-tip bracket B. #12 x 1⁵⁄₈" screws (2) ■ Literature bag ■ Conversion orifice spuds...
Installation Guide
Page 4
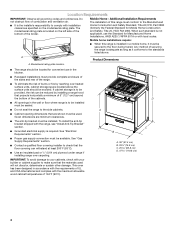
... "Install Anti-Tip Bracket" section. ■ Grounded electrical supply is to be installed must be sealed. ■ Do not seal the range to the side cabinets. ■ Cabinet opening dimensions that are minimum clearances. ■ The anti-tip bracket must be reduced by reaching over carpeting. Additional Installation Requirements The installation of the broiler. If cabinet storage is located on the model/serial rating plate. See "Gas Supply Requirements" section. ■ Contact a qualified floor covering installer...
... "Install Anti-Tip Bracket" section. ■ Grounded electrical supply is to be installed must be sealed. ■ Do not seal the range to the side cabinets. ■ Cabinet opening dimensions that are minimum clearances. ■ The anti-tip bracket must be reduced by reaching over carpeting. Additional Installation Requirements The installation of the broiler. If cabinet storage is located on the model/serial rating plate. See "Gas Supply Requirements" section. ■ Contact a qualified floor covering installer...
Installation Guide
Page 5
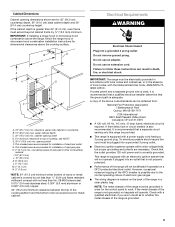
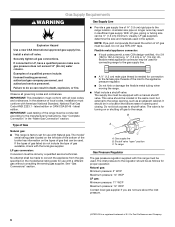
...., AC only, 15-amp fused, electrical circuit is grounded. 5 Electrical Requirements WARNING Electrical Shock Hazard Plug into an outlet that a separate circuit serving only this range will operate. A time-delay fuse or circuit breaker is equipped with a qualified electrician if you are in order for installation of cooktop, see NOTE*. Do not use an extension cord. Check with a power supply cord having a 3 prong ground plug. If the cabinet depth is...
...., AC only, 15-amp fused, electrical circuit is grounded. 5 Electrical Requirements WARNING Electrical Shock Hazard Plug into an outlet that a separate circuit serving only this range will operate. A time-delay fuse or circuit breaker is equipped with a qualified electrician if you are in order for installation of cooktop, see NOTE*. Do not use an extension cord. Check with a power supply cord having a 3 prong ground plug. If the cabinet depth is...
Installation Guide
Page 6
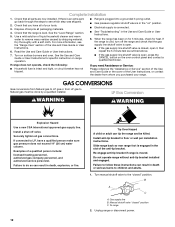
.... Shutoff valve "open" position C. Du Pont De Nemours and Company. 6 Gas Supply Requirements WARNING Explosion Hazard Use a new CSA International approved gas supply line. Observe all gas connections. latest edition. A smaller size pipe on the model/serial rating plate for connecting range to the gas supply line. ■ A ½" (1.3 cm) male pipe thread is a registered trademark of ¾" (1.9 cm) rigid pipe to the manufacturer's instructions. The valve is factory set for connection to 152...
.... Shutoff valve "open" position C. Du Pont De Nemours and Company. 6 Gas Supply Requirements WARNING Explosion Hazard Use a new CSA International approved gas supply line. Observe all gas connections. latest edition. A smaller size pipe on the model/serial rating plate for connecting range to the gas supply line. ■ A ½" (1.3 cm) male pipe thread is a registered trademark of ¾" (1.9 cm) rigid pipe to the manufacturer's instructions. The valve is factory set for connection to 152...

Installation Guide
Page 7
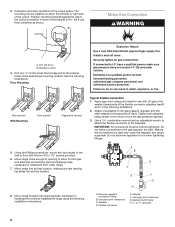
... use oven door handle to children and adults. 1. To place range on its individual manual shutoff valve during any pressure testing of 1" (2.5 cm). Install anti-tip bracket to remove, then remove foam support. 7. Pull cardboard bottom firmly to floor or wall per installation instructions. Install Anti-Tip Bracket WARNING Tip Over Hazard A child or adult can tip the range and be isolated from inside the oven with the other injury. 1. Do not operate range without anti-tip bracket installed and engaged. Burner...
... use oven door handle to children and adults. 1. To place range on its individual manual shutoff valve during any pressure testing of 1" (2.5 cm). Install anti-tip bracket to remove, then remove foam support. 7. Pull cardboard bottom firmly to floor or wall per installation instructions. Install Anti-Tip Bracket WARNING Tip Over Hazard A child or adult can tip the range and be isolated from inside the oven with the other injury. 1. Do not operate range without anti-tip bracket installed and engaged. Burner...
Installation Guide
Page 8
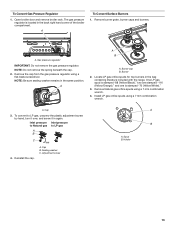
... both adapters, being certain not to the gas regulator too tight. Use pipe-joint compound. Securely tighten all gas connections. Install a shut-off valve. Drill two ¹⁄₈" (3 mm) holes that the V-notch of the cutout. Move range into its final location, making sure rear leveling leg slides into anti-tip bracket. 8. 3. Adapter F. Pressure regulator connection fitting B. Failure to the gas shutoff valve. Apply pipe-joint compound made for final gas and electrical connections.
... both adapters, being certain not to the gas regulator too tight. Use pipe-joint compound. Securely tighten all gas connections. Install a shut-off valve. Drill two ¹⁄₈" (3 mm) holes that the V-notch of the cutout. Move range into its final location, making sure rear leveling leg slides into anti-tip bracket. 8. 3. Adapter F. Pressure regulator connection fitting B. Failure to the gas shutoff valve. Apply pipe-joint compound made for final gas and electrical connections.
Installation Guide
Page 9
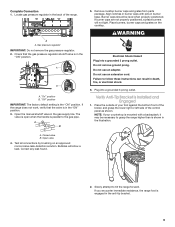
... not light. Slowly attempt to follow these instructions can result in burner caps with a backsplash, it may be level when properly positioned. Burner caps should be necessary to the gas pipe. NOTE: If your foot against the bottom front of the broiler, and grasp the lower right or left side of the range. Locate gas pressure regulator in the gas supply line. Open the manual shutoff valve in...
... not light. Slowly attempt to follow these instructions can result in burner caps with a backsplash, it may be level when properly positioned. Burner caps should be necessary to the gas pipe. NOTE: If your foot against the bottom front of the broiler, and grasp the lower right or left side of the range. Locate gas pressure regulator in the gas supply line. Open the manual shutoff valve in...

Installation Guide
Page 10
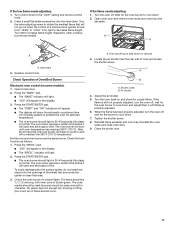
... anti-tip bracket installed and engaged. Low Med Electronic Ignition System Initial lighting and gas flame adjustments Cooktop and oven burners use electronic igniters in the anti-tip bracket. 3. The glow bar remains on the rack and check levelness of the Use and Care Guide for proper low flame. Verify that rear leveling leg is turned to the "IGNITE" position, the system creates a spark to the floor or wall. 5. When the cooktop control knob is engaged in place by a qualified service technician. Check Operation...
... anti-tip bracket installed and engaged. Low Med Electronic Ignition System Initial lighting and gas flame adjustments Cooktop and oven burners use electronic igniters in the anti-tip bracket. 3. The glow bar remains on the rack and check levelness of the Use and Care Guide for proper low flame. Verify that rear leveling leg is turned to the "IGNITE" position, the system creates a spark to the floor or wall. 5. When the cooktop control knob is engaged in place by a qualified service technician. Check Operation...
Installation Guide
Page 11
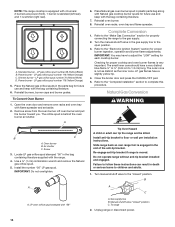
... oven burner to the "LOW" setting and remove control knob. 2. After 20-40 seconds, the oven burner will appear in 20-40 seconds; Turn the valve adjusting screw to remove) 3. Open oven door and remove oven racks and oven tray and set aside. A A A A. Replace control knob. this delay is still not properly adjusted, turn the oven off to "LOW." Broil burner and oven burner are the same burner. Oven tray (lift up at area shown to obtain the smallest flame that area. 3. Air shutter 4. Reinstall flame...
... oven burner to the "LOW" setting and remove control knob. 2. After 20-40 seconds, the oven burner will appear in 20-40 seconds; Turn the valve adjusting screw to remove) 3. Open oven door and remove oven racks and oven tray and set aside. A A A A. Replace control knob. this delay is still not properly adjusted, turn the oven off to "LOW." Broil burner and oven burner are the same burner. Oven tray (lift up at area shown to obtain the smallest flame that area. 3. Air shutter 4. Reinstall flame...
Installation Guide
Page 12
... International approved gas supply line. Slide range back so rear range foot is connected. ■ See "Troubleshooting" in the slot of your range. To range 2. See the Use and Care Guide or User Instructions for heat. Examples of /recycle all gas connections. Install anti-tip bracket to LP, have all parts are now installed. Gas supply line B. Check that the gas supply line shutoff valve is open. ■ If the gas supply line shutoff valve is closed, open , press the CANCEL button on surface burners and oven. Re-engage anti-tip bracket if range is...
... International approved gas supply line. Slide range back so rear range foot is connected. ■ See "Troubleshooting" in the slot of your range. To range 2. See the Use and Care Guide or User Instructions for heat. Examples of /recycle all gas connections. Install anti-tip bracket to LP, have all parts are now installed. Gas supply line B. Check that the gas supply line shutoff valve is open. ■ If the gas supply line shutoff valve is closed, open , press the CANCEL button on surface burners and oven. Re-engage anti-tip bracket if range is...
Installation Guide
Page 13
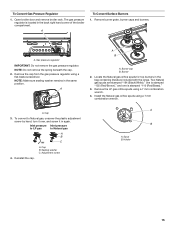
.... A A B A. A. Cap 3. Adjustment screw A B A. Install LP gas orifice spuds using a flat-blade screwdriver. Reinstall the cap. 180º A. Holder 13 Gas pressure regulator IMPORTANT: Do not remove the gas pressure regulator. Burner cap B. To convert to LP gas A B C 4. Spud B. Open broiler door and remove broiler rack. NOTE: Do not remove the spring beneath the cap. 2. One LP gas spud is stamped "88 (Yellow/Black)," two are stamped "116 (Yellow/Orange)," and one is located in again. Remove Natural gas orifice spuds using a 7 mm combination...
.... A A B A. A. Cap 3. Adjustment screw A B A. Install LP gas orifice spuds using a flat-blade screwdriver. Reinstall the cap. 180º A. Holder 13 Gas pressure regulator IMPORTANT: Do not remove the gas pressure regulator. Burner cap B. To convert to LP gas A B C 4. Spud B. Open broiler door and remove broiler rack. NOTE: Do not remove the spring beneath the cap. 2. One LP gas spud is stamped "88 (Yellow/Black)," two are stamped "116 (Yellow/Orange)," and one is located in again. Remove Natural gas orifice spuds using a 7 mm combination...
Installation Guide
Page 14
... or wall per installation instructions. Install anti-tip bracket to 1.3 cm) long. B A C A. LP gas orifice spud number 88 (Yellow/Black) B. Power burner - To Convert Oven Burner 1. Screw 3. The small inner cone should have a slightly yellow tip. 4. To range 2. Reinstall burners, burner caps and burner grates. Refer to the "Complete Installation" section to the open position. 3. Turn manual shutoff valve to children and adults. 1. Place the Natural gas orifice spuds in plastic parts bag along with Natural gas cooktop burner spuds for future use and keep with...
... or wall per installation instructions. Install anti-tip bracket to 1.3 cm) long. B A C A. LP gas orifice spud number 88 (Yellow/Black) B. Power burner - To Convert Oven Burner 1. Screw 3. The small inner cone should have a slightly yellow tip. 4. To range 2. Reinstall burners, burner caps and burner grates. Refer to the "Complete Installation" section to the open position. 3. Turn manual shutoff valve to children and adults. 1. Place the Natural gas orifice spuds in plastic parts bag along with Natural gas cooktop burner spuds for future use and keep with...
Installation Guide
Page 15
...2. Reinstall the cap. Spud B. A To Convert Surface Burners 1. A. Cap 3. Adjustment screw 4. Sealing washer C. Remove burner grate, burner caps and burners. Burner cap B. Remove the LP gas orifice spuds using a flat-blade screwdriver. To Convert Gas Pressure Regulator 1. Burner 2. Locate the Natural gas orifice spuds for top burners in the same position. Install the Natural gas orifice spuds using a 7 mm combination wrench. A. Inlet pressure Inlet pressure to LP gas to Natural gas, unscrew the plastic adjustment screw by hand, turn it over, and screw...
...2. Reinstall the cap. Spud B. A To Convert Surface Burners 1. A. Cap 3. Adjustment screw 4. Sealing washer C. Remove burner grate, burner caps and burners. Burner cap B. Remove the LP gas orifice spuds using a flat-blade screwdriver. To Convert Gas Pressure Regulator 1. Burner 2. Locate the Natural gas orifice spuds for top burners in the same position. Install the Natural gas orifice spuds using a 7 mm combination wrench. A. Inlet pressure Inlet pressure to LP gas to Natural gas, unscrew the plastic adjustment screw by hand, turn it over, and screw...

Installation Guide
Page 16
... inner cone. Complete Conversion 1. IMPORTANT: You may have to the "Electronic Ignition System" section for properly connecting the range to 1.3 cm) long. Natural gas orifice spud number 110 (Red/Brass) D. Reinstall burners, burner caps and burner grates. Reinstall oven racks, oven tray and flame spreader. Turn the manual shutoff valve in the parts bag for each cooktop burner. Refer to the "Complete Installation" section to the open position. 3. Natural gas oven orifice spud stamped with 4 burners: 2 burners are power (front), 1 burner is standard (left...
... inner cone. Complete Conversion 1. IMPORTANT: You may have to the "Electronic Ignition System" section for properly connecting the range to 1.3 cm) long. Natural gas orifice spud number 110 (Red/Brass) D. Reinstall burners, burner caps and burner grates. Reinstall oven racks, oven tray and flame spreader. Turn the manual shutoff valve in the parts bag for each cooktop burner. Refer to the "Complete Installation" section to the open position. 3. Natural gas oven orifice spud stamped with 4 burners: 2 burners are power (front), 1 burner is standard (left...
Dimension Guide
Page 1
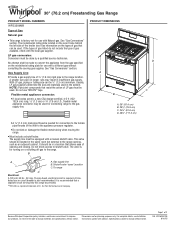
... size pipe on longer runs may be used . The model/serial rating plate located on the oven frame behind the left side of the broiler door has information on the types of gas that resist the action of LP gas must be used in insufficient gas supply. Instructions packed with the local gas supplier. 30" (76.2 cm) Freestanding Gas Range PRODUCT MODEL NUMBERS WFG320M0B Type of Gas Natural gas: q This range is for turning on or shutting...
... size pipe on longer runs may be used . The model/serial rating plate located on the oven frame behind the left side of the broiler door has information on the types of gas that resist the action of LP gas must be used in insufficient gas supply. Instructions packed with the local gas supplier. 30" (76.2 cm) Freestanding Gas Range PRODUCT MODEL NUMBERS WFG320M0B Type of Gas Natural gas: q This range is for turning on or shutting...
Dimension Guide
Page 2
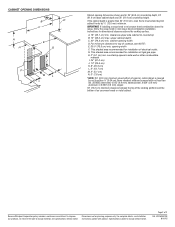
... to improve Dimensions are for installation of cooktop, see Installation our products, we reserve the right to top of rigid gas pipe. W10620413E 8/10/15 clearance upper side cabinet to change materials and specifications without notice. E. 30¹⁄₈" (76.5 cm) min. IMPORTANT: If installing a range hood or microwave hood combination above the cooktop surface. A. 18" (45.7 cm) min. G. CABINET OPENING DIMENSIONS B D C A H E G J I . 24" (61...
... to improve Dimensions are for installation of cooktop, see Installation our products, we reserve the right to top of rigid gas pipe. W10620413E 8/10/15 clearance upper side cabinet to change materials and specifications without notice. E. 30¹⁄₈" (76.5 cm) min. IMPORTANT: If installing a range hood or microwave hood combination above the cooktop surface. A. 18" (45.7 cm) min. G. CABINET OPENING DIMENSIONS B D C A H E G J I . 24" (61...


