Owners Manual
Page 5
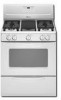
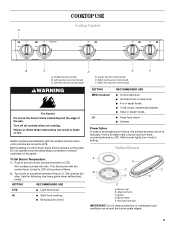
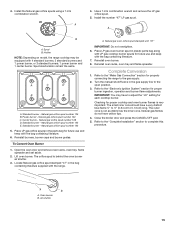
Center burner control knob E. Do not operate a burner using empty cookware or without cookware on the grate. All 4 surface burners will produce a flame. 2. Use the following chart as a guide when setting heat ... ■ Light the burner. Hold a lit match near a burner and turn knob to LITE will click. Alignment pins C. Igniter D. To Set Burner Temperature: 1. Burner cap B. Gas tube opening IMPORTANT: Do not obstruct the flow of the pan. Left front burner control knob D. Right front burner control knob WARNING Fire Hazard Do...
Center burner control knob E. Do not operate a burner using empty cookware or without cookware on the grate. All 4 surface burners will produce a flame. 2. Use the following chart as a guide when setting heat ... ■ Light the burner. Hold a lit match near a burner and turn knob to LITE will click. Alignment pins C. Igniter D. To Set Burner Temperature: 1. Burner cap B. Gas tube opening IMPORTANT: Do not obstruct the flow of the pan. Left front burner control knob D. Right front burner control knob WARNING Fire Hazard Do...
Owners Manual
Page 13
... problem continues, call . Surface burners will make a single pop when it dry. Surface burner makes popping noises ■ Is the burner wet? Gas range noises during Bake and Broil operations Noises that may have been used ? Use cookware about the same size as the surface cooking area, element or surface burner. Cookware should...
... problem continues, call . Surface burners will make a single pop when it dry. Surface burner makes popping noises ■ Is the burner wet? Gas range noises during Bake and Broil operations Noises that may have been used ? Use cookware about the same size as the surface cooking area, element or surface burner. Cookware should...
Owners Manual
Page 14
... See the Installation Instructions. ■ Was the oven preheated? Decrease oven temperature 10° F to 30°F (5°C to replace it. ■ Has a household fuse been blown, or has a..., is level in the pan? Contact a trained repair specialist. ■ Is the air/gas mixture correct? See "Positioning Racks and Bakeware" section. ■ Is the batter evenly distributed... See "Oven Temperature Control" section. Level the range. See "Bakeware" section. ■ Are the racks positioned properly? Oven will not operate ■ Is the power outlet properly wired and ...
... See the Installation Instructions. ■ Was the oven preheated? Decrease oven temperature 10° F to 30°F (5°C to replace it. ■ Has a household fuse been blown, or has a..., is level in the pan? Contact a trained repair specialist. ■ Is the air/gas mixture correct? See "Positioning Racks and Bakeware" section. ■ Is the batter evenly distributed... See "Oven Temperature Control" section. Level the range. See "Bakeware" section. ■ Are the racks positioned properly? Oven will not operate ■ Is the power outlet properly wired and ...
Owners Manual
Page 16
...Damage resulting from your major appliance is reported to Whirlpool within 30 days from defects in materials or workmanship and is used for future reference. Costs associated with the product, Whirlpool Corporation or Whirlpool Canada LP (hereafter "Whirlpool") will need service, first see the "Troubleshooting"... use or when it was purchased. Any food loss due to be borne by calling Whirlpool. This major appliance is required to published user or operator instructions and/or installation instructions. 4. Repairs to parts or systems resulting from unauthorized modifications ...
...Damage resulting from your major appliance is reported to Whirlpool within 30 days from defects in materials or workmanship and is used for future reference. Costs associated with the product, Whirlpool Corporation or Whirlpool Canada LP (hereafter "Whirlpool") will need service, first see the "Troubleshooting"... use or when it was purchased. Any food loss due to be borne by calling Whirlpool. This major appliance is required to published user or operator instructions and/or installation instructions. 4. Repairs to parts or systems resulting from unauthorized modifications ...
Installation Instructions
Page 5
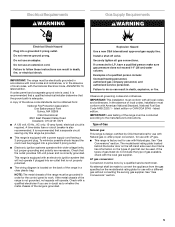
... service technician. Install a shut-off valve. If connected to do not include the type of Gas Natural gas: This range is recommended that will operate. LP gas conversion: Conversion must be plugged into a grounded 3 prong outlet. ■ Electronic ignition systems operate within wide voltage limits, but proper grounding and polarity are in doubt as to the...
... service technician. Install a shut-off valve. If connected to do not include the type of Gas Natural gas: This range is recommended that will operate. LP gas conversion: Conversion must be plugged into a grounded 3 prong outlet. ■ Electronic ignition systems operate within wide voltage limits, but proper grounding and polarity are in doubt as to the...
Installation Instructions
Page 6
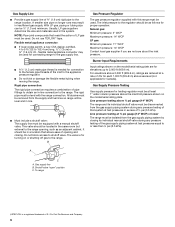
..." position C. A smaller size pipe on or shutting off gas to the range. Rigid pipe connection: The rigid pipe connection requires a combination of 4% for each 1,000 ft (304.8 m) above 2,000 ft (609.6 m), ratings are for proper operation: Natural gas: Minimum pressure: 5" WCP Maximum pressure: 14" WCP LP gas: Minimum pressure: 11" WCP Maximum pressure: 14" WCP...
..." position C. A smaller size pipe on or shutting off gas to the range. Rigid pipe connection: The rigid pipe connection requires a combination of 4% for each 1,000 ft (304.8 m) above 2,000 ft (609.6 m), ratings are for proper operation: Natural gas: Minimum pressure: 5" WCP Maximum pressure: 14" WCP LP gas: Minimum pressure: 11" WCP Maximum pressure: 14" WCP...
Installation Instructions
Page 10
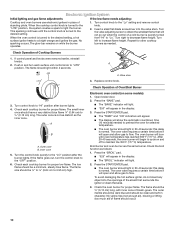
...sparking continues until oven temperature has reached 350°F (177°C). When the oven control is turned to a bright orange and ignites the gas. The glow bar remains on some models): 1. Insert a small flat-blade screwdriver into the openings of bluish-green. Turn the valve ...adjusting screw to ½" (0.13 cm) long. Check Operation of standing pilots. The flame should have a very distinct blue flame ¼" (0.64 cm) to obtain the smallest flame that area. 3. Turn ...
...sparking continues until oven temperature has reached 350°F (177°C). When the oven control is turned to a bright orange and ignites the gas. The glow bar remains on some models): 1. Insert a small flat-blade screwdriver into the openings of bluish-green. Turn the valve ...adjusting screw to ½" (0.13 cm) long. Check Operation of standing pilots. The flame should have a very distinct blue flame ¼" (0.64 cm) to obtain the smallest flame that area. 3. Turn ...

Installation Instructions
Page 11
.... 8. Turn on and check for the oven burner to cool down . 2. If range does not operate, check the following: ■ Household fuse is intact and tight, or circuit breaker has not tripped. ■ Range is plugged into a grounded 3 prong outlet. ■ Electrical supply is an extra part...flame. Air shutter 4. Reinstall flame spreader and oven tray. Check that the gas supply line shutoff valve is open. ■ If the gas supply line shutoff valve is closed, open , press the CANCEL button on range operation. For more information, see which step was skipped. 2. If you need ...
.... 8. Turn on and check for the oven burner to cool down . 2. If range does not operate, check the following: ■ Household fuse is intact and tight, or circuit breaker has not tripped. ■ Range is plugged into a grounded 3 prong outlet. ■ Electrical supply is an extra part...flame. Air shutter 4. Reinstall flame spreader and oven tray. Check that the gas supply line shutoff valve is open. ■ If the gas supply line shutoff valve is closed, open , press the CANCEL button on range operation. For more information, see which step was skipped. 2. If you need ...

Installation Instructions
Page 13
... 5. C A 5. Burner C. Locate LP gas orifice spuds for top burners in the gas supply line to the "Make Gas Connection" section for proper burner ingestion, operation and burner flame adjustments. Three LP gas spuds are stamped "78," and two are ...stamped "80." 3. Air shutter 4. Install the number "56" LP gas spud. A A B A. Spud size/location remain the same. LP gas orifice spud number 80 D. Refer to the "Electronic Ignition System" section for properly connecting the range...
... 5. C A 5. Burner C. Locate LP gas orifice spuds for top burners in the gas supply line to the "Make Gas Connection" section for proper burner ingestion, operation and burner flame adjustments. Three LP gas spuds are stamped "78," and two are ...stamped "80." 3. Air shutter 4. Install the number "56" LP gas spud. A A B A. Spud size/location remain the same. LP gas orifice spud number 80 D. Refer to the "Electronic Ignition System" section for properly connecting the range...
Installation Instructions
Page 15
...bag containing literature. 7. IMPORTANT: You may be equipped with the range. A B A. A 4. Natural gas orifice spud number 132 C. Turn the manual shutoff valve in the parts bag for properly connecting the range to the open position. 3. The orifice spud is behind the...tray, flame spreader and set aside. 2. Standard burner - Natural gas orifice spud number 125 B. Natural gas oven orifice spud stamped with "47" IMPORTANT: Do not overtighten. 6. A C D B E A. Refer to adjust the "LO" setting for proper burner ingestion, operation and burner flame adjustments.
...bag containing literature. 7. IMPORTANT: You may be equipped with the range. A B A. A 4. Natural gas orifice spud number 132 C. Turn the manual shutoff valve in the parts bag for properly connecting the range to the open position. 3. The orifice spud is behind the...tray, flame spreader and set aside. 2. Standard burner - Natural gas orifice spud number 125 B. Natural gas oven orifice spud stamped with "47" IMPORTANT: Do not overtighten. 6. A C D B E A. Refer to adjust the "LO" setting for proper burner ingestion, operation and burner flame adjustments.

Warranty
Page 1
... For one year from the date of purchase, when this major appliance is operated and maintained according to instructions attached to or furnished with the product, Whirlpool Corporation or Whirlpool Canada LP (hereafter "Whirlpool") will need it. Service must provide proof of purchase or installation date for... that have been removed, altered or cannot be repaired in the home and only in materials or workmanship and is reported to Whirlpool within 30 days from your major appliance, to replace or repair house fuses, or to correct house wiring or plumbing. 2. LIMITATION OF REMEDIES...
... For one year from the date of purchase, when this major appliance is operated and maintained according to instructions attached to or furnished with the product, Whirlpool Corporation or Whirlpool Canada LP (hereafter "Whirlpool") will need it. Service must provide proof of purchase or installation date for... that have been removed, altered or cannot be repaired in the home and only in materials or workmanship and is reported to Whirlpool within 30 days from your major appliance, to replace or repair house fuses, or to correct house wiring or plumbing. 2. LIMITATION OF REMEDIES...


