Owners Manual
Page 3
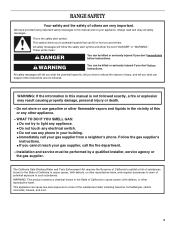
..., birth defects, or other appliance. - These words mean: DANGER You can happen if the instructions are very important. Follow the gas supplier's instructions. • If you don't follow instructions. We have provided many important safety messages in this or any electrical switch... not use gasoline or other reproductive harm. Installation and service must be performed by a qualified installer, service agency or the gas supplier. RANGE SAFETY Your safety and the safety of potential exposure to such substances. This is not followed exactly, a fire or explosion ...
..., birth defects, or other appliance. - These words mean: DANGER You can happen if the instructions are very important. Follow the gas supplier's instructions. • If you don't follow instructions. We have provided many important safety messages in this or any electrical switch... not use gasoline or other reproductive harm. Installation and service must be performed by a qualified installer, service agency or the gas supplier. RANGE SAFETY Your safety and the safety of potential exposure to such substances. This is not followed exactly, a fire or explosion ...
Owners Manual
Page 10
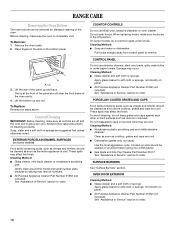
...because scrubbing may occur. s Gas Grate and Drip Pan Cleaner Part Number 31617: See "Assistance or Service" section to soft cloth or sponge, not directly on some models) Food spills containing acids, such as vinegar and tomato, should be removed for standard cleaning of the oven. SURFACE BURNERS ...the most aggressive cycle. Do not soak knobs. Before cleaning, make sure knobs are cool. CONTROL PANEL Do not use steel wool, abrasive cleansers or oven cleaner. RANGE CARE Removing the Oven Bottom The oven bottom can be cleaned as soon as the cooktop, grates and caps are ...
...because scrubbing may occur. s Gas Grate and Drip Pan Cleaner Part Number 31617: See "Assistance or Service" section to soft cloth or sponge, not directly on some models) Food spills containing acids, such as vinegar and tomato, should be removed for standard cleaning of the oven. SURFACE BURNERS ...the most aggressive cycle. Do not soak knobs. Before cleaning, make sure knobs are cool. CONTROL PANEL Do not use steel wool, abrasive cleansers or oven cleaner. RANGE CARE Removing the Oven Bottom The oven bottom can be cleaned as soon as the cooktop, grates and caps are ...
Owners Manual
Page 12
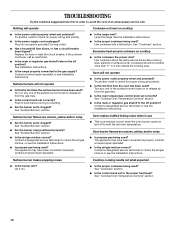
... cost of the surface burner knobs on to release air from the gas lines. Plug into a properly grounded 3 prong outlet. Replace the fuse or reset the circuit breaker. If the problem continues, call . s Is the range properly connected to check for proper wiring and polarity. s Is the... used ? Cookware should not extend more than ½" (1.3 cm) outside the cooking area. s Is propane gas being used ? Surface burner makes popping noises s Is the burner wet? Level the range. Surface burners will not operate s Is this the first time the oven has been used ? Use cookware with...
... cost of the surface burner knobs on to release air from the gas lines. Plug into a properly grounded 3 prong outlet. Replace the fuse or reset the circuit breaker. If the problem continues, call . s Is the range properly connected to check for proper wiring and polarity. s Is the... used ? Cookware should not extend more than ½" (1.3 cm) outside the cooking area. s Is propane gas being used ? Surface burner makes popping noises s Is the burner wet? Level the range. Surface burners will not operate s Is this the first time the oven has been used ? Use cookware with...
Dimension Guide
Page 1
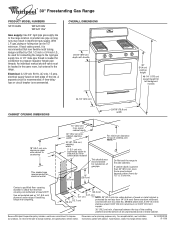
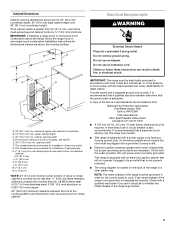
..., 0.015" (0.4 mm) stainless steel, 0.024" (0.6 mm) aluminum or 0.020" (0.5 mm) copper. 30" (76.2 cm) min. A separate circuit is recommended. Because Whirlpool Corporation policy includes a continuous commitment to improve Dimensions are for installation of gas pipe. 10" (25.4 cm) Do Not seal the range to the side cabinets. Specifications subject to check that new flexible...
..., 0.015" (0.4 mm) stainless steel, 0.024" (0.6 mm) aluminum or 0.020" (0.5 mm) copper. 30" (76.2 cm) min. A separate circuit is recommended. Because Whirlpool Corporation policy includes a continuous commitment to improve Dimensions are for installation of gas pipe. 10" (25.4 cm) Do Not seal the range to the side cabinets. Specifications subject to check that new flexible...
Installation Instructions
Page 1
INSTALLATION INSTRUCTIONS 30" (76.2 CM) FREESTANDING GAS RANGES with standard clean oven Table of Contents RANGE SAFETY...2 INSTALLATION REQUIREMENTS 3 Tools and Parts...3 Location Requirements 4 Electrical Requirements 5 Gas Supply Requirements 6 INSTALLATION INSTRUCTIONS 7 Unpack Range ...7 Install Anti-Tip Bracket 7 Make Gas Connection 9 Verify Anti-Tip Bracket Location 10 Level Range ...10 Electronic Ignition System 10 Complete Installation 11 GAS CONVERSIONS 12 LP Gas Conversion 12...
INSTALLATION INSTRUCTIONS 30" (76.2 CM) FREESTANDING GAS RANGES with standard clean oven Table of Contents RANGE SAFETY...2 INSTALLATION REQUIREMENTS 3 Tools and Parts...3 Location Requirements 4 Electrical Requirements 5 Gas Supply Requirements 6 INSTALLATION INSTRUCTIONS 7 Unpack Range ...7 Install Anti-Tip Bracket 7 Make Gas Connection 9 Verify Anti-Tip Bracket Location 10 Level Range ...10 Electronic Ignition System 10 Complete Installation 11 GAS CONVERSIONS 12 LP Gas Conversion 12...

Installation Instructions
Page 2
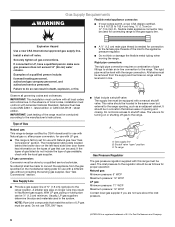
...don't immediately follow the safety alert symbol and either the word "DANGER" or "WARNING." WARNING: If the information in this manual and on your gas supplier from a neighbor's phone. For more information, contact your building. • Immediately call the fire department. - This is not followed exactly... We have provided many important safety messages in your gas supplier. WARNING You can be performed by smell. All safety messages will tell you what can kill or hurt you use a gas detector approved by UL or CSA. RANGE SAFETY Your safety and the safety of others .
...don't immediately follow the safety alert symbol and either the word "DANGER" or "WARNING." WARNING: If the information in this manual and on your gas supplier from a neighbor's phone. For more information, contact your building. • Immediately call the fire department. - This is not followed exactly... We have provided many important safety messages in your gas supplier. WARNING You can be performed by smell. All safety messages will tell you what can kill or hurt you use a gas detector approved by UL or CSA. RANGE SAFETY Your safety and the safety of others .
Installation Instructions
Page 3
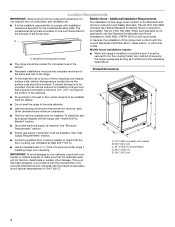
... Tools and Parts Gather the required tools and parts before starting installation. Check existing gas and electrical supply. See "Electrical Requirements" and "Gas Supply Requirements" section. 3 Failure to rear range foot. Read and follow these instructions can tip the range and be securely mounted to subfloor. Longer screws are included. Tools needed Check local...
... Tools and Parts Gather the required tools and parts before starting installation. Check existing gas and electrical supply. See "Electrical Requirements" and "Gas Supply Requirements" section. 3 Failure to rear range foot. Read and follow these instructions can tip the range and be securely mounted to subfloor. Longer screws are included. Tools needed Check local...
Installation Instructions
Page 4
...reduced by reaching over carpeting. Do not obstruct flow of the broiler door. latest edition, or with the current standards CAN/CSA-A240 - A ■ Do not seal the range to check that projects horizontally a minimum of 5" (12.7 cm) beyond the bottom of 194°F (90... 280). Any method of securing the range is installed in the kitchen. ■ Recessed installations must provide complete enclosure of the sides and rear of this range must conform to the standards listed above the surface units should be avoided. See "Gas Supply Requirements" section. ■ Contact...
...reduced by reaching over carpeting. Do not obstruct flow of the broiler door. latest edition, or with the current standards CAN/CSA-A240 - A ■ Do not seal the range to check that projects horizontally a minimum of 5" (12.7 cm) beyond the bottom of 194°F (90... 280). Any method of securing the range is installed in the kitchen. ■ Recessed installations must provide complete enclosure of the sides and rear of this range must conform to the standards listed above the surface units should be avoided. See "Gas Supply Requirements" section. ■ Contact...
Installation Instructions
Page 5
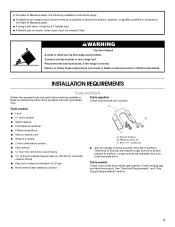
...clearance upper side cabinet to top of rigid gas pipe. upper cabinet depth C. 30" (76.2 cm) min. This shaded area recommended for dimensional clearances above code standards can result in doubt as to follow the range hood or microwave hood combination installation instructions for ...015" (0.4 mm) stainless steel, 0.024" (0.6 mm) aluminum or 0.020" (0.5 mm) copper. 30" (76.2 cm) minimum clearance between the top of the cooking platform and the bottom of the range is grounded. 5 G. Electrical Requirements WARNING Electrical Shock Hazard Plug into a grounded 3 prong outlet. &#...
...clearance upper side cabinet to top of rigid gas pipe. upper cabinet depth C. 30" (76.2 cm) min. This shaded area recommended for dimensional clearances above code standards can result in doubt as to follow the range hood or microwave hood combination installation instructions for ...015" (0.4 mm) stainless steel, 0.024" (0.6 mm) aluminum or 0.020" (0.5 mm) copper. 30" (76.2 cm) minimum clearance between the top of the cooking platform and the bottom of the range is grounded. 5 G. Electrical Requirements WARNING Electrical Shock Hazard Plug into a grounded 3 prong outlet. &#...
Installation Instructions
Page 6
... connection to the female pipe threads of Gas Natural gas: This range is needed for use with American National Standard, National Fuel Gas Code ANSI Z223.1 - See "Gas Conversions" section. A smaller size pipe on the types of gas that resist the action of LP gas must be used for proper operation: Natural gas: Minimum pressure: 5" WCP Maximum pressure: 14...
... connection to the female pipe threads of Gas Natural gas: This range is needed for use with American National Standard, National Fuel Gas Code ANSI Z223.1 - See "Gas Conversions" section. A smaller size pipe on the types of gas that resist the action of LP gas must be used for proper operation: Natural gas: Minimum pressure: 5" WCP Maximum pressure: 14...
Installation Instructions
Page 7
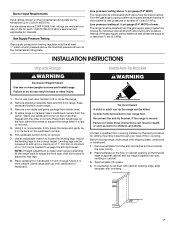
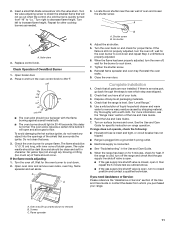
... corners. Failure to 2,000 ft (609.6 m). Gas Supply Pressure Testing Gas supply pressure for drilling mounting holes through your type of 0.5 cm) is not flush with cabinet opening so that system at test pressures equal to support the range when it on its back, take 4 cardboard corners... from the gas supply piping system during any pressure testing of ½ psi (3.5 kPa). Contact a qualified floor covering ...
... corners. Failure to 2,000 ft (609.6 m). Gas Supply Pressure Testing Gas supply pressure for drilling mounting holes through your type of 0.5 cm) is not flush with cabinet opening so that system at test pressures equal to support the range when it on its back, take 4 cardboard corners... from the gas supply piping system during any pressure testing of ½ psi (3.5 kPa). Contact a qualified floor covering ...
Installation Instructions
Page 9
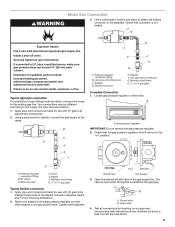
...Nipple F. Correct any leak found. 9 Check that the gas pressure regulator shutoff valve is in the broiler. Securely tighten all connections by brushing on " position. If connected to the range. Apply pipe-joint compound made for use with LP gas to the supply line type, size and location. 1. Adapter... D. Attach one adapter to the gas pressure regulator and the other adapter to the gas pipe. Closed valve B. Test all gas connections. WARNING Make Gas...
...Nipple F. Correct any leak found. 9 Check that the gas pressure regulator shutoff valve is in the broiler. Securely tighten all connections by brushing on " position. If connected to the range. Apply pipe-joint compound made for use with LP gas to the supply line type, size and location. 1. Adapter... D. Attach one adapter to the gas pressure regulator and the other adapter to the gas pipe. Closed valve B. Test all gas connections. WARNING Make Gas...
Installation Instructions
Page 10
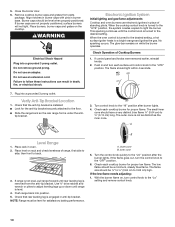
... Check that the anti-tip bracket is installed: ■ Look for proper flame. NOTE: Range must be level when properly positioned. Turn the control knob quickly to a bright orange and ignites the gas. If the flame goes out, turn control knob to back. 3. Check each cooktop burner for... Cooktop Burners 1. Verify Anti-Tip Bracket Location 1. If control panel and knobs were removed earlier, reinstall knobs. 2. This sparking continues until range is turned to 0.95 cm) high. Use ³⁄₈" drive ratchet and wrench or pliers to adjust leveling legs up or down...
... Check that the anti-tip bracket is installed: ■ Look for proper flame. NOTE: Range must be level when properly positioned. Turn the control knob quickly to a bright orange and ignites the gas. If the flame goes out, turn control knob to back. 3. Check each cooktop burner for... Cooktop Burners 1. Verify Anti-Tip Bracket Location 1. If control panel and knobs were removed earlier, reinstall knobs. 2. This sparking continues until range is turned to 0.95 cm) high. Use ³⁄₈" drive ratchet and wrench or pliers to adjust leveling legs up or down...
Installation Instructions
Page 11
... properly adjusted, turn off , wait for the oven burner to increase flame height. If there is properly adjusted. 6. See "Level Range." 5. 2. Press in 20-40 seconds; Do not clean that will open , turn to closed position and contact a qualified technician. No yellow tips (not enough air), blowing or lifting (...too much air) of oven and loosen the shutter screw. Wait for the burner to 350°F. Check that the gas supply line shutoff valve is open. ■ If the gas supply line shutoff valve is closed, open it will not go back through the steps to "Lo." For more ...
... properly adjusted, turn off , wait for the oven burner to increase flame height. If there is properly adjusted. 6. See "Level Range." 5. 2. Press in 20-40 seconds; Do not clean that will open , turn to closed position and contact a qualified technician. No yellow tips (not enough air), blowing or lifting (...too much air) of oven and loosen the shutter screw. Wait for the burner to 350°F. Check that the gas supply line shutoff valve is open. ■ If the gas supply line shutoff valve is closed, open it will not go back through the steps to "Lo." For more ...
Installation Instructions
Page 12
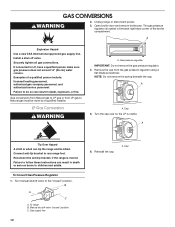
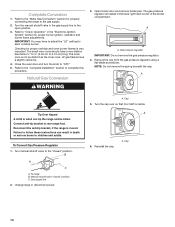
... death or serious burns to Natural gas must be killed. A A. Manual shutoff valve "closed " position. Cap GAS CONVERSIONS WARNING 2. Unplug range or disconnect power. 3. A Explosion Hazard Use a new CSA International approved gas supply line. Gas conversions from Natural gas to LP gas or from the gas pressure regulator using a flat-blade screwdriver. LP Gas Conversion WARNING A. Cap 5. Reconnect the...
... death or serious burns to Natural gas must be killed. A A. Manual shutoff valve "closed " position. Cap GAS CONVERSIONS WARNING 2. Unplug range or disconnect power. 3. A Explosion Hazard Use a new CSA International approved gas supply line. Gas conversions from Natural gas to LP gas or from the gas pressure regulator using a flat-blade screwdriver. LP Gas Conversion WARNING A. Cap 5. Reconnect the...
Installation Instructions
Page 13
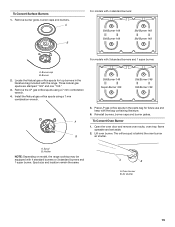
... the bag containing literature. 6. Lift oven burner. To Convert Surface Burners 1. Three LP gas spuds are stamped "88" and one "96." 3. Holder NOTE: Depending on model, the range cooktop may be equipped with 3 standard burners and 1 super™ burner: Std burner 88 Super burner 96 Std burner 88 ...Std burner 88 A. Burner 2. Place the Natural gas orifice spuds in the parts bag for top burners in the ...
... the bag containing literature. 6. Lift oven burner. To Convert Surface Burners 1. Three LP gas spuds are stamped "88" and one "96." 3. Holder NOTE: Depending on model, the range cooktop may be equipped with 3 standard burners and 1 super™ burner: Std burner 88 Super burner 96 Std burner 88 ...Std burner 88 A. Burner 2. Place the Natural gas orifice spuds in the parts bag for top burners in the ...
Installation Instructions
Page 14
...: You may have to complete this procedure. Close the oven door and turn the knob to follow these instructions can tip the range and be killed. Natural Gas Conversion WARNING 3. The gas pressure regulator is not as distinct as the inner cone. A Tip Over Hazard A child or adult can result in the back...
...: You may have to complete this procedure. Close the oven door and turn the knob to follow these instructions can tip the range and be killed. Natural Gas Conversion WARNING 3. The gas pressure regulator is not as distinct as the inner cone. A Tip Over Hazard A child or adult can result in the back...
Installation Instructions
Page 15
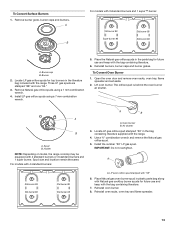
... racks, oven tray, flame spreader and set aside. 2. Three natural gas spuds are stamped "149" and one "165." 3. Install the Natural gas orifice spuds using a 7 mm combination wrench. 4. Spud B. Air shutter 15 Holder NOTE: Depending on model, the range cooktop may be equipped with 3 standard burners and 1 super burner: A. Std Burner 149 Super Burner...
... racks, oven tray, flame spreader and set aside. 2. Three natural gas spuds are stamped "149" and one "165." 3. Install the Natural gas orifice spuds using a 7 mm combination wrench. 4. Spud B. Air shutter 15 Holder NOTE: Depending on model, the range cooktop may be equipped with 3 standard burners and 1 super burner: A. Std Burner 149 Super Burner...
Installation Instructions
Page 16
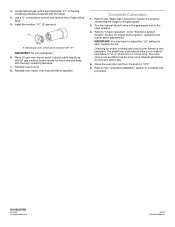
... Reinstall oven racks, oven tray and flame spreader. Refer to the "Make Gas Connection" section for future use and keep with LP gas cooktop burner spuds for properly connecting the range to "Check Operation" in the "Electronic Ignition System" section for each cooktop ...burner. Natural gas oven orifice spud stamped with the range. 4. Reinstall oven burner. 8. Complete Conversion 1. W10032070B © 2009. Locate Natural gas orifice spud stamped "47" in plastic parts bag along with the bag containing ...
... Reinstall oven racks, oven tray and flame spreader. Refer to the "Make Gas Connection" section for future use and keep with LP gas cooktop burner spuds for properly connecting the range to "Check Operation" in the "Electronic Ignition System" section for each cooktop ...burner. Natural gas oven orifice spud stamped with the range. 4. Reinstall oven burner. 8. Complete Conversion 1. W10032070B © 2009. Locate Natural gas orifice spud stamped "47" in plastic parts bag along with the bag containing ...


