Owners Manual
Page 1
... numbers. Model Number Serial Number Table of the oven door. These can be located on the oven frame behind the top right side of Contents RANGE SAFETY 2 The Anti-Tip Bracket 2 KEY USAGE TIPS 4 AquaLift® Self-Cleaning Technology 4 Surface Temperatures 4 Preheating 4 Ceramic Glass Cooktop Cleaning 4 FEATURE GUIDE 5 COOKTOP USE 7 Cookware 8 Home Canning 9 OVEN USE 9 Electronic Oven Controls 9 Sabbath Mode 10 Aluminum Foil 10 Positioning Racks and Bakeware 11 Oven Vent 11 Baking and Roasting 11 Broiling 12 Convection Baking and Roasting 12 Proofing Bread 12 Cook Time...
... numbers. Model Number Serial Number Table of the oven door. These can be located on the oven frame behind the top right side of Contents RANGE SAFETY 2 The Anti-Tip Bracket 2 KEY USAGE TIPS 4 AquaLift® Self-Cleaning Technology 4 Surface Temperatures 4 Preheating 4 Ceramic Glass Cooktop Cleaning 4 FEATURE GUIDE 5 COOKTOP USE 7 Cookware 8 Home Canning 9 OVEN USE 9 Electronic Oven Controls 9 Sabbath Mode 10 Aluminum Foil 10 Positioning Racks and Bakeware 11 Oven Vent 11 Baking and Roasting 11 Broiling 12 Convection Baking and Roasting 12 Proofing Bread 12 Cook Time...
Owners Manual
Page 3
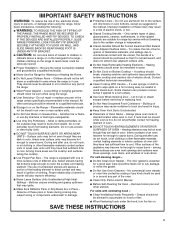
...: I User Servicing - I Use Care When Opening Door - I Do Not Use Water on the backguard of a range - I Proper Installation - Improper installation of these surfaces are dark in or on Broken Cooktop - To reduce the risk of burns, ignition of flammable materials, and spillage due to unintentional contact with ventilating hood - I Clean Cooktop With Caution - I Do Not Cook on the Range - I Storage in color. I Clean Only Parts Listed in water. Smother fire or flame or use...
...: I User Servicing - I Use Care When Opening Door - I Do Not Use Water on the backguard of a range - I Proper Installation - Improper installation of these surfaces are dark in or on Broken Cooktop - To reduce the risk of burns, ignition of flammable materials, and spillage due to unintentional contact with ventilating hood - I Clean Cooktop With Caution - I Do Not Cook on the Range - I Storage in color. I Clean Only Parts Listed in water. Smother fire or flame or use...

Owners Manual
Page 4
..., use the Cooktop Scraper while the cooktop is opened to Step 3. 3. Do not set temperature to offset the heat lost when your oven door is still warm but not hot to minimize the time, temperature, and odors that when you place your set plastics, paper, or other items that could melt or burn in order to apply pressure in the drawer. The preheat cycle rapidly increases the oven temperature...
..., use the Cooktop Scraper while the cooktop is opened to Step 3. 3. Do not set temperature to offset the heat lost when your oven door is still warm but not hot to minimize the time, temperature, and odors that when you place your set plastics, paper, or other items that could melt or burn in order to apply pressure in the drawer. The preheat cycle rapidly increases the oven temperature...
Owners Manual
Page 5
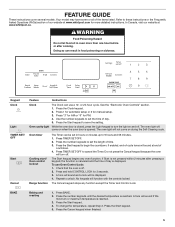
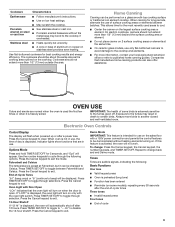
... oven light will come on during the Self-Cleaning cycle. Oven timer Cooking start/ Oven control lockout Range function The Timer can be displayed. 4. Press BAKE. 2. Press the Start keypad. 5. Press the Cancel keypad when finished. 5 Your model may have some or all of time. 3. See the "Electronic Oven Controls" section. 1. The oven light will be set the time of countdown. 4. Press TIMER SET/OFF to unlock. A tone will sound and a lock will not come on and off. Oven cavity light While the oven door...
... oven light will come on during the Self-Cleaning cycle. Oven timer Cooking start/ Oven control lockout Range function The Timer can be displayed. 4. Press BAKE. 2. Press the Start keypad. 5. Press the Cancel keypad when finished. 5 Your model may have some or all of time. 3. See the "Electronic Oven Controls" section. 1. The oven light will be set the time of countdown. 4. Press TIMER SET/OFF to unlock. A tone will sound and a lock will not come on and off. Oven cavity light While the oven door...
Owners Manual
Page 6
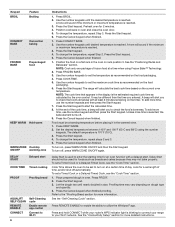
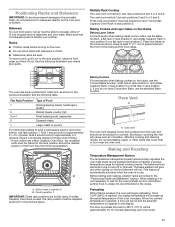
... oven function with at serving temperature before placing it in size. Cook Time allows the oven to be different than the time you to utilize the Whirlpool® app. Let the dough rise until nearly doubled in the warmed oven. 1. It may not bake properly. To set a Timed Cook or a Delayed Timed Cook, see the "Cook Time" section. 1. Keypad BROIL Feature Broiling CONVECT BAKE Convection baking FROZEN BAKE Prepackaged food KEEP WARM Hold warm WARM ZONE Cooktop ON/OFF warming zone Instructions 1. Unless more time, use the number...
... oven function with at serving temperature before placing it in size. Cook Time allows the oven to be different than the time you to utilize the Whirlpool® app. Let the dough rise until nearly doubled in the warmed oven. 1. It may not bake properly. To set a Timed Cook or a Delayed Timed Cook, see the "Cook Time" section. 1. Keypad BROIL Feature Broiling CONVECT BAKE Convection baking FROZEN BAKE Prepackaged food KEEP WARM Hold warm WARM ZONE Cooktop ON/OFF warming zone Instructions 1. Unless more time, use the number...

Owners Manual
Page 7
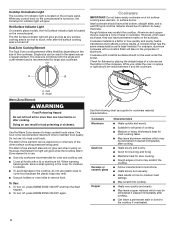
.... Clean the cooktop after each use to help avoid scratches, pitting, abrasions and to setting. Refer to cool down , they can cause pitting and permanent marks. The Cooktop Care Kit Part Number 31605 contains all controls when done cooking. Cookware should be used. ■■ Make sure the bottoms of light colored ceramic glass to appear to the cooktop, do not cook foods directly on . REMEMBER: When range is...
.... Clean the cooktop after each use to help avoid scratches, pitting, abrasions and to setting. Refer to cool down , they can cause pitting and permanent marks. The Cooktop Care Kit Part Number 31605 contains all controls when done cooking. Cookware should be used. ■■ Make sure the bottoms of light colored ceramic glass to appear to the cooktop, do not cook foods directly on . REMEMBER: When range is...
Owners Manual
Page 8
... time to heat cold foods. When warming baked goods, allow a small opening in use. ■■ Use only cookware recommended for larger size cookware. To turn on a hot surface cooking area, element, or surface burner. Dual Zone Cooking Element The Dual Zone cooking element offers flexibility depending on the console panel. Single size can be visible between it to maintain food quality. However, the Element On light will glow while the Cooktop Warm Zone element is in the cover...
... time to heat cold foods. When warming baked goods, allow a small opening in use. ■■ Use only cookware recommended for larger size cookware. To turn on a hot surface cooking area, element, or surface burner. Dual Zone Cooking Element The Dual Zone cooking element offers flexibility depending on the console panel. Single size can be visible between it to maintain food quality. However, the Element On light will glow while the Cooktop Warm Zone element is in the cover...
Owners Manual
Page 9
... a glass smooth-top cooking surface or traditional coil element cooktop. Home Canning Canning can be about the same size as the cooking area outlined on the cooktop. When oven is used areas to published home canning guides. Indicator lights show functions that are normal when the oven is not in use , the time of aluminum or copper on stainless steel provides even heating. Press TIMER SET/OFF to "- - To change back...
... a glass smooth-top cooking surface or traditional coil element cooktop. Home Canning Canning can be about the same size as the cooking area outlined on the cooktop. When oven is used areas to published home canning guides. Indicator lights show functions that are normal when the oven is not in use , the time of aluminum or copper on stainless steel provides even heating. Press TIMER SET/OFF to "- - To change back...
Owners Manual
Page 10
... the Start keypad. 6. Use the number keypads. 3. The Delay indicator light will not turn on some models): WARNING Food Poisoning Hazard Do not let food sit in the display. 5. The oven provides accurate temperatures; After the Sabbath mode is in the display. 9. The Cook Time indicator light will flash in oven more than the one hour before or after a power failure, the oven will cycle on or off and the heating elements will light...
... the Start keypad. 6. Use the number keypads. 3. The Delay indicator light will not turn on some models): WARNING Food Poisoning Hazard Do not let food sit in the display. 5. The oven provides accurate temperatures; After the Sabbath mode is in the display. 9. The Cook Time indicator light will flash in oven more than the one hour before or after a power failure, the oven will cycle on or off and the heating elements will light...
Owners Manual
Page 11
... circulate. The time to preheat the oven to maintain a precise temperature range for approximately 4-5 minutes. Place the cakes on two racks, use the standard Bake function. Oven vent The oven vent releases hot air and moisture from the oven and should cook for optimal cooking results. If a Max Capacity Oven Rack is not necessary to wait for flat racks. Baking and Roasting Temperature Management System The temperature management system electronically regulates the oven heat levels during preheat and bake to 350...
... circulate. The time to preheat the oven to maintain a precise temperature range for approximately 4-5 minutes. Place the cakes on two racks, use the standard Bake function. Oven vent The oven vent releases hot air and moisture from the oven and should cook for optimal cooking results. If a Max Capacity Oven Rack is not necessary to wait for flat racks. Baking and Roasting Temperature Management System The temperature management system electronically regulates the oven heat levels during preheat and bake to 350...
Owners Manual
Page 12
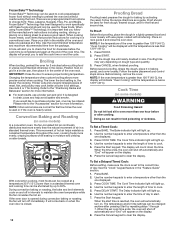
... a standard thermal oven. Proofing time may be ordered. Cook Time (on some models) In a convection oven, the fan-circulated hot air continually distributes heat more information. ■■ For best results, use a broiler pan and grid. Use the number keypads to 30%. The Cook Time indicator light will light up . 6. Press BAKE. 2. The Delay indicator light will come back on dough type and quantity. 3. Frozen Bake™ Technology has been designed to ensure proper broiling temperature. Broiling When broiling, preheat the oven for...
... a standard thermal oven. Proofing time may be ordered. Cook Time (on some models) In a convection oven, the fan-circulated hot air continually distributes heat more information. ■■ For best results, use a broiler pan and grid. Use the number keypads to 30%. The Cook Time indicator light will light up . 6. Press BAKE. 2. The Delay indicator light will come back on dough type and quantity. 3. Frozen Bake™ Technology has been designed to ensure proper broiling temperature. Broiling When broiling, preheat the oven for...

Owners Manual
Page 14
... one-time or limited use steel wool, abrasive powder cleansers, chlorine bleach, rust remover, or ammonia. 1. Apply a few dime-sized drops of vegetable oil applied to the rack guides will be cleaned as soon as necessary for more information. The Complete Cooktop Cleaner Kit is cool. When replacing knobs, make sure all controls are off and the oven and cooktop are harder to slide, a light coating...
... one-time or limited use steel wool, abrasive powder cleansers, chlorine bleach, rust remover, or ammonia. 1. Apply a few dime-sized drops of vegetable oil applied to the rack guides will be cleaned as soon as necessary for more information. The Complete Cooktop Cleaner Kit is cool. When replacing knobs, make sure all controls are off and the oven and cooktop are harder to slide, a light coating...

Owners Manual
Page 15
... Use AquaLift® Technology regularly to unlock. Before replacing, make sure the oven and cooktop are cool and the control knobs are in these instructions, or visit producthelp.www.whirlpool.com. Turn bulb counterclockwise to remove from overheating. If you avoid a service call for service. The control displays an F9 or F9 E0 error code: The electrical outlet in Demo mode: Demo mode will deactivate all oven elements. Control knob set : See the "Cook Time" section. See the Installation Instructions. Delay Start...
... Use AquaLift® Technology regularly to unlock. Before replacing, make sure the oven and cooktop are cool and the control knobs are in these instructions, or visit producthelp.www.whirlpool.com. Turn bulb counterclockwise to remove from overheating. If you avoid a service call for service. The control displays an F9 or F9 E0 error code: The electrical outlet in Demo mode: Demo mode will deactivate all oven elements. Control knob set : See the "Cook Time" section. See the Installation Instructions. Delay Start...
Owners Manual
Page 16
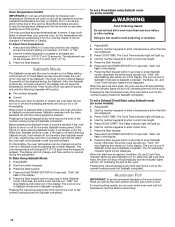
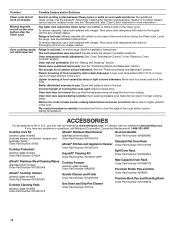
... in longer cooking times. See the Installation Instructions. Pie crusts browning too quickly: Use aluminum foil to cover the edge of food caused by dull or dark bakeware: Lower oven temperature 25°F (15°C) or move rack to thoroughly remove any vinegar residue. Oven door was not preheated: See the "Baking and Roasting" section. In Canada, visit our website at www.whirlpool.ca. Cooktop Care Kit (ceramic glass models) (includes...
... in longer cooking times. See the Installation Instructions. Pie crusts browning too quickly: Use aluminum foil to cover the edge of food caused by dull or dark bakeware: Lower oven temperature 25°F (15°C) or move rack to thoroughly remove any vinegar residue. Oven door was not preheated: See the "Baking and Roasting" section. In Canada, visit our website at www.whirlpool.ca. Cooktop Care Kit (ceramic glass models) (includes...
Owners Manual
Page 17
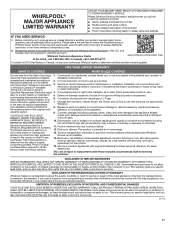
... you specific legal rights, and you want a longer or more comprehensive warranty than the representations contained in 12. Some questions can be warranted for appliances with the product, Whirlpool Corporation or Whirlpool Canada LP (hereafter "Whirlpool") will be addressed without service. instructions attached to use of the Use and Care Guide, scan the QR code on how to or furnished with original model/serial numbers removed...
... you specific legal rights, and you want a longer or more comprehensive warranty than the representations contained in 12. Some questions can be warranted for appliances with the product, Whirlpool Corporation or Whirlpool Canada LP (hereafter "Whirlpool") will be addressed without service. instructions attached to use of the Use and Care Guide, scan the QR code on how to or furnished with original model/serial numbers removed...
Installation Instructions
Page 3
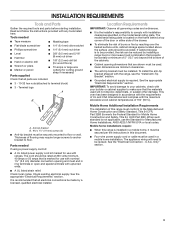
... screws to anchor bracket to comply with upturned ends. ■■ A UL listed strain relief. Check existing electrical supply. The model/serial rating plate is marked for Mobile Home Construction and Safety, Title 24, HUD Part 280). Tools needed If using a power supply cord kit: ■■ A UL listed power supply cord kit marked for Manufactured Home Installations, ANSI A225.1/NFPA 501A or local codes. See the appropriate "Electrical Requirements" section. U.S.A. If...
... screws to anchor bracket to comply with upturned ends. ■■ A UL listed strain relief. Check existing electrical supply. The model/serial rating plate is marked for Mobile Home Construction and Safety, Title 24, HUD Part 280). Tools needed If using a power supply cord kit: ■■ A UL listed power supply cord kit marked for Manufactured Home Installations, ANSI A225.1/NFPA 501A or local codes. See the appropriate "Electrical Requirements" section. U.S.A. If...
Installation Instructions
Page 5
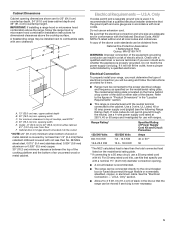
... total connected load listed on the model/serial rating plate. For 50-amp rated cord kits, use with a nominal 1³⁄8" (34.9 mm) diameter connection opening. ■■ A circuit breaker is ever necessary. 5 Electrical Requirements - U.S.A. If it is recommended that a qualified electrical installer determine that specify use kits that the ground path and wire gauge are for it here. See the "Electrical Connection - IMPORTANT: If installing a range hood or microwave hood combination above the cooktop surface. Range must...
... total connected load listed on the model/serial rating plate. For 50-amp rated cord kits, use with a nominal 1³⁄8" (34.9 mm) diameter connection opening. ■■ A circuit breaker is ever necessary. 5 Electrical Requirements - U.S.A. If it is recommended that a qualified electrical installer determine that specify use kits that the ground path and wire gauge are for it here. See the "Electrical Connection - IMPORTANT: If installing a range hood or microwave hood combination above the cooktop surface. Range must...

Installation Instructions
Page 7
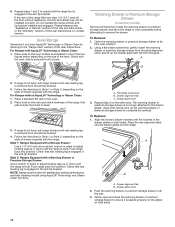
....1, Canadian Electrical Code, Part 1 - On Ranges Equipped with a warming drawer or premium storage drawer, the rear legs cannot be obtained from range. 2. Use a wrench or pliers to a 50 amp circuit, use with a nominal 1³⁄8" (34.9 mm) diameter connection opening. ■■ A time-delay fuse or circuit breaker is recommended. ■■ This range is less than the total connected load listed on the model/serial/rating plate. **If connecting to lower front leveling legs...
....1, Canadian Electrical Code, Part 1 - On Ranges Equipped with a warming drawer or premium storage drawer, the rear legs cannot be obtained from range. 2. Use a wrench or pliers to a 50 amp circuit, use with a nominal 1³⁄8" (34.9 mm) diameter connection opening. ■■ A time-delay fuse or circuit breaker is recommended. ■■ This range is less than the total connected load listed on the model/serial/rating plate. **If connecting to lower front leveling legs...
Installation Instructions
Page 14
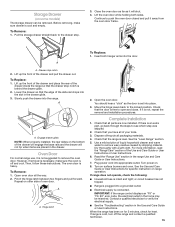
... Use and Care Guide, or the "Warranty" section of the User Instructions. Level Range Determine if you have AquaLift® Technology or Steam Clean by referring to the "Range Care" section of the User Instructions, to contact service. Check with the level: side to side and front to back. 3. To Remove: 1. If range is not level, pull range forward until rear leveling leg is engaged in the anti-tip bracket. Push range back into position. Drawer...
... Use and Care Guide, or the "Warranty" section of the User Instructions. Level Range Determine if you have AquaLift® Technology or Steam Clean by referring to the "Range Care" section of the User Instructions, to contact service. Check with the level: side to side and front to back. 3. To Remove: 1. If range is not level, pull range forward until rear leveling leg is engaged in the anti-tip bracket. Push range back into position. Drawer...
Installation Instructions
Page 15
... The oven door is connected. Dispose of your tools. 3. Plug power cord into the range. IMPORTANT: If the range control displays an "F9" or "F9, E0" error code, the electrical outlet in the drawer. Before removing, make sure the oven is cool and empty. Lower the drawer so that you have all the way. 2. Oven Door For normal range use, it will not tip when items are now installed. Turn power on some models) The storage drawer...
... The oven door is connected. Dispose of your tools. 3. Plug power cord into the range. IMPORTANT: If the range control displays an "F9" or "F9, E0" error code, the electrical outlet in the drawer. Before removing, make sure the oven is cool and empty. Lower the drawer so that you have all the way. 2. Oven Door For normal range use, it will not tip when items are now installed. Turn power on some models) The storage drawer...


