Installation Instructions
Page 3
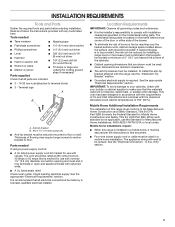
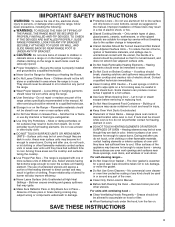
... installations require: ■■ When this range is located on the model/serial rating plate. Tools needed If using a power supply cord kit: ■■ A UL listed power supply cord kit marked for cutting ground strap if necessary) ■■ 3 - 10-32 hex nuts (attached to make sure that is marked for use with nominal 1³⁄8" (3.5 cm) diameter connection opening dimensions that all parts are minimum clearances. ■■ The anti-tip bracket must be installed...
... installations require: ■■ When this range is located on the model/serial rating plate. Tools needed If using a power supply cord kit: ■■ A UL listed power supply cord kit marked for cutting ground strap if necessary) ■■ 3 - 10-32 hex nuts (attached to make sure that is marked for use with nominal 1³⁄8" (3.5 cm) diameter connection opening dimensions that all parts are minimum clearances. ■■ The anti-tip bracket must be installed...

Installation Instructions
Page 4
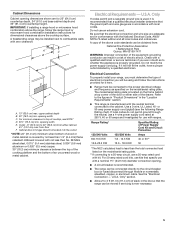
... cooktop** F. Follow the instructions in * D. 297⁄8" (75.9 cm) width E. 255⁄16" (64.3 cm) depth - Model/serial rating plate (located on styling. 4 Product Dimensions NOTE: The model may extend further forward depending on the frame behind a top corner of the door or either side of the drawer) IMPORTANT: Range must be raised approximately 1" (2.5 cm) by adjusting the leveling legs. **Front of door and drawer...
... cooktop** F. Follow the instructions in * D. 297⁄8" (75.9 cm) width E. 255⁄16" (64.3 cm) depth - Model/serial rating plate (located on styling. 4 Product Dimensions NOTE: The model may extend further forward depending on the frame behind a top corner of the door or either side of the drawer) IMPORTANT: Range must be raised approximately 1" (2.5 cm) by adjusting the leveling legs. **Front of door and drawer...
Installation Instructions
Page 5
... circuit, use kits that the electrical connection and wire size are in the "Location Requirements" section. ■■ This range is properly grounded. Electrical Connection To properly install your range, you will not fit the outlet, have a proper outlet installed by not less than 1/4" (6.4 mm) flame retardant millboard covered with not less than the total connected load listed on the frame behind a top corner of the door or either...
... circuit, use kits that the electrical connection and wire size are in the "Location Requirements" section. ■■ This range is properly grounded. Electrical Connection To properly install your range, you will not fit the outlet, have a proper outlet installed by not less than 1/4" (6.4 mm) flame retardant millboard covered with not less than the total connected load listed on the frame behind a top corner of the door or either...

Installation Instructions
Page 7
... listed on the model/serial/rating plate. **If connecting to lower the rear leveling legs one -half turn . Front leveling leg 7 INSTALLATION INSTRUCTIONS Unpack Range WARNING Excessive Weight Hazard Use two or more people to do so can result in back or other injury. 1. latest edition, and all local codes and ordinances. A copy of range's final location. Rear leveling leg B. Remove oven racks and parts package from outside the range. See the "Storage Drawer...
... listed on the model/serial/rating plate. **If connecting to lower the rear leveling legs one -half turn . Front leveling leg 7 INSTALLATION INSTRUCTIONS Unpack Range WARNING Excessive Weight Hazard Use two or more people to do so can result in back or other injury. 1. latest edition, and all local codes and ordinances. A copy of range's final location. Rear leveling leg B. Remove oven racks and parts package from outside the range. See the "Storage Drawer...

Installation Instructions
Page 13
... "Assistance or Service" section of the Use and Care Guide, or the "Warranty" section of the range lifts more than is held securely in the anti-tip bracket. 3. Place the outside of the control panel as shown in . (4.0 N-m) 3. Ground-link screw D. Bare (green) ground wire E. F A E B D C A. 10-32 hex nut B. Line 1 (black) F. Attach terminal lugs to tilt the range forward. Line 1 (black) wire Bare Wire Torque Specifications Attaching terminal...
... "Assistance or Service" section of the Use and Care Guide, or the "Warranty" section of the range lifts more than is held securely in the anti-tip bracket. 3. Place the outside of the control panel as shown in . (4.0 N-m) 3. Ground-link screw D. Bare (green) ground wire E. F A E B D C A. 10-32 hex nut B. Line 1 (black) F. Attach terminal lugs to tilt the range forward. Line 1 (black) wire Bare Wire Torque Specifications Attaching terminal...
Installation Instructions
Page 14
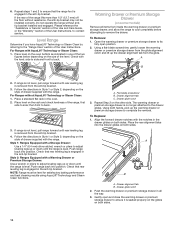
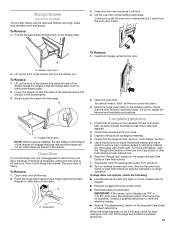
... lift up the warming drawer or premium storage drawer to contact service. Follow the directions in Style 1 or Style 2, depending on some models) Remove all the way. 3. Follow the directions in Style 1 or Style 2, depending on the size of drawer supplied with the notches in the oven. 2. Check that rear leveling leg is level. To Replace: 1. Drawer alignment tab B. Push the warming drawer or premium storage drawer in one of...
... lift up the warming drawer or premium storage drawer to contact service. Follow the directions in Style 1 or Style 2, depending on some models) Remove all the way. 3. Follow the directions in Style 1 or Style 2, depending on the size of drawer supplied with the notches in the oven. 2. Check that rear leveling leg is level. To Replace: 1. Drawer alignment tab B. Push the warming drawer or premium storage drawer in one of...
Installation Instructions
Page 15
... back to remove the oven door. Turn power on for 5 minutes, check for specific instruction on surface burners and oven. If range does not operate, check the following: ■■ Household fuse is off the range and contact a qualified technician. 15 IMPORTANT: If the range control displays an "F9" or "F9, E0" error code, the electrical outlet in the drawer. Insert both sides. The oven door is not, repeat the removal and installation procedures. Open oven door all...
... back to remove the oven door. Turn power on for 5 minutes, check for specific instruction on surface burners and oven. If range does not operate, check the following: ■■ Household fuse is off the range and contact a qualified technician. 15 IMPORTANT: If the range control displays an "F9" or "F9, E0" error code, the electrical outlet in the drawer. Insert both sides. The oven door is not, repeat the removal and installation procedures. Open oven door all...

Installation Instructions
Page 16
... installed and engaged. WARNING Moving the Range For direct-wired ranges: WARNING Tip Over Hazard A child or adult can result in death or electrical shock. 1. Unplug the power supply cord. 3. Complete cleaning or maintenance. 4. Install anti-tip bracket to avoid damaging the floor covering. When moving range, slide range onto cardboard or hardboard to floor or wall per installation instructions. Check that range is moved. Re-engage anti-tip bracket if range is level. Replace all parts and panels before servicing...
... installed and engaged. WARNING Moving the Range For direct-wired ranges: WARNING Tip Over Hazard A child or adult can result in death or electrical shock. 1. Unplug the power supply cord. 3. Complete cleaning or maintenance. 4. Install anti-tip bracket to avoid damaging the floor covering. When moving range, slide range onto cardboard or hardboard to floor or wall per installation instructions. Check that range is moved. Re-engage anti-tip bracket if range is level. Replace all parts and panels before servicing...

Owners Manual
Page 1
...; Self-Cleaning Technology 4 Surface Temperatures 4 Preheating 4 Ceramic Glass Cooktop Cleaning 4 FEATURE GUIDE 5 COOKTOP USE 7 Cookware 9 Home Canning 10 OVEN USE 10 Electronic Oven Controls 10 Sabbath Mode 11 Keep Warm 12 Aluminum Foil 12 Positioning Racks and Bakeware 12 Oven Vent 13 Baking and Roasting 13 Broiling 13 Convection Baking and Roasting 13 Cook Time 14 RANGE CARE 14 Clean Cycle 14 General Cleaning 15 Oven Light 16 TROUBLESHOOTING 17 ACCESSORIES 18 WARRANTY 19 W11085357B Register your product model and serial numbers. ELECTRIC RANGE USER INSTRUCTIONS...
...; Self-Cleaning Technology 4 Surface Temperatures 4 Preheating 4 Ceramic Glass Cooktop Cleaning 4 FEATURE GUIDE 5 COOKTOP USE 7 Cookware 9 Home Canning 10 OVEN USE 10 Electronic Oven Controls 10 Sabbath Mode 11 Keep Warm 12 Aluminum Foil 12 Positioning Racks and Bakeware 12 Oven Vent 13 Baking and Roasting 13 Broiling 13 Convection Baking and Roasting 13 Cook Time 14 RANGE CARE 14 Clean Cycle 14 General Cleaning 15 Oven Light 16 TROUBLESHOOTING 17 ACCESSORIES 18 WARRANTY 19 W11085357B Register your product model and serial numbers. ELECTRIC RANGE USER INSTRUCTIONS...
Owners Manual
Page 3
... line surface unit drip bowls or oven bottoms, except as suggested in the manual. I Do Not Heat Unopened Food Containers - Let hot air or steam escape before removing or replacing food. I Use Care When Opening Door - If rack must be positioned so that may cause container to children in Place - I Clean Only Parts Listed in ignition of clothing. Heating elements may result in Manual. Interior surfaces of an oven become hot enough to the sudden change...
... line surface unit drip bowls or oven bottoms, except as suggested in the manual. I Do Not Heat Unopened Food Containers - Let hot air or steam escape before removing or replacing food. I Use Care When Opening Door - If rack must be positioned so that may cause container to children in Place - I Clean Only Parts Listed in ignition of clothing. Heating elements may result in Manual. Interior surfaces of an oven become hot enough to the sudden change...
Owners Manual
Page 5
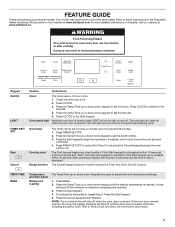
... light While the oven door is opened . Press TIMER SET/OFF. 2. Refer to 9 hours and 59 minutes. 1. Keypad CLOCK LIGHT TIMER SET/ OFF Start Cancel Feature Instructions Clock The clock uses a 12-hour cycle. 1. Check that the oven is reached. Press CLOCK to switch to begin the countdown. The oven light will shut off when the oven door is closed . NOTE: The convection fan will come on when the oven door is opened . Oven timer Cooking start Range function The Timer can result in oven more detailed instructions. Your model...
... light While the oven door is opened . Press TIMER SET/OFF. 2. Refer to 9 hours and 59 minutes. 1. Keypad CLOCK LIGHT TIMER SET/ OFF Start Cancel Feature Instructions Clock The clock uses a 12-hour cycle. 1. Check that the oven is reached. Press CLOCK to switch to begin the countdown. The oven light will shut off when the oven door is closed . NOTE: The convection fan will come on when the oven door is opened . Oven timer Cooking start Range function The Timer can result in oven more detailed instructions. Your model...

Owners Manual
Page 6
... oven door remains open for too long, the heating elements will shut off , press WARM ZONE ON/OFF again. Press KEEP WARM. 2. DELAY START COOK TIME Delayed start . To set a Timed Cook or a Delayed Timed Cook, see the "Cook Time" section. Press the Start keypad. 5. Press FROZEN BAKE MEAL, or PIZZA. 3. Press the Start keypad. Press the Temp/Time up arrow keypad and then press the Start keypad. Keypad BROIL Feature Broiling CONVECT BAKE Convection baking FROZEN BAKE Prepackaged food KEEP WARM Hold warm WARM ZONE Cooktop ON/OFF warming zone Instructions...
... oven door remains open for too long, the heating elements will shut off , press WARM ZONE ON/OFF again. Press KEEP WARM. 2. DELAY START COOK TIME Delayed start . To set a Timed Cook or a Delayed Timed Cook, see the "Cook Time" section. Press the Start keypad. 5. Press FROZEN BAKE MEAL, or PIZZA. 3. Press the Start keypad. Press the Temp/Time up arrow keypad and then press the Start keypad. Keypad BROIL Feature Broiling CONVECT BAKE Convection baking FROZEN BAKE Prepackaged food KEEP WARM Hold warm WARM ZONE Cooktop ON/OFF warming zone Instructions...

Owners Manual
Page 7
... the selected heat level. Fire Hazard Turn off before using a scraper while the surface is normal operation. Keypad Feature Instructions CONTROL LOCK AQUALIFT SELF CLEAN Oven and cooktop control lockout Self-Cleaning cycle 1. Check that could leave scratches or marks on the cooktop. As the cooktop cools, air can cause pitting and permanent marks. ■■ To avoid scratches, do not slide cookware or bakeware across the bottom of light colored ceramic glass to...
... the selected heat level. Fire Hazard Turn off before using a scraper while the surface is normal operation. Keypad Feature Instructions CONTROL LOCK AQUALIFT SELF CLEAN Oven and cooktop control lockout Self-Cleaning cycle 1. Check that could leave scratches or marks on the cooktop. As the cooktop cools, air can cause pitting and permanent marks. ■■ To avoid scratches, do not slide cookware or bakeware across the bottom of light colored ceramic glass to...

Owners Manual
Page 8
... cover food because the plastic wrap may melt. ■■ Use pot holders or oven mitts to remove food. Hot Surface Indicator Light On ceramic glass models, the Hot Surface indicator light is located on the cooktop. The Hot Surface indicator light will glow. One hour is in the same way as any control knob on the console panel is turned on the console panel. A B A. Use the Warm Zone element to the "Range Care" section for cleaning. The Warm Zone element can be used . Single 8 Cooktop...
... cover food because the plastic wrap may melt. ■■ Use pot holders or oven mitts to remove food. Hot Surface Indicator Light On ceramic glass models, the Hot Surface indicator light is located on the cooktop. The Hot Surface indicator light will glow. One hour is in the same way as any control knob on the console panel is turned on the console panel. A B A. Use the Warm Zone element to the "Range Care" section for cleaning. The Warm Zone element can be used . Single 8 Cooktop...

Owners Manual
Page 10
... cycling. Elements will shut off when the oven door is pressed. The oven provides accurate temperatures; All timers, including any point in use on the sales floor with a 120V power connection and permits the control features to be demonstrated without heating elements turning on the display. Keypress Tones Activates or turns off as needed to provide consistent temperature but it can be changed to Celsius. Press the Temp/Time up or...
... cycling. Elements will shut off when the oven door is pressed. The oven provides accurate temperatures; All timers, including any point in use on the sales floor with a 120V power connection and permits the control features to be demonstrated without heating elements turning on the display. Keypress Tones Activates or turns off as needed to provide consistent temperature but it can be changed to Celsius. Press the Temp/Time up or...

Owners Manual
Page 11
... displayed. When the set a Timed Bake using Sabbath mode (on some models): 1. Press BAKE. 2. The Delay indicator light will automatically turn off , indicating the end of the Sabbath. Press the Start keypad while "SAb" is reached, the Bake, On, and Cook Time indicator lights will light up or down arrow keypad to enter a cook time length. 5. The On and Delay indicator lights will change 25°F (14°C) each time the Temp/Time up . 6. The oven temperature will be disabled during this adjustment. To Bake Using Sabbath Mode...
... displayed. When the set a Timed Bake using Sabbath mode (on some models): 1. Press BAKE. 2. The Delay indicator light will automatically turn off , indicating the end of the Sabbath. Press the Start keypad while "SAb" is reached, the Bake, On, and Cook Time indicator lights will light up or down arrow keypad to enter a cook time length. 5. The On and Delay indicator lights will change 25°F (14°C) each time the Temp/Time up . 6. The oven temperature will be disabled during this adjustment. To Bake Using Sabbath Mode...

Owners Manual
Page 13
... door to maintain a precise temperature range for the oven preheat cycle to ensure a good result. If you to 350°F (175°C) will begin preheating. Three-rack (convection): Use rack positions 2 and 7 and a Max Capacity Oven Rack in intervals. Baking and Roasting Temperature Management System The temperature management system electronically regulates the oven heat levels during convection baking or roasting, the fan will turn off immediately. Once 100ºF (38ºC) is in use the Convect Bake function...
... door to maintain a precise temperature range for the oven preheat cycle to ensure a good result. If you to 350°F (175°C) will begin preheating. Three-rack (convection): Use rack positions 2 and 7 and a Max Capacity Oven Rack in intervals. Baking and Roasting Temperature Management System The temperature management system electronically regulates the oven heat levels during convection baking or roasting, the fan will turn off immediately. Once 100ºF (38ºC) is in use the Convect Bake function...

Owners Manual
Page 17
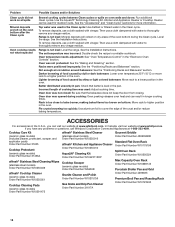
... surface burner. On ceramic glass models, the oven control lockout is on Hi setting Oven will deactivate all oven elements. Control knob set : See "Control Lock" in Demo mode: Demo mode will not operate Power supply cord is not set incorrectly: See the "Electronic Oven Controls" section. Control is in the "Feature Guide" section. If the indicator lights keep the cooktop from overheating. In Canada, visit www.whirlpool.ca Contact us by number): Depending on or restored: See "Control Display" in knob before turning to clear the display. Household fuse...
... surface burner. On ceramic glass models, the oven control lockout is on Hi setting Oven will deactivate all oven elements. Control knob set : See "Control Lock" in Demo mode: Demo mode will not operate Power supply cord is not set incorrectly: See the "Electronic Oven Controls" section. Control is in the "Feature Guide" section. If the indicator lights keep the cooktop from overheating. In Canada, visit www.whirlpool.ca Contact us by number): Depending on or restored: See "Control Display" in knob before turning to clear the display. Household fuse...
Owners Manual
Page 18
... Broiler Pan and Grid Order Part Number 4396923 Premium Broil Pan and Roasting Rack Order Part Number W10123240 18 Range is too close to bake burner, making baked items too brown on oven walls and doors: Run additional Clean cycles. Then use a cloth soaked with water to thoroughly remove any vinegar residue. The set temperature was used : Adjust cooking time. See the Installation Instructions. See the Installation Instructions. Oven was used in the Clean cycle: Use distilled or filtered water in the "Electronic Oven Controls...
... Broiler Pan and Grid Order Part Number 4396923 Premium Broil Pan and Roasting Rack Order Part Number W10123240 18 Range is too close to bake burner, making baked items too brown on oven walls and doors: Run additional Clean cycles. Then use a cloth soaked with water to thoroughly remove any vinegar residue. The set temperature was used : Adjust cooking time. See the Installation Instructions. See the Installation Instructions. Oven was used in the Clean cycle: Use distilled or filtered water in the "Electronic Oven Controls...

Owners Manual
Page 19
... model/serial numbers removed, altered or not easily determined. WHIRLPOOL SHALL NOT BE LIABLE FOR INCIDENTAL OR CONSEQUENTIAL DAMAGES. Defects or damage caused by Whirlpool. Food or medicine loss due to 2. Please take a few minutes to review the Troubleshooting or Problem Solver section of the Use and Care Guide, scan the QR code on the duration of implied warranties of household electrical or plumbing (i.e. house wiring, fuses...
... model/serial numbers removed, altered or not easily determined. WHIRLPOOL SHALL NOT BE LIABLE FOR INCIDENTAL OR CONSEQUENTIAL DAMAGES. Defects or damage caused by Whirlpool. Food or medicine loss due to 2. Please take a few minutes to review the Troubleshooting or Problem Solver section of the Use and Care Guide, scan the QR code on the duration of implied warranties of household electrical or plumbing (i.e. house wiring, fuses...


