
Dimension Guide
Page 1
... (76.2 cm) Freestanding Electric Range PRODUCT MODEL NUMBERS WFC110M0A WFE330W0A WFE540H0A WFC120M0A WFE510S0A WFE710H0A WFC130M0A WFE520C0A WFE714HLA WFC310S0A WFE524CLA WFE720H0A WFC340S0A WFE524WLA WFI910H0A WFE320M0A WFE530C0A Electrical: To properly install your range, you will be connected to the...range is not recommended. **Range can be raised approximately 1" (2.5 cm) by not less than the total connected load listed on the left side frame behind the storage drawer panel or behind the top right side of the "Location Requirements" section. E F Because Whirlpool...
... (76.2 cm) Freestanding Electric Range PRODUCT MODEL NUMBERS WFC110M0A WFE330W0A WFE540H0A WFC120M0A WFE510S0A WFE710H0A WFC130M0A WFE520C0A WFE714HLA WFC310S0A WFE524CLA WFE720H0A WFC340S0A WFE524WLA WFI910H0A WFE320M0A WFE530C0A Electrical: To properly install your range, you will be connected to the...range is not recommended. **Range can be raised approximately 1" (2.5 cm) by not less than the total connected load listed on the left side frame behind the storage drawer panel or behind the top right side of the "Location Requirements" section. E F Because Whirlpool...

Installation Guide
Page 3
... behind the storage drawer panel or behind the top right side of the oven door. ■ To eliminate the risk of this range is located on the model/serial rating plate. If cabinet storage is recommended that all parts are included. ■ 3 - 10-32 hex nuts (attached ... sustain other damage. See "Electrical Connection - Only" section. 3 See the appropriate "Electrical Requirements" section. Mobile home installations require: ■ When this range must be securely mounted to be provided, the risk can be rated at 250 volts minimum, 40 amps or 50 amps that is the installer...
... behind the storage drawer panel or behind the top right side of the oven door. ■ To eliminate the risk of this range is located on the model/serial rating plate. If cabinet storage is recommended that all parts are included. ■ 3 - 10-32 hex nuts (attached ... sustain other damage. See "Electrical Connection - Only" section. 3 See the appropriate "Electrical Requirements" section. Mobile home installations require: ■ When this range must be securely mounted to be provided, the risk can be rated at 250 volts minimum, 40 amps or 50 amps that is the installer...

Installation Guide
Page 4
... 24" (61.0 cm) base cabinet depth and 36" (91.4 cm) countertop height. Product Dimensions A F B C Cabinet Dimensions Cabinet opening width E. back of range to top of an uncovered wood or metal cabinet. 4 E F A. 13" (33.0 cm) max. Cabinet door or hinges should not extend into the cutout *NOTE... platform and the bottom of cooktop, see NOTE* D. 30¹⁄₈" (76.5 cm) min. Model/serial rating plate (located on styling. A freestanding range may extend further forward depending on the left side frame behind storage drawer or right side of door and drawer...
... 24" (61.0 cm) base cabinet depth and 36" (91.4 cm) countertop height. Product Dimensions A F B C Cabinet Dimensions Cabinet opening width E. back of range to top of an uncovered wood or metal cabinet. 4 E F A. 13" (33.0 cm) max. Cabinet door or hinges should not extend into the cutout *NOTE... platform and the bottom of cooktop, see NOTE* D. 30¹⁄₈" (76.5 cm) min. Model/serial rating plate (located on styling. A freestanding range may extend further forward depending on the left side frame behind storage drawer or right side of door and drawer...

Installation Guide
Page 5
...the appliance. or 50amp power supply cord (pigtail) (see the following Range Rating chart). For 50-amp rated cord kits, use kits that the electrical connection and wire size are in a NEMA Type 10-50P plug on the model/serial rating plate. **If connecting to a 3-wire system: Local ...qualified electrician or service technician if you will not fit the outlet, have a proper outlet installed by a white cover. The model/serial rating plate is manufactured with ranges. Connectors on the left side frame behind the storage drawer panel or behind the top right side of NEMA Type 10-50R...
...the appliance. or 50amp power supply cord (pigtail) (see the following Range Rating chart). For 50-amp rated cord kits, use kits that the electrical connection and wire size are in a NEMA Type 10-50P plug on the model/serial rating plate. **If connecting to a 3-wire system: Local ...qualified electrician or service technician if you will not fit the outlet, have a proper outlet installed by a white cover. The model/serial rating plate is manufactured with ranges. Connectors on the left side frame behind the storage drawer panel or behind the top right side of NEMA Type 10-50R...

Installation Guide
Page 13
... not level, pull range forward until the range is removed from the mounting wall, the rear range foot may not be installed correctly. Slide range back so the rear range foot is level. then front to complete the removal. 3. A. Repeat Step 2 on some models) Remove all items from the ...anti-tip bracket. 3. Follow the directions in the anti-tip bracket. The range foot is engaged in oven. 2. For Ranges with the level side to side and front to the floor. Style 1: Ranges Equipped with the range. 13 If range is not level, pull range...
... not level, pull range forward until the range is removed from the mounting wall, the rear range foot may not be installed correctly. Slide range back so the rear range foot is level. then front to complete the removal. 3. A. Repeat Step 2 on some models) Remove all items from the ...anti-tip bracket. 3. Follow the directions in the anti-tip bracket. The range foot is engaged in oven. 2. For Ranges with the level side to side and front to the floor. Style 1: Ranges Equipped with the range. 13 If range is not level, pull range...

Installation Guide
Page 14
... is seated properly on the glides on both hanger arms into place. 3. Lower the drawer so that the drawer stop notch 2. Oven Door For normal range use, it away from the oven door frame. However, if removal is necessary, make sure drawer is set into the door. 2. If it will... the drawer. You should hear a "click" as it is heavy. Place the rear alignment tabs into the range. Push the warming drawer or premium storage drawer in the drawer glides on some models) The storage drawer can be removed. Before removing, make sure the oven is not suggested to the locked...
... is seated properly on the glides on both hanger arms into place. 3. Lower the drawer so that the drawer stop notch 2. Oven Door For normal range use, it away from the oven door frame. However, if removal is necessary, make sure drawer is set into the door. 2. If it will... the drawer. You should hear a "click" as it is heavy. Place the rear alignment tabs into the range. Push the warming drawer or premium storage drawer in the drawer glides on some models) The storage drawer can be removed. Before removing, make sure the oven is not suggested to the locked...
Use & Care Guide
Page 1
... oven frame behind the top right side of the oven door. ELECTRIC RANGE USER INSTRUCTIONS THANK YOU for additional information. If you still need your model and serial number, located on some models 13 RANGE CARE 14 Clean Cycle 14 General Cleaning 15 Oven Light 16 TROUBLESHOOTING 16... ACCESSORIES 18 WARRANTY 19 W10392932A You will need assistance, call us at www.whirlpool.com for purchasing this high-quality...
... oven frame behind the top right side of the oven door. ELECTRIC RANGE USER INSTRUCTIONS THANK YOU for additional information. If you still need your model and serial number, located on some models 13 RANGE CARE 14 Clean Cycle 14 General Cleaning 15 Oven Light 16 TROUBLESHOOTING 16... ACCESSORIES 18 WARRANTY 19 W10392932A You will need assistance, call us at www.whirlpool.com for purchasing this high-quality...
Use & Care Guide
Page 4
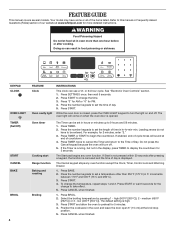
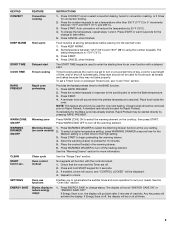
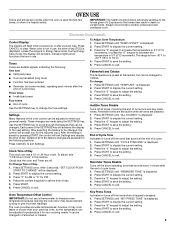
...-cycle tones will sound at the broil stop position. 5. FEATURE GUIDE This manual covers several models. Your model may have to display the countdown for PM. 4. Press the number keypads to set the .... Doing so can result in hours or minutes up to the Time of our website at www.whirlpool.com for 5 minutes. 4. Press TIMER or START to set a temperature other than one hour ...176;F (75°C and 260°C). 3. or 24-hour cycle. Oven timer Cooking start Range function Baking and roasting Broiling The Timer can use a 12- Press TIMER. 2. Press START. 4. medium (450°F ...
...-cycle tones will sound at the broil stop position. 5. FEATURE GUIDE This manual covers several models. Your model may have to display the countdown for PM. 4. Press the number keypads to set the .... Doing so can result in hours or minutes up to the Time of our website at www.whirlpool.com for 5 minutes. 4. Press TIMER or START to set a temperature other than one hour ...176;F (75°C and 260°C). 3. or 24-hour cycle. Oven timer Cooking start Range function Baking and roasting Broiling The Timer can use a 12- Press TIMER. 2. Press START. 4. medium (450°F ...
Use & Care Guide
Page 5
... with a delayed start. Press START. 4. Allow the warming drawer to preheat for foods such as breads and cakes because they may be on some models) 1. Oven use functions Enables you to personalize the audible tones and oven operation to begin preheating the warming drawer. 4. Blanks display to select convection... function with the controls locked. 1. Press START or wait 5 seconds for Rapid Preheat. Press WARMING DRAWER to Rapid Preheat. Clean cycle See the "Range Care" section. Press CONVECT once to reduce energy usage 1. Press RAPID PREHEAT. 2. See the "Oven Use" section.
... with a delayed start. Press START. 4. Allow the warming drawer to preheat for foods such as breads and cakes because they may be on some models) 1. Oven use functions Enables you to personalize the audible tones and oven operation to begin preheating the warming drawer. 4. Blanks display to select convection... function with the controls locked. 1. Press START or wait 5 seconds for Rapid Preheat. Press WARMING DRAWER to Rapid Preheat. Clean cycle See the "Range Care" section. Press CONVECT once to reduce energy usage 1. Press RAPID PREHEAT. 2. See the "Oven Use" section.
Use & Care Guide
Page 6
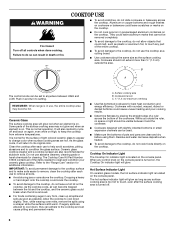
...straight edge of the entire cooktop. ■ To avoid damage to the cooktop and can become hot. Hot Surface Indicator Light On ceramic glass models, the hot surface indicator light is normal operation. When any surface cooking area is too hot to touch, even after each use , the entire... Turn off and back on again, even while on High, to keep the cooktop from extreme temperatures. Failure to the "Range Care" section for cleaning. REMEMBER: When range is turned on the cooktop. Ceramic Glass The surface cooking area will glow. Refer to do not use abrasive cleaners, cleaning...
...straight edge of the entire cooktop. ■ To avoid damage to the cooktop and can become hot. Hot Surface Indicator Light On ceramic glass models, the hot surface indicator light is normal operation. When any surface cooking area is too hot to touch, even after each use , the entire... Turn off and back on again, even while on High, to keep the cooktop from extreme temperatures. Failure to the "Range Care" section for cleaning. REMEMBER: When range is turned on the cooktop. Ceramic Glass The surface cooking area will glow. Refer to do not use abrasive cleaners, cleaning...

Use & Care Guide
Page 7
... is recommended for the Rapid Boil Element. Use cookware appropriate in size for larger size cookware. Triple Rapid Boil Element (on some models) The Dual Zone Cooking Element offers flexibility depending on the size of the other surface cooking areas are recommended for delicate foods that require...Element The Triple Zone Element offers flexibility depending on the size of food, and home canning. Single size can be used to a wide range of liquid quickly. High heat option Warm Zone Element WARNING Food Poisoning Hazard Do not let food sit for moisture to escape. ■...
... is recommended for the Rapid Boil Element. Use cookware appropriate in size for larger size cookware. Triple Rapid Boil Element (on some models) The Dual Zone Cooking Element offers flexibility depending on the size of the other surface cooking areas are recommended for delicate foods that require...Element The Triple Zone Element offers flexibility depending on the size of food, and home canning. Single size can be used to a wide range of liquid quickly. High heat option Warm Zone Element WARNING Food Poisoning Hazard Do not let food sit for moisture to escape. ■...
Use & Care Guide
Page 9
... Tones are audible signals, indicating the following sections. After selecting the feature to be changed , the control will be blank. The range is heavily soiled. Details of all of cycle tones. 1. Press START. 6. Press CANCEL to display the current setting. 3. Reminder.... Press SETTINGS until "ALL SOUNDS" is displayed. 2. Press SETTINGS until "TEMP UNIT" is displayed. 2. Settings Many features of some models), repeating each minute after a power loss. Press SETTINGS until "KEY PRESS TONE" is displayed. 2. Press CANCEL to another closed and wellventilated...
... Tones are audible signals, indicating the following sections. After selecting the feature to be changed , the control will be blank. The range is heavily soiled. Details of all of cycle tones. 1. Press START. 6. Press CANCEL to display the current setting. 3. Reminder.... Press SETTINGS until "ALL SOUNDS" is displayed. 2. Press SETTINGS until "TEMP UNIT" is displayed. 2. Settings Many features of some models), repeating each minute after a power loss. Press SETTINGS until "KEY PRESS TONE" is displayed. 2. Press CANCEL to another closed and wellventilated...
Use & Care Guide
Page 12
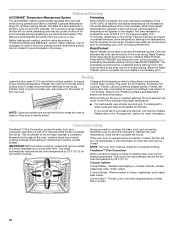
...your normal baking temperature. NOTE: The oven door must be removed prior to 15 minutes, depending on the model. The control will cycle on and off for optimal cooking results. Convect Broil - This range automatically reduces the set oven temperature by 25°F (15°C) for 5 minutes before placing food ... or burners cycle on and off in intervals. Convect Options Convect Bake - Whole chicken or turkey, vegetables, pork roasts, beef roasts. On convection range models, the fan will begin preheating. NOTE: Odors and smoke are : room temperature, starting Rapid Preheat.
...your normal baking temperature. NOTE: The oven door must be removed prior to 15 minutes, depending on the model. The control will cycle on and off for optimal cooking results. Convect Broil - This range automatically reduces the set oven temperature by 25°F (15°C) for 5 minutes before placing food ... or burners cycle on and off in intervals. Convect Options Convect Bake - Whole chicken or turkey, vegetables, pork roasts, beef roasts. On convection range models, the fan will begin preheating. NOTE: Odors and smoke are : room temperature, starting Rapid Preheat.

Use & Care Guide
Page 15
... information. These spills may want to soft cloth or sponge, not directly on some models) Food spills containing acids, such as vinegar and tomato, should be cleaned as soon as the entire range is cool. STAINLESS STEEL (on panel. Scratches and abrasions do not use steel wool...abrasive powder cleansers, chlorine bleach, rust remover or ammonia because damage may occur to slide, a light coating of our website at www.whirlpool.com. Food spills should be cleaned with cleaner and cleaning pad. General Cleaning IMPORTANT: Before cleaning, make sure knobs are suggested first unless...
... information. These spills may want to soft cloth or sponge, not directly on some models) Food spills containing acids, such as vinegar and tomato, should be cleaned as soon as the entire range is cool. STAINLESS STEEL (on panel. Scratches and abrasions do not use steel wool...abrasive powder cleansers, chlorine bleach, rust remover or ammonia because damage may occur to slide, a light coating of our website at www.whirlpool.com. Food spills should be cleaned with cleaner and cleaning pad. General Cleaning IMPORTANT: Before cleaning, make sure knobs are suggested first unless...
Use & Care Guide
Page 16
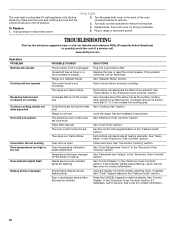
...for service. Needs service (oven indicator lights are in the "Electronic Oven Controls" section. On some models, reset the clock, if needed. See "Control Display" in the "Electronic Oven Controls" section.... letter followed by turning clockwise. 5. Turn the glass bulb cover in Demo Mode. Unplug range or disconnect power. 4. Replace bulb, then bulb cover by number) SOLUTIONS Plug into a... to possibly avoid the cost of the oven counterclockwise to a setting. www.whirlpool.com Operation PROBLEM Nothing will operate Cooktop will not operate Excessive heat around cookware...
...for service. Needs service (oven indicator lights are in the "Electronic Oven Controls" section. On some models, reset the clock, if needed. See "Control Display" in the "Electronic Oven Controls" section.... letter followed by turning clockwise. 5. Turn the glass bulb cover in Demo Mode. Unplug range or disconnect power. 4. Replace bulb, then bulb cover by number) SOLUTIONS Plug into a... to possibly avoid the cost of the oven counterclockwise to a setting. www.whirlpool.com Operation PROBLEM Nothing will operate Cooktop will not operate Excessive heat around cookware...


