Owners Manual 1
Page 1
... SAFETY 2 The Anti-Tip Bracket 2 FEATURE GUIDE 4 COOKTOP USE 7 Cookware 8 Home Canning 9 OVEN USE 10 Electronic Oven Controls 10 Sabbath Mode 10 Keep Warm 11 Aluminum Foil 12 Positioning Racks and Bakeware 12 Oven Vent 12 Baking and Roasting 12 Broiling 13 Convection Baking and Roasting 13 Cook Time 13 RANGE CARE 14 Self-Cleaning Cycle 14 General Cleaning 14 Oven Light 15 TROUBLESHOOTING 16 ACCESSORIES 18 WARRANTY 19 W11102909D Model Number Serial Number Para una versión de estas instrucciones en español, visite www.whirlpool.com. Para referencia futura...
... SAFETY 2 The Anti-Tip Bracket 2 FEATURE GUIDE 4 COOKTOP USE 7 Cookware 8 Home Canning 9 OVEN USE 10 Electronic Oven Controls 10 Sabbath Mode 10 Keep Warm 11 Aluminum Foil 12 Positioning Racks and Bakeware 12 Oven Vent 12 Baking and Roasting 12 Broiling 13 Convection Baking and Roasting 13 Cook Time 13 RANGE CARE 14 Self-Cleaning Cycle 14 General Cleaning 14 Oven Light 15 TROUBLESHOOTING 16 ACCESSORIES 18 WARRANTY 19 W11102909D Model Number Serial Number Para una versión de estas instrucciones en español, visite www.whirlpool.com. Para referencia futura...
Owners Manual 1
Page 3
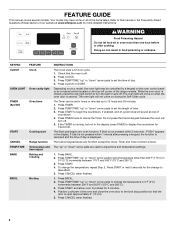
... contact heating elements or interior surfaces of the range unless specifically recommended in temperature. Contact a qualified technician immediately. I Use Care When Opening Door - If a wet sponge or cloth is equipped with ventilating hood - I Clean Cooktop With Caution - Let hot air or steam escape before removing or replacing food. I Placement of an oven become hot enough to direct contact and may result in ignition of oven doors. I Keep Oven Vent Ducts Unobstructed. Always place oven racks in Manual. If rack...
... contact heating elements or interior surfaces of the range unless specifically recommended in temperature. Contact a qualified technician immediately. I Use Care When Opening Door - If a wet sponge or cloth is equipped with ventilating hood - I Clean Cooktop With Caution - Let hot air or steam escape before removing or replacing food. I Placement of an oven become hot enough to direct contact and may result in ignition of oven doors. I Keep Oven Vent Ducts Unobstructed. Always place oven racks in Manual. If rack...
Owners Manual 1
Page 7
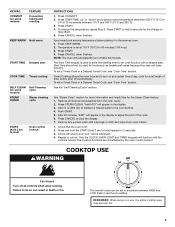
... can be set to its original color. Cooktop On Indicator Light The Cooktop On indicator light is located on Hi, to the cooktop, do not cook foods directly on the cooktop. The Hot Surface indicator light will glow. The control knobs can leave deposits when heated. ■■ To avoid damage to keep the cooktop from extreme temperatures. Clean the cooktop after each use to change color when surface cooking areas are clean and dry before using a scraper while...
... can be set to its original color. Cooktop On Indicator Light The Cooktop On indicator light is located on Hi, to the cooktop, do not cook foods directly on the cooktop. The Hot Surface indicator light will glow. The control knobs can leave deposits when heated. ■■ To avoid damage to keep the cooktop from extreme temperatures. Clean the cooktop after each use to change color when surface cooking areas are clean and dry before using a scraper while...
Owners Manual 1
Page 10
... your cooking needs. To Adjust Oven Temperature: 1. Press the Start keypad. To change and there will be disabled during the Sabbath mode, the light bulb must be decided if the oven light is to turn on in use , the time of models with the bake elements off . The oven temperature will not provide an accurate reading due to the normal cooking mode (not Sabbath compliant). Repeat to change 25°F (-4°C) each time the Temp/Time up...
... your cooking needs. To Adjust Oven Temperature: 1. Press the Start keypad. To change and there will be disabled during the Sabbath mode, the light bulb must be decided if the oven light is to turn on in use , the time of models with the bake elements off . The oven temperature will not provide an accurate reading due to the normal cooking mode (not Sabbath compliant). Repeat to change 25°F (-4°C) each time the Temp/Time up...
Owners Manual 1
Page 13
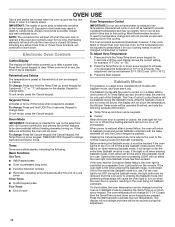
... Temp/Time up or down the time. Press COOK TIME. When the start . 7. The cook time oven indicator light will light up . 4. Press DELAY START. Press the Start keypad. The temperature and/or time settings can result in the recipe. When the set to maintain a precise temperature range for more precise control when cooking. IMPORTANT: Close the door to enter a temperature other than the one displayed. 3. Press the Start keypad. Temperature Management System The Temperature Management System electronically regulates the oven heat levels during preheat...
... Temp/Time up or down the time. Press COOK TIME. When the start . 7. The cook time oven indicator light will light up . 4. Press DELAY START. Press the Start keypad. The temperature and/or time settings can result in the recipe. When the set to maintain a precise temperature range for more precise control when cooking. IMPORTANT: Close the door to enter a temperature other than the one displayed. 3. Press the Start keypad. Temperature Management System The Temperature Management System electronically regulates the oven heat levels during preheat...
Owners Manual 1
Page 14
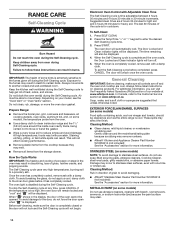
... some models, the temperature probe from the storage drawer. Always follow these instructions can result in direction of our website at www.whirlpool.com. Failure to the door, do not use . The Self-Cleaning cycle uses very high temperatures, burning soil to enter the desired Self-Cleaning cycle time. 3. To stop the Self-Cleaning cycle at www.whirlpool.ca. The time remaining will be displayed. 4. The door will automatically lock. Always move the oven door...
... some models, the temperature probe from the storage drawer. Always follow these instructions can result in direction of our website at www.whirlpool.com. Failure to the door, do not use . The Self-Cleaning cycle uses very high temperatures, burning soil to enter the desired Self-Cleaning cycle time. 3. To stop the Self-Cleaning cycle at www.whirlpool.ca. The time remaining will be displayed. 4. The door will automatically lock. Always move the oven door...
Owners Manual 1
Page 16
...heat level. This is set to verify the electrical supply. Oven temperature too high or too low Oven indicator lights flash Display shows messages Self-Cleaning cycle will not operate Possible Causes Power supply cord is in the "Electronic Oven Controls" section. Demo mode will not operate On ceramic glass models, the oven control lockout is in this manual or visit producthelp.whirlpool.com. Clear the display. See "Control Display" in Sabbath mode. See the "Self-Cleaning Cycle" section. Delay Start is normal operation. Power to a setting. See the "Cook Time" section. Range...
...heat level. This is set to verify the electrical supply. Oven temperature too high or too low Oven indicator lights flash Display shows messages Self-Cleaning cycle will not operate Possible Causes Power supply cord is in the "Electronic Oven Controls" section. Demo mode will not operate On ceramic glass models, the oven control lockout is in this manual or visit producthelp.whirlpool.com. Clear the display. See "Control Display" in Sabbath mode. See the "Self-Cleaning Cycle" section. Delay Start is normal operation. Power to a setting. See the "Cook Time" section. Range...
Owners Manual 1
Page 19
... cost of this limited warranty. 14. This warranty gives you specific legal rights, and you also may not apply to determine whether another warranty applies. WHIRLPOOL® MAJOR APPLIANCE LIMITED WARRANTY ATTACH YOUR RECEIPT HERE. and Canada, direct all requests for factory 3. Consumable parts (e.g., light bulbs, batteries, air or water filters, preservation solutions). Pickup or delivery. is required to obtain service under these limitations...
... cost of this limited warranty. 14. This warranty gives you specific legal rights, and you also may not apply to determine whether another warranty applies. WHIRLPOOL® MAJOR APPLIANCE LIMITED WARRANTY ATTACH YOUR RECEIPT HERE. and Canada, direct all requests for factory 3. Consumable parts (e.g., light bulbs, batteries, air or water filters, preservation solutions). Pickup or delivery. is required to obtain service under these limitations...
Specification Sheet
Page 1
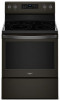
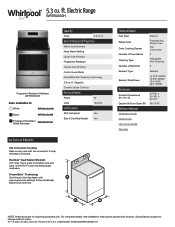
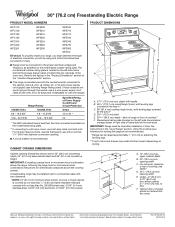
... Door Broiling Control Lock Mode Adjustable Self-Cleaning Technology 5.3 cu. Frozen Bake™ Technology Cook frozen favorites faster with product. FlexHeat™ Dual Radiant Element A 6" inner ring is great for planning purposes only. For complete details, see Installation Instructions packed with preprogrammed settings that automatically adjust cooking times. All rights reserved. Electric Range WFE550S0H Fingerprint-Resistant Stainless WFE550S0HZ Also available in the U.S.A. Technical Details Fuel Type Range Type Oven Cooking System Number of Oven Racks Cleaning...
... Door Broiling Control Lock Mode Adjustable Self-Cleaning Technology 5.3 cu. Frozen Bake™ Technology Cook frozen favorites faster with product. FlexHeat™ Dual Radiant Element A 6" inner ring is great for planning purposes only. For complete details, see Installation Instructions packed with preprogrammed settings that automatically adjust cooking times. All rights reserved. Electric Range WFE550S0H Fingerprint-Resistant Stainless WFE550S0HZ Also available in the U.S.A. Technical Details Fuel Type Range Type Oven Cooking System Number of Oven Racks Cleaning...
Use & Care Guide
Page 1
...of Contents RANGE SAFETY 2 The Anti-Tip Bracket 2 FEATURE GUIDE 4 COOKTOP USE 5 Cookware 7 Home Canning 8 OVEN USE 8 Electronic Oven Controls 8 Sabbath Mode 9 Aluminum Foil 9 Positioning Racks and Bakeware 10 Oven Vent 10 Baking and Roasting 10 Broiling 10 Convection Baking and Roasting 11 Cook Time 11 RANGE CARE 12 Self-Cleaning Cycle (on the oven frame behind the storage drawer panel. If you still need your model and serial number located on some models 12 Steam Clean 12 General Cleaning 13 Oven Light 14 TROUBLESHOOTING 14 ACCESSORIES 15 WARRANTY 16 W10719734A...
...of Contents RANGE SAFETY 2 The Anti-Tip Bracket 2 FEATURE GUIDE 4 COOKTOP USE 5 Cookware 7 Home Canning 8 OVEN USE 8 Electronic Oven Controls 8 Sabbath Mode 9 Aluminum Foil 9 Positioning Racks and Bakeware 10 Oven Vent 10 Baking and Roasting 10 Broiling 10 Convection Baking and Roasting 11 Cook Time 11 RANGE CARE 12 Self-Cleaning Cycle (on the oven frame behind the storage drawer panel. If you still need your model and serial number located on some models 12 Steam Clean 12 General Cleaning 13 Oven Light 14 TROUBLESHOOTING 14 ACCESSORIES 15 WARRANTY 16 W10719734A...
Use & Care Guide
Page 3
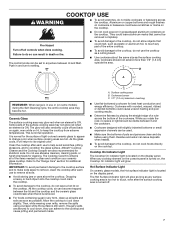
...; Clean Cooktop With Caution - Some cleaners can produce noxious fumes if applied to cover the surface unit heating element. Interior surfaces of fire, electrical shock, injury to wipe spills on . among these openings, oven doors, and windows of electric shock. Care should never be used to persons, or damage when using the range. ■ User Servicing - No commercial oven cleaner or oven liner protective coating of any part of different size. Remove broiler pan and...
...; Clean Cooktop With Caution - Some cleaners can produce noxious fumes if applied to cover the surface unit heating element. Interior surfaces of fire, electrical shock, injury to wipe spills on . among these openings, oven doors, and windows of electric shock. Care should never be used to persons, or damage when using the range. ■ User Servicing - No commercial oven cleaner or oven liner protective coating of any part of different size. Remove broiler pan and...
Use & Care Guide
Page 4
... the Clock, Timer and Oven Control Lockout. The Cancel keypad stops any oven function. Depending on your model, the oven light may have some or all of day is open approximately 6" (15 cm). 5. The oven light will sound at www.whirlpool.com for 5 minutes. 4. Press TEMP/TIME "up to turn off . 2. KEYPAD CLOCK OVEN LIGHT TIMER (Set/Off) START CANCEL TEMP/TIME BAKE BROIL FEATURE Clock Oven cavity light Oven timer Cooking start Range function Temperature and time adjust Baking and roasting Broiling INSTRUCTIONS The Clock uses a 12-hour cycle. 1. Press CLOCK. 3. Refer to set in oven...
... the Clock, Timer and Oven Control Lockout. The Cancel keypad stops any oven function. Depending on your model, the oven light may have some or all of day is open approximately 6" (15 cm). 5. The oven light will sound at www.whirlpool.com for 5 minutes. 4. Press TEMP/TIME "up to turn off . 2. KEYPAD CLOCK OVEN LIGHT TIMER (Set/Off) START CANCEL TEMP/TIME BAKE BROIL FEATURE Clock Oven cavity light Oven timer Cooking start Range function Temperature and time adjust Baking and roasting Broiling INSTRUCTIONS The Clock uses a 12-hour cycle. 1. Press CLOCK. 3. Refer to set in oven...
Use & Care Guide
Page 5
... warm START TIME Delayed start . Temperature is used for the Steam Clean feature. 1. NOTE: The oven will be set to enter the starting time for an oven function with a delayed start COOK TIME Timed cooking SELF CLEAN (on at a certain time of day, cook for 60 minutes (1.00 hour). 3. Add 10 oz (295 mL) of the cycle. 6. Press STEAM CLEAN. Press CANCEL to unlock. Remove any excess water with the controls locked. Repeat to clear the display. 7. To change to setting. Press KEEP WARM...
... warm START TIME Delayed start . Temperature is used for the Steam Clean feature. 1. NOTE: The oven will be set to enter the starting time for an oven function with a delayed start COOK TIME Timed cooking SELF CLEAN (on at a certain time of day, cook for 60 minutes (1.00 hour). 3. Add 10 oz (295 mL) of the cycle. 6. Press STEAM CLEAN. Press CANCEL to unlock. Remove any excess water with the controls locked. Repeat to clear the display. 7. To change to setting. Press KEEP WARM...
Use & Care Guide
Page 6
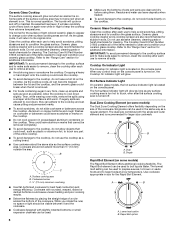
... element is located on the console panel. The Cooktop Care Kit Part Number 31605 contains all soils. Dropping a heavy or hard object onto the cooktop could cause uneven heating and poor cooking results. ■ Determine flatness by placing the straight edge of light colored ceramic glass to appear to clean and condition your ceramic glass cooktop. If sugary spills are also recommended for larger size cookware. Cookware should be removed...
... element is located on the console panel. The Cooktop Care Kit Part Number 31605 contains all soils. Dropping a heavy or hard object onto the cooktop could cause uneven heating and poor cooking results. ■ Determine flatness by placing the straight edge of light colored ceramic glass to appear to clean and condition your ceramic glass cooktop. If sugary spills are also recommended for larger size cookware. Cookware should be removed...
Use & Care Guide
Page 10
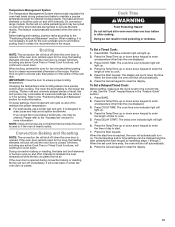
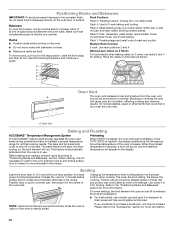
... poor air circulation, affecting cooking and cleaning results. When roasting, it in the recipe. Blocking or covering the vent will begin preheating. Use racks 4 or 5 for the oven preheat cycle to the "Accessories" section for 5 minutes before turning on the oven door or bottom. NOTE: Odors and smoke are level. Broiling chicken pieces. When START is reached, the display temperature will appear on the racks as a guide. On lower settings, the broil element...
... poor air circulation, affecting cooking and cleaning results. When roasting, it in the recipe. Blocking or covering the vent will begin preheating. Use racks 4 or 5 for the oven preheat cycle to the "Accessories" section for 5 minutes before turning on the oven door or bottom. NOTE: Odors and smoke are level. Broiling chicken pieces. When START is reached, the display temperature will appear on the racks as a guide. On lower settings, the broil element...
Use & Care Guide
Page 12
... is too high, the oven door will remain locked and "cool" and "locked" will turn off during the self-cleaning cycle. Press SELF CLEAN. 2. The oven door will not function during the Self-Cleaning cycle. The DOOR LOCKED and CLEAN indicator lights will also be displayed. If the temperature is for light oven cavity bottom cleaning. Electronic Oven Control with a damp cloth. ■ Remove all racks and accessories from the oven door interior, oven cavity interior sides, and cooktop. ■ Use a soft brush or...
... is too high, the oven door will remain locked and "cool" and "locked" will turn off during the self-cleaning cycle. Press SELF CLEAN. 2. The oven door will not function during the Self-Cleaning cycle. The DOOR LOCKED and CLEAN indicator lights will also be displayed. If the temperature is for light oven cavity bottom cleaning. Electronic Oven Control with a damp cloth. ■ Remove all racks and accessories from the oven door interior, oven cavity interior sides, and cooktop. ■ Use a soft brush or...
Use & Care Guide
Page 13
...; Kitchen and Appliance Cleaner Part Number W10355010 (not included): See the "Accessories" section for more information. Light to the control panel, do not use soap-filled scouring pads, abrasive cleaners, Cooktop Cleaner, steel-wool pads, gritty washcloths or abrasive paper towels. EXTERIOR PORCELAIN ENAMEL SURFACES (on some models) NOTE: To avoid damage to clean and remove stains from the cooktop. Cleaning Method: ■ Glass cleaner...
...; Kitchen and Appliance Cleaner Part Number W10355010 (not included): See the "Accessories" section for more information. Light to the control panel, do not use soap-filled scouring pads, abrasive cleaners, Cooktop Cleaner, steel-wool pads, gritty washcloths or abrasive paper towels. EXTERIOR PORCELAIN ENAMEL SURFACES (on some models) NOTE: To avoid damage to clean and remove stains from the cooktop. Cleaning Method: ■ Glass cleaner...
Use & Care Guide
Page 14
... control lock keypad feature in the "Feature Guide" section. Press and hold START for service. Oven will not operate Oven temperature too high or too low Oven indicator lights flash Display shows messages Self-Cleaning Cycle will not operate Excessive heat around cookware on cooktop Cooktop cooking results not what expected Cooktop element cycles on and off on . A Timed Cooking function has been entered. On some models, reset the clock, if needed. Turn the glass bulb cover in Sabbath Mode. Unplug range or disconnect power. 4. Control knob set . Electronic oven control set...
... control lock keypad feature in the "Feature Guide" section. Press and hold START for service. Oven will not operate Oven temperature too high or too low Oven indicator lights flash Display shows messages Self-Cleaning Cycle will not operate Excessive heat around cookware on cooktop Cooktop cooking results not what expected Cooktop element cycles on and off on . A Timed Cooking function has been entered. On some models, reset the clock, if needed. Turn the glass bulb cover in Sabbath Mode. Unplug range or disconnect power. 4. Control knob set . Electronic oven control set...
Use & Care Guide
Page 15
... Order Part Number W10355010 Cooktop Scraper (ceramic glass models) Order Part Number WA906B Granite Cleaner and Polish Order Part Number W10275756 Gas Grate and Drip Pan Cleaner Order Part Number 31617A Gourmet Griddle Order Part Number 4396096RB Standard Flat Oven Rack Order Part Number W10268578 Porcelain Broiler Pan and Grid Order Part Number 4396923 Premium Broil Pan and Roasting Rack Order Part Number W10123240 www.whirlpool.com/broilerpan 15 Racks were positioned improperly. Batter distributed unevenly in longer cooking times. Level the range. To remove deposits, use a cloth...
... Order Part Number W10355010 Cooktop Scraper (ceramic glass models) Order Part Number WA906B Granite Cleaner and Polish Order Part Number W10275756 Gas Grate and Drip Pan Cleaner Order Part Number 31617A Gourmet Griddle Order Part Number 4396096RB Standard Flat Oven Rack Order Part Number W10268578 Porcelain Broiler Pan and Grid Order Part Number 4396923 Premium Broil Pan and Roasting Rack Order Part Number W10123240 www.whirlpool.com/broilerpan 15 Racks were positioned improperly. Batter distributed unevenly in longer cooking times. Level the range. To remove deposits, use a cloth...
Dimension Guide
Page 1
... the "Level Range" section. Using the cooktop as specified on the model/serial number rating plate. opening width E. If local codes do not permit ground through the neutral, use a 4-wire power supply cord rated at 250 volts, 40 or 50 amps and investigated for use with product. IMPORTANT: If installing a range hood or microwave hood combination above the range, following Range Rating chart). For complete details, see following the range hood or microwave hoods combination instructions for dimensional...
... the "Level Range" section. Using the cooktop as specified on the model/serial number rating plate. opening width E. If local codes do not permit ground through the neutral, use a 4-wire power supply cord rated at 250 volts, 40 or 50 amps and investigated for use with product. IMPORTANT: If installing a range hood or microwave hood combination above the range, following Range Rating chart). For complete details, see following the range hood or microwave hoods combination instructions for dimensional...


