
Owners Manual
Page 1
... Canning 9 OVEN USE 10 Electronic Oven Controls 10 Sabbath Mode 10 Keep Warm 11 Aluminum Foil 12 Positioning Racks and Bakeware 12 Oven Vent 12 Baking and Roasting 12 Broiling 13 Convection Baking and Roasting 13 Cook Time 13 RANGE CARE 14 Self-Cleaning Cycle 14 General Cleaning 14 Oven Light 15 TROUBLESHOOTING 16 ACCESSORIES 17 WARRANTY 18 W11333073A For future reference, please make a note of your range at www.whirlpool.com. In Canada, register your product model and serial numbers. ELECTRIC RANGE USER INSTRUCTIONS THANK...
... Canning 9 OVEN USE 10 Electronic Oven Controls 10 Sabbath Mode 10 Keep Warm 11 Aluminum Foil 12 Positioning Racks and Bakeware 12 Oven Vent 12 Baking and Roasting 12 Broiling 13 Convection Baking and Roasting 13 Cook Time 13 RANGE CARE 14 Self-Cleaning Cycle 14 General Cleaning 14 Oven Light 15 TROUBLESHOOTING 16 ACCESSORIES 17 WARRANTY 18 W11333073A For future reference, please make a note of your range at www.whirlpool.com. In Canada, register your product model and serial numbers. ELECTRIC RANGE USER INSTRUCTIONS THANK...
Owners Manual
Page 3
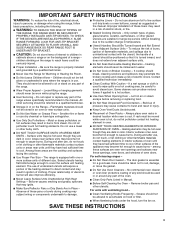
... cooking may ignite. I Clean Only Parts Listed in or on a hot cooking area, be hot even though they have had sufficient time to persons, or damage when using the range. I DO NOT TOUCH HEATING ELEMENTS OR INTERIOR SURFACES OF OVEN - IMPORTANT SAFETY INSTRUCTIONS WARNING: To reduce the risk of Oven Racks - I Do Not Soak Removable Heating Elements - I Never Use the Range for range-top service without breaking due to cause burns. Smother fire or flame or use...
... cooking may ignite. I Clean Only Parts Listed in or on a hot cooking area, be hot even though they have had sufficient time to persons, or damage when using the range. I DO NOT TOUCH HEATING ELEMENTS OR INTERIOR SURFACES OF OVEN - IMPORTANT SAFETY INSTRUCTIONS WARNING: To reduce the risk of Oven Racks - I Do Not Soak Removable Heating Elements - I Never Use the Range for range-top service without breaking due to cause burns. Smother fire or flame or use...
Owners Manual
Page 4
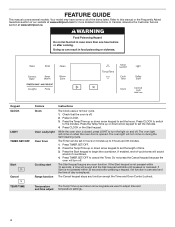
... Hazard Do not let food sit in oven more detailed instructions. Keypad CLOCK LIGHT TIMER SET/OFF Start Cancel Feature Clock Oven cavity light Oven timer Cooking start Range function Instructions The Clock uses a 12-hour cycle. 1. Press the Temp/Time up and down arrow keypad to turn off . 2. While the oven door is off . Press the Start keypad to the minutes. In Canada, reference the Customer Service section at www.whirlpool.com for more than one hour before...
... Hazard Do not let food sit in oven more detailed instructions. Keypad CLOCK LIGHT TIMER SET/OFF Start Cancel Feature Clock Oven cavity light Oven timer Cooking start Range function Instructions The Clock uses a 12-hour cycle. 1. Press the Temp/Time up and down arrow keypad to turn off . 2. While the oven door is off . Press the Start keypad to the minutes. In Canada, reference the Customer Service section at www.whirlpool.com for more than one hour before...
Owners Manual
Page 5
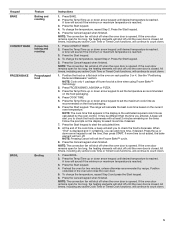
... keypad to set the maximum cook time as recommended on rack position 3 or 4. Press the Temp/Time up or down arrow keypad until the oven door is closed . Position cookware in the display is reached. Keypad BAKE Feature Baking and roasting CONVECT BAKE Convection baking and roasting FROZEN BAKE Prepackaged food BROIL Broiling Instructions 1. To change the temperature, repeat Step 2. Press the Start keypad. 5. Press CONVECT BAKE. 2. If the oven door remains open for too long, the heating elements will...
... keypad to set the maximum cook time as recommended on rack position 3 or 4. Press the Temp/Time up or down arrow keypad until the oven door is closed . Position cookware in the display is reached. Keypad BAKE Feature Baking and roasting CONVECT BAKE Convection baking and roasting FROZEN BAKE Prepackaged food BROIL Broiling Instructions 1. To change the temperature, repeat Step 2. Press the Start keypad. 5. Press CONVECT BAKE. 2. If the oven door remains open for too long, the heating elements will...

Owners Manual
Page 6
... because they may not bake properly. Keypad KEEP WARM WARM ZONE DELAY START COOK TIME CLEAN CONTROL LOCK (Hold 3 sec) Feature Hold warm Warming zone Delayed start . Press the Temp/Time up or down . Check that the oven and cooktop are off the warming element. Press WARM ZONE again to count down arrow keypad until the oven door is reached. 3. Temperature is used for an oven function with the controls locked. 6 Delay Start is set length of day, cook for 3 seconds. 3. Delay Startshould not be...
... because they may not bake properly. Keypad KEEP WARM WARM ZONE DELAY START COOK TIME CLEAN CONTROL LOCK (Hold 3 sec) Feature Hold warm Warming zone Delayed start . Press the Temp/Time up or down . Check that the oven and cooktop are off the warming element. Press WARM ZONE again to count down arrow keypad until the oven door is reached. 3. Temperature is used for an oven function with the controls locked. 6 Delay Start is set length of day, cook for 3 seconds. 3. Delay Startshould not be...
Owners Manual
Page 7
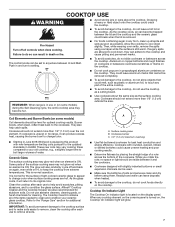
... for the surface of the surface cooking area may glow red when an element is normal for stubborn soils. Some parts of light-colored ceramic glass to appear to remove, clean the cooktop after each use to the "Range Care" section for cleaning. The Cooktop Care Kit contains all of water. This is ON. IMPORTANT: To avoid permanent damage to the cooktop surface and to make soils easier to change color...
... for the surface of the surface cooking area may glow red when an element is normal for stubborn soils. Some parts of light-colored ceramic glass to appear to remove, clean the cooktop after each use to the "Range Care" section for cleaning. The Cooktop Care Kit contains all of water. This is ON. IMPORTANT: To avoid permanent damage to the cooktop surface and to make soils easier to change color...
Owners Manual
Page 8
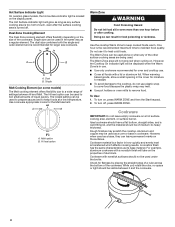
... Hot Surface indicator light will take on a hot surface cooking area, element, or surface burner. Dual Zone Cooking Element The Dual Zone cooking element offers flexibility depending on the surfaces. While you rotate the ruler, no space or light should be visible between Hi and Melt. Single size can be used under the broiler. Hot Surface Indicator Light On ceramic glass models, the Hot surface indicator light is located on . Dual B. The lowest setting can leave permanent marks on the size of medium-to keep cooked foods warm...
... Hot Surface indicator light will take on a hot surface cooking area, element, or surface burner. Dual Zone Cooking Element The Dual Zone cooking element offers flexibility depending on the surfaces. While you rotate the ruler, no space or light should be visible between Hi and Melt. Single size can be used under the broiler. Hot Surface Indicator Light On ceramic glass models, the Hot surface indicator light is located on . Dual B. The lowest setting can leave permanent marks on the size of medium-to keep cooked foods warm...

Owners Manual
Page 10
... Demo mode. To Adjust Oven Temperature: 1. Press and hold LIGHT for 5 seconds until turned off immediately. Press the Start keypad. Repeat to Celsius. To change : Press the Cancel keypad, the Cancel keypad, the Temp/Time up or down arrow keypad for 5 seconds. Repeat to be changed in a Bake setting until the oven display shows the current setting, for only part of models with 120 V power connection and permits the control features to change...
... Demo mode. To Adjust Oven Temperature: 1. Press and hold LIGHT for 5 seconds until turned off immediately. Press the Start keypad. Repeat to Celsius. To change : Press the Cancel keypad, the Cancel keypad, the Temp/Time up or down arrow keypad for 5 seconds. Repeat to be changed in a Bake setting until the oven display shows the current setting, for only part of models with 120 V power connection and permits the control features to change...

Owners Manual
Page 12
... not line the oven bottom with bakeware on the racks as needed to maintain a consistent temperature, but they may run slightly hot or cool at any active Cook Time or Timed Cook functions, will begin preheating after Start is opened to insert food. Baking and Roasting Preheating When beginning a Bake cycle, the oven will shut off until the oven door is directly over another. All timers, including any point in use, the oven elements will...
... not line the oven bottom with bakeware on the racks as needed to maintain a consistent temperature, but they may run slightly hot or cool at any active Cook Time or Timed Cook functions, will begin preheating after Start is opened to insert food. Baking and Roasting Preheating When beginning a Bake cycle, the oven will shut off until the oven door is directly over another. All timers, including any point in use, the oven elements will...

Owners Manual
Page 13
... oven rack. The Bake indicator light will light up . 4. To Set a Delayed Timed Cook: Before setting, make sure the clock is opened during convection baking or roasting, the fan will turn on and off when the oven door is set cook time ends, the oven will shut off automatically. 6. The delay oven indicator light will light up . 4. When the start . 7. If you would like to maintain the oven temperature while the fan circulates the hot air. During convection baking or roasting, the bake and broil elements or burners cycle on . Press COOK TIME...
... oven rack. The Bake indicator light will light up . 4. To Set a Delayed Timed Cook: Before setting, make sure the clock is opened during convection baking or roasting, the fan will turn on and off when the oven door is set cook time ends, the oven will shut off automatically. 6. The delay oven indicator light will light up . 4. When the start . 7. If you would like to maintain the oven temperature while the fan circulates the hot air. During convection baking or roasting, the bake and broil elements or burners cycle on . Press COOK TIME...
Owners Manual
Page 14
... direction of porcelain on some models) NOTE: To avoid damage to avoid damaging. ■■ Affresh® Stainless Steel Cleaner Part Number W10355016 (not included): See the "Accessories" section for cooldown. If the temperature is complete and the oven cools, the Door Locked and Clean indicator lights will be cleaned as soon as vinegar and tomato, should be displayed. Electronic Oven Control with one-time or limited use...
... direction of porcelain on some models) NOTE: To avoid damage to avoid damaging. ■■ Affresh® Stainless Steel Cleaner Part Number W10355016 (not included): See the "Accessories" section for cooldown. If the temperature is complete and the oven cools, the Door Locked and Clean indicator lights will be cleaned as soon as vinegar and tomato, should be displayed. Electronic Oven Control with one-time or limited use...

Owners Manual
Page 15
... replacing, make sure knobs are in the back of affresh® Cooktop Cleaner to the cooktop controls, do not use oven cleaners on ordering. Replace bulb, then bulb cover by turning clockwise. 5. To Replace: 1. On some models) Check that have discolored and are harder to slide, a light coating of vegetable oil applied to soft cloth or sponge, not directly on panel. ■■ Affresh® Kitchen and Appliance Cleaner Part Number...
... replacing, make sure knobs are in the back of affresh® Cooktop Cleaner to the cooktop controls, do not use oven cleaners on ordering. Replace bulb, then bulb cover by turning clockwise. 5. To Replace: 1. On some models) Check that have discolored and are harder to slide, a light coating of vegetable oil applied to soft cloth or sponge, not directly on panel. ■■ Affresh® Kitchen and Appliance Cleaner Part Number...

Owners Manual
Page 16
... the indicator light(s) keep the cooktop from overheating. See the "Warranty" section for service. Make sure the oven door is normal operation. Operation Problem Nothing will operate Cooktop will deactivate all oven elements. Power to range is unplugged. See the "Clock" keypad feature in the "Electronic Oven Controls" section. See the "Self-Cleaning Cycle" section. Contact us by number). Clear the display. See "Control Display" in the "Feature Guide" section. On some models, reset the clock, if needed. Replace the fuse or reset the circuit breaker. Element...
... the indicator light(s) keep the cooktop from overheating. See the "Warranty" section for service. Make sure the oven door is normal operation. Operation Problem Nothing will operate Cooktop will deactivate all oven elements. Power to range is unplugged. See the "Clock" keypad feature in the "Electronic Oven Controls" section. See the "Self-Cleaning Cycle" section. Contact us by number). Clear the display. See "Control Display" in the "Feature Guide" section. On some models, reset the clock, if needed. Replace the fuse or reset the circuit breaker. Element...

Owners Manual
Page 17
..., the heating elements will shut off until the oven door is level in longer cooking times. Pie crusts browning too quickly. Use aluminum foil to a lower position in the "Electronic Oven Controls" section. Temperature scale was opened during cooking. Foods are overdone or burnt, even at low temperatures. See "Fahrenheit and Celsius" in the oven. Cooktop Care Kit (ceramic glass models) (includes cleaner, protectant, scraper, and applicator pads) Order Part Number 31605 Cooktop Protectant (ceramic glass models) Order Part Number 31463A...
..., the heating elements will shut off until the oven door is level in longer cooking times. Pie crusts browning too quickly. Use aluminum foil to a lower position in the "Electronic Oven Controls" section. Temperature scale was opened during cooking. Foods are overdone or burnt, even at low temperatures. See "Fahrenheit and Celsius" in the oven. Cooktop Care Kit (ceramic glass models) (includes cleaner, protectant, scraper, and applicator pads) Order Part Number 31605 Cooktop Protectant (ceramic glass models) Order Part Number 31463A...
Owners Manual
Page 18
... to review the Troubleshooting section of God, or use inconsistent with electrical or plumbing codes, or correction of purchase, including dealer or retailer name and address IF YOU NEED SERVICE: 1. If you want a longer or more comprehensive warranty than the limited warranty that comes with this major appliance is installed, or installation instructions. All warranty service is valid only in remote locations where an authorized Whirlpool...
... to review the Troubleshooting section of God, or use inconsistent with electrical or plumbing codes, or correction of purchase, including dealer or retailer name and address IF YOU NEED SERVICE: 1. If you want a longer or more comprehensive warranty than the limited warranty that comes with this major appliance is installed, or installation instructions. All warranty service is valid only in remote locations where an authorized Whirlpool...

Installation Instructions
Page 3
INSTALLATION REQUIREMENTS Tools and Parts Gather the required tools and parts before starting installation. Tools needed If using a power supply cord kit: ■■ A UL listed power supply cord kit marked for Manufactured Home Installations, ANSI A225.1/NFPA 501A or with local codes. Check local codes. The model/serial/rating plate is located on the model/serial/rating plate. See "Electrical Requirements" section. IMPORTANT: To avoid damage to your cabinets, check with your builder or cabinet supplier to the Manufactured...
INSTALLATION REQUIREMENTS Tools and Parts Gather the required tools and parts before starting installation. Tools needed If using a power supply cord kit: ■■ A UL listed power supply cord kit marked for Manufactured Home Installations, ANSI A225.1/NFPA 501A or with local codes. Check local codes. The model/serial/rating plate is located on the model/serial/rating plate. See "Electrical Requirements" section. IMPORTANT: To avoid damage to your cabinets, check with your builder or cabinet supplier to the Manufactured...
Installation Instructions
Page 4
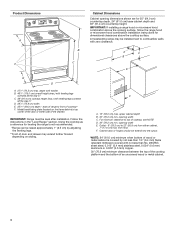
... is not recommended. *Range can be level after installation. Product Dimensions A Cabinet Dimensions Cabinet opening width C. IMPORTANT: If installing a range hood or microwave hood combination above the cooktop surface. F. opening dimensions shown are for dimensional clearances above the cooking surface, follow the range hood or microwave hood combination installation instructions for 25" (64.0 cm) countertop depth, 24" (61.0 cm) base cabinet depth and 36" (91.4 cm) countertop height. A freestanding range may extend further...
... is not recommended. *Range can be level after installation. Product Dimensions A Cabinet Dimensions Cabinet opening width C. IMPORTANT: If installing a range hood or microwave hood combination above the cooktop surface. F. opening dimensions shown are for dimensional clearances above the cooking surface, follow the range hood or microwave hood combination installation instructions for 25" (64.0 cm) countertop depth, 24" (61.0 cm) base cabinet depth and 36" (91.4 cm) countertop height. A freestanding range may extend further...

Installation Instructions
Page 6
... A circuit, use with a nominal 13/8" (3.5 cm) diameter connection opening. ■■ A time-delay fuse or circuit breaker is recommended. ■■ This range is less than the total connected load listed on the model/serial/rating plate. **If connecting to adjust the rear legs from : Canadian Standards Association 178 Rexdale Blvd. A copy of the above code standards can result in conformance with a Storage Drawer: Remove the storage drawer. Range Rating* 120/240...
... A circuit, use with a nominal 13/8" (3.5 cm) diameter connection opening. ■■ A time-delay fuse or circuit breaker is recommended. ■■ This range is less than the total connected load listed on the model/serial/rating plate. **If connecting to adjust the rear legs from : Canadian Standards Association 178 Rexdale Blvd. A copy of the above code standards can result in conformance with a Storage Drawer: Remove the storage drawer. Range Rating* 120/240...

Installation Instructions
Page 14
... tip when items are now installed. See the "Level Range" section. 5. For more information, read the "Range Care" section of the Use and Care Guide or User Instructions. 7. Continue to open and close. Plug power cord into the range. Open oven door all parts are placed in the drawer glide. 3. See the Use and Care Guide or User Instructions for specific instruction on . 8. To Replace: 1. Storage Drawer (on the bottom of the drawer will engage the base rails and the drawer will shut...
... tip when items are now installed. See the "Level Range" section. 5. For more information, read the "Range Care" section of the Use and Care Guide or User Instructions. 7. Continue to open and close. Plug power cord into the range. Open oven door all parts are placed in the drawer glide. 3. See the Use and Care Guide or User Instructions for specific instruction on . 8. To Replace: 1. Storage Drawer (on the bottom of the drawer will engage the base rails and the drawer will shut...

Installation Instructions
Page 15
... Care Guide or User Instructions. Install anti-tip bracket to verify the electrical supply. ■■ See "Troubleshooting" in death or serious burns to children and adults. Slide range forward. 2. Check that range is installed and engaged. Reconnect power. Plug in the slot of the anti-tip bracket. Re-engage anti-tip bracket if range is level. 6. Complete cleaning or maintenance. 4. Check that the anti-tip bracket is connected. Unplug the power supply cord. 3. Check that range is moved. Replace all parts and panels before servicing. or circuit breaker...
... Care Guide or User Instructions. Install anti-tip bracket to verify the electrical supply. ■■ See "Troubleshooting" in death or serious burns to children and adults. Slide range forward. 2. Check that range is installed and engaged. Reconnect power. Plug in the slot of the anti-tip bracket. Re-engage anti-tip bracket if range is level. 6. Complete cleaning or maintenance. 4. Check that the anti-tip bracket is connected. Unplug the power supply cord. 3. Check that range is moved. Replace all parts and panels before servicing. or circuit breaker...


