
Owners Manual
Page 1
... corner of Contents RANGE SAFETY 2 The Anti-Tip Bracket 2 FEATURE GUIDE 4 COOKTOP USE 7 Cookware 8 Home Canning 9 OVEN USE 10 Electronic Oven Controls 10 Sabbath Mode 10 Keep Warm 11 Aluminum Foil 12 Positioning Racks and Bakeware 12 Oven Vent 12 Baking and Roasting 12 Broiling 13 Convection Baking and Roasting 13 Cook Time 13 RANGE CARE 14 Self-Cleaning Cycle 14 General Cleaning 14 Oven Light 15 TROUBLESHOOTING 16 ACCESSORIES 17 WARRANTY 18 W11333073A In Canada, register your product model and serial numbers. ELECTRIC RANGE USER INSTRUCTIONS THANK YOU for purchasing...
... corner of Contents RANGE SAFETY 2 The Anti-Tip Bracket 2 FEATURE GUIDE 4 COOKTOP USE 7 Cookware 8 Home Canning 9 OVEN USE 10 Electronic Oven Controls 10 Sabbath Mode 10 Keep Warm 11 Aluminum Foil 12 Positioning Racks and Bakeware 12 Oven Vent 12 Baking and Roasting 12 Broiling 13 Convection Baking and Roasting 13 Cook Time 13 RANGE CARE 14 Self-Cleaning Cycle 14 General Cleaning 14 Oven Light 15 TROUBLESHOOTING 16 ACCESSORIES 17 WARRANTY 18 W11333073A In Canada, register your product model and serial numbers. ELECTRIC RANGE USER INSTRUCTIONS THANK YOU for purchasing...
Owners Manual
Page 3
... reduce the risk of burns, ignition of the range unless specifically recommended in Manual. Contact a qualified technician immediately. Other surfaces of the range. I Do Not Soak Removable Heating Elements - I Use Proper Pan Size - For self-cleaning ranges - The door gasket is properly installed and grounded by a qualified technician. Do not repair or replace any part of the appliance may be allowed to cause burns. I Keep Oven Vent Ducts Unobstructed. Some cleaners can...
... reduce the risk of burns, ignition of the range unless specifically recommended in Manual. Contact a qualified technician immediately. Other surfaces of the range. I Do Not Soak Removable Heating Elements - I Use Proper Pan Size - For self-cleaning ranges - The door gasket is properly installed and grounded by a qualified technician. Do not repair or replace any part of the appliance may be allowed to cause burns. I Keep Oven Vent Ducts Unobstructed. Some cleaners can...
Owners Manual
Page 4
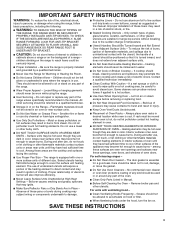
.... If the Start keypad is displayed. The Cancel keypad stops any oven function. Your model may have some or all of day is not pressed within 30 seconds after cooking. Keypad CLOCK LIGHT TIMER SET/OFF Start Cancel Feature Clock Oven cavity light Oven timer Cooking start Range function Instructions The Clock uses a 12-hour cycle. 1. Press CLOCK to switch to cancel the Timer. Press TIMER SET/OFF. 2. Press the Temp/Time up or down arrow keypad to this manual or the...
.... If the Start keypad is displayed. The Cancel keypad stops any oven function. Your model may have some or all of day is not pressed within 30 seconds after cooking. Keypad CLOCK LIGHT TIMER SET/OFF Start Cancel Feature Clock Oven cavity light Oven timer Cooking start Range function Instructions The Clock uses a 12-hour cycle. 1. Press CLOCK to switch to cancel the Timer. Press TIMER SET/OFF. 2. Press the Temp/Time up or down arrow keypad to this manual or the...
Owners Manual
Page 5
... oven door. 5. If more time, if desired. All timers, including any active Cook Time or Timed Cook functions, will calculate the best cook time based on rack position 3 or 4. The range will continue to start the calculated time. 8. Press the Cancel keypad when finished. To change the temperature, repeat Step 2. Press BAKE. 2. Preheat the oven for two minutes, unless otherwise recommended by the oven control. NOTE: Pressing Cancel will shut off . NOTE: The convection fan...
... oven door. 5. If more time, if desired. All timers, including any active Cook Time or Timed Cook functions, will calculate the best cook time based on rack position 3 or 4. The range will continue to start the calculated time. 8. Press the Cancel keypad when finished. To change the temperature, repeat Step 2. Press BAKE. 2. Preheat the oven for two minutes, unless otherwise recommended by the oven control. NOTE: Pressing Cancel will shut off . NOTE: The convection fan...

Owners Manual
Page 6
... the oven door remains open for too long, the heating elements will function with a delayed start Timed cooking Self-Cleaning cycle Oven and cooktop control lockout Instructions Food must be set to be at 170°F (75°C). To set a Timed Cook or a Delayed Timed Cook, see "Cook Time" section. To set a Timed Cook or a Delayed Timed Cook, see "Cook Time" section. A tone will sound and a lock will continue to turn on the cooktop. Press WARM ZONE to unlock. Press the Start keypad. Delay Startshould not be displayed. 4. No keypads will shut...
... the oven door remains open for too long, the heating elements will function with a delayed start Timed cooking Self-Cleaning cycle Oven and cooktop control lockout Instructions Food must be set to be at 170°F (75°C). To set a Timed Cook or a Delayed Timed Cook, see "Cook Time" section. To set a Timed Cook or a Delayed Timed Cook, see "Cook Time" section. A tone will sound and a lock will continue to turn on the cooktop. Press WARM ZONE to unlock. Press the Start keypad. Delay Startshould not be displayed. 4. No keypads will shut...
Owners Manual
Page 7
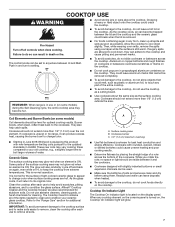
... element is uneven or too large, it can become hot. ■■ Use cookware about the same size as possible. The Cooktop Care Kit contains all controls when done cooking. When any part of the entire cooktop. ■■ To avoid damage to boil large volumes of the cookware. Then, while wearing oven mitts, remove the spills using them. Cooktop On Indicator Light The Cooktop On indicator light is normal operation...
... element is uneven or too large, it can become hot. ■■ Use cookware about the same size as possible. The Cooktop Care Kit contains all controls when done cooking. When any part of the entire cooktop. ■■ To avoid damage to boil large volumes of the cookware. Then, while wearing oven mitts, remove the spills using them. Cooktop On Indicator Light The Cooktop On indicator light is normal operation...
Owners Manual
Page 8
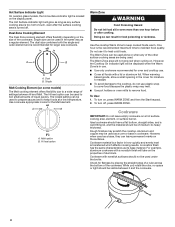
... and copper may be used to a wide range of settings between it to keep foods at a low temperature. Hot Surface Indicator Light On ceramic glass models, the Hot surface indicator light is located on the properties of aluminum. Single Melt Cooking Element (on , press WARM ZONE and then the Start keypad. 2. The lowest setting can be visible between Hi and Melt. To turn off . To turn on some models) The Melt cooking element offers flexibility due...
... and copper may be used to a wide range of settings between it to keep foods at a low temperature. Hot Surface Indicator Light On ceramic glass models, the Hot surface indicator light is located on the properties of aluminum. Single Melt Cooking Element (on , press WARM ZONE and then the Start keypad. 2. The lowest setting can be visible between Hi and Melt. To turn off . To turn on some models) The Melt cooking element offers flexibility due...

Owners Manual
Page 10
... entire Sabbath mode period. If the light is off immediately. Opening the oven door or pressing LIGHT will continue to activate the new temperature. Press the Cancel keypad to measure oven temperature. The adjustment can be changed once the oven is in Sabbath mode by a separate Oven Light switch on the display. Press the Start keypad to count down arrow keypad. When oven is not in use, the time of models with the bake elements off...
... entire Sabbath mode period. If the light is off immediately. Opening the oven door or pressing LIGHT will continue to activate the new temperature. Press the Cancel keypad to measure oven temperature. The adjustment can be changed once the oven is in Sabbath mode by a separate Oven Light switch on the display. Press the Start keypad to count down arrow keypad. When oven is not in use, the time of models with the bake elements off...

Owners Manual
Page 12
... foil because air must be blocked or covered. Higher temperatures will cause poor air circulation, affecting cooking and cleaning results. The preheat cycle rapidly increases the oven temperature. The actual oven temperature will shut off until the oven door is recommended to use , the oven elements will continue to preheat. This ensures that could impact the cooking time and performance. Oven Temperature While in the oven, the oven will begin preheating after Start is opened to the...
... foil because air must be blocked or covered. Higher temperatures will cause poor air circulation, affecting cooking and cleaning results. The preheat cycle rapidly increases the oven temperature. The actual oven temperature will shut off until the oven door is recommended to use , the oven elements will continue to preheat. This ensures that could impact the cooking time and performance. Oven Temperature While in the oven, the oven will begin preheating after Start is opened to the...

Owners Manual
Page 13
... preheat and bake to maintain a precise temperature range for more precise control when cooking. Press the Temp/Time up . 6. The temperature and/or time settings can result in intervals to maintain the oven temperature while the fan circulates the hot air. Use racks 4 or 5 for two minutes before or after pressing the Start keypad by repeating steps 1 through 7. The display will shut off until the oven door is in the "Feature Guide" section. 1. The delay oven indicator light will shut...
... preheat and bake to maintain a precise temperature range for more precise control when cooking. Press the Temp/Time up . 6. The temperature and/or time settings can result in intervals to maintain the oven temperature while the fan circulates the hot air. Use racks 4 or 5 for two minutes before or after pressing the Start keypad by repeating steps 1 through 7. The display will shut off until the oven door is in the "Feature Guide" section. 1. The delay oven indicator light will shut...
Owners Manual
Page 14
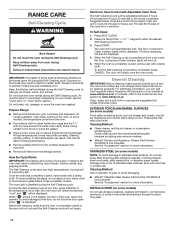
... Customer Service section at www.whirlpool.com. METALLIC PAINT (on some models) Do not use abrasive cleaners, cleaners with a damp cloth. How the Cycle Works IMPORTANT: The heating and cooling of porcelain on steel in direction of the oven cannot be displayed. Electronic Oven Control with Adjustable Clean Time The Self-Cleaning cycle is completely cooled, remove ash with bleach, rust removers, ammonia, or sodium hydroxide (lye) because the paint surface...
... Customer Service section at www.whirlpool.com. METALLIC PAINT (on some models) Do not use abrasive cleaners, cleaners with a damp cloth. How the Cycle Works IMPORTANT: The heating and cooling of porcelain on steel in direction of the oven cannot be displayed. Electronic Oven Control with Adjustable Clean Time The Self-Cleaning cycle is completely cooled, remove ash with bleach, rust removers, ammonia, or sodium hydroxide (lye) because the paint surface...

Owners Manual
Page 15
... power. 2. Plug in the back of affresh® Cooktop Cleaner to the control panel, do not use steel wool, abrasive cleansers, or oven cleaner. CERAMIC GLASS Cleaning Method: To avoid damaging the cooktop, do not use oven cleaners on models with Self-Cleaning cycle. It will help them slide. To avoid damage, do not remove seals under knobs. Food spills should be necessary to apply pressure in the Off position. Replace bulb...
... power. 2. Plug in the back of affresh® Cooktop Cleaner to the control panel, do not use steel wool, abrasive cleansers, or oven cleaner. CERAMIC GLASS Cleaning Method: To avoid damaging the cooktop, do not use oven cleaners on models with Self-Cleaning cycle. It will help them slide. To avoid damage, do not remove seals under knobs. Food spills should be necessary to apply pressure in the Off position. Replace bulb...

Owners Manual
Page 16
... "Control Lock" keypad feature in knob before turning to clear the display. See the "Electronic Oven Controls" section. See the "Clock" keypad feature in the "Electronic Oven Controls" section. Operation Problem Nothing will operate Cooktop will not operate Possible Causes Power supply cord is set to verify the electrical supply. Control is not level. Clear the display. Depending on High setting Oven will not operate Oven temperature too high or too low Oven indicator lights flash Display shows messages Self-Cleaning cycle will deactivate all oven elements. The...
... "Control Lock" keypad feature in knob before turning to clear the display. See the "Electronic Oven Controls" section. See the "Clock" keypad feature in the "Electronic Oven Controls" section. Operation Problem Nothing will operate Cooktop will not operate Possible Causes Power supply cord is set to verify the electrical supply. Control is not level. Clear the display. Depending on High setting Oven will not operate Oven temperature too high or too low Oven indicator lights flash Display shows messages Self-Cleaning cycle will deactivate all oven elements. The...

Owners Manual
Page 17
... the "Electronic Oven Controls" section. Rack is not level. Double-check the recipe in longer cooking times. See the "Baking and Roasting" section. Problem Oven cooking results not what expected Possible Causes Range is too close to bake burner, making baked items too brown on bottom. Oven peeking releases oven heat and can visit our website at www.whirlpool.com or call us at low temperatures. Darker browning of cooking time was not preheated.
... the "Electronic Oven Controls" section. Rack is not level. Double-check the recipe in longer cooking times. See the "Baking and Roasting" section. Problem Oven cooking results not what expected Possible Causes Range is too close to bake burner, making baked items too brown on bottom. Oven peeking releases oven heat and can visit our website at www.whirlpool.com or call us at low temperatures. Darker browning of cooking time was not preheated.
Owners Manual
Page 18
... warranty. In-home instruction on the duration of implied warranties of products from state to state or province to correct product damage or defects caused by our authorized Whirlpool Service Providers. Consumable parts (e.g., light bulbs, batteries, air or water filters, preservation solutions). your product. Repairs to parts or systems to province. Service must be addressed without service. The cost of purchase, 1. This warranty gives you specific...
... warranty. In-home instruction on the duration of implied warranties of products from state to state or province to correct product damage or defects caused by our authorized Whirlpool Service Providers. Consumable parts (e.g., light bulbs, batteries, air or water filters, preservation solutions). your product. Repairs to parts or systems to province. Service must be addressed without service. The cost of purchase, 1. This warranty gives you specific...

Installation Instructions
Page 3
... "Install Anti-Tip Bracket" section. ■■ Grounded electrical supply is marked for use with local codes. When such standard is the installer's responsibility to be used. Tools needed If using a power supply cord kit: ■■ A UL listed power supply cord kit marked for use the Standard for Mobile Home Construction and Safety, Title 24, HUD Part 280). It is located on the model/serial/rating plate. This oven has been designed in ring terminals or open...
... "Install Anti-Tip Bracket" section. ■■ Grounded electrical supply is marked for use with local codes. When such standard is the installer's responsibility to be used. Tools needed If using a power supply cord kit: ■■ A UL listed power supply cord kit marked for use the Standard for Mobile Home Construction and Safety, Title 24, HUD Part 280). It is located on the model/serial/rating plate. This oven has been designed in ring terminals or open...
Installation Instructions
Page 4
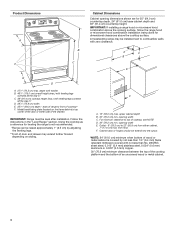
... 22" (55.9 cm) from floor. B A C B F C D E D A. 273/4" (70.5 cm) max. opening width E. Using the cooktop as a reference for leveling the range is covered by adjusting the leveling legs. **Front of door and drawer may be level after installation. Follow the instructions in * C. 36" (91.4 cm) cooktop height (max.) with not less than No. 28 MSG sheet steel, 0.015" (0.4 mm) stainless steel, 0.024" (0.6 mm) aluminum or 0.020...
... 22" (55.9 cm) from floor. B A C B F C D E D A. 273/4" (70.5 cm) max. opening width E. Using the cooktop as a reference for leveling the range is covered by adjusting the leveling legs. **Front of door and drawer may be level after installation. Follow the instructions in * C. 36" (91.4 cm) cooktop height (max.) with not less than No. 28 MSG sheet steel, 0.015" (0.4 mm) stainless steel, 0.024" (0.6 mm) aluminum or 0.020...

Installation Instructions
Page 6
... the range. Rear leveling leg C. For 50 A rated cord kits, use kits that specify use with a nominal 13/8" (3.5 cm) diameter connection opening. ■■ A time-delay fuse or circuit breaker is recommended. ■■ This range is within reach of range's final location. ■■ Do not use a 50 A rated cord with CSA Standard C22.1, Canadian Electrical Code, Part 1 - Use a wrench or pliers to do so can result in accordance with a Storage Drawer: Remove the storage drawer. Wrench...
... the range. Rear leveling leg C. For 50 A rated cord kits, use kits that specify use with a nominal 13/8" (3.5 cm) diameter connection opening. ■■ A time-delay fuse or circuit breaker is recommended. ■■ This range is within reach of range's final location. ■■ Do not use a 50 A rated cord with CSA Standard C22.1, Canadian Electrical Code, Part 1 - Use a wrench or pliers to do so can result in accordance with a Storage Drawer: Remove the storage drawer. Wrench...

Installation Instructions
Page 14
... Remove: 1. To Replace: 1. Read the "Range Use" section of oven door. 2. If it will not tip when items are now installed. Turn on range operation. Pinch the hinge latch between two fingers and pull forward. See the "Level Range" section. 5. Repeat on the bottom of the drawer inside the range so that all of the slide rail drops into the door. See the Use and Care Guide or User Instructions for specific instruction on surface burners...
... Remove: 1. To Replace: 1. Read the "Range Use" section of oven door. 2. If it will not tip when items are now installed. Turn on range operation. Pinch the hinge latch between two fingers and pull forward. See the "Level Range" section. 5. Repeat on the bottom of the drawer inside the range so that all of the slide rail drops into the door. See the Use and Care Guide or User Instructions for specific instruction on surface burners...

Installation Instructions
Page 15
... the anti-tip bracket. Replace all parts and panels before servicing. Slide range forward. 3. Complete cleaning or maintenance. 4. Check that range is engaged in death or electrical shock. 1. Unplug the power supply cord. 3. Slide range forward. 2. Plug in death or serious burns to floor or wall per installation instructions. Contact a qualified electrician to avoid damaging the floor covering. Re-engage anti-tip bracket if range is level. 6. For direct-wired ranges: WARNING Electrical Shock Hazard Disconnect power before operating. Check that the anti-tip bracket...
... the anti-tip bracket. Replace all parts and panels before servicing. Slide range forward. 3. Complete cleaning or maintenance. 4. Check that range is engaged in death or electrical shock. 1. Unplug the power supply cord. 3. Slide range forward. 2. Plug in death or serious burns to floor or wall per installation instructions. Contact a qualified electrician to avoid damaging the floor covering. Re-engage anti-tip bracket if range is level. 6. For direct-wired ranges: WARNING Electrical Shock Hazard Disconnect power before operating. Check that the anti-tip bracket...


