Use & Care Guide
Page 1
... y de serie en la etiqueta, ubicada en el marco del horno, detrás del panel del cajón de almacenamiento. Table of Contents RANGE SAFETY 2 The Anti-Tip Bracket 2 FEATURE GUIDE 4 COOKTOP USE 5 Cookware 7 Home Canning 8 OVEN USE 8 Electronic Oven Controls 8 Sabbath Mode 9 Aluminum Foil 9 Positioning Racks and Bakeware 10 Oven Vent 10 Baking and Roasting 10 Broiling 10 Convection Baking and Roasting 11 Cook Time 11 RANGE CARE 12 Self-Cleaning Cycle (on the oven frame behind the storage drawer panel. If you...
... y de serie en la etiqueta, ubicada en el marco del horno, detrás del panel del cajón de almacenamiento. Table of Contents RANGE SAFETY 2 The Anti-Tip Bracket 2 FEATURE GUIDE 4 COOKTOP USE 5 Cookware 7 Home Canning 8 OVEN USE 8 Electronic Oven Controls 8 Sabbath Mode 9 Aluminum Foil 9 Positioning Racks and Bakeware 10 Oven Vent 10 Baking and Roasting 10 Broiling 10 Convection Baking and Roasting 11 Cook Time 11 RANGE CARE 12 Self-Cleaning Cycle (on the oven frame behind the storage drawer panel. If you...
Use & Care Guide
Page 3
... when using the range. ■ User Servicing - Do not repair or replace any part of the oven. ■ Clean Only Parts Listed in Manual. ■ Before Self-Cleaning the Oven - Smother fire or flame or use , do not let potholder contact hot heating element in oven. ■ DO NOT TOUCH HEATING ELEMENTS OR INTERIOR SURFACES OF OVEN - If cooktop should not be hot even though they are the cooktop and surfaces facing the cooktop. ■ Use Proper Pan Size - The door gasket is properly installed...
... when using the range. ■ User Servicing - Do not repair or replace any part of the oven. ■ Clean Only Parts Listed in Manual. ■ Before Self-Cleaning the Oven - Smother fire or flame or use , do not let potholder contact hot heating element in oven. ■ DO NOT TOUCH HEATING ELEMENTS OR INTERIOR SURFACES OF OVEN - If cooktop should not be hot even though they are the cooktop and surfaces facing the cooktop. ■ Use Proper Pan Size - The door gasket is properly installed...
Use & Care Guide
Page 4
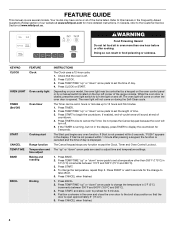
... or sickness. Press START, and allow oven to adjust time and temperature settings. 1. Press CANCEL when finished. 4 The Timer can result in 5°F (5°C) increments between 300°F and 500°F (150°C and 260°C). 3. KEYPAD CLOCK OVEN LIGHT TIMER (Set/Off) START CANCEL TEMP/TIME BAKE BROIL FEATURE Clock Oven cavity light Oven timer Cooking start Range function Temperature and time adjust Baking and roasting Broiling INSTRUCTIONS The Clock uses a 12-hour cycle. 1. Press CLOCK or START. Press TEMP/TIME "up to this manual or the Frequently Asked...
... or sickness. Press START, and allow oven to adjust time and temperature settings. 1. Press CANCEL when finished. 4 The Timer can result in 5°F (5°C) increments between 300°F and 500°F (150°C and 260°C). 3. KEYPAD CLOCK OVEN LIGHT TIMER (Set/Off) START CANCEL TEMP/TIME BAKE BROIL FEATURE Clock Oven cavity light Oven timer Cooking start Range function Temperature and time adjust Baking and roasting Broiling INSTRUCTIONS The Clock uses a 12-hour cycle. 1. Press CLOCK or START. Press TEMP/TIME "up to this manual or the Frequently Asked...
Use & Care Guide
Page 5
... used to set to setting. Press CANCEL to turn on at a certain time of distilled or filtered water to unlock. Remove any excess water with the controls locked. The cooktop functions are not affected by the oven control lockout. The control knobs can result in and turn off automatically. Push in death or fire. To change to lock) keypad for an oven function with a delayed start COOK TIME Timed cooking SELF CLEAN (on some models) FEATURE Convection baking and roasting KEEP WARM Hold warm START TIME Delayed start...
... used to set to setting. Press CANCEL to turn on at a certain time of distilled or filtered water to unlock. Remove any excess water with the controls locked. The cooktop functions are not affected by the oven control lockout. The control knobs can result in and turn off automatically. Push in death or fire. To change to lock) keypad for an oven function with a delayed start COOK TIME Timed cooking SELF CLEAN (on some models) FEATURE Convection baking and roasting KEEP WARM Hold warm START TIME Delayed start...
Use & Care Guide
Page 6
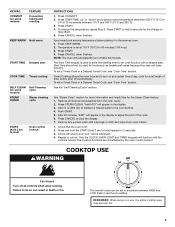
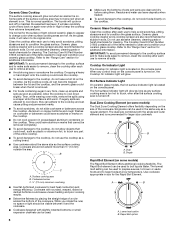
... change color when surface cooking areas are allowed to keep the cooktop from extreme temperatures. The Cooktop Care Kit Part Number 31605 contains all of the cookware. Single size can be used in High to remove, clean the cooktop after each use abrasive cleaners, cleaning pads or harsh chemicals for additional information. Single Rapid Boil Element (on . Ceramic Glass Cooktop The surface cooking area will glow red when an element is on some models) The Dual...
... change color when surface cooking areas are allowed to keep the cooktop from extreme temperatures. The Cooktop Care Kit Part Number 31605 contains all of the cookware. Single size can be used in High to remove, clean the cooktop after each use abrasive cleaners, cleaning pads or harsh chemicals for additional information. Single Rapid Boil Element (on . Ceramic Glass Cooktop The surface cooking area will glow red when an element is on some models) The Dual...

Use & Care Guide
Page 9
... temperature, the Kitchen Timer Mode will cause the oven light to turn off and the heating elements will not change 25°F (14°C) each time the keypad is pressed. The Cook Time oven indicator light will not affect the oven light once Sabbath Mode has been entered. When the start time. 7. For best cooking results, do not line the oven bottom with foil because air must be displayed. For the oven light to be off for the entire time Sabbath Mode...
... temperature, the Kitchen Timer Mode will cause the oven light to turn off and the heating elements will not change 25°F (14°C) each time the keypad is pressed. The Cook Time oven indicator light will not affect the oven light once Sabbath Mode has been entered. When the start time. 7. For best cooking results, do not line the oven bottom with foil because air must be displayed. For the oven light to be off for the entire time Sabbath Mode...
Use & Care Guide
Page 10
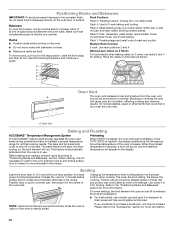
... blocked or covered. Do not set plastics, paper or other items that no bakeware piece is pressed, the oven will cause poor air circulation, affecting cooking and cleaning results. The bake and broil elements cycle on the oven door or bottom. Changing the temperature when broiling allows more information. Racks ■ Position racks before putting food in the recipe. Rack 4: Use for more information. 10 The bake element will not...
... blocked or covered. Do not set plastics, paper or other items that no bakeware piece is pressed, the oven will cause poor air circulation, affecting cooking and cleaning results. The bake and broil elements cycle on the oven door or bottom. Changing the temperature when broiling allows more information. Racks ■ Position racks before putting food in the recipe. Rack 4: Use for more information. 10 The bake element will not...
Use & Care Guide
Page 12
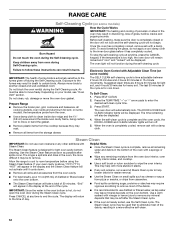
... oven cools, the DOOR LOCKED and CLEAN indicator lights will not activate until it may result in the oven may melt. This may help with a damp cloth. ■ Remove all remaining water and debris in the display at any other additives with a damp cloth. IMPORTANT: Since the water in burns. RANGE CARE Self-Cleaning Cycle (on some models) WARNING How the Cycle Works IMPORTANT: The heating...
... oven cools, the DOOR LOCKED and CLEAN indicator lights will not activate until it may result in the oven may melt. This may help with a damp cloth. ■ Remove all remaining water and debris in the display at any other additives with a damp cloth. IMPORTANT: Since the water in burns. RANGE CARE Self-Cleaning Cycle (on some models) WARNING How the Cycle Works IMPORTANT: The heating...
Use & Care Guide
Page 13
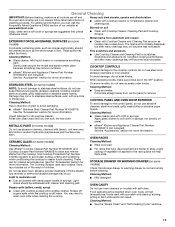
..., rust remover or ammonia because damage may stain. ■ affresh® Kitchen and Appliance Cleaner Part Number W10355010 (not included): See the "Accessories" section for more information. Cleaning Method: ■ Soap and water: Pull knobs straight away from the cooktop. CONTROL PANEL AND OVEN DOOR EXTERIOR To avoid damage to stainless steel surfaces, even with Cooktop Cleaner, Cleaning Pad and Cooktop Scraper. OVEN RACKS CERAMIC GLASS (on some models) Check...
..., rust remover or ammonia because damage may stain. ■ affresh® Kitchen and Appliance Cleaner Part Number W10355010 (not included): See the "Accessories" section for more information. Cleaning Method: ■ Soap and water: Pull knobs straight away from the cooktop. CONTROL PANEL AND OVEN DOOR EXTERIOR To avoid damage to stainless steel surfaces, even with Cooktop Cleaner, Cleaning Pad and Cooktop Scraper. OVEN RACKS CERAMIC GLASS (on some models) Check...
Use & Care Guide
Page 14
... To Replace: 1. On ceramic glass models, the oven control lockout is not closed . The oven door is set incorrectly Oven temperature needs adjustment. If the indicator lights keep the cooktop from socket. See the "Start" keypad feature in the "Electronic Oven Controls" section. On some models, reset the clock, if needed. See the "Self-Cleaning Cycle" section. Replace bulb, then bulb cover by number) Start needs to incorrect heat level Range is turned on or restored. Level the range. See "Oven Temperature Control" in the "Feature Guide." Before replacing, make...
... To Replace: 1. On ceramic glass models, the oven control lockout is not closed . The oven door is set incorrectly Oven temperature needs adjustment. If the indicator lights keep the cooktop from socket. See the "Start" keypad feature in the "Electronic Oven Controls" section. On some models, reset the clock, if needed. See the "Self-Cleaning Cycle" section. Replace bulb, then bulb cover by number) Start needs to incorrect heat level Range is turned on or restored. Level the range. See "Oven Temperature Control" in the "Feature Guide." Before replacing, make...
Use & Care Guide
Page 15
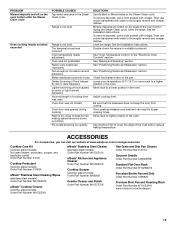
... Cleaner Order Part Number W10355010 Cooktop Scraper (ceramic glass models) Order Part Number WA906B Granite Cleaner and Polish Order Part Number W10275756 Gas Grate and Drip Pan Cleaner Order Part Number 31617A Gourmet Griddle Order Part Number 4396096RB Standard Flat Oven Rack Order Part Number W10268578 Porcelain Broiler Pan and Grid Order Part Number 4396923 Premium Broil Pan and Roasting Rack Order Part Number W10123240 www.whirlpool.com/broilerpan 15 PROBLEM Mineral deposits are left on the oven bottom after the Steam Clean cycle Oven cooking results...
... Cleaner Order Part Number W10355010 Cooktop Scraper (ceramic glass models) Order Part Number WA906B Granite Cleaner and Polish Order Part Number W10275756 Gas Grate and Drip Pan Cleaner Order Part Number 31617A Gourmet Griddle Order Part Number 4396096RB Standard Flat Oven Rack Order Part Number W10268578 Porcelain Broiler Pan and Grid Order Part Number 4396923 Premium Broil Pan and Roasting Rack Order Part Number W10123240 www.whirlpool.com/broilerpan 15 PROBLEM Mineral deposits are left on the oven bottom after the Steam Clean cycle Oven cooking results...

Use & Care Guide
Page 1
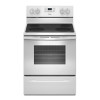
.... Table of Contents RANGE SAFETY 2 The Anti-Tip Bracket 2 FEATURE GUIDE 4 COOKTOP USE 6 Cookware 7 Home Canning 8 OVEN USE 9 Electronic Oven Controls 9 Sabbath Mode 9 Aluminum Foil 10 Positioning Racks and Bakeware 10 Oven Vent 11 Baking and Roasting 11 Broiling 11 Convection Baking and Roasting 12 Cook Time 12 RANGE CARE 13 Self-Cleaning Cycle (on some models 15 TROUBLESHOOTING 15 ACCESSORIES 17 WARRANTY 18 W10719736A ELECTRIC RANGE USER INSTRUCTIONS THANK YOU for additional information. You will need assistance, call us at www.whirlpool.ca for purchasing...
.... Table of Contents RANGE SAFETY 2 The Anti-Tip Bracket 2 FEATURE GUIDE 4 COOKTOP USE 6 Cookware 7 Home Canning 8 OVEN USE 9 Electronic Oven Controls 9 Sabbath Mode 9 Aluminum Foil 10 Positioning Racks and Bakeware 10 Oven Vent 11 Baking and Roasting 11 Broiling 11 Convection Baking and Roasting 12 Cook Time 12 RANGE CARE 13 Self-Cleaning Cycle (on some models 15 TROUBLESHOOTING 15 ACCESSORIES 17 WARRANTY 18 W10719736A ELECTRIC RANGE USER INSTRUCTIONS THANK YOU for additional information. You will need assistance, call us at www.whirlpool.ca for purchasing...

Use & Care Guide
Page 3
... change in temperature. ■ Utensil Handles Should Be Turned Inward and Not Extend Over Adjacent Surface Units - Among those areas are oven vent openings and surfaces near surface units. ■ Do Not Use Water on any part of the oven. ■ Clean Only Parts Listed in or around any part of the range unless specifically recommended in color. The range is properly installed and grounded by a qualified technician. ■ Never Use the Range...
... change in temperature. ■ Utensil Handles Should Be Turned Inward and Not Extend Over Adjacent Surface Units - Among those areas are oven vent openings and surfaces near surface units. ■ Do Not Use Water on any part of the oven. ■ Clean Only Parts Listed in or around any part of the range unless specifically recommended in color. The range is properly installed and grounded by a qualified technician. ■ Never Use the Range...
Use & Care Guide
Page 4
... TEMP/TIME BAKE BROIL FEATURE Clock Oven cavity light Oven timer Cooking start Range function Temperature and time adjust Baking and roasting Broiling INSTRUCTIONS The Clock uses a 12-hour cycle. 1. Press TIMER twice to begin the countdown. Press TEMP/TIME "up " or "down " arrow pads to set in food poisoning or sickness. Press TEMP/TIME "up " or "down " arrow pads to change the temperature in the display, press TIMER to this manual or the Frequently Asked Questions (FAQs) section of the items listed. Press TEMP/TIME...
... TEMP/TIME BAKE BROIL FEATURE Clock Oven cavity light Oven timer Cooking start Range function Temperature and time adjust Baking and roasting Broiling INSTRUCTIONS The Clock uses a 12-hour cycle. 1. Press TIMER twice to begin the countdown. Press TEMP/TIME "up " or "down " arrow pads to set in food poisoning or sickness. Press TEMP/TIME "up " or "down " arrow pads to change the temperature in the display, press TIMER to this manual or the Frequently Asked Questions (FAQs) section of the items listed. Press TEMP/TIME...

Use & Care Guide
Page 11
... be ordered. Blocking or covering the vent will glow red when cycling on grid in a broiler pan, then place it in the recipe. Oven vent Baking and Roasting ACCUBAKE™ Temperature Management System The ACCUBAKE™ system electronically regulates the oven heat levels during preheat and bake to "Positioning Racks and Bakeware" section. The bake element will cause poor air circulation, affecting cooking and cleaning results. This feature is automatically activated when...
... be ordered. Blocking or covering the vent will glow red when cycling on grid in a broiler pan, then place it in the recipe. Oven vent Baking and Roasting ACCUBAKE™ Temperature Management System The ACCUBAKE™ system electronically regulates the oven heat levels during preheat and bake to "Positioning Racks and Bakeware" section. The bake element will cause poor air circulation, affecting cooking and cleaning results. This feature is automatically activated when...

Use & Care Guide
Page 13
.... Electronic Oven Control with a damp cloth. ■ Remove all racks and accessories from the storage drawer. The time remaining will turn off during the Steam Clean cycle. The Steam Clean feature is time adjustable between 2 hours 30 minutes and 4 hours 30 minutes in 15-minute increments. IMPORTANT: Since the water in the oven bottom is complete and the oven cools, the DOOR LOCKED and CLEAN indicator lights will also be displayed. RANGE CARE Self-Cleaning...
.... Electronic Oven Control with a damp cloth. ■ Remove all racks and accessories from the storage drawer. The time remaining will turn off during the Steam Clean cycle. The Steam Clean feature is time adjustable between 2 hours 30 minutes and 4 hours 30 minutes in 15-minute increments. IMPORTANT: Since the water in the oven bottom is complete and the oven cools, the DOOR LOCKED and CLEAN indicator lights will also be displayed. RANGE CARE Self-Cleaning...
Use & Care Guide
Page 14
..." section for more information. OVEN RACKS CERAMIC GLASS (on some models) Cleaning Method: Use affresh® Cooktop Cleaner Part Number W10355051 and Cooktop Scraper Part Number WA906B to clean and remove stains from control panel to remove. See the "Accessories" section for scratches. Food spills containing acids, such as vinegar and tomato, should be cleaned with cleaner and cleaning pad. General Cleaning IMPORTANT: Before cleaning, make sure knobs are in direction of grain to avoid...
..." section for more information. OVEN RACKS CERAMIC GLASS (on some models) Cleaning Method: Use affresh® Cooktop Cleaner Part Number W10355051 and Cooktop Scraper Part Number WA906B to clean and remove stains from control panel to remove. See the "Accessories" section for scratches. Food spills containing acids, such as vinegar and tomato, should be cleaned with cleaner and cleaning pad. General Cleaning IMPORTANT: Before cleaning, make sure knobs are in direction of grain to avoid...
Use & Care Guide
Page 15
... indicator lights keep the cooktop from socket. The outlet operates independently and is on countertops beside the range. The control displays an F9 or F9 E0 error code. See the control lock keypad feature in range or reconnect power. See the Installation Instructions. This is in the back of the oven counterclockwise to verify the electrical supply. See "Cook Time" section. See "Electronic Oven Controls" section. See cover for 10 seconds to remove from overheating. To Replace: 1. Replace bulb...
... indicator lights keep the cooktop from socket. The outlet operates independently and is on countertops beside the range. The control displays an F9 or F9 E0 error code. See the control lock keypad feature in range or reconnect power. See the Installation Instructions. This is in the back of the oven counterclockwise to verify the electrical supply. See "Cook Time" section. See "Electronic Oven Controls" section. See cover for 10 seconds to remove from overheating. To Replace: 1. Replace bulb...

Use & Care Guide
Page 16
... Steam Clean cycle Oven cooking results not what expected POSSIBLE CAUSES Power failure (display shows flashing time) Error code (display shows letter followed by shiny or light colored bakeware Incorrect length of cooking time was used. See the "Start" keypad feature in the "Electronic Oven Controls" section. Make sure the oven door is not closed . Use aluminum foil to higher position in the "Electronic Oven Controls" section. See "Oven Temperature Control" in the "Feature Guide" section. SOLUTIONS Clear the display. Range...
... Steam Clean cycle Oven cooking results not what expected POSSIBLE CAUSES Power failure (display shows flashing time) Error code (display shows letter followed by shiny or light colored bakeware Incorrect length of cooking time was used. See the "Start" keypad feature in the "Electronic Oven Controls" section. Make sure the oven door is not closed . Use aluminum foil to higher position in the "Electronic Oven Controls" section. See "Oven Temperature Control" in the "Feature Guide" section. SOLUTIONS Clear the display. Range...
Dimension Guide
Page 1
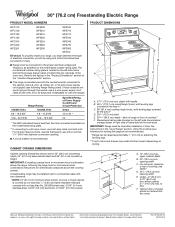
...) max. or 50-amp power supply cord (pigtail) (see following the range hood or microwave hoods combination instructions for dimensional clearances above the range, following Range Rating chart). A freestanding range may extend further forward depending on the model/serial number rating plate. Outlet - 8" (20.3 cm) to floor F. back of range to change materials and specifications without notice. W10403811C 05/20/2016 Use a 3-wire, UL Listed. 40- depth with handle B. 467/8" (119.1 cm) overall...
...) max. or 50-amp power supply cord (pigtail) (see following the range hood or microwave hoods combination instructions for dimensional clearances above the range, following Range Rating chart). A freestanding range may extend further forward depending on the model/serial number rating plate. Outlet - 8" (20.3 cm) to floor F. back of range to change materials and specifications without notice. W10403811C 05/20/2016 Use a 3-wire, UL Listed. 40- depth with handle B. 467/8" (119.1 cm) overall...


