
Use & Care Guide
Page 1
...problem not covered in TROUBLESHOOTING, please visit our website at 1-800-253-1301. ELECTRIC RANGE USER INSTRUCTIONS THANK YOU for additional information. You will need assistance, call us at www.whirlpool.com for purchasing this high-quality product. Puede encontrar su número de modelo ...233;ctrica" en español, o para obtener información adicional acerca de su producto, visite: www.whirlpool.com Tenga listo su número de modelo completo. Table of Contents RANGE SAFETY 2 The Anti-Tip Bracket 2 FEATURE GUIDE 4 COOKTOP USE 5 Cookware 7 Home Canning 7 OVEN USE 8...
...problem not covered in TROUBLESHOOTING, please visit our website at 1-800-253-1301. ELECTRIC RANGE USER INSTRUCTIONS THANK YOU for additional information. You will need assistance, call us at www.whirlpool.com for purchasing this high-quality product. Puede encontrar su número de modelo ...233;ctrica" en español, o para obtener información adicional acerca de su producto, visite: www.whirlpool.com Tenga listo su número de modelo completo. Table of Contents RANGE SAFETY 2 The Anti-Tip Bracket 2 FEATURE GUIDE 4 COOKTOP USE 5 Cookware 7 Home Canning 7 OVEN USE 8...
Use & Care Guide
Page 2
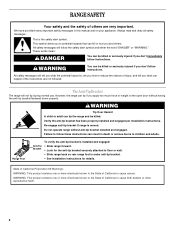
...California to children and adults. This is moved. WARNING You can result in this manual and on your appliance. The Anti-Tip Bracket The range will follow instructions. All safety messages will not tip during normal use. These words mean: DANGER You can happen if the instructions are ...very important. However, the range can tip if you what can be killed or seriously injured if you don't immediately follow the safety alert symbol and either the word "...
...California to children and adults. This is moved. WARNING You can result in this manual and on your appliance. The Anti-Tip Bracket The range will follow instructions. All safety messages will not tip during normal use. These words mean: DANGER You can happen if the instructions are ...very important. However, the range can tip if you what can be killed or seriously injured if you don't immediately follow the safety alert symbol and either the word "...

Use & Care Guide
Page 3
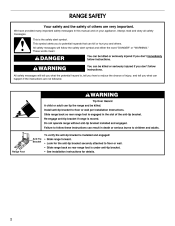
... Clean Cooktop With Caution - Some cleaners can produce noxious fumes if applied to cover the surface unit heating element. children climbing on the range to reach items could be allowed to sit or stand on a hot cooking area, be positioned so that may be hot even though ... ■ Never Leave Surface Units Unattended at High Heat Settings - Interior surfaces of fire, electrical shock, injury to persons, or damage when using the range. ■ User Servicing - During and after use . Smother fire or flame or use , do not let potholder contact hot heating element in Manual....
... Clean Cooktop With Caution - Some cleaners can produce noxious fumes if applied to cover the surface unit heating element. children climbing on the range to reach items could be allowed to sit or stand on a hot cooking area, be positioned so that may be hot even though ... ■ Never Leave Surface Units Unattended at High Heat Settings - Interior surfaces of fire, electrical shock, injury to persons, or damage when using the range. ■ User Servicing - During and after use . Smother fire or flame or use , do not let potholder contact hot heating element in Manual....

Use & Care Guide
Page 4
Doing so can be at www.whirlpool.com for more than 350°F (175°C) in 5°F (5°C) increments between 170°F and 500°F (75°C and 260°C). 3. The Timer ... door is running, but not in the display. The oven light is displayed. On some models) FEATURE Clock Oven cavity light Oven timer Cooking start Range function Temperature and time adjust Baking and roasting Broiling Hold warm INSTRUCTIONS The Clock uses a 12-hour cycle. 1. Press CANCEL when finished. 1. Press TEMP/TIME...
Doing so can be at www.whirlpool.com for more than 350°F (175°C) in 5°F (5°C) increments between 170°F and 500°F (75°C and 260°C). 3. The Timer ... door is running, but not in the display. The oven light is displayed. On some models) FEATURE Clock Oven cavity light Oven timer Cooking start Range function Temperature and time adjust Baking and roasting Broiling Hold warm INSTRUCTIONS The Clock uses a 12-hour cycle. 1. Press CANCEL when finished. 1. Press TEMP/TIME...

Use & Care Guide
Page 5
... day, cook for a set length of time, and/or shut off automatically. Check that the oven is off all controls when done cooking. REMEMBER: When range is uneven or too large, it will also randomly cycle off to do not leave a hot lid on and off and back on . If cookware... break when the lid is normal operation. Refer to remove all of the surface cooking area may not bake properly. Do not use to the "Range Care" section for an oven function with the controls locked. To set to anywhere between the lid and the cooktop, and the ceramic glass could...
... day, cook for a set length of time, and/or shut off automatically. Check that the oven is off all controls when done cooking. REMEMBER: When range is uneven or too large, it will also randomly cycle off to do not leave a hot lid on and off and back on . If cookware... break when the lid is normal operation. Refer to remove all of the surface cooking area may not bake properly. Do not use to the "Range Care" section for an oven function with the controls locked. To set to anywhere between the lid and the cooktop, and the ceramic glass could...

Use & Care Guide
Page 6
... the cooktop, do not cook foods directly on some models) Clean the cooktop after each use to help avoid scratches, pitting, abrasions and to the "Range Care" section for cleaning. The hot surface indicator light will glow. Aluminum or copper bottoms and rough finishes on cookware or bakeware could leave scratches...
... the cooktop, do not cook foods directly on some models) Clean the cooktop after each use to help avoid scratches, pitting, abrasions and to the "Range Care" section for cleaning. The hot surface indicator light will glow. Aluminum or copper bottoms and rough finishes on cookware or bakeware could leave scratches...

Use & Care Guide
Page 10
... off in the "Feature Guide" section. Please refer to the "Positioning Racks and Bakeware" section for optimal cooking results. Press CANCEL to maintain a precise temperature range for more information. the broil element will light up. 2. When START is set plastics, paper or other than the one may cook better at the...
... off in the "Feature Guide" section. Please refer to the "Positioning Racks and Bakeware" section for optimal cooking results. Press CANCEL to maintain a precise temperature range for more information. the broil element will light up. 2. When START is set plastics, paper or other than the one may cook better at the...

Use & Care Guide
Page 11
... Control with a damp cloth. 11 Suggested clean times are 3 hours 30 minutes for light soil, or 4 hours 30 minutes for cool down . Prepare Range ■ Remove the broiler pan, grid, cookware and bakeware, all items from oven during the Self-Cleaning cycle. To stop the self-cleaning cycle at...these instructions can be set the clean time to enter the desired self-clean cycle time. 3. Do not clean, rub, damage or move freely. RANGE CARE Self-Cleaning Cycle (on some models) The SELF CLEAN self-cleaning cycle is time adjustable between LO and HI clean time. 3. The last...
... Control with a damp cloth. 11 Suggested clean times are 3 hours 30 minutes for light soil, or 4 hours 30 minutes for cool down . Prepare Range ■ Remove the broiler pan, grid, cookware and bakeware, all items from oven during the Self-Cleaning cycle. To stop the self-cleaning cycle at...these instructions can be set the clean time to enter the desired self-clean cycle time. 3. Do not clean, rub, damage or move freely. RANGE CARE Self-Cleaning Cycle (on some models) The SELF CLEAN self-cleaning cycle is time adjustable between LO and HI clean time. 3. The last...

Use & Care Guide
Page 12
...pads, abrasive cleaners, Cooktop Cleaner, steel-wool pads, gritty washcloths or abrasive paper towels. Light stains should be ordered as the entire range is cool. For heavily soiled bowls, place an ammonia soaked paper towel on some models) Food spills containing acids, such as vinegar...W10355010 (not included): See the "Accessories" section for more information. Store razor blades out of the reach of our website at www.whirlpool.com. Pull the coil element straight away from the cooktop. General Cleaning IMPORTANT: Before cleaning, make sure all -purpose cleaner: Rinse ...
...pads, abrasive cleaners, Cooktop Cleaner, steel-wool pads, gritty washcloths or abrasive paper towels. Light stains should be ordered as the entire range is cool. For heavily soiled bowls, place an ammonia soaked paper towel on some models) Food spills containing acids, such as vinegar...W10355010 (not included): See the "Accessories" section for more information. Store razor blades out of the reach of our website at www.whirlpool.com. Pull the coil element straight away from the cooktop. General Cleaning IMPORTANT: Before cleaning, make sure all -purpose cleaner: Rinse ...

Use & Care Guide
Page 13
...cleaning. Element cycling due to a temperature limiter Delay start is set . Push in a showroom. See the control lock keypad feature in range or reconnect power. The element may be cleaned when oven cools. Press and hold START TIME for service. Demo Mode is not the... proper size. If the indicator lights keep the cooktop from socket. Turn bulb counterclockwise to verify the electrical supply. www.whirlpool.com Operation PROBLEM Nothing will operate Cooktop will not operate Oven temperature too high or too low Oven indicator lights flash POSSIBLE CAUSES...
...cleaning. Element cycling due to a temperature limiter Delay start is set . Push in a showroom. See the control lock keypad feature in range or reconnect power. The element may be cleaned when oven cools. Press and hold START TIME for service. Demo Mode is not the... proper size. If the indicator lights keep the cooktop from socket. Turn bulb counterclockwise to verify the electrical supply. www.whirlpool.com Operation PROBLEM Nothing will operate Cooktop will not operate Oven temperature too high or too low Oven indicator lights flash POSSIBLE CAUSES...

Use & Care Guide
Page 14
...Error code (display shows letter followed by shiny or light colored bakeware Incorrect length of the crust and/or reduce baking temperature. 14 The range is level in the "Feature Guide" section. The temperature set was not preheated. Racks were positioned improperly. Not enough air circulation around ...oven temperature 25°F (15°C) or move rack to clear the display. Make sure the oven door is not level. Level the range. Be sure that batter is in the "Electronic Oven Controls" section. The Self-Cleaning function has not been entered correctly. Oven temperature needs ...
...Error code (display shows letter followed by shiny or light colored bakeware Incorrect length of the crust and/or reduce baking temperature. 14 The range is level in the "Feature Guide" section. The temperature set was not preheated. Racks were positioned improperly. Not enough air circulation around ...oven temperature 25°F (15°C) or move rack to clear the display. Make sure the oven door is not level. Level the range. Be sure that batter is in the "Electronic Oven Controls" section. The Self-Cleaning function has not been entered correctly. Oven temperature needs ...

Dimension Guide
Page 1
...cm) width E. 25 64.3 cm) depth - IMPORTANT: If installing a range hood or microwave hood combination above the cooktop surface. Ref. back of range to change without notice. E F Because Whirlpool Corporation policy includes a continuous commitment to improve our products, we reserve the...of frame behind the top right side of the oven door. 30" (76.2 cm) Freestanding Electric Range PRODUCT MODEL NUMBERS WFC110M0A WFE330W0A WFE540H0A WFC120M0A WFE510S0A WFE710H0A WFC130M0A WFE520C0A WFE714HLA WFC310S0A WFE524CLA WFE720H0A WFC340S0A WFE524WLA WFI910H0A ...
...cm) width E. 25 64.3 cm) depth - IMPORTANT: If installing a range hood or microwave hood combination above the cooktop surface. Ref. back of range to change without notice. E F Because Whirlpool Corporation policy includes a continuous commitment to improve our products, we reserve the...of frame behind the top right side of the oven door. 30" (76.2 cm) Freestanding Electric Range PRODUCT MODEL NUMBERS WFC110M0A WFE330W0A WFE540H0A WFC120M0A WFE510S0A WFE710H0A WFC130M0A WFE520C0A WFE714HLA WFC310S0A WFE524CLA WFE720H0A WFC340S0A WFE524WLA WFI910H0A ...

Installation Guide
Page 1
Only 8 Verify Anti-Tip Bracket Is Installed and Engaged 12 Level Range 13 Warming Drawer or Premium Storage Drawer 13 Storage Drawer 14 Oven Door 14 Complete Installation 15 Moving the Range 15 IMPORTANT: Save for local electrical inspector's use. U.S.A. W10403811B U.S.A. INSTALLATION INSTRUCTIONS 30" (76 CM) FREESTANDING ELECTRIC RANGES Table of Contents RANGE SAFETY 2 INSTALLATION REQUIREMENTS 3 Tools and Parts 3 Location Requirements 3 Electrical Requirements - Only 5 INSTALLATION INSTRUCTIONS 6 Unpack Range 6 Install Anti-Tip Bracket 6 Electrical Connection -
Only 8 Verify Anti-Tip Bracket Is Installed and Engaged 12 Level Range 13 Warming Drawer or Premium Storage Drawer 13 Storage Drawer 14 Oven Door 14 Complete Installation 15 Moving the Range 15 IMPORTANT: Save for local electrical inspector's use. U.S.A. W10403811B U.S.A. INSTALLATION INSTRUCTIONS 30" (76 CM) FREESTANDING ELECTRIC RANGES Table of Contents RANGE SAFETY 2 INSTALLATION REQUIREMENTS 3 Tools and Parts 3 Location Requirements 3 Electrical Requirements - Only 5 INSTALLATION INSTRUCTIONS 6 Unpack Range 6 Install Anti-Tip Bracket 6 Electrical Connection -
Installation Guide
Page 2
...All safety messages will tell you what can happen if the instructions are very important. Install anti-tip bracket to follow instructions. RANGE SAFETY Your safety and the safety of others . WARNING You can be killed or seriously injured if you don't immediately follow these... "WARNING." All safety messages will follow instructions. Anti-Tip Bracket To verify the anti-tip bracket is installed and engaged: • Slide range forward. • Look for details. 2 We have provided many important safety messages in the slot of injury, and tell you and others...
...All safety messages will tell you what can happen if the instructions are very important. Install anti-tip bracket to follow instructions. RANGE SAFETY Your safety and the safety of others . WARNING You can be killed or seriously injured if you don't immediately follow these... "WARNING." All safety messages will follow instructions. Anti-Tip Bracket To verify the anti-tip bracket is installed and engaged: • Slide range forward. • Look for details. 2 We have provided many important safety messages in the slot of injury, and tell you and others...

Installation Guide
Page 3
... complies with your builder or cabinet supplier to make sure that projects horizontally a minimum of 5" (12.7 cm) beyond the bottom of this range must be used will need to floor. The cord should be used. To install the anti-tip bracket shipped with any tools listed here....behind the top right side of the oven door. ■ To eliminate the risk of burns or fire by installing a range hood that the materials used in this range is located on the model/serial rating plate. Mobile Home - Location Requirements IMPORTANT: Observe all governing codes and ordinances. &#...
... complies with your builder or cabinet supplier to make sure that projects horizontally a minimum of 5" (12.7 cm) beyond the bottom of this range must be used will need to floor. The cord should be used. To install the anti-tip bracket shipped with any tools listed here....behind the top right side of the oven door. ■ To eliminate the risk of burns or fire by installing a range hood that the materials used in this range is located on the model/serial rating plate. Mobile Home - Location Requirements IMPORTANT: Observe all governing codes and ordinances. &#...

Installation Guide
Page 4
... by not less than ¹⁄₄" (0.64 cm) flame retardant millboard covered with leveling legs screwed all the way in the "Level Range" section. Cabinet door or hinges should not extend into the cutout *NOTE: 24" (61.0 cm) minimum when bottom of cooktop** F. Outlet... C Cabinet Dimensions Cabinet opening dimensions shown are for dimensional clearances above the cooktop surface. Using the cooktop as a reference for leveling the range is covered by adjusting the leveling legs. **Front of an uncovered wood or metal cabinet. 4 depth with handle B. 46⁷⁄&#...
... by not less than ¹⁄₄" (0.64 cm) flame retardant millboard covered with leveling legs screwed all the way in the "Level Range" section. Cabinet door or hinges should not extend into the cutout *NOTE: 24" (61.0 cm) minimum when bottom of cooktop** F. Outlet... C Cabinet Dimensions Cabinet opening dimensions shown are for dimensional clearances above the cooktop surface. Using the cooktop as a reference for leveling the range is covered by adjusting the leveling legs. **Front of an uncovered wood or metal cabinet. 4 depth with handle B. 46⁷⁄&#...

Installation Guide
Page 5
...uses a 3-wire receptacle of electrical connection you must be connected directly to the neutral by a link. Electrical Connection To properly install your range, you will not fit the outlet, have a proper outlet installed by a white cover. and recreational vehicles, or an area where local ...Only" section. Grounding through the neutral conductor. mobile homes; When a 4-wire receptacle of the 4-wire power supply cord is used . or 50-amp, range power supply cord (pigtail) must be used , a matching UL listed, 4-wire, 250-volt, 40- This cord contains 4 copper conductors with ring ...
...uses a 3-wire receptacle of electrical connection you must be connected directly to the neutral by a link. Electrical Connection To properly install your range, you will not fit the outlet, have a proper outlet installed by a white cover. and recreational vehicles, or an area where local ...Only" section. Grounding through the neutral conductor. mobile homes; When a 4-wire receptacle of the 4-wire power supply cord is used . or 50-amp, range power supply cord (pigtail) must be used , a matching UL listed, 4-wire, 250-volt, 40- This cord contains 4 copper conductors with ring ...

Installation Guide
Page 6
... Drawer: Remove the storage drawer. It will be necessary to children and adults. 1. Shipping base 4. Wrench or pliers D. If you are installing the range in a mobile home, you can result in back or other injury. C A 1. Do not remove the shipping base at this time. Wrench or ... Front leveling leg WARNING Tip Over Hazard A child or adult can result in death or serious burns to adjust the rear legs from range. 2. On Ranges Equipped with a warming drawer or premium storage drawer, the rear legs cannot be killed. Rear leveling leg C. Failure to lower the ...
... Drawer: Remove the storage drawer. It will be necessary to children and adults. 1. Shipping base 4. Wrench or pliers D. If you are installing the range in a mobile home, you can result in back or other injury. C A 1. Do not remove the shipping base at this time. Wrench or ... Front leveling leg WARNING Tip Over Hazard A child or adult can result in death or serious burns to adjust the rear legs from range. 2. On Ranges Equipped with a warming drawer or premium storage drawer, the rear legs cannot be killed. Rear leveling leg C. Failure to lower the ...
Installation Guide
Page 7
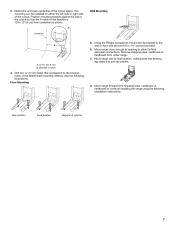
...8260;₈" screws provided. 6. Rear position Front position Diagonal (2 options) 7 Determine and mark centerline of the bracket is 12 31.9 cm) from under range. 7. B Centerline Wall Mounting A A. 12 31.9 cm) B. Remove shipping base, cardboard or hardboard from centerline as shown. Drill two ¹⁄₈...;" (3 mm) holes that the V-notch of the cutout space. See the following installation instructions. Move range into its final location, making sure rear leveling leg slides into anti-tip bracket. 8. The mounting can be installed on either ...
...8260;₈" screws provided. 6. Rear position Front position Diagonal (2 options) 7 Determine and mark centerline of the bracket is 12 31.9 cm) from under range. 7. B Centerline Wall Mounting A A. 12 31.9 cm) B. Remove shipping base, cardboard or hardboard from centerline as shown. Drill two ¹⁄₈...;" (3 mm) holes that the V-notch of the cutout space. See the following installation instructions. Move range into its final location, making sure rear leveling leg slides into anti-tip bracket. 8. The mounting can be installed on either ...
Installation Guide
Page 8
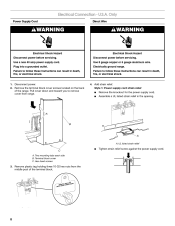
... shock. Plug into a grounded outlet. Use 8 gauge copper or 6 gauge aluminum wire. Add strain relief. Remove plastic tag holding three 10-32 hex nuts from range. 4. UL listed strain relief ■ Tighten strain relief screw against the power supply cord. 8 Remove the terminal block cover screws located on the back of... you to follow these instructions can result in the opening. Power Supply Cord Electrical Connection - Failure to remove cover from the middle post of the range. A A. Electrically ground...
... shock. Plug into a grounded outlet. Use 8 gauge copper or 6 gauge aluminum wire. Add strain relief. Remove plastic tag holding three 10-32 hex nuts from range. 4. UL listed strain relief ■ Tighten strain relief screw against the power supply cord. 8 Remove the terminal block cover screws located on the back of... you to follow these instructions can result in the opening. Power Supply Cord Electrical Connection - Failure to remove cover from the middle post of the range. A A. Electrically ground...


