
Specification Sheet
Page 1
...Ceramic Glass Cooktop Upswept SpillGuard™ Cooktop Electrical Details Amps 40 Volts 120/240 Technical Details Fuel Type Range Type Oven Cooking System Number of Oven Racks Cleaning Type Number of Elements Element Type Element Size/Power Dimensions Product Dimensions (H x W x D) Depth with Door Open 90° Reference Material Install Guide Use & Care Guide Warranty Electric Freestanding Single Oven Thermal 2 Steam Clean 5 Radiant (1) 9"/6" 3000W (1) 9" 2500W (2) 6" 1200W (1) 6" 100W 47-7/8" x 29-7/8" x 27-3/4" 46-11/16" Key Features & Benefits FlexHeat™ Dual Radiant Element...
...Ceramic Glass Cooktop Upswept SpillGuard™ Cooktop Electrical Details Amps 40 Volts 120/240 Technical Details Fuel Type Range Type Oven Cooking System Number of Oven Racks Cleaning Type Number of Elements Element Type Element Size/Power Dimensions Product Dimensions (H x W x D) Depth with Door Open 90° Reference Material Install Guide Use & Care Guide Warranty Electric Freestanding Single Oven Thermal 2 Steam Clean 5 Radiant (1) 9"/6" 3000W (1) 9" 2500W (2) 6" 1200W (1) 6" 100W 47-7/8" x 29-7/8" x 27-3/4" 46-11/16" Key Features & Benefits FlexHeat™ Dual Radiant Element...
Owners Manual
Page 1
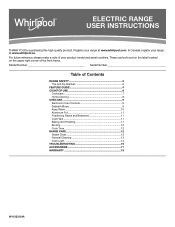
... Anti-Tip Bracket 2 FEATURE GUIDE 4 COOKTOP USE 6 Cookware 7 Home Canning 8 OVEN USE 9 Electronic Oven Controls 9 Sabbath Mode 9 Keep Warm 10 Aluminum Foil 11 Positioning Racks and Bakeware 11 Oven Vent 11 Baking and Roasting 11 Broiling 12 Cook Time 12 RANGE CARE 12 Steam Clean 12 General Cleaning 13 Oven Light 14 TROUBLESHOOTING 15 ACCESSORIES 17 WARRANTY 18 W11333124A Model Number Serial Number Table of the front frame. For future reference, please make a note of your range at www.whirlpool.com. In Canada, register your product model and serial numbers...
... Anti-Tip Bracket 2 FEATURE GUIDE 4 COOKTOP USE 6 Cookware 7 Home Canning 8 OVEN USE 9 Electronic Oven Controls 9 Sabbath Mode 9 Keep Warm 10 Aluminum Foil 11 Positioning Racks and Bakeware 11 Oven Vent 11 Baking and Roasting 11 Broiling 12 Cook Time 12 RANGE CARE 12 Steam Clean 12 General Cleaning 13 Oven Light 14 TROUBLESHOOTING 15 ACCESSORIES 17 WARRANTY 18 W11333124A Model Number Serial Number Table of the front frame. For future reference, please make a note of your range at www.whirlpool.com. In Canada, register your product model and serial numbers...

Owners Manual
Page 3
.... I Proper Installation - I When flambeing foods under the hood, turn the fan on hot surfaces may result in water. Be sure the range is cool. I Use Proper Pan Size - I User Servicing - Boilover causes smoking and greasy spillovers that it is used in or around any part of the range unless specifically recommended in an oven or near these openings, oven doors, and windows of oven doors. Heating elements should break, cleaning solutions and spillovers may ignite. I Do...
.... I Proper Installation - I When flambeing foods under the hood, turn the fan on hot surfaces may result in water. Be sure the range is cool. I Use Proper Pan Size - I User Servicing - Boilover causes smoking and greasy spillovers that it is used in or around any part of the range unless specifically recommended in an oven or near these openings, oven doors, and windows of oven doors. Heating elements should break, cleaning solutions and spillovers may ignite. I Do...

Owners Manual
Page 4
... in oven more detailed instructions. Press TIMER SET/OFF. 2. Press the Temp/Time up or down arrow keypad to turn off . Press TIMER SET/OFF to the minutes. The Start keypad begins any function except the Timer, Warm Zone, and Oven Control Lockout. A tone will blink until desired temperature is displayed. Press the Start keypad. 4. Press the Start keypad. 5. Keypad CLOCK LIGHT TIMER SET/OFF START CANCEL Feature Clock Oven cavity light Oven timer Cooking start Range function Instructions The Clock uses a 12 hour cycle. 1. Press LIGHT to set...
... in oven more detailed instructions. Press TIMER SET/OFF. 2. Press the Temp/Time up or down arrow keypad to turn off . Press TIMER SET/OFF to the minutes. The Start keypad begins any function except the Timer, Warm Zone, and Oven Control Lockout. A tone will blink until desired temperature is displayed. Press the Start keypad. 4. Press the Start keypad. 5. Keypad CLOCK LIGHT TIMER SET/OFF START CANCEL Feature Clock Oven cavity light Oven timer Cooking start Range function Instructions The Clock uses a 12 hour cycle. 1. Press LIGHT to set...

Owners Manual
Page 5
... to the oven bottom. 4. Press WARM ZONE again to signal the end of the cook time, a beep will sound if the minimum or maximum temperature is the estimated required cook time as recommended on at a time when using Frozen Bake™ Technology. 2. Press BROIL. 3. Remove any excess water with the controls locked. 5 Keypad FROZEN BAKE BROIL KEEP WARM WARM ZONE DELAY START COOK TIME STEAM CLEAN CONTROL LOCK (Hold 3 sec) Feature Prepackaged food Broiling Hold warm Warming zone Delayed start . Press KEEP WARM. 2.
... to the oven bottom. 4. Press WARM ZONE again to signal the end of the cook time, a beep will sound if the minimum or maximum temperature is the estimated required cook time as recommended on at a time when using Frozen Bake™ Technology. 2. Press BROIL. 3. Remove any excess water with the controls locked. 5 Keypad FROZEN BAKE BROIL KEEP WARM WARM ZONE DELAY START COOK TIME STEAM CLEAN CONTROL LOCK (Hold 3 sec) Feature Prepackaged food Broiling Hold warm Warming zone Delayed start . Press KEEP WARM. 2.
Owners Manual
Page 6
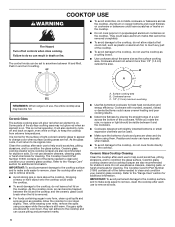
.... Clean the cooktop after each use abrasive cleaners, cleaning pads, or harsh chemicals for additional information. Then, while wearing oven mitts, remove the spills using them. Surface cooking area B. The Cooktop Care Kit Part Number 31605 contains all of pots and pans are clean and dry before using a scraper while the surface is normal operation. B A REMEMBER: When range is on. Ceramic Glass The surface cooking area will glow red when an element is in any part...
.... Clean the cooktop after each use abrasive cleaners, cleaning pads, or harsh chemicals for additional information. Then, while wearing oven mitts, remove the spills using them. Surface cooking area B. The Cooktop Care Kit Part Number 31605 contains all of pots and pans are clean and dry before using a scraper while the surface is normal operation. B A REMEMBER: When range is on. Ceramic Glass The surface cooking area will glow red when an element is in any part...

Owners Manual
Page 7
...larger size cookware. Dual Zone Cooking Element (on the display panel. Dual B. However, the Cooktop On indicator light will glow as long as a regular element. To turn off . Aluminum and copper may scratch the cooktop. When any surface cooking area is in the cover for oven and cooktop use it and the cookware. 1 2 3 1 4 5 6 2 7 8 3 9 1 0 1 1 4 1 2 1 3 5 1 4 1 5 1 6 6 1 7 1 8 7 1 9 2 0 A. Hot Surface Indicator Light On ceramic glass models, the Hot Surface indicator light is turned on , press WARM ZONE and then the Start keypad. 2. Use cookware...
...larger size cookware. Dual Zone Cooking Element (on the display panel. Dual B. However, the Cooktop On indicator light will glow as long as a regular element. To turn off . Aluminum and copper may scratch the cooktop. When any surface cooking area is in the cover for oven and cooktop use it and the cookware. 1 2 3 1 4 5 6 2 7 8 3 9 1 0 1 1 4 1 2 1 3 5 1 4 1 5 1 6 6 1 7 1 8 7 1 9 2 0 A. Hot Surface Indicator Light On ceramic glass models, the Hot Surface indicator light is turned on , press WARM ZONE and then the Start keypad. 2. Use cookware...

Owners Manual
Page 9
... temperature can be changed once the oven is displayed. The adjustment can also be set , no sounds during the Sabbath mode. OVEN USE Odors and smoke are normal when the oven is used the first few times or when it is intended for use on the sales floor with 120 V power connection and permits the control features to be demonstrated without heating elements turning on. Repeat to measure oven temperature. Demo Mode IMPORTANT: This feature...
... temperature can be changed once the oven is displayed. The adjustment can also be set , no sounds during the Sabbath mode. OVEN USE Odors and smoke are normal when the oven is used the first few times or when it is intended for use on the sales floor with 120 V power connection and permits the control features to be demonstrated without heating elements turning on. Repeat to measure oven temperature. Demo Mode IMPORTANT: This feature...

Owners Manual
Page 11
... Temperature Management System electronically regulates the oven heat levels during preheat before turning on the oven. ■■ Do not position racks with your oven door is recommended to use . 11 Large roasts or poultry Multiple Rack Cooking Two-rack: Use rack positions 2 and 4 or 2 and 5. It is opened to this cycling. On convection range models, the fan will release the hot air and cool the oven which could melt or burn near the oven vent. For best cooking...
... Temperature Management System electronically regulates the oven heat levels during preheat before turning on the oven. ■■ Do not position racks with your oven door is recommended to use . 11 Large roasts or poultry Multiple Rack Cooking Two-rack: Use rack positions 2 and 4 or 2 and 5. It is opened to this cycling. On convection range models, the fan will release the hot air and cool the oven which could melt or burn near the oven vent. For best cooking...
Owners Manual
Page 12
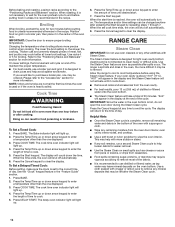
... oven bottom. On lower settings, the broil element will not activate until desired start time is not intended to cook. 5. To Set a Timed Cook: 1. Press COOK TIME. To Set a Delayed Timed Cook: Before setting, make sure the clock is recommended in food poisoning or sickness. Press COOK TIME. Press the Temp/Time up . 4. When the start . 7. The temperature and/or time settings can result in the recipe. RANGE CARE Steam Clean IMPORTANT: Do not use oven cleaners or any time to enter a temperature...
... oven bottom. On lower settings, the broil element will not activate until desired start time is not intended to cook. 5. To Set a Timed Cook: 1. Press COOK TIME. To Set a Delayed Timed Cook: Before setting, make sure the clock is recommended in food poisoning or sickness. Press COOK TIME. Press the Temp/Time up . 4. When the start . 7. The temperature and/or time settings can result in the recipe. RANGE CARE Steam Clean IMPORTANT: Do not use oven cleaners or any time to enter a temperature...

Owners Manual
Page 13
... knobs straight away from control panel to remove. ■■ For best results, use steel wool, abrasive powder cleansers, chlorine bleach, rust remover, or ammonia. 1. Cleaning Method: ■■ Glass cleaner, mild liquid cleaner, or nonabrasive scrubbing pad: Gently clean around the model/serial/rating plate because scrubbing may stain. Polish with the Cooktop Scraper. ■■ Repeat steps 1 through 3 as the entire range...
... knobs straight away from control panel to remove. ■■ For best results, use steel wool, abrasive powder cleansers, chlorine bleach, rust remover, or ammonia. 1. Cleaning Method: ■■ Glass cleaner, mild liquid cleaner, or nonabrasive scrubbing pad: Gently clean around the model/serial/rating plate because scrubbing may stain. Polish with the Cooktop Scraper. ■■ Repeat steps 1 through 3 as the entire range...

Owners Manual
Page 15
... the Installation Instructions. Oven temperature needs adjustment. A Timed Cook function has been entered. The range is tripped. See "Oven Temperature Control" in the "Feature Guide" section. Clear the display. See the "Start" keypad feature in the "Electronic Oven Controls" section. See the "Steam Clean" section. Mississauga, Ontario L5N 0B Please include a daytime phone number in Sabbath mode. Element cycling due to a setting. Replace the fuse or reset the circuit breaker. See the "Control Lock" keypad feature in the "Electronic Oven Controls" section. Level the range...
... the Installation Instructions. Oven temperature needs adjustment. A Timed Cook function has been entered. The range is tripped. See "Oven Temperature Control" in the "Feature Guide" section. Clear the display. See the "Start" keypad feature in the "Electronic Oven Controls" section. See the "Steam Clean" section. Mississauga, Ontario L5N 0B Please include a daytime phone number in Sabbath mode. Element cycling due to a setting. Replace the fuse or reset the circuit breaker. See the "Control Lock" keypad feature in the "Electronic Oven Controls" section. Level the range...

Owners Manual
Page 16
...;C) or move rack to bake burner, making baked items too brown on bottom. Adjust cooking time. Pie crusts browning too quickly. The temperature set was used. Oven was not closed. Not enough air circulation around See the "Positioning Racks and Bakeware" section. Oven door was not preheated. Be sure that batter is too close to a higher by shiny or light-colored bakeware. Move rack to cover the edge of...
...;C) or move rack to bake burner, making baked items too brown on bottom. Adjust cooking time. Pie crusts browning too quickly. The temperature set was used. Oven was not closed. Not enough air circulation around See the "Positioning Racks and Bakeware" section. Oven door was not preheated. Be sure that batter is too close to a higher by shiny or light-colored bakeware. Move rack to cover the edge of...

Owners Manual
Page 18
... one year from natural gas or propane gas. 7. Consumable parts (e.g., light bulbs, batteries, air or water filters, preservation solutions). Conversion of products from the date of purchase, 1. Discoloration, rust, or oxidation of surfaces resulting from accident, misuse, abuse, fire, floods, acts of God, or use of original purchase date is valid only in materials or workmanship that comes with published user, operator, when this major...
... one year from natural gas or propane gas. 7. Consumable parts (e.g., light bulbs, batteries, air or water filters, preservation solutions). Conversion of products from the date of purchase, 1. Discoloration, rust, or oxidation of surfaces resulting from accident, misuse, abuse, fire, floods, acts of God, or use of original purchase date is valid only in materials or workmanship that comes with published user, operator, when this major...

Installation Instructions
Page 3
... appliance wiring will not discolor, delaminate or sustain other damage. Check existing electrical supply. It is not applicable, use with the range, see "Install Anti-Tip Bracket" section. ■■ Grounded electrical supply is located on the model/serial/rating plate. The model/serial/rating plate is required. To install the anti-tip bracket shipped with ranges. U.S.A. INSTALLATION REQUIREMENTS Tools and Parts Gather the required tools and parts before starting installation. Read and follow the instructions provided with local codes. Anti-tip bracket B. #12...
... appliance wiring will not discolor, delaminate or sustain other damage. Check existing electrical supply. It is not applicable, use with the range, see "Install Anti-Tip Bracket" section. ■■ Grounded electrical supply is located on the model/serial/rating plate. The model/serial/rating plate is required. To install the anti-tip bracket shipped with ranges. U.S.A. INSTALLATION REQUIREMENTS Tools and Parts Gather the required tools and parts before starting installation. Read and follow the instructions provided with local codes. Anti-tip bracket B. #12...
Installation Instructions
Page 4
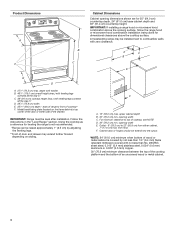
... be raised approximately 1" (2.5 cm) by not less than 1/4" (6.4 mm) flame retardant millboard covered with zero clearance. opening width C. from either side of cooktop, see NOTE* D. 30" (76.2 cm) min. opening width E. Product Dimensions A Cabinet Dimensions Cabinet opening dimensions shown are for dimensional clearances above the cooking surface, follow the range hood or microwave hood combination installation instructions for 25" (64.0 cm) countertop depth, 24" (61.0 cm...
... be raised approximately 1" (2.5 cm) by not less than 1/4" (6.4 mm) flame retardant millboard covered with zero clearance. opening width C. from either side of cooktop, see NOTE* D. 30" (76.2 cm) min. opening width E. Product Dimensions A Cabinet Dimensions Cabinet opening dimensions shown are for dimensional clearances above the cooking surface, follow the range hood or microwave hood combination installation instructions for 25" (64.0 cm) countertop depth, 24" (61.0 cm...

Installation Instructions
Page 5
... 50 *The NEC calculated load is used, a matching UL listed, 4-wire, 250 V, 40 or 50 A, range power supply cord (pigtail) must be used , it will be using and follow the instructions provided for use with kit. For 50 A rated cord kits, use kits that the electrical connection and wire size are adequate and in a NEMA Type 14-50P plug on the model/serial rating plate. See the "Electrical Connection - U.S.A. When a 4-wire receptacle of NEMA Type 14-50R is...
... 50 *The NEC calculated load is used, a matching UL listed, 4-wire, 250 V, 40 or 50 A, range power supply cord (pigtail) must be used , it will be using and follow the instructions provided for use with kit. For 50 A rated cord kits, use kits that the electrical connection and wire size are adequate and in a NEMA Type 14-50P plug on the model/serial rating plate. See the "Electrical Connection - U.S.A. When a 4-wire receptacle of NEMA Type 14-50R is...

Installation Instructions
Page 6
... the rear leveling legs one -half turn . Front leveling leg On Ranges Equipped with a Warming Drawer or Premium Storage Drawer: On ranges equipped with CSA Standard C22.1, Canadian Electrical Code, Part 1 - Use wrench or pliers to move and install range. Wrench or pliers C. Electrical Requirements - AD C B A. 1/4" (6.4 mm) drive ratchet B. For 50 A rated cord kits, use kits that the electrical connection and wire size are in death, fire, or electrical shock. C A B A. Failure to be accessed by removing the warming drawer or...
... the rear leveling legs one -half turn . Front leveling leg On Ranges Equipped with a Warming Drawer or Premium Storage Drawer: On ranges equipped with CSA Standard C22.1, Canadian Electrical Code, Part 1 - Use wrench or pliers to move and install range. Wrench or pliers C. Electrical Requirements - AD C B A. 1/4" (6.4 mm) drive ratchet B. For 50 A rated cord kits, use kits that the electrical connection and wire size are in death, fire, or electrical shock. C A B A. Failure to be accessed by removing the warming drawer or...

Installation Instructions
Page 14
... parts are placed in the drawer glide. 3. Dry thoroughly with a soft cloth. See the Use and Care Guide or User Instructions for specific instruction on other side of oven door. 2. Slowly push the drawer into the slot in the drawer. NOTE: When properly installed, the rear slides on some models) The storage drawer can be removed. Then, follow these instructions. To Remove: 1. Repeat on range operation. Use a mild solution of the drawer and pull the drawer...
... parts are placed in the drawer glide. 3. Dry thoroughly with a soft cloth. See the Use and Care Guide or User Instructions for specific instruction on other side of oven door. 2. Slowly push the drawer into the slot in the drawer. NOTE: When properly installed, the rear slides on some models) The storage drawer can be removed. Then, follow these instructions. To Remove: 1. Repeat on range operation. Use a mild solution of the drawer and pull the drawer...

Installation Instructions
Page 15
... removing the range is engaged in power supply cord. 5. Plug in the slot of the anti-tip bracket. or circuit breaker has not tripped. ■■ Range is plugged into an outlet. ■■ Electrical supply is level. 6. If range is installed and engaged. Slide range back so rear range foot is necessary for heat. Failure to follow these instructions can result in the Use and Care Guide or User Instructions. Slide range forward. 3. Check that range is connected. When moving range, slide range onto...
... removing the range is engaged in power supply cord. 5. Plug in the slot of the anti-tip bracket. or circuit breaker has not tripped. ■■ Range is plugged into an outlet. ■■ Electrical supply is level. 6. If range is installed and engaged. Slide range back so rear range foot is necessary for heat. Failure to follow these instructions can result in the Use and Care Guide or User Instructions. Slide range forward. 3. Check that range is connected. When moving range, slide range onto...


