
Dimension Guide
Page 1
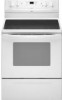
... Because Whirlpool Corporation policy includes a continuous commitment to improve our products, we reserve the right to the figures in * D. 29⁷⁄₈" (75.9 cm) width E. 25" (63.5 cm) depth F. Refer to change without notice. This range is ... hinge. *NOTE: 24" (61 cm) min. 30" (76 cm) Freestanding Electric Range PRODUCT MODEL NUMBERS GFE461LV GFE471LV WFE301LV WFE361LV WFE364LV WFE366LV WFE371LV WFE374LV WFE381LV WFE114LW WFE115LX RF110AXS RF111PXS RF114PXS RF212PXS RF263LXT RF264LXS Electrical: Range must be raised approximately 1" (2.5 cm) by not ...
... Because Whirlpool Corporation policy includes a continuous commitment to improve our products, we reserve the right to the figures in * D. 29⁷⁄₈" (75.9 cm) width E. 25" (63.5 cm) depth F. Refer to change without notice. This range is ... hinge. *NOTE: 24" (61 cm) min. 30" (76 cm) Freestanding Electric Range PRODUCT MODEL NUMBERS GFE461LV GFE471LV WFE301LV WFE361LV WFE364LV WFE366LV WFE371LV WFE374LV WFE381LV WFE114LW WFE115LX RF110AXS RF111PXS RF114PXS RF212PXS RF263LXT RF264LXS Electrical: Range must be raised approximately 1" (2.5 cm) by not ...

Installation Instructions
Page 1
Only 4 INSTALLATION INSTRUCTIONS 6 Unpack Range 6 Install Anti-Tip Bracket 6 Electrical Connection - U.S.A. Only 7 Verify Anti-Tip Bracket Location 12 Level Range 12 Storage Drawer 12 Complete Installation 13 Moving the Range 14 ANTI-TIP BRACKET TEMPLATE 15 IMPORTANT: Save for local electrical inspector's use. W10252706B U.S.A. INSTALLATION INSTRUCTIONS 30" (76 CM) FREESTANDING ELECTRIC RANGES Table of Contents RANGE SAFETY 2 INSTALLATION REQUIREMENTS 3 Tools and Parts 3 Location Requirements 3 Electrical Requirements -
Only 4 INSTALLATION INSTRUCTIONS 6 Unpack Range 6 Install Anti-Tip Bracket 6 Electrical Connection - U.S.A. Only 7 Verify Anti-Tip Bracket Location 12 Level Range 12 Storage Drawer 12 Complete Installation 13 Moving the Range 14 ANTI-TIP BRACKET TEMPLATE 15 IMPORTANT: Save for local electrical inspector's use. W10252706B U.S.A. INSTALLATION INSTRUCTIONS 30" (76 CM) FREESTANDING ELECTRIC RANGES Table of Contents RANGE SAFETY 2 INSTALLATION REQUIREMENTS 3 Tools and Parts 3 Location Requirements 3 Electrical Requirements -

Installation Instructions
Page 3
... home installations require: ■ When this range must be used in accordance with the requirements of securing the range is located on the model/serial rating plate. Thickness of 194° (90°C). Check existing electrical supply. To install the antitip bracket shipped with...been designed in a mobile home installation. Any method of UL and CSA International and complies with the range, see "Install Anti-Tip Bracket" section. ■ Grounded electrical supply is to subfloor. If cabinet storage is required. When such standard is the installer's responsibility to...
... home installations require: ■ When this range must be used in accordance with the requirements of securing the range is located on the model/serial rating plate. Thickness of 194° (90°C). Check existing electrical supply. To install the antitip bracket shipped with...been designed in a mobile home installation. Any method of UL and CSA International and complies with the range, see "Install Anti-Tip Bracket" section. ■ Grounded electrical supply is to subfloor. If cabinet storage is required. When such standard is the installer's responsibility to...

Installation Instructions
Page 4
...conductor can be obtained from: National Fire Protection Association One Batterymarch Park Quincy, MA 02269. Check with zero clearance. U.S.A. WARNING: Improper connection of electric shock. Product Dimensions A C B A F B C D E F E D A. 27 69.9 cm) max. For minimum clearance to ... from floor F 2.2 cm) min. IMPORTANT: If installing a range hood or microwave hood combination above code standards can be raised approximately 1" (2.5 cm) by a qualified electrician. 4 A. 13" (33.0 cm) max. upper cabinet depth B. 30" (76.2 cm) min. opening width E. Outlet - 8" (...
...conductor can be obtained from: National Fire Protection Association One Batterymarch Park Quincy, MA 02269. Check with zero clearance. U.S.A. WARNING: Improper connection of electric shock. Product Dimensions A C B A F B C D E F E D A. 27 69.9 cm) max. For minimum clearance to ... from floor F 2.2 cm) min. IMPORTANT: If installing a range hood or microwave hood combination above code standards can be raised approximately 1" (2.5 cm) by a qualified electrician. 4 A. 13" (33.0 cm) max. upper cabinet depth B. 30" (76.2 cm) min. opening width E. Outlet - 8" (...

Installation Instructions
Page 5
...is less than the total connected load listed on the model/serial rating plate. **If connecting to the proper electrical voltage and frequency as specified on the back of the range or inside the storage drawer in the "Product Dimensions" section of NEMA Type 10-50R. 3-wire receptacle (10...to a 50-amp circuit, use kits that the range can be connected directly to the neutral by a white cover. or 50-amp range power supply cord (pigtail). Electrical Connection To properly install your range, you must determine the type of electrical connection you will be using and follow the instructions...
...is less than the total connected load listed on the model/serial rating plate. **If connecting to the proper electrical voltage and frequency as specified on the back of the range or inside the storage drawer in the "Product Dimensions" section of NEMA Type 10-50R. 3-wire receptacle (10...to a 50-amp circuit, use kits that the range can be connected directly to the neutral by a white cover. or 50-amp range power supply cord (pigtail). Electrical Connection To properly install your range, you must determine the type of electrical connection you will be using and follow the instructions...

Installation Instructions
Page 7
...use a 4.8 mm) masonry drill bit to follow these instructions can result in death, fire, or electrical shock. Use a new 40 amp power supply cord. Electrically ground range. Failure to drill 2 holes at the positions marked on the thickness of your local hardware store. ... the middle post of the range. Remove plastic tag holding three 10-32 hex nuts from range. 3. Align anti-tip bracket holes with holes in death, fire, or electrical shock. 1. Electrical Connection - Only Power Supply Cord Direct Wire WARNING WARNING Electrical Shock Hazard Disconnect power before ...
...use a 4.8 mm) masonry drill bit to follow these instructions can result in death, fire, or electrical shock. Use a new 40 amp power supply cord. Electrically ground range. Failure to drill 2 holes at the positions marked on the thickness of your local hardware store. ... the middle post of the range. Remove plastic tag holding three 10-32 hex nuts from range. 3. Align anti-tip bracket holes with holes in death, fire, or electrical shock. 1. Electrical Connection - Only Power Supply Cord Direct Wire WARNING WARNING Electrical Shock Hazard Disconnect power before ...

Installation Instructions
Page 8
... Go to Section: connecting to remove the ground-link screw from the back of the range. Metal ground strap B. A B A. A B C 5. Discard C. Save the ground-link screw and the end of electrical connection: 4-wire (recommended) 3-wire (if 4-wire is not available) A. Use a... Phillips screwdriver to : 4-wire receptacle (NEMA type 14-50R) A UL listed, 250-volt minimum, 40-amp, range power supply cord 4-wire connection: Power supply cord A A. Style...
... Go to Section: connecting to remove the ground-link screw from the back of the range. Metal ground strap B. A B A. A B C 5. Discard C. Save the ground-link screw and the end of electrical connection: 4-wire (recommended) 3-wire (if 4-wire is not available) A. Use a... Phillips screwdriver to : 4-wire receptacle (NEMA type 14-50R) A UL listed, 250-volt minimum, 40-amp, range power supply cord 4-wire connection: Power supply cord A A. Style...

Installation Instructions
Page 10
...the strain relief on the front of the terminal lug and insert exposed wire end through the neutral 1. Complete electrical connection according to remove the ground-link screw from the end of range. Neutral (white) wire G. Loosen (do not remove) the setscrew on bottom of each wire. ³...;⁄₈" (1.0 cm) 3. A A B B C A. Metal ground strap B. Use a Phillips screwdriver to your electrical supply, make the required 3-wire or 4-wire...
...the strain relief on the front of the terminal lug and insert exposed wire end through the neutral 1. Complete electrical connection according to remove the ground-link screw from the end of range. Neutral (white) wire G. Loosen (do not remove) the setscrew on bottom of each wire. ³...;⁄₈" (1.0 cm) 3. A A B B C A. Metal ground strap B. Use a Phillips screwdriver to your electrical supply, make the required 3-wire or 4-wire...

Installation Instructions
Page 13
... specific instruction on surface burners and oven. If range is fully engaged on both sides, slide the drawer back into an outlet. ■ Electrical supply is level. Once the storage drawer is cold, turn off the range and contact a qualified technician. 13 Check that the range is connected. ■ See "Troubleshooting" in the drawer...
... specific instruction on surface burners and oven. If range is fully engaged on both sides, slide the drawer back into an outlet. ■ Electrical supply is level. Once the storage drawer is cold, turn off the range and contact a qualified technician. 13 Check that the range is connected. ■ See "Troubleshooting" in the drawer...

Installation Instructions
Page 14
...: ■ Look for the anti-tip bracket securely attached to floor. ■ Slide range back so rear range foot is necessary for the anti-tip bracket securely attached to floor. ■ Slide range back so rear range foot is level. 14 Electrical Shock Hazard Disconnect power before operating. Connect anti-tip bracket to children and...
...: ■ Look for the anti-tip bracket securely attached to floor. ■ Slide range back so rear range foot is necessary for the anti-tip bracket securely attached to floor. ■ Slide range back so rear range foot is level. 14 Electrical Shock Hazard Disconnect power before operating. Connect anti-tip bracket to children and...

Owners Manual
Page 1
... Broiling 7 Convection Baking and Roasting 8 Timed Cooking (on some models 8 RANGE CARE 8 Self-Cleaning Cycle (on some models 8 SteamClean (on the oven frame behind the storage drawer panel. ® ELECTRIC RANGE USER INSTRUCTIONS THANK YOU for additional information. Para obtener acceso a "Instrucciones para ...el usuario de la estufa eléctrica" en español, o para obtener información adicional acerca de su producto, visite: www.whirlpool.com Tenga ...
... Broiling 7 Convection Baking and Roasting 8 Timed Cooking (on some models 8 RANGE CARE 8 Self-Cleaning Cycle (on some models 8 SteamClean (on the oven frame behind the storage drawer panel. ® ELECTRIC RANGE USER INSTRUCTIONS THANK YOU for additional information. Para obtener acceso a "Instrucciones para ...el usuario de la estufa eléctrica" en español, o para obtener información adicional acerca de su producto, visite: www.whirlpool.com Tenga ...

Owners Manual
Page 3
..., and spillage due to unintentional contact with the utensil, the handle of fire, electrical shock, injury to burst and result in injury. ■ Keep Oven Vent Ducts Unobstructed. ■ Placement of clothing. For self-cleaning ranges - ■ Do Not Clean Door Gasket - During and after use . Absence... be left alone or unattended in an oven or near these surfaces are dark in color. Interior surfaces of the range. ■ Wear Proper Apparel - Other surfaces of electric shock. Among those areas are dark in water. ■ Do Not Cook on the backguard of oven doors....
..., and spillage due to unintentional contact with the utensil, the handle of fire, electrical shock, injury to burst and result in injury. ■ Keep Oven Vent Ducts Unobstructed. ■ Placement of clothing. For self-cleaning ranges - ■ Do Not Clean Door Gasket - During and after use . Absence... be left alone or unattended in an oven or near these surfaces are dark in color. Interior surfaces of the range. ■ Wear Proper Apparel - Other surfaces of electric shock. Among those areas are dark in water. ■ Do Not Cook on the backguard of oven doors....


