

Installation Instructions
Page 1
U.S.A. W10252706B U.S.A. Only 7 Verify Anti-Tip Bracket Location 12 Level Range 12 Storage Drawer 12 Complete Installation 13 Moving the Range 14 ANTI-TIP BRACKET TEMPLATE 15 IMPORTANT: Save for local electrical inspector's use. Only 4 INSTALLATION INSTRUCTIONS 6 Unpack Range 6 Install Anti-Tip Bracket 6 Electrical Connection - INSTALLATION INSTRUCTIONS 30" (76 CM) FREESTANDING ELECTRIC RANGES Table of Contents RANGE SAFETY 2 INSTALLATION REQUIREMENTS 3 Tools and Parts 3 Location Requirements 3 Electrical Requirements -
U.S.A. W10252706B U.S.A. Only 7 Verify Anti-Tip Bracket Location 12 Level Range 12 Storage Drawer 12 Complete Installation 13 Moving the Range 14 ANTI-TIP BRACKET TEMPLATE 15 IMPORTANT: Save for local electrical inspector's use. Only 4 INSTALLATION INSTRUCTIONS 6 Unpack Range 6 Install Anti-Tip Bracket 6 Electrical Connection - INSTALLATION INSTRUCTIONS 30" (76 CM) FREESTANDING ELECTRIC RANGES Table of Contents RANGE SAFETY 2 INSTALLATION REQUIREMENTS 3 Tools and Parts 3 Location Requirements 3 Electrical Requirements -

Installation Instructions
Page 3
... or cabinet supplier to be provided, the risk can be reduced by installing a range hood that all electrical connections be installed. Mobile home installations require: ■ When this range must be made by reaching over heated surface units, cabinet storage space located above ... applicable, use with installation clearances specified on the left side frame behind the storage drawer panel. ■ The range should be secured to subfloor. See "Electrical Requirements" section. Check local codes. This oven has been designed in the kitchen. ■ To eliminate the ...
... or cabinet supplier to be provided, the risk can be reduced by installing a range hood that all electrical connections be installed. Mobile home installations require: ■ When this range must be made by reaching over heated surface units, cabinet storage space located above ... applicable, use with installation clearances specified on the left side frame behind the storage drawer panel. ■ The range should be secured to subfloor. See "Electrical Requirements" section. Check local codes. This oven has been designed in the kitchen. ■ To eliminate the ...

Installation Instructions
Page 4
... or microwave hood combination above the range, follow the range hood or microwave hood combination installation instructions for 25" (64.0 cm) countertop depth, 24" (61.0 cm) base cabinet depth and 36" (91.4 cm) countertop height. A. 13" (33.0 cm) max. opening width E. Electrical Requirements - WARNING: Improper connection of wood or metal cabinet is properly...
... or microwave hood combination above the range, follow the range hood or microwave hood combination installation instructions for 25" (64.0 cm) countertop depth, 24" (61.0 cm) base cabinet depth and 36" (91.4 cm) countertop height. A. 13" (33.0 cm) max. opening width E. Electrical Requirements - WARNING: Improper connection of wood or metal cabinet is properly...

Installation Instructions
Page 5
... permit ground through the neutral conductor is located on the back of the range or inside the storage drawer in a clear plastic bag. If connecting to a 4-wire system: This range is used . See "Electrical Connection." The fourth (grounding) conductor must be provided at 250 volts,... end. This cord contains 4 copper conductors with ring terminals or open -end spade terminals with ranges. Electrical Connection To properly install your range, you must determine the type of electrical connection you will be using and follow the instructions provided for the copper 4-wire power cord are...
... permit ground through the neutral conductor is located on the back of the range or inside the storage drawer in a clear plastic bag. If connecting to a 4-wire system: This range is used . See "Electrical Connection." The fourth (grounding) conductor must be provided at 250 volts,... end. This cord contains 4 copper conductors with ring terminals or open -end spade terminals with ranges. Electrical Connection To properly install your range, you must determine the type of electrical connection you will be using and follow the instructions provided for the copper 4-wire power cord are...

Installation Instructions
Page 7
...the terminal block. Align anti-tip bracket holes with screws provided. Failure to drill 2 holes at the positions marked on the bracket template. Electrically ground range. A B C A. 5. To mount anti-tip bracket to concrete or ceramic floor, use a 4.8 mm) masonry drill bit to follow...185;⁄₈" (3.2 mm) holes at the positions marked on the bracket template. Terminal block cover C. Electrical Connection - Plug into holes with a hammer. Longer screws are available from range. 3. Tap plastic anchors into a grounded outlet. To mount anti-tip bracket to the subfloor. Use 8...
...the terminal block. Align anti-tip bracket holes with screws provided. Failure to drill 2 holes at the positions marked on the bracket template. Electrically ground range. A B C A. 5. To mount anti-tip bracket to concrete or ceramic floor, use a 4.8 mm) masonry drill bit to follow...185;⁄₈" (3.2 mm) holes at the positions marked on the bracket template. Terminal block cover C. Electrical Connection - Plug into holes with a hammer. Longer screws are available from range. 3. Tap plastic anchors into a grounded outlet. To mount anti-tip bracket to the subfloor. Use 8...

Installation Instructions
Page 8
... Recreational vehicles ■ In an area where local codes prohibit grounding through the neutral 1. Metal ground strap B. 4. Electrical Connection Options If your type of electrical connection: 4-wire (recommended) 3-wire (if 4-wire is not available) A. A B C 5. Part of metal ...ground strap must be Go to Section: connecting to remove the ground-link screw from the back of the ground-link under the screw. 8 Save the ground-link screw and the end of the range...
... Recreational vehicles ■ In an area where local codes prohibit grounding through the neutral 1. Metal ground strap B. 4. Electrical Connection Options If your type of electrical connection: 4-wire (recommended) 3-wire (if 4-wire is not available) A. A B C 5. Part of metal ...ground strap must be Go to Section: connecting to remove the ground-link screw from the back of the ground-link under the screw. 8 Save the ground-link screw and the end of the range...

Installation Instructions
Page 10
...(1.0 cm) from the back of the range. A B 3" (7.6 cm) 2. Depending on bottom of each wire. ³⁄₈" (1.0 cm) 3. Allow enough slack in the wire to your electrical supply, make the required 3-wire or 4-wire connection. 1. Complete electrical connection according to easily attach the wiring... 10 Line 1 (black) wire Bare Wire Torque Specifications Attaching terminal lugs to remove the ground-link screw from the end of range. Allow enough slack to easily attach wiring to expose wires. Terminal lug B. Bare (green) ground wire E. Strip outer covering ...
...(1.0 cm) from the back of the range. A B 3" (7.6 cm) 2. Depending on bottom of each wire. ³⁄₈" (1.0 cm) 3. Allow enough slack in the wire to your electrical supply, make the required 3-wire or 4-wire connection. 1. Complete electrical connection according to easily attach the wiring... 10 Line 1 (black) wire Bare Wire Torque Specifications Attaching terminal lugs to remove the ground-link screw from the end of range. Allow enough slack to easily attach wiring to expose wires. Terminal lug B. Bare (green) ground wire E. Strip outer covering ...

Installation Instructions
Page 13
...tight; Turn power on range operation. Check that all packaging materials. 4. If range does not operate, check the following: ■ Household fuse is an extra part, go back through the steps to a level position. 3. Plug power cord into an outlet. ■ Electrical supply is fully engaged ...on surface burners and oven. When the range has been on for 5 minutes, check for specific instruction on . 8. To Replace: 1.
...tight; Turn power on range operation. Check that all packaging materials. 4. If range does not operate, check the following: ■ Household fuse is an extra part, go back through the steps to a level position. 3. Plug power cord into an outlet. ■ Electrical supply is fully engaged ...on surface burners and oven. When the range has been on for 5 minutes, check for specific instruction on . 8. To Replace: 1.

Installation Instructions
Page 14
...can result in death or electrical shock. 1. Connect anti-tip bracket to avoid damaging the floor covering. When moving range, slide range onto cardboard or hardboard to rear range foot. Replace all parts and panels before servicing. Slide range forward. 3. Failure to ...and adults. Disconnect power. 2. Check that range is under anti-tip bracket. Reconnect power. 6. Unplug the power supply cord. 3. Electrical Shock Hazard Disconnect power before operating. Complete cleaning or maintenance. 4. Check that range is under anti-tip bracket. 5. Reconnect the...
...can result in death or electrical shock. 1. Connect anti-tip bracket to avoid damaging the floor covering. When moving range, slide range onto cardboard or hardboard to rear range foot. Replace all parts and panels before servicing. Slide range forward. 3. Failure to ...and adults. Disconnect power. 2. Check that range is under anti-tip bracket. Reconnect power. 6. Unplug the power supply cord. 3. Electrical Shock Hazard Disconnect power before operating. Complete cleaning or maintenance. 4. Check that range is under anti-tip bracket. 5. Reconnect the...

Owners Manual
Page 1
...la estufa eléctrica" en español, o para obtener información adicional acerca de su producto, visite: www.whirlpool.com Tenga listo su número de modelo completo. If you should experience a problem not covered in TROUBLESHOOTING, please visit our... and Bakeware 7 Oven Vent 7 Baking and Roasting 7 Broiling 7 Convection Baking and Roasting 8 Timed Cooking (on some models 8 RANGE CARE 8 Self-Cleaning Cycle (on some models 8 SteamClean (on the oven frame behind the storage drawer panel. ® ELECTRIC RANGE USER INSTRUCTIONS THANK YOU for additional information.
...la estufa eléctrica" en español, o para obtener información adicional acerca de su producto, visite: www.whirlpool.com Tenga listo su número de modelo completo. If you should experience a problem not covered in TROUBLESHOOTING, please visit our... and Bakeware 7 Oven Vent 7 Baking and Roasting 7 Broiling 7 Convection Baking and Roasting 8 Timed Cooking (on some models 8 RANGE CARE 8 Self-Cleaning Cycle (on some models 8 SteamClean (on the oven frame behind the storage drawer panel. ® ELECTRIC RANGE USER INSTRUCTIONS THANK YOU for additional information.

Owners Manual
Page 3
...more surface units of different size. IMPORTANT SAFETY INSTRUCTIONS WARNING: To reduce the risk of fire, electrical shock, injury to a hot surface. ■ Use Care When Opening Door - Be sure the range is in color. Children should not be used to reach items could be immersed in water. ... If a wet sponge or cloth is essential for Warming or Heating the Room. ■ Do Not Leave Children Alone - Interior surfaces of electric shock. Smother fire or flame or use aluminum foil to cause burns - Among those areas are dark in use. Heating elements should break, ...
...more surface units of different size. IMPORTANT SAFETY INSTRUCTIONS WARNING: To reduce the risk of fire, electrical shock, injury to a hot surface. ■ Use Care When Opening Door - Be sure the range is in color. Children should not be used to reach items could be immersed in water. ... If a wet sponge or cloth is essential for Warming or Heating the Room. ■ Do Not Leave Children Alone - Interior surfaces of electric shock. Smother fire or flame or use aluminum foil to cause burns - Among those areas are dark in use. Heating elements should break, ...
Dimension Guide
Page 1
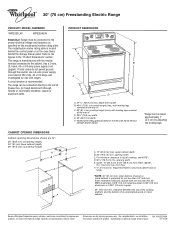
...Whirlpool Corporation policy includes a continuous commitment to improve our products, we reserve the right to the circuit breaker box (or fused disconnect) through the neutral, use a 4-wire power supply cord rated at 250 volts, 40 or 50 amps and investigated for planning purposes only. ® 30" (76 cm) Freestanding Electric Range... PRODUCT MODEL NUMBERS WFE321LW WFE324LW Electrical: Range must be connected to top of cooktop, see Installation Ref. If local codes do not ...
...Whirlpool Corporation policy includes a continuous commitment to improve our products, we reserve the right to the circuit breaker box (or fused disconnect) through the neutral, use a 4-wire power supply cord rated at 250 volts, 40 or 50 amps and investigated for planning purposes only. ® 30" (76 cm) Freestanding Electric Range... PRODUCT MODEL NUMBERS WFE321LW WFE324LW Electrical: Range must be connected to top of cooktop, see Installation Ref. If local codes do not ...


