Owners Manual
Page 1
...Oven Vent 11 Baking and Roasting 11 Broiling 12 Cook Time 12 RANGE CARE 12 Steam Clean 12 General Cleaning 13 Oven Light 14 TROUBLESHOOTING 15 ACCESSORIES 17 WARRANTY 18 W11333124A Register your range at www.whirlpool.ca. In Canada, register your product model and serial numbers.... For future reference, please make a note of your range at www.whirlpool.com. Model Number Serial Number Table of the front frame....
...Oven Vent 11 Baking and Roasting 11 Broiling 12 Cook Time 12 RANGE CARE 12 Steam Clean 12 General Cleaning 13 Oven Light 14 TROUBLESHOOTING 15 ACCESSORIES 17 WARRANTY 18 W11333124A Register your range at www.whirlpool.ca. In Canada, register your product model and serial numbers.... For future reference, please make a note of your range at www.whirlpool.com. Model Number Serial Number Table of the front frame....

Owners Manual
Page 2
... the anti-tip bracket is installed and engaged: • Slide range forward. • Look for details. 2 Verify the anti-tip bracket has been properly installed and engaged per installation instructions. Re-engage anti-tip bracket if range is under anti-tip bracket. • See installation instructions for... the anti-tip bracket securely attached to floor or wall. • Slide range back so rear range foot is moved. However, the range can tip if you apply too much force or weight to children and adults. WARNING Tip Over Hazard A child or...
... the anti-tip bracket is installed and engaged: • Slide range forward. • Look for details. 2 Verify the anti-tip bracket has been properly installed and engaged per installation instructions. Re-engage anti-tip bracket if range is under anti-tip bracket. • See installation instructions for... the anti-tip bracket securely attached to floor or wall. • Slide range back so rear range foot is moved. However, the range can tip if you apply too much force or weight to children and adults. WARNING Tip Over Hazard A child or...

Owners Manual
Page 3
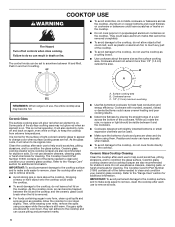
...-TIP BRACKET. children climbing on Broken Cooktop - I Protective Liners - All other bulky cloth. Flammable materials should be allowed to accumulate on the Range - I User Servicing - If cooktop should break, cleaning solutions and spillovers may result in or around any kind should not be hot even though... location while oven is used in a risk of electric shock, or fire. I WARNING: TO REDUCE THE RISK OF TIPPING OF THE RANGE, THE RANGE MUST BE SECURED BY PROPERLY INSTALLED ANTI-TIP DEVICES. Proper relationship of utensil to burner will expose a portion of these pans or bowls...
...-TIP BRACKET. children climbing on Broken Cooktop - I Protective Liners - All other bulky cloth. Flammable materials should be allowed to accumulate on the Range - I User Servicing - If cooktop should break, cleaning solutions and spillovers may result in or around any kind should not be hot even though... location while oven is used in a risk of electric shock, or fire. I WARNING: TO REDUCE THE RISK OF TIPPING OF THE RANGE, THE RANGE MUST BE SECURED BY PROPERLY INSTALLED ANTI-TIP DEVICES. Proper relationship of utensil to burner will expose a portion of these pans or bowls...

Owners Manual
Page 4
... keypad to set the hours. Press the Start keypad. 4. If Start is displayed. In Canada, reference the Customer Service section at www.whirlpool.com for more than one hour before or after pressing a keypad, the function is canceled and the time of countdown. 4. Press the ...finished. 4 Refer to set the minutes. 4. Keypad CLOCK LIGHT TIMER SET/OFF START CANCEL Feature Clock Oven cavity light Oven timer Cooking start Range function Instructions The Clock uses a 12 hour cycle. 1. Press TIMER SET/OFF to adjust time and temperature settings. 1. Do not press the...
... keypad to set the hours. Press the Start keypad. 4. If Start is displayed. In Canada, reference the Customer Service section at www.whirlpool.com for more than one hour before or after pressing a keypad, the function is canceled and the time of countdown. 4. Press the ...finished. 4 Refer to set the minutes. 4. Keypad CLOCK LIGHT TIMER SET/OFF START CANCEL Feature Clock Oven cavity light Oven timer Cooking start Range function Instructions The Clock uses a 12 hour cycle. 1. Press TIMER SET/OFF to adjust time and temperature settings. 1. Do not press the...

Owners Manual
Page 5
... Timed cooking Steam cleaning cycle Oven and cooktop control lockout Instructions 1. Press the Temp/Time up or down arrow keypad to clear the display. 6. The range will exit the Frozen Bake™ cycle. 9. Press the Start keypad to the oven bottom. 4. If more time, if desired. Press the Temp/Time up...
... Timed cooking Steam cleaning cycle Oven and cooktop control lockout Instructions 1. Press the Temp/Time up or down arrow keypad to clear the display. 6. The range will exit the Frozen Bake™ cycle. 9. Press the Start keypad to the oven bottom. 4. If more time, if desired. Press the Temp/Time up...
Owners Manual
Page 6
... C. 1/2" (1.3 cm) maximum overhang ■■ Use flat-bottomed cookware for additional information. Refer to the "Range Care" section for cleaning. Refer to the "Range Care" section for best heat conduction and energy efficiency. Cookware with slightly indented bottoms or small expansion channels can become... hot. B A REMEMBER: When range is still warm. Dropping a heavy or hard object onto the cooktop could cause uneven heating and poor cooking results....
... C. 1/2" (1.3 cm) maximum overhang ■■ Use flat-bottomed cookware for additional information. Refer to the "Range Care" section for cleaning. Refer to the "Range Care" section for best heat conduction and energy efficiency. Cookware with slightly indented bottoms or small expansion channels can become... hot. B A REMEMBER: When range is still warm. Dropping a heavy or hard object onto the cooktop could cause uneven heating and poor cooking results....

Owners Manual
Page 7
... finish will take on the display panel. Doing so can leave permanent marks on some models) The Melt cooking element offers flexibility due to a wide range of medium-to the cooktop, do not use it and the cookware. 1 2 3 1 4 5 6 2 7 8 3 9 1 0 1 1 4 1 2 1 3 5 1 4 1 5 1 6 6 1 7 1 8 7 1 9 2 0 A. The HI heat option can be of settings between it to remove food...
... finish will take on the display panel. Doing so can leave permanent marks on some models) The Melt cooking element offers flexibility due to a wide range of medium-to the cooktop, do not use it and the cookware. 1 2 3 1 4 5 6 2 7 8 3 9 1 0 1 1 4 1 2 1 3 5 1 4 1 5 1 6 6 1 7 1 8 7 1 9 2 0 A. The HI heat option can be of settings between it to remove food...

Owners Manual
Page 11
... from the oven and should not be cycled on two racks, use the Bake function and place flat racks in rack position 2. On convection range models, the fan will take longer to maintain a consistent temperature, but they may run while preheating and may be blocked or covered. Baking ...and oven walls. Opening the oven door while in use , the oven elements will take approximately 12 to 15 minutes to maintain a precise temperature range for a flat rack, as shown in use will begin at the proper temperature. Baking Cookies and Layer Cakes on Two Racks Baking Layer Cakes...
... from the oven and should not be cycled on two racks, use the Bake function and place flat racks in rack position 2. On convection range models, the fan will take longer to maintain a consistent temperature, but they may run while preheating and may be blocked or covered. Baking ...and oven walls. Opening the oven door while in use , the oven elements will take approximately 12 to 15 minutes to maintain a precise temperature range for a flat rack, as shown in use will begin at the proper temperature. Baking Cookies and Layer Cakes on Two Racks Baking Layer Cakes...
Owners Manual
Page 12
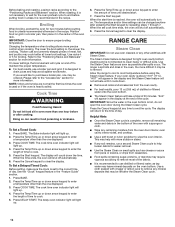
... brush or nylon scrubber to enter the amount of time until it cools down. ■■ Remove all remaining water and debris in the recipe. RANGE CARE Steam Clean IMPORTANT: Do not use a broiler pan and grid. The longer a spill sits and dries in the "Feature Guide" section. 1. IMPORTANT: Since the... appear in the display at lower broil settings. Press the Start keypad. When the start . 7. Press the Cancel keypad to clear the display. Allow the range to cool to the time of the oven with more precise control when cooking. "End" will light up. 6.
... brush or nylon scrubber to enter the amount of time until it cools down. ■■ Remove all remaining water and debris in the recipe. RANGE CARE Steam Clean IMPORTANT: Do not use a broiler pan and grid. The longer a spill sits and dries in the "Feature Guide" section. 1. IMPORTANT: Since the... appear in the display at lower broil settings. Press the Start keypad. When the start . 7. Press the Cancel keypad to clear the display. Allow the range to cool to the time of the oven with more precise control when cooking. "End" will light up. 6.

Owners Manual
Page 13
... "Accessories" section for more information. 13 Allow the cooktop to cool down completely before proceeding to the Customer Service section at www.whirlpool.com. General Cleaning IMPORTANT: Before cleaning, make sure knobs are cool. Cleaning Method: ■■ Glass cleaner, mild liquid cleaner...Rub affresh® Cooktop Cleaner onto the cooktop surface with the Cooktop Scraper. ■■ Repeat steps 1 through 3 as the entire range is still warm but not hot to remove. ■■ For best results, use steel wool, abrasive powder cleansers, chlorine bleach, ...
... "Accessories" section for more information. 13 Allow the cooktop to cool down completely before proceeding to the Customer Service section at www.whirlpool.com. General Cleaning IMPORTANT: Before cleaning, make sure knobs are cool. Cleaning Method: ■■ Glass cleaner, mild liquid cleaner...Rub affresh® Cooktop Cleaner onto the cooktop surface with the Cooktop Scraper. ■■ Repeat steps 1 through 3 as the entire range is still warm but not hot to remove. ■■ For best results, use steel wool, abrasive powder cleansers, chlorine bleach, ...

Owners Manual
Page 14
... cool cavity. If using commercial oven cleaners, follow package directions. Oven Light The oven light is cool and empty before cleaning. Unplug range or disconnect power. 2. Turn bulb counterclockwise to the rack guides will help them slide. At high temperatures, foods react with porcelain. To...socket. 4. Staining, etching, pitting, or faint white spots can be cleaned when oven cools. Turn the glass bulb cover in range or reconnect power. 14 Nonabrasive plastic scrubbing pad and mildly abrasive cleanser can result. OVEN RACKS Cleaning Method: ■■ Steel-...
... cool cavity. If using commercial oven cleaners, follow package directions. Oven Light The oven light is cool and empty before cleaning. Unplug range or disconnect power. 2. Turn bulb counterclockwise to the rack guides will help them slide. At high temperatures, foods react with porcelain. To...socket. 4. Staining, etching, pitting, or faint white spots can be cleaned when oven cools. Turn the glass bulb cover in range or reconnect power. 14 Nonabrasive plastic scrubbing pad and mildly abrasive cleanser can result. OVEN RACKS Cleaning Method: ■■ Steel-...

Owners Manual
Page 15
... the Cancel keypad to keep (s) flashing, call for 3 seconds to a temperature limiter. Contact a qualified electrician to a setting. The range is turned on High setting Oven will not operate Excessive heat around cookware on cooktop Cooktop cooking results not what expected Cooktop element cycles on... is in the "Feature Guide" section. See the "Start" keypad feature in the "Electronic Oven Controls" section. In Canada, visit www.whirlpool.ca. Control is set . The Steam Clean function has not been entered correctly. See the "Steam Clean" section. If you avoid a ...
... the Cancel keypad to keep (s) flashing, call for 3 seconds to a temperature limiter. Contact a qualified electrician to a setting. The range is turned on High setting Oven will not operate Excessive heat around cookware on cooktop Cooktop cooking results not what expected Cooktop element cycles on... is in the "Feature Guide" section. See the "Start" keypad feature in the "Electronic Oven Controls" section. In Canada, visit www.whirlpool.ca. Control is set . The Steam Clean function has not been entered correctly. See the "Steam Clean" section. If you avoid a ...

Owners Manual
Page 16
Problem Oven cooking results not what expected Possible Causes Range is calibrated incorrectly. The temperature set was not closed. See "Oven Temperature Control" in a reliable cookbook. Not enough air circulation around See the "Positioning ...quickly. See the "Positioning Racks and Bakeware" section. position in the "Electronic Oven Controls" section. 16 Temperature scale was opened during cooking. Solutions Level the range. See the Installation Instructions. Darker browning of cooking time was not preheated. Be sure that batter is too close to a lower position in the oven...
Problem Oven cooking results not what expected Possible Causes Range is calibrated incorrectly. The temperature set was not closed. See "Oven Temperature Control" in a reliable cookbook. Not enough air circulation around See the "Positioning ...quickly. See the "Positioning Racks and Bakeware" section. position in the "Electronic Oven Controls" section. 16 Temperature scale was opened during cooking. Solutions Level the range. See the Installation Instructions. Darker browning of cooking time was not preheated. Be sure that batter is too close to a lower position in the oven...

Installation Instructions
Page 2
... Over Hazard A child or adult can result in the slot of the anti-tip bracket. Slide range back so rear range foot is engaged in death or serious burns to follow these instructions can tip the range and be killed. Failure to children and adults. Re-engage anti-tip bracket if... securely attached to floor or wall per installation instructions. Install anti-tip bracket to floor or wall. • Slide range back so rear range foot is moved. Do not operate range without anti-tip bracket installed and engaged. Anti-Tip Bracket To verify the anti-tip bracket is installed and engaged: ...
... Over Hazard A child or adult can result in the slot of the anti-tip bracket. Slide range back so rear range foot is engaged in death or serious burns to follow these instructions can tip the range and be killed. Failure to children and adults. Re-engage anti-tip bracket if... securely attached to floor or wall per installation instructions. Install anti-tip bracket to floor or wall. • Slide range back so rear range foot is moved. Do not operate range without anti-tip bracket installed and engaged. Anti-Tip Bracket To verify the anti-tip bracket is installed and engaged: ...

Installation Instructions
Page 3
...It is to comply with upturned ends. ■■ A UL listed strain relief. To install the anti-tip bracket shipped with the range, see "Install Anti-Tip Bracket" section. ■■ Grounded electrical supply is installed in ring terminals or open-end spade terminals with ... for wood floors) Parts Supplied Check that all parts are minimum clearances. ■■ The anti-tip bracket must be used in this range is required. Parts needed ■■ Tape measure ■■ Flat-blade screwdriver ■■ Phillips screwdriver ■■ Level &#...
...It is to comply with upturned ends. ■■ A UL listed strain relief. To install the anti-tip bracket shipped with the range, see "Install Anti-Tip Bracket" section. ■■ Grounded electrical supply is installed in ring terminals or open-end spade terminals with ... for wood floors) Parts Supplied Check that all parts are minimum clearances. ■■ The anti-tip bracket must be used in this range is required. Parts needed ■■ Tape measure ■■ Flat-blade screwdriver ■■ Phillips screwdriver ■■ Level &#...
Installation Instructions
Page 4
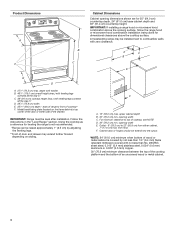
...an uncovered wood or metal cabinet. 4 Follow the instructions in * D. 297/8" (75.9 cm) width E. 255/16" (64.3 cm) depth - A freestanding range may extend further forward depending on the frame behind a top corner of the door or either cabinet, 7" (17.8 cm) max. B A C B F ...273/4" (70.5 cm) max. F. Product Dimensions A Cabinet Dimensions Cabinet opening dimensions shown are for dimensional clearances above the cooking surface, follow the range hood or microwave hood combination installation instructions for 25" (64.0 cm) countertop depth, 24" (61.0 cm) base cabinet depth and 36" ...
...an uncovered wood or metal cabinet. 4 Follow the instructions in * D. 297/8" (75.9 cm) width E. 255/16" (64.3 cm) depth - A freestanding range may extend further forward depending on the frame behind a top corner of the door or either cabinet, 7" (17.8 cm) max. B A C B F ...273/4" (70.5 cm) max. F. Product Dimensions A Cabinet Dimensions Cabinet opening dimensions shown are for dimensional clearances above the cooking surface, follow the range hood or microwave hood combination installation instructions for 25" (64.0 cm) countertop depth, 24" (61.0 cm) base cabinet depth and 36" ...

Installation Instructions
Page 5
... gauge are : 40 A circuit 2 No.-8 conductors 1 No.-10 white neutral 1 No.-8 green grounding If connecting to a 4-wire system: This range is manufactured with a nominal 1³⁄8" (3.5 cm) diameter connection opening. ■■ A circuit breaker is prohibited for use of the power ...SRDT with the National Electrical Code, ANSI/ NFPA 70-latest edition and all local codes and ordinances. See "Electrical Connection - Range Rating* Specified Rating of electrical connection you are adequate and in doubt as to whether the appliance is recommended that a qualified...
... gauge are : 40 A circuit 2 No.-8 conductors 1 No.-10 white neutral 1 No.-8 green grounding If connecting to a 4-wire system: This range is manufactured with a nominal 1³⁄8" (3.5 cm) diameter connection opening. ■■ A circuit breaker is prohibited for use of the power ...SRDT with the National Electrical Code, ANSI/ NFPA 70-latest edition and all local codes and ordinances. See "Electrical Connection - Range Rating* Specified Rating of electrical connection you are adequate and in doubt as to whether the appliance is recommended that a qualified...

Installation Instructions
Page 6
...Wrench or pliers D. It will be plugged into a standard 14-50R wall receptacle. Electrical Requirements - Canada Only WARNING Electrical Shock Hazard Electrically ground range. A A. Failure to do so can result in conformance with kit. Be sure that the ground path is adequate and wire gauge are not ...sure the range is recommended that a qualified electrical installer determine that the electrical connection and wire size are adequate and in back or other injury. ...
...Wrench or pliers D. It will be plugged into a standard 14-50R wall receptacle. Electrical Requirements - Canada Only WARNING Electrical Shock Hazard Electrically ground range. A A. Failure to do so can result in conformance with kit. Be sure that the ground path is adequate and wire gauge are not ...sure the range is recommended that a qualified electrical installer determine that the electrical connection and wire size are adequate and in back or other injury. ...

Installation Instructions
Page 7
... storage drawer or warming drawer. 2. Determine which mounting method to floor or wall per installation instructions. Re-engage anti-tip bracket if range is engaged in death or serious burns to the floor. 3. See the following installation instructions. Determine and mark centerline of the cutout space...Install Anti-Tip Bracket WARNING Floor Mounting Rear position Front position Diagonal (2 options) Tip Over Hazard A child or adult can tip the range and be installed on either the left-side or right-side of the cutout. Install anti-tip bracket to use the wall mounting ...
... storage drawer or warming drawer. 2. Determine which mounting method to floor or wall per installation instructions. Re-engage anti-tip bracket if range is engaged in death or serious burns to the floor. 3. See the following installation instructions. Determine and mark centerline of the cutout space...Install Anti-Tip Bracket WARNING Floor Mounting Rear position Front position Diagonal (2 options) Tip Over Hazard A child or adult can tip the range and be installed on either the left-side or right-side of the cutout. Install anti-tip bracket to use the wall mounting ...

Installation Instructions
Page 8
...cord. Failure to follow these instructions can result in death, fire, or electrical shock. OR Remove the top 10-32 hex nut from range. A B 4. Add strain relief. U.S.A. Style 1: Power supply cord strain relief ■■ Remove the knockout for the power supply... cord. ■■ Assemble a UL Listed strain relief in death, fire, or electrical shock. 1. Electrically ground range. Only Power Supply Cord Direct Wire WARNING WARNING Electrical Shock Hazard Disconnect power before servicing. Electrical Shock Hazard Disconnect power before servicing....
...cord. Failure to follow these instructions can result in death, fire, or electrical shock. OR Remove the top 10-32 hex nut from range. A B 4. Add strain relief. U.S.A. Style 1: Power supply cord strain relief ■■ Remove the knockout for the power supply... cord. ■■ Assemble a UL Listed strain relief in death, fire, or electrical shock. 1. Electrically ground range. Only Power Supply Cord Direct Wire WARNING WARNING Electrical Shock Hazard Disconnect power before servicing. Electrical Shock Hazard Disconnect power before servicing....


