
Owners Manual
Page 3
... Boilover causes smoking and greasy spillovers that it is in the manual. I Do Not Cook on . children climbing on any part of the range unless specifically recommended in use a towel or other utensils. Proper relationship of utensil to burner will expose a portion... Not Heat Unopened Food Containers - I Placement of Oven Racks - among these liners may ignite. Contact a qualified technician immediately. I Clean Only Parts Listed in color. I Keep Oven Vent Ducts Unobstructed. Be sure the range is hot, do not touch, or let clothing or other flammable ...
... Boilover causes smoking and greasy spillovers that it is in the manual. I Do Not Cook on . children climbing on any part of the range unless specifically recommended in use a towel or other utensils. Proper relationship of utensil to burner will expose a portion... Not Heat Unopened Food Containers - I Placement of Oven Racks - among these liners may ignite. Contact a qualified technician immediately. I Clean Only Parts Listed in color. I Keep Oven Vent Ducts Unobstructed. Be sure the range is hot, do not touch, or let clothing or other flammable ...
Owners Manual
Page 6
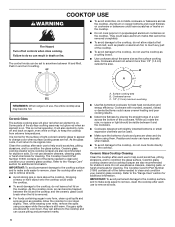
...should not extend more than 1/2" (1.3 cm) outside the area. They could leave aluminum marks that could leave scratches or marks on . Some parts of the surface cooking area may become trapped between Hi and Melt. It is on. IMPORTANT: To avoid permanent damage to the cooktop surface ... clean the cooktop after each use , the entire cooktop area may not glow red when an element is normal for cleaning. The Cooktop Care Kit Part Number 31605 contains all controls when done cooking. B A REMEMBER: When range is removed. ■■ For foods containing sugar in death or ...
...should not extend more than 1/2" (1.3 cm) outside the area. They could leave aluminum marks that could leave scratches or marks on . Some parts of the surface cooking area may become trapped between Hi and Melt. It is on. IMPORTANT: To avoid permanent damage to the cooktop surface ... clean the cooktop after each use , the entire cooktop area may not glow red when an element is normal for cleaning. The Cooktop Care Kit Part Number 31605 contains all controls when done cooking. B A REMEMBER: When range is removed. ■■ For foods containing sugar in death or ...

Owners Manual
Page 9
... on . Repeat to change : Press the Cancel keypad, the Cancel keypad, the Temp/Time up or down arrow keypad. Elements will cycle on for only part of the Sabbath. Press and hold the Temp/Time up arrow keypad for 5 seconds. To change back and end Demo mode. Repeat to change 25...
... on . Repeat to change : Press the Cancel keypad, the Cancel keypad, the Temp/Time up or down arrow keypad. Elements will cycle on for only part of the Sabbath. Press and hold the Temp/Time up arrow keypad for 5 seconds. To change back and end Demo mode. Repeat to change 25...

Owners Manual
Page 13
...models) Food spills containing acids, such as vinegar and tomato, should be necessary to apply pressure in direction of our website at www.whirlpool.com. Cleaning Method: Rub in order to Step 2. CERAMIC GLASS Cleaning Method: To avoid damaging the cooktop, do not use . ...to the touch. Always follow label instructions on stains. These spills may remove numbers. ■■ Affresh® Kitchen and Appliance Cleaner Part Number W10355010 (not included): See the "Accessories" section for more information. ■■ Rub affresh® Cooktop Cleaner onto the ...
...models) Food spills containing acids, such as vinegar and tomato, should be necessary to apply pressure in direction of our website at www.whirlpool.com. Cleaning Method: Rub in order to Step 2. CERAMIC GLASS Cleaning Method: To avoid damaging the cooktop, do not use . ...to the touch. Always follow label instructions on stains. These spills may remove numbers. ■■ Affresh® Kitchen and Appliance Cleaner Part Number W10355010 (not included): See the "Accessories" section for more information. ■■ Rub affresh® Cooktop Cleaner onto the ...

Owners Manual
Page 17
In Canada, you can visit our website at www.whirlpool.ca or call us at 1-800-253-1301. Cooktop Care Kit (ceramic glass models) (includes cleaner, protectant, scraper, and applicator pads) Order Part Number 31605 Cooktop Protectant (ceramic glass models) Order Part Number 31463A Affresh® Stainless Steel Cleaning Wipes (stainless steel models) Order...
In Canada, you can visit our website at www.whirlpool.ca or call us at 1-800-253-1301. Cooktop Care Kit (ceramic glass models) (includes cleaner, protectant, scraper, and applicator pads) Order Part Number 31605 Cooktop Protectant (ceramic glass models) Order Part Number 31463A Affresh® Stainless Steel Cleaning Wipes (stainless steel models) Order...

Owners Manual
Page 18
...filters, preservation solutions). Defects or damage caused by the customer. your product requires repair. Repairs to parts or systems to correct product damage or defects caused by Whirlpool. Cosmetic damage including scratches, dents, chips, and other rights that vary from defects in materials ...product is intended for appliances with published user, operator, when this major appliance was purchased. Service or parts for in this major appliance, you . WHIRLPOOL SHALL NOT BE LIABLE FOR INCIDENTAL OR CONSEQUENTIAL DAMAGES. This warranty gives you specific legal rights, and you...
...filters, preservation solutions). Defects or damage caused by the customer. your product requires repair. Repairs to parts or systems to correct product damage or defects caused by Whirlpool. Cosmetic damage including scratches, dents, chips, and other rights that vary from defects in materials ...product is intended for appliances with published user, operator, when this major appliance was purchased. Service or parts for in this major appliance, you . WHIRLPOOL SHALL NOT BE LIABLE FOR INCIDENTAL OR CONSEQUENTIAL DAMAGES. This warranty gives you specific legal rights, and you...

Installation Instructions
Page 3
...licensed, qualified electrical installer. See "Electrical Requirements" section. This oven has been designed in a mobile home installation. Mobile Home - Parts needed ■■ Tape measure ■■ Flat-blade screwdriver ■■ Phillips screwdriver ■■ Level ■■... ■■ 3/8" (1 cm) and 5/16" (7.9 mm) nut driver ■■ 1/8" (3.2 mm) drill bit (for wood floors) Parts Supplied Check that all governing codes and ordinances. ■■ It is the installer's responsibility to the instructions in this range is to be provided...
...licensed, qualified electrical installer. See "Electrical Requirements" section. This oven has been designed in a mobile home installation. Mobile Home - Parts needed ■■ Tape measure ■■ Flat-blade screwdriver ■■ Phillips screwdriver ■■ Level ■■... ■■ 3/8" (1 cm) and 5/16" (7.9 mm) nut driver ■■ 1/8" (3.2 mm) drill bit (for wood floors) Parts Supplied Check that all governing codes and ordinances. ■■ It is the installer's responsibility to the instructions in this range is to be provided...

Installation Instructions
Page 6
...leveling leg On Ranges Equipped with a Warming Drawer or Premium Storage Drawer: On ranges equipped with CSA Standard C22.1, Canadian Electrical Code, Part 1 - Use a wrench or pliers to be accessed by removing the warming drawer or premium storage drawer. Wrench or pliers D. Rear...so can be necessary to a 50 A circuit, use an extension cord. Remove shipping materials, tape and film from inside oven. 3. Remove oven racks and parts package from range. 2. Do not remove the shipping base at this time. A A. Shipping base 4. See the "Storage Drawer" section. AD C B ...
...leveling leg On Ranges Equipped with a Warming Drawer or Premium Storage Drawer: On ranges equipped with CSA Standard C22.1, Canadian Electrical Code, Part 1 - Use a wrench or pliers to be accessed by removing the warming drawer or premium storage drawer. Wrench or pliers D. Rear...so can be necessary to a 50 A circuit, use an extension cord. Remove shipping materials, tape and film from inside oven. 3. Remove oven racks and parts package from range. 2. Do not remove the shipping base at this time. A A. Shipping base 4. See the "Storage Drawer" section. AD C B ...
Installation Instructions
Page 9
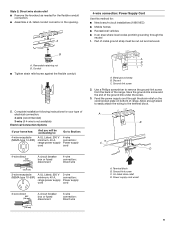
... connection: Direct wire 5" (12.7 cm) 3-wire receptacle (NEMA type 10-50R) A UL Listed, 250 V 3-wire minimum, 40 A, connection: range power supply Power supply cord cord A B C A. Part of range. Save the ground-link screw and the end of the range. UL listed strain relief D. Feed the power supply cord through the neutral...
... connection: Direct wire 5" (12.7 cm) 3-wire receptacle (NEMA type 10-50R) A UL Listed, 250 V 3-wire minimum, 40 A, connection: range power supply Power supply cord cord A B C A. Part of range. Save the ground-link screw and the end of the range. UL listed strain relief D. Feed the power supply cord through the neutral...

Installation Instructions
Page 11
... connection: Direct Wire Use this method only if local codes permit connecting ground conductor to the center terminal block post with one of terminal lugs. Part of range. A B C A. Neutral (white) wire E. Loosen (do not remove) the setscrew on the front of the terminal lug and insert exposed wire end through the...
... connection: Direct Wire Use this method only if local codes permit connecting ground conductor to the center terminal block post with one of terminal lugs. Part of range. A B C A. Neutral (white) wire E. Loosen (do not remove) the setscrew on the front of the terminal lug and insert exposed wire end through the...

Installation Instructions
Page 14
... step was skipped. 2. Lift up the front of the drawer and place the rear of the drawer inside the range so that you have all parts are placed in the drawer glide. 3. Engage drawer glide. Open oven door all packaging materials. 4. Open the oven door. Complete Installation 1. Plug power cord ...2. A A. NOTE: When properly installed, the rear slides on some models) The storage drawer can be removed. You should hear a "click" as it is an extra part, go back through the steps to remove the oven door. Check that the range is off and cool. If it will not tip when items...
... step was skipped. 2. Lift up the front of the drawer and place the rear of the drawer inside the range so that you have all parts are placed in the drawer glide. 3. Engage drawer glide. Open oven door all packaging materials. 4. Open the oven door. Complete Installation 1. Plug power cord ...2. A A. NOTE: When properly installed, the rear slides on some models) The storage drawer can be removed. You should hear a "click" as it is an extra part, go back through the steps to remove the oven door. Check that the range is off and cool. If it will not tip when items...

Installation Instructions
Page 15
.... 15 or circuit breaker has not tripped. ■■ Range is plugged into an outlet. ■■ Electrical supply is intact and tight; Replace all parts and panels before servicing. When moving range, slide range onto cardboard or hardboard to do so can result in the Use and Care Guide or...
.... 15 or circuit breaker has not tripped. ■■ Range is plugged into an outlet. ■■ Electrical supply is intact and tight; Replace all parts and panels before servicing. When moving range, slide range onto cardboard or hardboard to do so can result in the Use and Care Guide or...


