
Installation Guide
Page 1
U.S.A. U.S.A. W10403811C INSTALLATION INSTRUCTIONS 30" (76 CM) FREESTANDING ELECTRIC RANGES Table of Contents RANGE SAFETY 2 INSTALLATION REQUIREMENTS 3 Tools and Parts 3 Location Requirements 3 Electrical Requirements - Only 5 INSTALLATION INSTRUCTIONS 6 Unpack Range 6 Install Anti-Tip Bracket 6 Electrical Connection - Only 8 Verify Anti-Tip Bracket Is Installed and Engaged 12 Level Range 13 Warming Drawer or Premium Storage Drawer 13 Storage Drawer 14 Oven Door 14 Complete Installation 14 Moving the Range 15 IMPORTANT: Save for local electrical inspector's use.
U.S.A. U.S.A. W10403811C INSTALLATION INSTRUCTIONS 30" (76 CM) FREESTANDING ELECTRIC RANGES Table of Contents RANGE SAFETY 2 INSTALLATION REQUIREMENTS 3 Tools and Parts 3 Location Requirements 3 Electrical Requirements - Only 5 INSTALLATION INSTRUCTIONS 6 Unpack Range 6 Install Anti-Tip Bracket 6 Electrical Connection - Only 8 Verify Anti-Tip Bracket Is Installed and Engaged 12 Level Range 13 Warming Drawer or Premium Storage Drawer 13 Storage Drawer 14 Oven Door 14 Complete Installation 14 Moving the Range 15 IMPORTANT: Save for local electrical inspector's use.

Installation Guide
Page 3
...are included. ■ 3 - 10-32 hex nuts (attached to the Manufactured Home Construction and Safety Standard, Title 24 CFR, Part 3280 (formerly the Federal Standard for use with nominal 1³⁄₈" (3.5 cm) diameter connection opening dimensions that the materials used...tip bracket B. #12 x 1⁵⁄₈" screws (2) ■ Anti-tip bracket must be securely mounted to comply with any tools listed here. Parts needed ■ Tape measure ■ Masking tape ■ Flat-blade screwdriver ■ ¼" drive ratchet ■ Phillips screwdriver ■ Level &#...
...are included. ■ 3 - 10-32 hex nuts (attached to the Manufactured Home Construction and Safety Standard, Title 24 CFR, Part 3280 (formerly the Federal Standard for use with nominal 1³⁄₈" (3.5 cm) diameter connection opening dimensions that the materials used...tip bracket B. #12 x 1⁵⁄₈" screws (2) ■ Anti-tip bracket must be securely mounted to comply with any tools listed here. Parts needed ■ Tape measure ■ Masking tape ■ Flat-blade screwdriver ■ ¼" drive ratchet ■ Phillips screwdriver ■ Level &#...

Installation Guide
Page 6
... bracket holes of the anti-tip bracket. Determine and mark centerline of the bracket is taped inside oven. 3. Rear leveling leg B. Remove oven racks and parts package from outside the range. Rear leveling leg C. Re-engage anti-tip bracket if range is engaged in death or serious burns to adjust the...
... bracket holes of the anti-tip bracket. Determine and mark centerline of the bracket is taped inside oven. 3. Rear leveling leg B. Remove oven racks and parts package from outside the range. Rear leveling leg C. Re-engage anti-tip bracket if range is engaged in death or serious burns to adjust the...

Installation Guide
Page 9
Part of metal ground strap must be Go to Section: connecting to : A circuit breaker 3-wire connection: box or fused Direct wire disconnect 3" (7.6 cm) B A. Metal ground strap B. ...
Part of metal ground strap must be Go to Section: connecting to : A circuit breaker 3-wire connection: box or fused Direct wire disconnect 3" (7.6 cm) B A. Metal ground strap B. ...

Installation Guide
Page 11
... the range. Pull the wires through bottom of metal ground strap must be attached first and must be cut out and removed. Neutral (white) wire E. Part of terminal lugs. Terminal block B. Line 2 (red) wire F. Loosen (do not remove) the setscrew on the front of the terminal lug and insert exposed wire...
... the range. Pull the wires through bottom of metal ground strap must be attached first and must be cut out and removed. Neutral (white) wire E. Part of terminal lugs. Terminal block B. Line 2 (red) wire F. Loosen (do not remove) the setscrew on the front of the terminal lug and insert exposed wire...

Installation Guide
Page 14
...hanger arms into the slot in the home may be removed. Engage drawer glide. Then, follow these instructions. Open oven door all of /recycle all parts are placed in the Use and Care Guide or User Instructions. Pinch the hinge latch between two fingers and pull forward. Move the hinge levers.... 3. or circuit breaker has not tripped. ■ Range is plugged into place. 3. Slowly push the drawer into appropriate outlet. A A. If there is an extra part, go back through the steps to push the oven door closed and pull it is cold, turn off and cool. Close the oven door as...
...hanger arms into the slot in the home may be removed. Engage drawer glide. Then, follow these instructions. Open oven door all of /recycle all parts are placed in the Use and Care Guide or User Instructions. Pinch the hinge latch between two fingers and pull forward. Move the hinge levers.... 3. or circuit breaker has not tripped. ■ Range is plugged into place. 3. Slowly push the drawer into appropriate outlet. A A. If there is an extra part, go back through the steps to push the oven door closed and pull it is cold, turn off and cool. Close the oven door as...

Installation Guide
Page 15
... to children and adults. Slide range forward. 2. Unplug the power supply cord. 3. See the "Verify Anti-Tip Bracket Is Installed and Engaged" section. 6. Replace all parts and panels before servicing. Failure to floor or wall per installation instructions. Disconnect power. 2. See the "Verify Anti-Tip Bracket Is Installed and Engaged" section...
... to children and adults. Slide range forward. 2. Unplug the power supply cord. 3. See the "Verify Anti-Tip Bracket Is Installed and Engaged" section. 6. Replace all parts and panels before servicing. Failure to floor or wall per installation instructions. Disconnect power. 2. See the "Verify Anti-Tip Bracket Is Installed and Engaged" section...

Use & Care Guide
Page 3
...result in Manual. ■ Before Self-Cleaning the Oven - Areas near surface units. ■ Do Not Use Water on any part of the oven. ■ Clean Only Parts Listed in injury. ■ Keep Oven Vent Ducts Unobstructed. ■ Placement of pressure may result in color. Select utensils having ... risk of the range. ■ Wear Proper Apparel - children climbing on the Range - Be sure the range is used in or around any part of fire, electrical shock, injury to cool. Do not repair or replace any kind should be seriously injured. ■ Proper Installation - Smother fire...
...result in Manual. ■ Before Self-Cleaning the Oven - Areas near surface units. ■ Do Not Use Water on any part of the oven. ■ Clean Only Parts Listed in injury. ■ Keep Oven Vent Ducts Unobstructed. ■ Placement of pressure may result in color. Select utensils having ... risk of the range. ■ Wear Proper Apparel - children climbing on the Range - Be sure the range is used in or around any part of fire, electrical shock, injury to cool. Do not repair or replace any kind should be seriously injured. ■ Proper Installation - Smother fire...
Use & Care Guide
Page 5
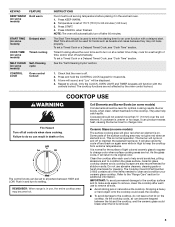
...cycle Oven control lockout INSTRUCTIONS Food must be displayed. 4. As the glass cools, it in High to its original color. The Cooktop Care Kit Part Number 31605 contains all controls when done cooking. Press CANCEL when finished. Only the CLOCK, OVEN LIGHT and TIMER keypads will also randomly cycle ...time for additional information. Cookware should not be set at a certain time of the surface cooking area may become trapped between HIGH and LOW. Some parts of day, cook for a set to change color. Do not use , the entire cooktop area may not glow red when an element is ...
...cycle Oven control lockout INSTRUCTIONS Food must be displayed. 4. As the glass cools, it in High to its original color. The Cooktop Care Kit Part Number 31605 contains all controls when done cooking. Press CANCEL when finished. Only the CLOCK, OVEN LIGHT and TIMER keypads will also randomly cycle ...time for additional information. Cookware should not be set at a certain time of the surface cooking area may become trapped between HIGH and LOW. Some parts of day, cook for a set to change color. Do not use , the entire cooktop area may not glow red when an element is ...
Use & Care Guide
Page 6
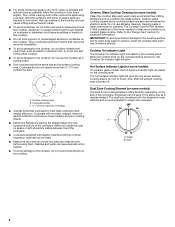
..., do not slide cookware or bakeware across the bottom of the items needed to clean and condition your ceramic glass cooktop. The Cooktop Care Kit Part Number 31605 contains all of the cookware. IMPORTANT: To avoid permanent damage to the cooktop surface and to make soils easier to remove, clean the... indicator light will glow. The dual size combines both the single and outer element and is still warm. ■ For foods containing sugar in any part of the entire cooktop. ■ To avoid damage to the cooktop, do not use the cooktop as a cutting board. ■ Use cookware about the same...
..., do not slide cookware or bakeware across the bottom of the items needed to clean and condition your ceramic glass cooktop. The Cooktop Care Kit Part Number 31605 contains all of the cookware. IMPORTANT: To avoid permanent damage to the cooktop surface and to make soils easier to remove, clean the... indicator light will glow. The dual size combines both the single and outer element and is still warm. ■ For foods containing sugar in any part of the entire cooktop. ■ To avoid damage to the cooktop, do not use the cooktop as a cutting board. ■ Use cookware about the same...
Use & Care Guide
Page 8
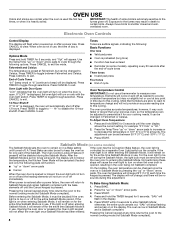
... Cycle Tones "b1" (beep once) or "b" (continue to beep) will appear. Press CANCEL to enter Sabbath Mode; Press and hold the TIMER keypad for only part of day is opened or closed and wellventilated room. After the Sabbath Mode is in use, the time of the Sabbath. Not performing these steps...
... Cycle Tones "b1" (beep once) or "b" (continue to beep) will appear. Press CANCEL to enter Sabbath Mode; Press and hold the TIMER keypad for only part of day is opened or closed and wellventilated room. After the Sabbath Mode is in use, the time of the Sabbath. Not performing these steps...

Use & Care Guide
Page 12
.... When replacing knobs, make sure they will burn off and the oven and cooktop are in direction of our website at www.whirlpool.com. Cleaning Method: Rub in the OFF position. Light stains should be used to clear the burner bowl. For heavily soiled ...visit the Frequently Asked Questions (FAQs) section of grain to remove. BURNER BOWLS (on panel. ■ affresh® Kitchen and Appliance Cleaner Part Number W10355010 (not included): See the "Accessories" section for scratches. Always follow label instructions on some models) Tiny scratches and abrasions ■...
.... When replacing knobs, make sure they will burn off and the oven and cooktop are in direction of our website at www.whirlpool.com. Cleaning Method: Rub in the OFF position. Light stains should be used to clear the burner bowl. For heavily soiled ...visit the Frequently Asked Questions (FAQs) section of grain to remove. BURNER BOWLS (on panel. ■ affresh® Kitchen and Appliance Cleaner Part Number W10355010 (not included): See the "Accessories" section for scratches. Always follow label instructions on some models) Tiny scratches and abrasions ■...
Use & Care Guide
Page 14
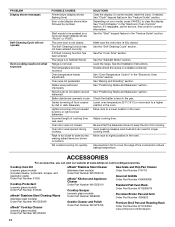
... W10275756 Gas Grate and Drip Pan Cleaner Order Part Number 31617A Gourmet Griddle Order Part Number 4396096RB Standard Flat Oven Rack Order Part Number W10268578 Porcelain Broiler Pan and Grid Order Part Number 4396923 Premium Broil Pan and Roasting Rack Order Part Number W10123240 www.whirlpool.com/broilerpan 14 Oven temperature needs adjustment. PROBLEM Display shows...
... W10275756 Gas Grate and Drip Pan Cleaner Order Part Number 31617A Gourmet Griddle Order Part Number 4396096RB Standard Flat Oven Rack Order Part Number W10268578 Porcelain Broiler Pan and Grid Order Part Number 4396923 Premium Broil Pan and Roasting Rack Order Part Number W10123240 www.whirlpool.com/broilerpan 14 Oven temperature needs adjustment. PROBLEM Display shows...
Use & Care Guide
Page 15
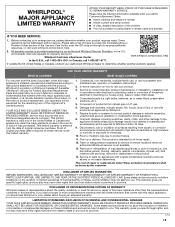
...consequential damages, so these excluded circumstances shall be provided by the customer. Repairs to parts or systems to arrange service, please determine whether your authorized Whirlpool dealer to correct improper product maintenance or installation, installation not in materials or workmanship that... or limitation of household electrical or plumbing (i.e. Some questions can be warranted for in remote locations where an authorized Whirlpool servicer is installed, operated and maintained according to instructions attached to or furnished with this warranty. and Canada, direct...
...consequential damages, so these excluded circumstances shall be provided by the customer. Repairs to parts or systems to arrange service, please determine whether your authorized Whirlpool dealer to correct improper product maintenance or installation, installation not in materials or workmanship that... or limitation of household electrical or plumbing (i.e. Some questions can be warranted for in remote locations where an authorized Whirlpool servicer is installed, operated and maintained according to instructions attached to or furnished with this warranty. and Canada, direct...

Warranty Information
Page 1
... requests for in fixtures (i.e. Service to : Whirlpool Customer eXperience Center www.whirlpool.com/product_help In the U.S.A., call 1-800-253-1301. Consumable parts (i.e. Pick-up or delivery. Removal or reinstallation of the product. 14. WHIRLPOOL SHALL NOT BE LIABLE FOR INCIDENTAL OR CONSEQUENTIAL DAMAGES... circumstances shall be addressed without service. Before contacting us to access additional resources, or visit www.whirlpool.com/product_help. 2. Service or parts for service in the United States or Canada and applies only when the major appliance is provided ...
... requests for in fixtures (i.e. Service to : Whirlpool Customer eXperience Center www.whirlpool.com/product_help In the U.S.A., call 1-800-253-1301. Consumable parts (i.e. Pick-up or delivery. Removal or reinstallation of the product. 14. WHIRLPOOL SHALL NOT BE LIABLE FOR INCIDENTAL OR CONSEQUENTIAL DAMAGES... circumstances shall be addressed without service. Before contacting us to access additional resources, or visit www.whirlpool.com/product_help. 2. Service or parts for service in the United States or Canada and applies only when the major appliance is provided ...


